


 本文详细介绍了openfire插件的开发流程,包括简单的插件入门、servlet和JSP的开发配置,以及遇到的登录验证和空指针异常问题的解决方法。通过实例代码和配置文件,帮助开发者理解并掌握openfire插件开发。
近来几天为了写一个openfire的小插件可谓脑袋都大了。。。自己又是初学小菜鸟一个,学习过程算是非常的磕磕绊绊。这里记录下来仅供后来的同学参考,也少走些弯路。勤能补拙,期望大家多多支持,共同学习,共同进步。
1.plugin插件开发
1.1简单插件入门(简单plugin结构)
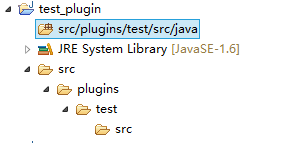
在结构方面我最初也是很头疼,给那么多图反而更容易把人搞混淆。我们还是用文字加配图说明吧。
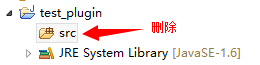
新建一个 java project ,这里命名为 test_plugin。(new -> java project -> finish)然后把src删除或重命名为 src/plugins/test/src/java (即与openfire原生插件保持一致)。若是删除src的话,就新建 Source Folder命名为 src/plugins/test/src/java (new -> Source Folder )。然后项目目录下就会自动生成对应的 src文件夹及层级结构。
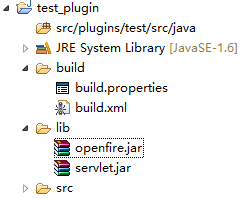
同样,在工程项目中新建文件夹(new ->folder)命名 build ,lib .其中build下边新建 build.properties 和 build.xml文件,用以ant编译生成插件。llib文件存放openfire等jar库。这里将openfir.jar + sevlet.jar拷贝至lib目录并add to buid path.
1.2 build文件
build文件用于编译和打包,很多像我这样的小白基本不会用代码打包编译。网上有推荐利用源码包里边的build来编译打包,这也是一种方法,这里我使用的是jooho大大写好的build文件。我稍微做了些修改。贴上两个文件源码
uild.properties
tomcat.home=D:/Program Files/tomcat-5.0.28
# If you want to build a plugin, please set the value to the plugin name.
# Note:The plugin name must is the same as the plugins folder.
plugin.name=testbuild.xml
<project name="Webapp Precompilation" default="openfire-plugins" basedir=".">

	<!-- 全局变量设置 -->
	<property file="build.properties" />

	<!-- 插件源码位置 -->
	<property name="plugin.path" value="../src/plugins/${plugin.name}/src" />

	<!-- web应用输出目录 -->
	<property name="webapp.output.path" value="../src/plugins/${plugin.name}/bin" />

	<!-- java servlet相关文件编译jar存放位置 -->
	<property name="java.jar.dir" value="${webapp.output.path}/java-dist"/>

	<!-- jsp servlet编译后jar存放位置 -->
	<property name="jsp.jar.dir" value="${webapp.output.path}/jsp-dist/lib"/>

	<!-- 定义java servlet编译打包的Jar包名称 -->
	<property name="java.jar" value="${java.jar.dir}/plugin-${plugin.name}.jar"/>

	<!-- 定义jsp servlet编译打包的Jar包名称 -->
	<property name="jsp.jar" value="${jsp.jar.dir}/plugin-${plugin.name}-jsp.jar"/>

	<!-- jsp servlet配置到web.xml中 -->
	<property name="plugin.web.xml" value="${webapp.output.path}/jsp-dist/web.xml"/>

	<!-- 编译jsp 并生成相关jar、xml文件 -->
	<target name="jspc">

		<taskdef classname="org.apache.jasper.JspC" name="jasper2">
			<classpath id="jspc.classpath">
				<pathelement location="${java.home}/../lib/tools.jar" />
				<fileset dir="${tomcat.home}/bin">
					<include name="*.jar" />
				</fileset>
				<fileset dir="${tomcat.home}/server/lib">
					<include name="*.jar" />
				</fileset>
				<fileset dir="${tomcat.home}/common/lib">
					<include name="*.jar" />
				</fileset>
				<!--
                <fileset dir="D:/Workspace/openfire/build/lib">
                    <include name="**/*.jar" />
                </fileset-->
			</classpath>
		</taskdef>

		<!-- 编译jsp -> servlet class -->
		<jasper2 javaEncoding="UTF-8" validateXml="false"
            uriroot="${plugin.path}/web"
            outputDir="${webapp.output.path}/jsp-dist/src"
            package="com.qiao.univer.blog.plugin.${plugin.name}" />

		<!-- 编译后的servlet class 配置到web.xml文件中 -->
		<jasper2
            validateXml="false"
            uriroot="${plugin.path}/web"
            outputDir="${webapp.output.path}/jsp-dist/src"
            package="com.qiao.univer.blog.plugin.${plugin.name}"
            webXml="${plugin.web.xml}"/>
	</target>

	<!-- 编译jsp 并将其打jar包 -->
	<target name="compile">

		<mkdir dir="${webapp.output.path}/jsp-dist/classes" />
		<mkdir dir="${webapp.output.path}/jsp-dist/lib" />
		<mkdir dir="${webapp.output.path}/jsp-dist/src" />

		<javac destdir="${webapp.output.path}/jsp-dist/classes" optimize="off"
            encoding="UTF-8" debug="on" failοnerrοr="false"
            srcdir="${webapp.output.path}/jsp-dist/src" excludes="**/*.smap">
			<classpath>
				<pathelement location="${webapp.output.path}/jsp-dist/classes" />
				<fileset dir="${webapp.output.path}/jsp-dist/lib">
					<include name="*.jar" />
				</fileset>
				<pathelement location="${tomcat.home}/common/classes" />
				<fileset dir="${tomcat.home}/common/lib">
					<include name="*.jar" />
				</fileset>
				<pathelement location="${tomcat.home}/shared/classes" />
				<fileset dir="${tomcat.home}/shared/lib">
					<include name="*.jar" />
				</fileset>
				<fileset dir="${tomcat.home}/bin">
					<include name="*.jar" />
				</fileset>
			</classpath>
			<include name="**" />
			<exclude name="tags/**" />
		</javac>

		<jar jarfile="${jsp.jar}" basedir="${webapp.output.path}/jsp-dist/classes" />
	</target>

	<!-- 将java servlet打包成jar -->
	<target name="java-jar">
		<mkdir dir="${java.jar.dir}"/>
		<jar jarfile="${java.jar}">
			<fileset dir="../bin" includes="**/*.class"/>
		</jar>
	</target>

	<!-- 生成可部署的插件包 -->
	<target name="plug-jar">
		<!-- 插件插件包相关lib、 web目录 -->
		<mkdir dir="${webapp.output.path}/${plugin.name}/lib"/>
		<mkdir dir="${webapp.output.path}/${plugin.name}/web/WEB-INF"/>

		<!-- 复制jsp servlet的jar和java servlet的相关jar包到插件包的lib目录下 -->
		<copy file="${java.jar}" todir="${webapp.output.path}/${plugin.name}/lib"/>
		<copy file="${jsp.jar}" todir="${webapp.output.path}/${plugin.name}/lib"/>

		<!-- 将相关的图片、帮助文档、修改日志等文件复制到插件目录下 -->
		<copy todir="${webapp.output.path}/${plugin.name}">
			<fileset dir="${plugin.path}" includes="*.*"/>
		</copy>
		<copy todir="${webapp.output.path}/${plugin.name}/web">
			<fileset dir="${plugin.path}/web">
				<include name="*"/>
				<include name="**/*.*"/>
				<exclude name="**/*.xml"/>
				<exclude name="**/*.jsp"/>
			</fileset>
		</copy>
		<!-- jsp servlet的web复制到插件目录下 -->
		<copy file="${plugin.web.xml}" todir="${webapp.output.path}/${plugin.name}/web/WEB-INF"/>
		<copy todir="${webapp.output.path}/${plugin.name}/web">
			<fileset dir="${plugin.path}/web" includes="**/*.xml"/>
		</copy>
		<!-- 将国际化相关资源文件复制到插件目录下
        <copy file="${webapp.output.path}/bin/i18n" todir="${webapp.output.path}/${plugin.name}"/>
        -->
		<!-- 产生可部署插件包 -->
		<jar jarfile="${webapp.output.path}/${plugin.name}.jar">
			<fileset dir="${webapp.output.path}/${plugin.name}" includes="**/**"/>
		</jar>
	</target>

	<!-- 生成没有Web资源的可部署插件包 -->
	<target name="java-plug-jar">
		<!-- 插件插件包相关lib、 web目录 -->
		<mkdir dir="${webapp.output.path}/${plugin.name}/lib"/>

		<!-- 复制java servlet的相关jar包到插件包的lib目录下 -->
		<copy file="${java.jar}" todir="${webapp.output.path}/${plugin.name}/lib"/>

		<!-- 将相关的图片、帮助文档、修改日志等文件复制到插件目录下 -->
		<copy todir="${webapp.output.path}/${plugin.name}">
			<fileset dir="${plugin.path}" includes="*.*"/>
		</copy>

		<!-- 产生可部署插件包 -->
		<jar jarfile="${webapp.output.path}/${plugin.name}.jar">
			<fileset dir="${webapp.output.path}/${plugin.name}" includes="**/**"/>
		</jar>
	</target>

	<!-- 清理生成的文件 -->
	<target name="clean">
		<delete file="${webapp.output.path}/${plugin.name}.jar"/>
		<delete dir="${webapp.output.path}/${plugin.name}"/>
		<delete dir="${webapp.output.path}/jsp-dist"/>
		<delete dir="${webapp.output.path}/java-dist"/>
	</target>

	<target name="all" depends="clean,jspc,compile"/>

	<target name="openfire-plugin" depends="jspc,java-jar"/>

	<target name="openfire-plugins" depends="all,java-jar,plug-jar"/>

	<target name="openfire-plugin-java" depends="clean,java-jar,java-plug-jar"/>
</project>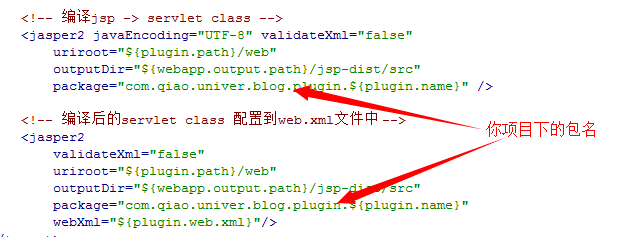
1.3 其他文件结构
在source folder下新建包(例 com.qiao.test.plugin),此包即为上边要修改的地方。
新建TestPlugin 类并实现Plugin接口 中的 init 和 destroy方法:
TestPlugin .java
import java.io.File;

import org.jivesoftware.openfire.XMPPServer;
import org.jivesoftware.openfire.container.Plugin;
import org.jivesoftware.openfire.container.PluginManager;

public class TestPlugin implements Plugin {

	private XMPPServer server;

	@Override
	public void initializePlugin(PluginManager manager, File pluginDirectory) {
		server = XMPPServer.getInstance();
		System.out.println("qiao init Plugin!");
		System.out.println(server.getServerInfo());
	}

	@Override
	public void destroyPlugin() {
		System.out.println("qiao destroy Plugin!");
	}
}changelog.htmllogo_small.giflogo_large.gif readme.html 和plugin.xml文件,其中前面是个可以从openfire源码中拷贝
changelog.html是修改日志;logo_small.gif是插件图标;plugin.xml是我们配置插件的文件,这个很重要。
配置 plugin.xml
<?xml version="1.0" encoding="UTF-8"?>
<plugin>
	<!-- Main plugin class  这里是最重要滴,就是你的插件的全路径-->
	<class>com.qiao.test.plugin.TestPlugin</class>

	<!-- Plugin meta-data -->
	<name>TestPlugin</name>
	<description>This is testplugin.</description>
	<author>qiao</author>

	<version>1.0</version>
	<date>10/05/20134</date>
	<url>http://localhost:9090/openfire/plugins.jsp</url>
	<minServerVersion>3.4.1</minServerVersion>
	<licenseType>gpl</licenseType>

	<adminconsole>
    </adminconsole>
</plugin>至此,整个框架大概就是这样:

编写ant命令,打可部署jar包。如果你不懂ant命令也没关系,你总知道java的基本常用的dos命令。只不过ant就是将dos转换成一个可重复多次调用的命令行。我们这里就是用上边的build.xml利用ant来编译和打包。
以下是jooho大大的话,小白可以略过。
(注意:这里我没有编写编译java代码到class的步骤,我是直接使用MyEclipse自动编译的bin/class的。如果你没有用MyEclipse或Eclipse,那么你需要将src中的Java代码编译class。
这里需要配置tomcat的目录,我这里是5.0.28的版本。我用tomcat6有些问题,这里主要是用tomcat中的lib库,帮助我们编译jsp。还需要配置你当前工程的所在目录,也就是工程在Eclipse中的目录位置。最后你需要配置插件的名称和插件在工程中的所在目录,这个是在打包的时候,需要将其他的html、image、xml等资源导入的jar内。
因为这里的插件是不带jsp的,所以我们执行clean、java-jar、java-plugin-jar。也就是openfire-plugin-java这个命令即可。执行命令后,你可以看到工作空间的工程目录下多了目录和文件。)
 最低0.47元/天 解锁文章


 883
883


 被折叠的 条评论
为什么被折叠?
被折叠的 条评论
为什么被折叠?
 到【灌水乐园】发言


