


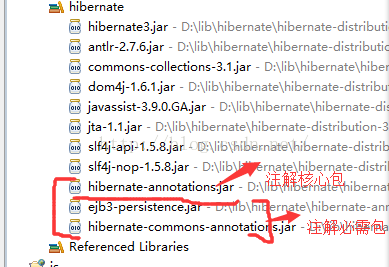
1.对项目引入注解所需的jar包,本例使用的是hibernate-annotations-3.4.0.,包括注解核心包以及注解必需的包(其它的hibernate所需的jar包已经引入项目,详见hibernate初探,使用的是hibernate-3.3.2)
2.在数据库新建测试表teacher(项目使用的是oracle数据库)
-- Create table
create table TEACHER
(
  id    NUMBER not null,
  name  VARCHAR2(20),
  title VARCHAR2(20)
)
tablespace USERS
  pctfree 10
  initrans 1
  maxtrans 255
  storage
  (
    initial 64
    minextents 1
    maxextents unlimited
  );
-- Create/Recreate primary, unique and foreign key constraints
alter table TEACHER
  add constraint PPP primary key (ID)
  using index
  tablespace USERS
  pctfree 10
  initrans 2
  maxtrans 255
  storage
  (
    initial 64K
    minextents 1
    maxextents unlimited
  );
package com.baosight.model;

import javax.persistence.Entity;
import javax.persistence.Id;

/**
 * <p>Title: </p>
 * <p>Description:Student </p>
 * <p>Company: </p>
 * @author yuan
 * @date 2016-4-10 下午12:32:46*/
@Entity
public class Teacher {
	private int id;
	private String name;
	private String title;
	@Id
	public int getId() {
		return id;
	}
	public void setId(int id) {
		this.id = id;
	}
	public String getName() {
		return name;
	}
	public void setName(String name) {
		this.name = name;
	}
	public String getTitle() {
		return title;
	}
	public void setTitle(String title) {
		this.title = title;
	}

}
<?xml version='1.0' encoding='utf-8'?>
<!DOCTYPE hibernate-configuration PUBLIC
        "-//Hibernate/Hibernate Configuration DTD 3.0//EN"
        "http://hibernate.sourceforge.net/hibernate-configuration-3.0.dtd">

<hibernate-configuration>

    <session-factory>

        <!-- Database connection settings -->
        <property name="connection.driver_class">oracle.jdbc.driver.OracleDriver</property>
        <property name="connection.url">jdbc:oracle:thin:@127.0.0.1:1521:orcl</property>
        <property name="connection.username">scott</property>
        <property name="connection.password">tiger</property>

        <!-- JDBC connection pool (use the built-in) -->
        <!-- <property name="connection.pool_size">1</property> -->

        <!-- SQL dialect -->
        <property name="dialect">org.hibernate.dialect.Oracle9Dialect</property>

        <!-- Enable Hibernate's automatic session context management -->
       <!--  <property name="current_session_context_class">thread</property> -->

        <!-- Disable the second-level cache  -->
        <property name="cache.provider_class">org.hibernate.cache.NoCacheProvider</property>

        <!-- Echo all executed SQL to stdout -->
        <property name="show_sql">true</property>

        <!-- Drop and re-create the database schema on startup -->
        <property name="hbm2ddl.auto">update</property>

        <mapping resource="com/baosight/model/Student.hbm.xml"/>
		<mapping class="com.baosight.model.Teacher"/>
    </session-factory>

</hibernate-configuration>import org.hibernate.Session;
import org.hibernate.SessionFactory;
import org.hibernate.cfg.AnnotationConfiguration;
import org.hibernate.cfg.Configuration;
import com.baosight.model.Student;
import com.baosight.model.Teacher;
/**
* <p>Title: </p>
* <p>Description:TestStu </p>
* <p>Company: </p>
* @author yuan
* @date 2016-4-10 下午3:16:01*/
public class TestTecher {
/**
* @Title: main
* @Description: TODO
* @param args
* @return void
* @throws
*/
public static void main(String[] args) {
// TODO Auto-generated method stub
//教师测试类
Teacher t = new Teacher();
t.setId(1);
t.setName("t1");
t.setTitle("中级");
//读取配置文件
Configuration cfg = new AnnotationConfiguration();
//得到session工厂
SessionFactory sf = cfg.configure().buildSessionFactory();
//得到session
Session session = sf.openSession();
//开启事务
session.beginTransaction();
//session执行save
session.save(t);
//事务提交
session.getTransaction().commit();
//关闭session
session.close();
//关闭session工厂
sf.close();
}
}
结果:1 1 t1 中级
综上所述,注解与常规的方法相比,代码要简洁许多,注解存在于实体类中,不需要再有实体类和对应数据库表的映射文件了,只需在hibernate配置文件中声明一下实体类的映射就行了,另外,注意使用注解读取hibernate配置文件时使用的是AnnotationConfiguration类,而不是普通的Configuration类。


 230
230

 被折叠的 条评论
为什么被折叠?
被折叠的 条评论
为什么被折叠?
 到【灌水乐园】发言


