


系统环境:python3.6, tensorflow1.4.0, ubuntu
摘要:im2txt用于将图像转为文字描述。在原版的im2txt中,使用inceptionV3 对图像进行压缩编码,然后使用lstm进行decode,得到文字描述。本次实验有所改进,采用17年的新网络densenet替代V3,需要更改部份代码。另外在实验方法上,没有用bazel也不是在python2.7运行,所以更改了tfrecord的生成代码。最后,实验结果没有取得预期效果,可能是训练不足或欠拟合。
一,训练集准备
下载mscoco数据集的三个文件,解压到相应文件夹目录
(具体参考https://blog.csdn.net/JOHNNIE_TURBO/article/details/77931506)。
重点是修改data中的build_mscoco_data.py,因为源码是py2.7写的,在编码方式上与py3.6有所不同,具体修改如下:
def _int64_feature(value):
  """Wrapper for inserting an int64 Feature into a SequenceExample proto."""
  return tf.train.Feature(int64_list=tf.train.Int64List(value=[value]))


def _bytes_feature(value):
  """Wrapper for inserting a bytes Feature into a SequenceExample proto."""
  return tf.train.Feature(bytes_list=tf.train.BytesList(value=[value]))  # (change) 图片读取时已经为二进制

def _str2bytes_feature(value):  # (add) 需要将原本的str转为utf8编码的二进制储存
  """Wrapper for inserting a bytes Feature into a SequenceExample proto."""
  return tf.train.Feature(bytes_list=tf.train.BytesList(value=[bytes(value, encoding="utf8")]))

def _int64_feature_list(values):
  """Wrapper for inserting an int64 FeatureList into a SequenceExample proto."""
  return tf.train.FeatureList(feature=[_int64_feature(v) for v in values])


def _bytes_feature_list(values):
  """Wrapper for inserting a bytes FeatureList into a SequenceExample proto."""
  return tf.train.FeatureList(feature=[_str2bytes_feature(v) for v in values])  # (change),调用str2byte


def _to_sequence_example(image, decoder, vocab):
  """Builds a SequenceExample proto for an image-caption pair.

  Args:
    image: An ImageMetadata object.
    decoder: An ImageDecoder object.
    vocab: A Vocabulary object.

  Returns:
    A SequenceExample proto.
  """
  with tf.gfile.FastGFile(image.filename, "rb") as f:  # (change)读取图片使用二进制直接读取
    encoded_image = f.read()
之后,修改数据加载路径后就可以直接python 运行。大约60分钟。期间可能会提示加载图片不是jpg编码,可以忽视。
注意,如果nltk或缺少punkt,就按照提示pip install nltk,之后在import nltk 后 加入 nltk.download('punkt')
二,模型构建与训练部份
1, 添加Densenet.py 文件到ops文件夹内
import tensorflow as tf
from tensorflow.contrib.layers import batch_norm, flatten
from tensorflow.contrib.framework import arg_scope
import numpy as np

#  growth_k = 24
#  nb_block = 2
dropout_rate = 0.2

def conv_layer(input, filter, kernel, stride=1, layer_name="conv"):
    with tf.name_scope(layer_name):
        network = tf.layers.conv2d(inputs=input, use_bias=False, filters=filter, kernel_size=kernel, strides=stride, padding='SAME')
        return network

def Global_Average_Pooling(x, stride=1):

    width = np.shape(x)[1]
    height = np.shape(x)[2]
    pool_size = [width, height]
    return tf.layers.average_pooling2d(inputs=x, pool_size=pool_size, strides=stride)

def Batch_Normalization(x, training, scope):
    with arg_scope([batch_norm],
                   scope=scope,
                   updates_collections=None,
                   decay=0.9,
                   center=True,
                   scale=True,
                   zero_debias_moving_mean=True) :
        return batch_norm(inputs=x, is_training=training, reuse=None)


def Drop_out(x, rate, training) :
    return tf.layers.dropout(inputs=x, rate=rate, training=training)

def Relu(x):
    return tf.nn.relu(x)

def Average_pooling(x, pool_size=[2,2], stride=2, padding='VALID'):
    return tf.layers.average_pooling2d(inputs=x, pool_size=pool_size, strides=stride, padding=padding)


def Max_Pooling(x, pool_size=[3,3], stride=2, padding='VALID'):
    return tf.layers.max_pooling2d(inputs=x, pool_size=pool_size, strides=stride, padding=padding)

def Concatenation(layers) :
    return tf.concat(layers, axis=3)

def Linear(x) :
    return tf.layers.dense(inputs=x, units=class_num, name='linear')

class DenseNet():
    def __init__(self, x, nb_blocks, filters, training, scope='Densenet'):
        self.nb_blocks = nb_blocks
        self.filters = filters
        self.training = training  # tf.placeholder(tf.bool, name='dn_istraining')
        self.dropout_rate = dropout_rate
        with tf.variable_scope(scope):
            self.model = self.Dense_net(x)


    def bottleneck_layer(self, x, scope):
        # print(x)
        with tf.name_scope(scope):
            x = Batch_Normalization(x, training=self.training, scope=scope+'_batch1')
            x = Relu(x)
            x = conv_layer(x, filter=4 * self.filters, kernel=[1,1], layer_name=scope+'_conv1')
            x = Drop_out(x, rate=self.dropout_rate, training=self.training)

            x = Batch_Normalization(x, training=self.training, scope=scope+'_batch2')
            x = Relu(x)
            x = conv_layer(x, filter=self.filters, kernel=[3,3], layer_name=scope+'_conv2')
            x = Drop_out(x, rate=self.dropout_rate, training=self.training)

            # print(x)

            return x

    def transition_layer(self, x, scope):
        with tf.name_scope(scope):
            x = Batch_Normalization(x, training=self.training, scope=scope+'_batch1')
            x = Relu(x)
            x = conv_layer(x, filter=self.filters, kernel=[1,1], layer_name=scope+'_conv1')
            x = Drop_out(x, rate=self.dropout_rate, training=self.training)
            x = Average_pooling(x, pool_size=[2,2], stride=2)

            return x

    def dense_block(self, input_x, nb_layers, layer_name):
        with tf.name_scope(layer_name):
            layers_concat = list()
            layers_concat.append(input_x)

            x = self.bottleneck_layer(input_x, scope=layer_name + '_bottleN_' + str(0))

            layers_concat.append(x)

            for i in range(nb_layers - 1):
                x = Concatenation(layers_concat)
                x = self.bottleneck_layer(x, scope=layer_name + '_bottleN_' + str(i + 1))
                layers_concat.append(x)

            x = Concatenation(layers_concat)

            return x

    def Dense_net(self, input_x):
        # input_x 299*299*3
        x = conv_layer(input_x, filter=2 * self.filters, kernel=[7,7], stride=2, layer_name='conv0')
        # 150*150*48
        # x = Max_Pooling(x, pool_size=[3,3], stride=2)

        x = self.dense_block(input_x=x, nb_layers=6, layer_name='dense_1')  # 192
        x = self.transition_layer(x, scope='trans_1')
        # 75*75*24
        x = self.dense_block(input_x=x, nb_layers=12, layer_name='dense_2')  # 75*75*312
        x = self.transition_layer(x, scope='trans_2')
        # 37*37*24
        x = self.dense_block(input_x=x, nb_layers=48, layer_name='dense_3')  # 1176
        x = self.transition_layer(x, scope='trans_3')
        # 18*18*24
        x = self.dense_block(input_x=x, nb_layers=32, layer_name='dense_4')
        # x = self.transition_layer(x, scope='trans_4')
        # 18*18*792
        with tf.name_scope('final_layer'):
            x = Batch_Normalization(x, training=self.training, scope='final_layer'+'_batch1')
            x = Relu(x)
            x = conv_layer(x, filter=512, kernel=[1,1], layer_name='final_layer'+'_conv1')
            x = Drop_out(x, rate=self.dropout_rate, training=self.training)


        # 100 Layer
        x = Batch_Normalization(x, training=self.training, scope='linear_batch')
        x = Relu(x)
        x = Global_Average_Pooling(x)
        x = flatten(x)
return x说明:注意'final_layer'操作层,加入了1X1卷积层将原本的18*18*792转为18*18*512(这个方法很简单粗暴,可能会对训练效果产生很小影响,最好是修改denseblock模块,使其输出为?*?*512),之后在通过全平均池化转为1*1*512。输出为512位的编码,所以模型输出为flatten(x)之后的展开。(densenet参考引用源码tensorflow版本)
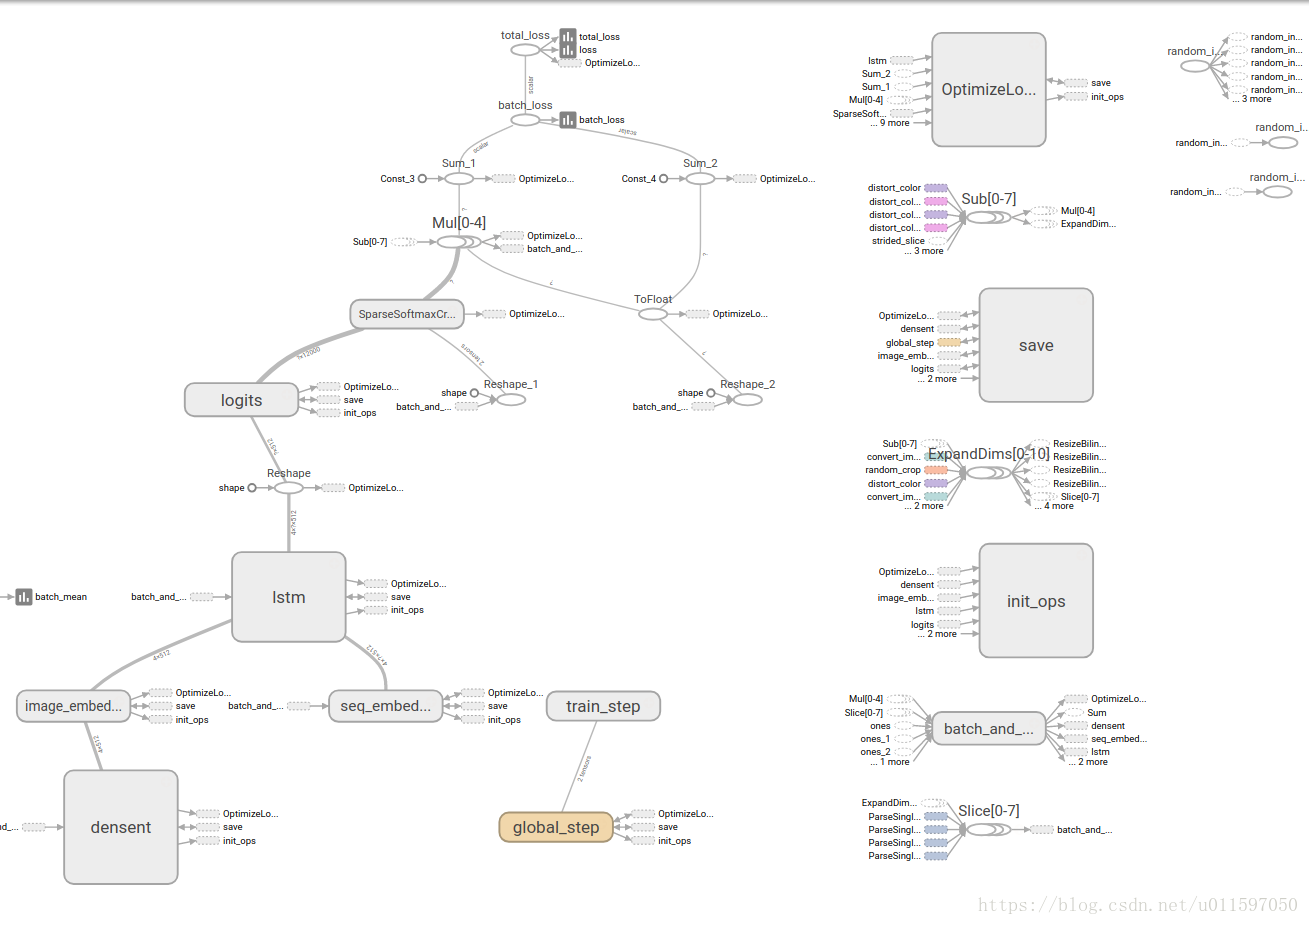
2, imtxt主模型构建部份
修改show_and_tell_model.py文件
#  改动一, 用densenet替换inceptionv3
def build_image_embeddings(self):
  """Builds the image model subgraph and generates image embeddings.

  Inputs:
    self.images

  Outputs:
    self.image_embeddings
  """
  # inception_output = image_embedding.inception_v3(
  #     self.images,
  #     trainable=self.train_inception,
  #     is_training=self.is_training())
  # self.inception_variables = tf.get_collection(
  #     tf.GraphKeys.GLOBAL_VARIABLES, scope="InceptionV3")
  densenet_output = Densenet.DenseNet(x=self.images, nb_blocks=None, filters=24, training=self.is_training(), scope='densent').model  # (add) 构建densenet编码模型
  self.inception_variables = tf.get_collection(
       tf.GraphKeys.GLOBAL_VARIABLES, scope="densent")  # (add) 收集densent的所有变量
  # Map inception output into embedding space.
  with tf.variable_scope("image_embedding") as scope:  # (change) inputs=densenet_output
    image_embeddings = tf.contrib.layers.fully_connected(
        inputs=densenet_output,
        num_outputs=self.config.embedding_size,
        activation_fn=None,
        weights_initializer=self.initializer,
        biases_initializer=None,
        scope=scope)

  # Save the embedding size in the graph.
  tf.constant(self.config.embedding_size, name="embedding_size")

  self.image_embeddings = image_embeddings
# 改动二
def build(self):
"""Creates all ops for training and evaluation."""
self.build_inputs()
self.build_image_embeddings()
self.build_seq_embeddings()
self.build_model()
# self.setup_inception_initializer() (del) 由于第一次训练所以要屏蔽预训练权重加载过程
self.setup_global_step()
3, 训练文件改动及开始
修改train.py
# 地址为第一步生成tfrecord文件的地址,?????为匹配内容,如果不改参数,会提示找到256个文件
tf.flags.DEFINE_string("input_file_pattern", "./data/tfrecord/train-?????-of-00256",
                       "File pattern of sharded TFRecord input files.")
# 第一次训练没有预训练参数为空
tf.flags.DEFINE_string("inception_checkpoint_file", "",
                       "Path to a pretrained inception_v3 model.")
# 训练模型参数保存地址以及tensorbord event地址
tf.flags.DEFINE_string("train_dir", "./checkpoints",
                       "Directory for saving and loading model checkpoints.")
#  注意,这里需要打开训练模型开关True。否则只会训练lstm模型参数,适用于有预训练权重,并打算对模型进行fine-tune
tf.flags.DEFINE_boolean("train_inception", True,
                        "Whether to train inception submodel variables.")


...........


  # Run training.
  # 注意:train.py最后这里要删除原来的init_fn,否则会加载预训练权重,如果第一次训练无预权重会报错
  tf.contrib.slim.learning.train(
      train_op,
      train_dir,
      log_every_n_steps=FLAGS.log_every_n_steps,
      graph=g,
      global_step=model.global_step,
      number_of_steps=FLAGS.number_of_steps,
      saver=saver)


if __name__ == "__main__":
  tf.app.run()
修改好文件后就可以开始训练了,python train.py, 训练时间会很长,3天以上(titanxp,我训练了一半的step。完全训练需要一周)。
注意:如果你的模型报OOM 错误意味着你的显存容量不够,可以修改减小Batch_size 大小降低显存占用。修改参数在configuration.py 文件中。其他超参数也在这里。
三,测试效果
训练好之后,可以运行tensorbord 查看loss与运行 evaluate.py得到验证集loss。(其实训练期间也行,只是可能会要求多余显卡,或指定只在cpu上运行。)
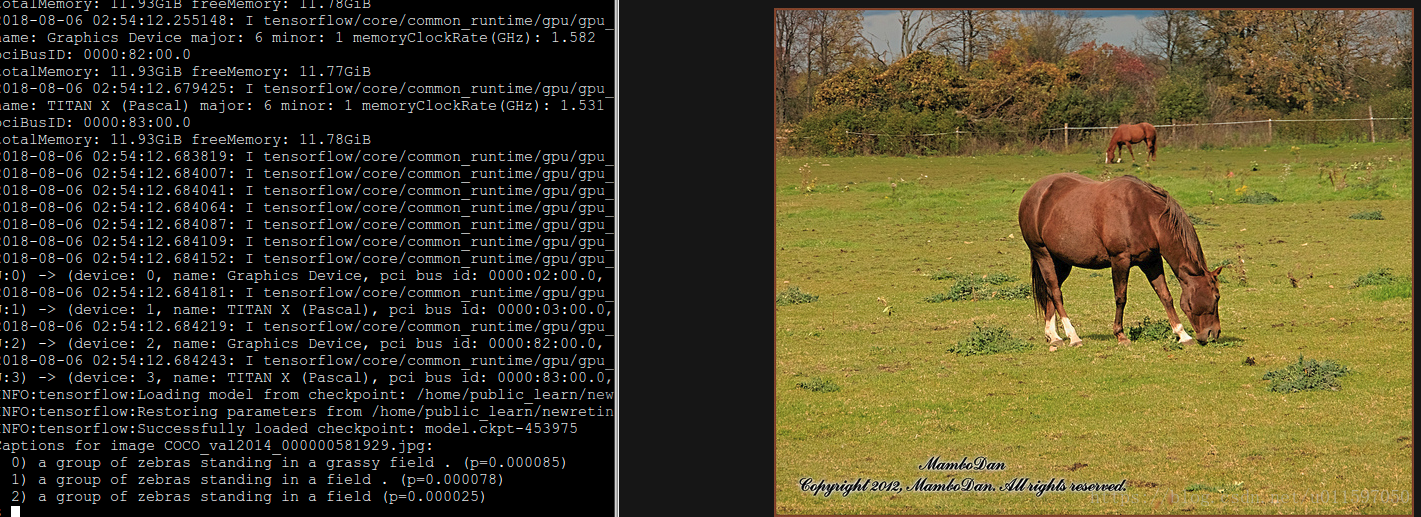
如果训练正常,可以运行run_inference.py 得到最后的图片转为文字描述的结果。(记得修改文件的flag)
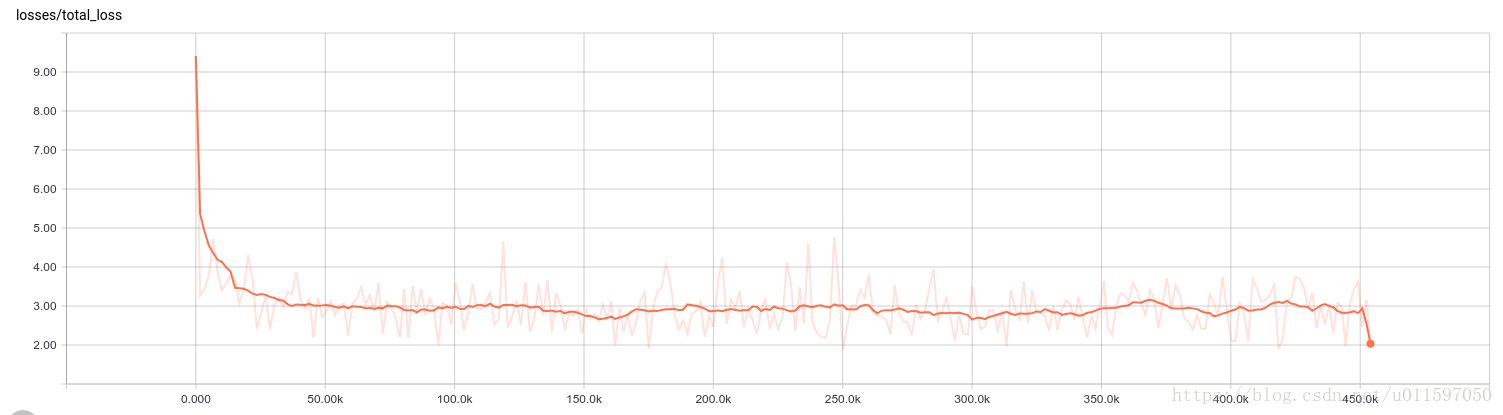
以下是我的训练效果
四,问题总结
从loss可以看到训练效果不是很好,没有对比过inceptionV3的情况,而且实际step数为初始设定值的一半。
最大问题就是densenet网络的天生运行缺陷,会导致显存严重不足报错。我在运行时,将batch_size 改为了4 才勉强运行网络(Titanxp 显存12GB)。这就导致了个严重的问题:无法提升网络层数与参数并导致欠拟合无法有效学习(最基本也是本程序的dense-121 模型准确率大约resnet-40水平),所以虽然采用了最新的densenet模型,其实最后效果是绝对不如原来的inceptionV3(尽管网络不深,但其参数量更大)。
解决方法:
1,换更深的resnet模型,或直接用V3/4 都不用改代码。
2,目前tensorflow对共享内存的程序优化还没有很好的支持(没有开源代码),对比pytorch,已经有改进过的densenet代码可以解决上述问题,有效降低70%显存,牺牲15%的运算速度。所以可以尝试优化tensorflow代码或将项目移植到pytorch。
五,学习参考
1,TensorFlow】im2txt — 将图像转为叙述文本
2,[NLP] 自己动手跑Google的Image Caption模型
3,Simple Tensorflow implementation of "Densenet" using Cifar10, MNIST(densenet源代码出处)
4, TensorFlow 画像キャプション・モデル – コンピュータ・ビジョンと自然言語処理の融合
5,小白学AI】图像标注Image Caption - tensorflow_models/im2txt
6,Show and Tell: A Neural Image Caption Generator(im2txt源代码出处)
感谢开源社区与博客主学习经验的分享。
个人水平有限,如有误,望提醒更改,谢谢。
本模型预期用于将 医学影像转换为相关病情描述。希望大家能够多交流,如果有新方法或模型期望你的分享,谢谢。


 8005
8005


 被折叠的 条评论
为什么被折叠?
被折叠的 条评论
为什么被折叠?
 到【灌水乐园】发言


