


- created by gloomyfish
图像噪声源于现实世界中数字信号总会受到各种各样的干扰,最终接受的图像和源于的数字信号之间总
是存在一定的差异,对于图像噪声,使用均值滤波和中值滤波来消除图像噪声的做法已经是很常见的图
像消噪手段。
一:图像加噪原理
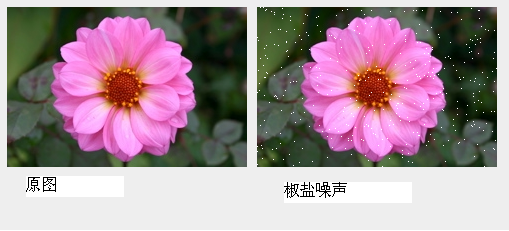
1. 椒盐噪声(Salt And Pepper Noise)
椒盐噪声是一种因为信号脉冲强度引起的噪声,信噪比(Signal NoiseRate)是衡量图像噪声的一个数字指标。
给一副数字图像加上椒盐噪声的处理顺序应该如下:
- 指定信噪比 SNR 其取值范围在[0, 1]之间
- 计算总像素数目 SP, 得到要加噪的像素数目 NP = SP * (1-SNR)
- 随机获取要加噪的每个像素位置P(i, j)
- 指定像素值为255或者0。
- 重复c, d两个步骤完成所有像素的NP个像素
- 输出加噪以后的图像
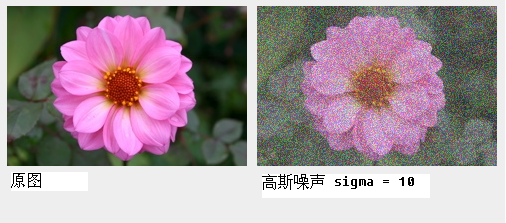
2. 高斯噪声(Gaussian Noise)
高斯噪声的密度取决于公式G(x, sigma) 其中X是代表平均值,sigma代表的标准方差,每个输入像素 Pin,
一个正常的高斯采样分布公式G(d), 得到输出像素Pout.
Pout = Pin + XMeans + sigma *G(d)
其中d为一个线性的随机数,G(d)是随机数的高斯分布随机值。
给一副数字图像加上高斯噪声的处理顺序如下:
a. 输入参数sigam 和 X mean
b. 以系统时间为种子产生一个伪随机数
c. 将伪随机数带入G(d)得到高斯随机数
d. 根据输入像素计算出输出像素
e. 重新将像素值防缩在[0 ~ 255]之间
f. 循环所有像素
g. 输出图像
二:关键程序解析
1. 椒盐噪声
根据信噪比,获取要加入椒盐噪声的像素数目
int size= (int)(inPixels.length * (1-SNR));
随机得到像素,完成椒盐噪声的加入
for(int i=0; i<size; i++) {
int row = (int)(Math.random()* (double)height);
int col = (int)(Math.random()* (double)width);
index= row * width + col;
inPixels[index]= (255 << 24) | (255 << 16) | (255 << 8) | 255;
}
2. 高斯噪声
根据标准方差,和伪随机数的范围,首先计算出一个伪随机数d ,根据d得到高斯分布的随机数值,整个代码如下:
float d = (float)Math.random()*RANDOM_SCOPE - RANDOM_SCOPE/2;
float sigma2 = sigma*sigma*2;
float PI2 = (float)Math.PI * 2;
float sigmaPI2 = (float)Math.sqrt(PI2*sigma);
float result = (float)Math.exp(-d/sigma2)/sigmaPI2;
伪随机数的范围为[-127~ 127]之间。
获取高斯噪声的像素代码如下:
tr = (int)((float)tr + getGaussianValue() + this.means);
tg = (int)((float)tg + getGaussianValue() + this.means);
tb = (int)((float)tb + getGaussianValue() + this.means);
mean是的值为0.
三:程序效果如下
加入白色椒盐噪声的图片
加入高斯噪声的图片
椒盐噪声的代码如下:
private BufferedImage addSaltAndPepperNoise(BufferedImage src, BufferedImage dst) {
    int width = src.getWidth();
       int height = src.getHeight();

       if ( dst == null )
           dst = createCompatibleDestImage( src, null );

       int[] inPixels = new int[width*height];
       getRGB( src, 0, 0, width, height, inPixels );

       int index = 0;
       int size = (int)(inPixels.length * (1-SNR));

       for(int i=0; i<size; i++) {
        int row = (int)(Math.random() * (double)height);
        int col = (int)(Math.random() * (double)width);
        index = row * width + col;
        inPixels[index] = (255 << 24) | (255 << 16) | (255 << 8) | 255;
       }

       setRGB( dst, 0, 0, width, height, inPixels );
       return dst;
}
高斯噪声的代码如下:
private BufferedImage gaussianNoise(BufferedImage src, BufferedImage dst) {
        int width = src.getWidth();
        int height = src.getHeight();

        if ( dst == null )
            dst = createCompatibleDestImage( src, null );

        int[] inPixels = new int[width*height];
        int[][][] tempPixels = new int[height][width][4];
        int[] outPixels = new int[width*height];
        getRGB( src, 0, 0, width, height, inPixels );
        int index = 0;
        float inMax = 0;
        float outMax = 0;
        for(int row=0; row<height; row++) {
            int ta = 0, tr = 0, tg = 0, tb = 0;
            for(int col=0; col<width; col++) {
                index = row * width + col;
                ta = (inPixels[index] >> 24) & 0xff;
                tr = (inPixels[index] >> 16) & 0xff;
                tg = (inPixels[index] >> 8) & 0xff;
                tb = inPixels[index] & 0xff;
                if(inMax < tr) {
                    inMax = tr;
                }
                if(inMax < tg) {
                    inMax = tg;
                }
                if(inMax < tb) {
                    inMax = tb;
                }
                tr = (int)((float)tr + getGaussianValue() + this.means);
                tg = (int)((float)tg + getGaussianValue() + this.means);
                tb = (int)((float)tb + getGaussianValue() + this.means);
                if(outMax < tr) {
                    outMax = tr;
                }
                if(outMax < tg) {
                    outMax = tg;
                }
                if(outMax < tb) {
                    outMax = tb;
                }
                tempPixels[row][col][0] = ta;
                tempPixels[row][col][1] = tr;
                tempPixels[row][col][2] = tg;
                tempPixels[row][col][3] = tb;
            }
        }

        // Normalization
        index = 0;
        float rate = inMax/outMax;
        for(int row=0; row<height; row++) {
            int ta = 0, tr = 0, tg = 0, tb = 0;
            for(int col=0; col<width; col++) {
                index = row * width + col;
                ta = tempPixels[row][col][0];
                tr = tempPixels[row][col][1];
                tg = tempPixels[row][col][2];
                tb = tempPixels[row][col][3];

                tr = (int)((float)tr * rate);
                tg = (int)((float)tg * rate);
                tb = (int)((float)tb * rate);
                outPixels[index] = (ta << 24) | (tr << 16) | (tg << 8) | tb;
            }
        }
        setRGB( dst, 0, 0, width, height, outPixels );
        return dst;
    }
view pla


 被折叠的 条评论
为什么被折叠?
被折叠的 条评论
为什么被折叠?
 到【灌水乐园】发言


