


一、History of Spring and the Spring Framework
Spring came into being in 2003 as a response to the complexity of the early J2EE specifications. While some consider Java EE and its modern-day successor Jakarta EE to be in competition with Spring, they are in fact complementary. The Spring programming model does not embrace the Jakarta EE platform specification; rather, it integrates with carefully selected individual specifications from the traditional EE umbrella:
-
Servlet API (JSR 340)
-
WebSocket API (JSR 356)
-
Concurrency Utilities (JSR 236)
-
JSON Binding API (JSR 367)
-
Bean Validation (JSR 303)
-
JPA (JSR 338)
-
JMS (JSR 914)
-
as well as JTA/JCA setups for transaction coordination, if necessary.
The Spring Framework also supports the Dependency Injection (JSR 330) and Common Annotations (JSR 250) specifications, which application developers may choose to use instead of the Spring-specific mechanisms provided by the Spring Framework. Originally, those were based on common javax packages.
As of Spring Framework 6.0, Spring has been upgraded to the Jakarta EE 9 level (e.g. Servlet 5.0+, JPA 3.0+), based on the jakarta namespace instead of the traditional javax packages. With EE 9 as the minimum and EE 10 supported already, Spring is prepared to provide out-of-the-box support for the further evolution of the Jakarta EE APIs. Spring Framework 6.0 is fully compatible with Tomcat 10.1, Jetty 11 and Undertow 2.3 as web servers, and also with Hibernate ORM 6.1.
Over time, the role of Java/Jakarta EE in application development has evolved. In the early days of J2EE and Spring, applications were created to be deployed to an application server. Today, with the help of Spring Boot, applications are created in a devops- and cloud-friendly way, with the Servlet container embedded and trivial to change. As of Spring Framework 5, a WebFlux application does not even use the Servlet API directly and can run on servers (such as Netty) that are not Servlet containers.
Spring continues to innovate and to evolve. Beyond the Spring Framework, there are other projects, such as Spring Boot, Spring Security, Spring Data, Spring Cloud, Spring Batch, among others. It’s important to remember that each project has its own source code repository, issue tracker, and release cadence. See spring.io/projects for the complete list of Spring projects.
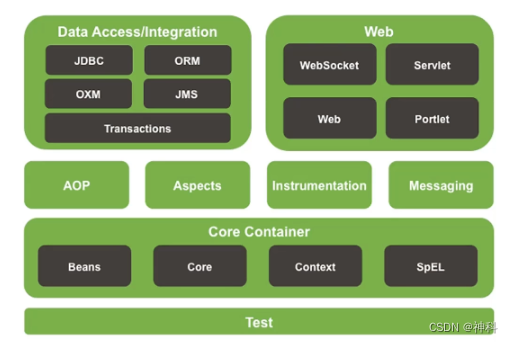
Features
-
Core technologies: dependency injection, events, resources, i18n, validation, data binding, type conversion, SpEL, AOP.
-
Testing: mock objects, TestContext framework, Spring MVC Test, WebTestClient.
-
Data Access: transactions, DAO support, JDBC, ORM, Marshalling XML.
-
Spring MVC and Spring WebFlux web frameworks.
-
Integration: remoting, JMS, JCA, JMX, email, tasks, scheduling, cache and observability.
-
Languages: Kotlin, Groovy, dynamic languages.
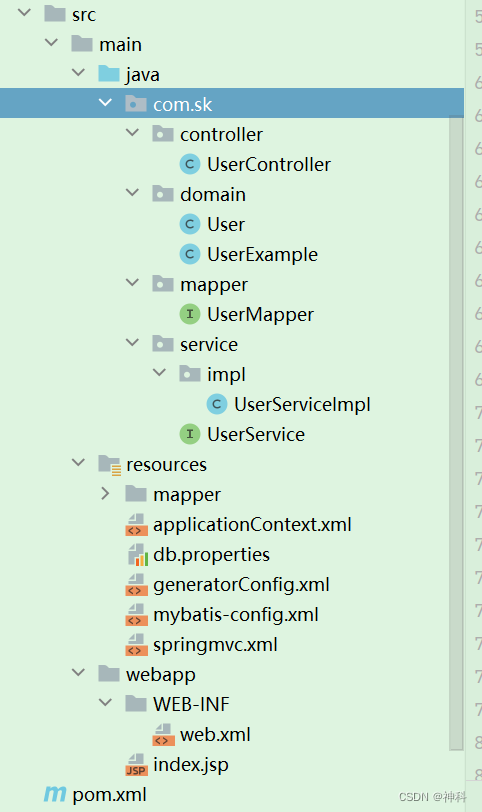
举例:spring mvc+mybatis
1、应用场景:Spring Framework是一个完整的企业级应用框架,可用于构建复杂、高扩展Java应用程序
2、依赖管理:需要手动添加依赖库
<dependencies>
        <!-- 测试 -->
        <dependency>
            <groupId>junit</groupId>
            <artifactId>junit</artifactId>
            <version>4.11</version>
            <scope>test</scope>
        </dependency>

        <!--Spring相关依赖-->
        <!--因为webmvc中包含了aop、beans、context、core等依赖-->
        <dependency>
            <groupId>org.springframework</groupId>
            <artifactId>spring-webmvc</artifactId>
            <version>${spring.version}</version>
        </dependency>

        <!-- Servlet的依赖 -->
        <dependency>
            <groupId>javax.servlet</groupId>
            <artifactId>javax.servlet-api</artifactId>
            <version>3.0.1</version>
            <scope>provided</scope>
        </dependency>

        <dependency>
            <groupId>commons-fileupload</groupId>
            <artifactId>commons-fileupload</artifactId>
            <version>1.2.1</version>
        </dependency>

        <dependency>
            <groupId>commons-io</groupId>
            <artifactId>commons-io</artifactId>
            <version>2.2</version>
        </dependency>

        <!-- MySQL Connector -->
        <dependency>
            <groupId>mysql</groupId>
            <artifactId>mysql-connector-java</artifactId>
            <version>${mysql.version}</version>
        </dependency>

        <!-- Spring JDBC -->
        <dependency>
            <groupId>org.springframework</groupId>
            <artifactId>spring-jdbc</artifactId>
            <version>${spring.version}</version>
        </dependency>

        <!-- 数据库连接池 -->
        <dependency>
            <groupId>com.alibaba</groupId>
            <artifactId>druid</artifactId>
            <version>${druid.version}</version>
        </dependency>

        <!-- Mybatis的依赖 -->
        <dependency>
            <groupId>org.mybatis</groupId>
            <artifactId>mybatis</artifactId>
            <version>${mybatis.version}</version>
        </dependency>

        <!-- MyBatis和Spring的整合依赖 -->
        <dependency>
            <groupId>org.mybatis</groupId>
            <artifactId>mybatis-spring</artifactId>
            <version>${mybatis.spring.version}</version>
        </dependency>
    </dependencies>
3、配置管理:
3.1、配置web.xml文件
<!DOCTYPE web-app PUBLIC
        "-//Sun Microsystems, Inc.//DTD Web Application 2.3//EN"
        "http://java.sun.com/dtd/web-app_2_3.dtd" >


<web-app xmlns:xsi="http://www.w3.org/2001/XMLSchema-instance" xmlns="http://xmlns.jcp.org/xml/ns/javaee"
         xsi:schemaLocation="http://xmlns.jcp.org/xml/ns/javaee http://xmlns.jcp.org/xml/ns/javaee/web-app_3_1.xsd"
         id="WebApp_ID" version="3.1">
  <display-name>Archetype Created Web Application</display-name>
  <!-- 指定Spring的核心配置文件 -->
  <context-param>
    <param-name>contextConfigLocation</param-name>
    <param-value>classpath:applicationContext.xml</param-value>
  </context-param>
  <!-- 注册ServletContext监听器,创建容器对象,并且将ApplicationContext对象放到Application域中 -->
  <listener>
    <listener-class>org.springframework.web.context.ContextLoaderListener</listener-class>
  </listener>
  <!-- 解决乱码的过滤器 -->
  <filter>
    <filter-name>CharacterEncodingFilter</filter-name>
    <filter-class>org.springframework.web.filter.CharacterEncodingFilter</filter-class>
    <init-param>
      <param-name>encoding</param-name>
      <param-value>utf-8</param-value>
    </init-param>
    <init-param>
      <param-name>forceEncoding</param-name>
      <param-value>true</param-value>
    </init-param>
  </filter>
  <filter-mapping>
    <filter-name>CharacterEncodingFilter</filter-name>
    <url-pattern>/*</url-pattern>
  </filter-mapping>

  <!--配置前端控制器:DispatcherServlet-->
  <servlet>
    <servlet-name>dispatcherServlet</servlet-name>
    <servlet-class>org.springframework.web.servlet.DispatcherServlet</servlet-class>
    <!-- 指定配置文件位置和名称 如果不设置,默认找/WEB-INF/<servlet-name>-servlet.xml -->
    <init-param>
      <param-name>contextConfigLocation</param-name>
      <param-value>classpath:springmvc.xml</param-value>
    </init-param>
    <load-on-startup>1</load-on-startup>
    <async-supported>true</async-supported>
  </servlet>
  <servlet-mapping>
    <servlet-name>dispatcherServlet</servlet-name>
    <url-pattern>/</url-pattern>
  </servlet-mapping>

  <!--Rest风格的URL-->
  <filter>
    <filter-name>HiddenHttpMethodFilter</filter-name>
    <filter-class>org.springframework.web.filter.HiddenHttpMethodFilter</filter-class>
  </filter>
  <filter-mapping>
    <filter-name>HiddenHttpMethodFilter</filter-name>
    <url-pattern>/*</url-pattern>
  </filter-mapping>
</web-app>
3.2、配置spring扫描和注解驱动:spring-mvc.xml
<?xml version="1.0" encoding="UTF-8"?>
<beans xmlns="http://www.springframework.org/schema/beans"
       xmlns:xsi="http://www.w3.org/2001/XMLSchema-instance"
       xmlns:context="http://www.springframework.org/schema/context"
       xmlns:mvc="http://www.springframework.org/schema/mvc"
       xsi:schemaLocation="http://www.springframework.org/schema/beans http://www.springframework.org/schema/beans/spring-beans.xsd
        http://www.springframework.org/schema/context http://www.springframework.org/schema/context/spring-context-4.0.xsd
        http://www.springframework.org/schema/mvc http://www.springframework.org/schema/mvc/spring-mvc-4.0.xsd">

    <!-- 扫描注解,这样com.sk包下的文件都能被扫描 -->
    <context:component-scan base-package="com.sk"/>

    <bean class="org.springframework.web.servlet.view.InternalResourceViewResolver">
        <property name="prefix" value="/WEB-INF/jsp/"/>
        <property name="suffix" value=".jsp"/>
    </bean>

    <bean class="org.springframework.web.servlet.view.BeanNameViewResolver">
        <property name="order" value="100"/>
    </bean>

    <!--静态资源-->
    <mvc:default-servlet-handler/>

    <!--配置注解驱动-->
    <mvc:annotation-driven>
            <mvc:message-converters>
                    <bean class="org.springframework.http.converter.StringHttpMessageConverter">
                            <property name="defaultCharset" value="UTF-8"/>
                            <property name="writeAcceptCharset" value="false"/>
                    </bean>
                    <bean class="org.springframework.http.converter.json.MappingJackson2HttpMessageConverter"/>
            </mvc:message-converters>
    </mvc:annotation-driven>

    <bean id="multipartResolver"
          class="org.springframework.web.multipart.commons.CommonsMultipartResolver">
        <property name="defaultEncoding" value="UTF-8"/>
        <property name="maxUploadSize" value="1024000"/>
    </bean>
</beans>
3.3、配置属性配置和业务层:applicationContext.xml中
<?xml version="1.0" encoding="UTF-8"?>
<beans xmlns="http://www.springframework.org/schema/beans"
       xmlns:xsi="http://www.w3.org/2001/XMLSchema-instance"
       xmlns:context="http://www.springframework.org/schema/context"
       xsi:schemaLocation="http://www.springframework.org/schema/beans http://www.springframework.org/schema/beans/spring-beans.xsd
        http://www.springframework.org/schema/context http://www.springframework.org/schema/context/spring-context-4.0.xsd">

    <!--数据源-->
    <context:property-placeholder location="classpath:db.properties"/>
    <!-- 数据库连接池 -->
    <!-- 配置数据源 -->
    <bean id="dataSource" class="com.alibaba.druid.pool.DruidDataSource">
        <property name="driverClassName" value="${jdbc.driver}"/>
        <property name="url" value="${jdbc.url}"/>
        <property name="username" value="${jdbc.user}"/>
        <property name="password" value="${jdbc.password}"/>
    </bean>

    <!-- mybatis和spring完美整合,不需要mybatis的配置映射文件 -->
    <bean id="sqlSessionFactory" class="org.mybatis.spring.SqlSessionFactoryBean">
        <property name="dataSource" ref="dataSource"/>
        <!-- 扫描domain包 -->
        <property name="typeAliasesPackage" value="com.david.domain"/>
        <!-- 扫描sql配置文件:mapper需要的xml文件-->
        <property name="mapperLocations" value="classpath:mapper/*.xml"/>
    </bean>

    <!-- Mapper动态代理开发,扫描dao接口包-->
    <bean class="org.mybatis.spring.mapper.MapperScannerConfigurer">
        <!-- 注入sqlSessionFactory -->
        <property name="sqlSessionFactoryBeanName" value="sqlSessionFactory"/>
        <!-- 给出需要扫描Dao接口包 -->
        <property name="basePackage" value="com.sk.mapper"/>
    </bean>

    <bean id="person" class="com.sk.domain.User" scope="prototype" abstract="false"/>
</beans>
4、启动方式:手动编写启动类,两种启动方式
4.1、方式一 :web.xml配置以下xml内容
<context-param>                <!--Spring上下文配置-->
   <param-name>contextConfigLocation</param-name>
   <param-value>/WEB-INF/rootContext.xml</param-value>        <!--指定配置文件地址及文件名称-->
</context-param>
<listener>         <!--上下文初始化监听器-->
   <listener-class>org.springframework.web.context.ContextloadListener</listener-class>
</listener>


<servlet>        <!--配置Servlet-->
    <servlet-name>springDispatcher</servlet-name>
    <servlet-class>org.springframework.web.servlet.DispatcherServlet</servlet-class>
    <init-param>
        <param-name>contextConfigLocation</param-name>
        <param-value>/WEB-INF/servletContext.xml</param-value>
    </init-param>
    <load-on-startup>1</load-on-startup>
</servlet>
<servlet-mapping>
    <servlet-name>springDispatcher</servlet-name>
    <url-pattern>/</url-pattern>
</servlet-mapping>
4.2、方式二
public class Bootstrap implements WebApplicationInitializer{
    @overvide
    public void onStartup(ServletContext container){
        XmlWebApplicationContext rootContext = new XmlWebApplicationContext();
        rootContext.setConfigLocation("/WEB-INF/rootContext.xml");
        container.addListener(new ContextLoaderListerner(rootContext));


        XmlWebApplicationContex servletContext = new XmlWebApplicationContex();
        servletCOntext.setConfigLocation("/WEB-INF/servletContext.xml");
        ServletRegistration.Dynamic dispatcher = container.addServlet(
            "springDispatcher", new DispatcherServlet(servletContext)
            );
        dispatcher.setLoadOnStartup(1);
        dispatcher.addMapping("/");

    }
}
二、History of Spring Boot
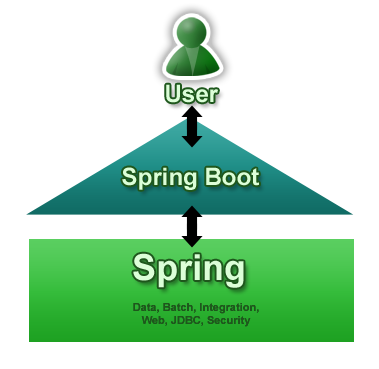
Spring Boot aims to make it easy to create Spring-powered, production-grade applications and services with minimum fuss. It takes an opinionated view of the Spring platform so that new and existing users can quickly get to the bits they need. You can use it to create stand-alone Java applications that can be started using 'java -jar' or more traditional WAR deployments. We also provide a command line tool that runs 'spring scripts'.
The diagram below shows Spring Boot as a point of focus on the larger Spring ecosystem. It presents a small surface area for users to approach and extract value from the rest of Spring:
The primary goals of Spring Boot are:
-
To provide a radically faster and widely accessible 'getting started' experience for all Spring development
-
To be opinionated out of the box, but get out of the way quickly as requirements start to diverge from the defaults
-
To provide a range of non-functional features that are common to large classes of projects (e.g. embedded servers, security, metrics, health checks, externalized configuration)
Spring Boot does not generate code and there is absolutely no requirement for XML configuration.
Spring Boot快速开发框架,开箱即用,不生产任何代码,也不需要XML配置。解决Sping Framework不一致配置和web容器问题
举例:spring boot + spring mvc + mybatis
1、应用场景:快速开发框架,开箱即用,简化开发、部署、运行过程

2、依赖配置:自动添加所需依赖
 <groupId>com.jack</groupId>
    <artifactId>springboot-mybatis</artifactId>
    <version>0.0.1-SNAPSHOT</version>
    <name>springboot-mybatis</name>
    <description>Demo project for Spring Boot</description>
    <properties>
        <java.version>8</java.version>
    </properties>
    <dependencies>
        <dependency>
            <groupId>org.springframework.boot</groupId>
            <artifactId>spring-boot-starter-web</artifactId>
        </dependency>

        <dependency>
            <groupId>org.springframework.boot</groupId>
            <artifactId>spring-boot-starter-test</artifactId>
            <scope>test</scope>
        </dependency>

        <dependency>
            <groupId>mysql</groupId>
            <artifactId>mysql-connector-java</artifactId>
        </dependency>

        <dependency>
            <groupId>org.mybatis.spring.boot</groupId>
            <artifactId>mybatis-spring-boot-starter</artifactId>
            <version>1.3.1</version>
        </dependency>
    </dependencies>
3、配置管理:使用application配置
只有application.properties或者application.yml
4、启动方式: @SpringBootApplication注解来自动配置和启动Spring应用程序
@SpringBootApplication
@ComponentScan(basePackages={"com.sk"})
public class SpringbootMybatisApplication {
    public static void main(String[] args) {
        SpringApplication.run(SpringbootMybatisApplication.class, args);
    }
}


 2381
2381

 被折叠的 条评论
为什么被折叠?
被折叠的 条评论
为什么被折叠?
 到【灌水乐园】发言


