


使用 Jetpack Compose Modifier实现个人资料图片重叠效果
先来2张想要实现的效果图:
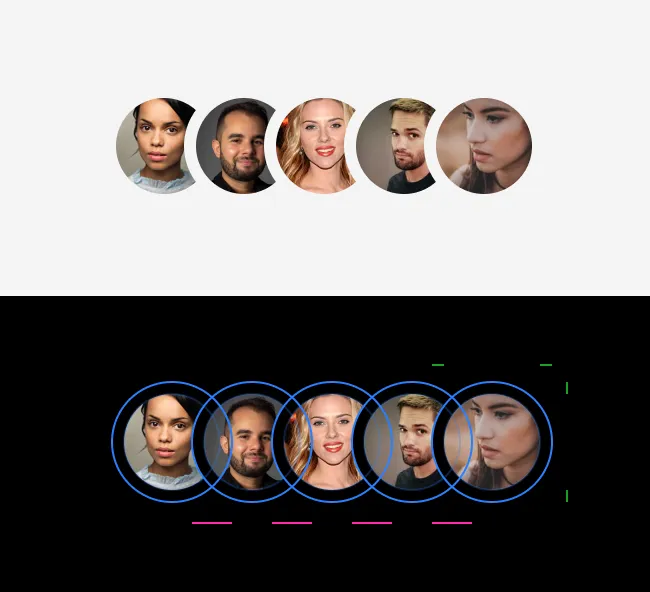
我想以重叠的方式显示个人资料图片。这不是最近的设计趋势,但在 2023 年仍然很优雅。
主要属性:
- 浅蓝色,带边距的图片尺寸
- 粉色,图片之间的负间距
- 绿色:图片的边距
显然,使用这些属性会使显示结果很棒。
负间距
在实现这个效果之前,我们知道将Row与Column组合可产生负排列效果。
结合个人资料图片启动一个可组合项:
val size = 48.dp
val margin = 6.dp
val spacing = 12.dp

// Easy solution
Row(horizontalArrangement = Arrangement.spacedBy(-spacing.dp)) {

    list.forEachIndexed { index, item ->
        val enable = index != (list.size - 1)
        ProfilePicture(
            url = item.url,
            imageSize = size,
            margin = margin.dp,
            negativeSpacing = spacing.dp,
            cropped = enable
        )
    }
}

负间距:ok ☑
个人资料图片重叠,最后一张在其他人之上
但到目前为止你可能还没有学到任何东西,而且项目之间没有空白。
让我们尝试添加…
图片边距
使用边框
我第一次尝试添加边距是将每张图片封装在一个Box带有Modifier.border(…).
@Composable
fun WithBorder() {
    // Hard coded stuff
    val size = 48.dp
    val strokeSize = 4
    val containerColor = MaterialTheme.colorScheme.tertiary
    val avatarBackgroundColor = MaterialTheme.colorScheme.secondaryContainer
    Box(
        modifier = Modifier
            .border(
                border = BorderStroke(strokeSize.dp, containerColor),
                shape = CircleShape
            )
    ) {
        // This box represent the profile picture
        Box(
            modifier = Modifier
                .clip(CircleShape)
                .padding(strokeSize.dp)
                .background(
                    color = avatarBackgroundColor,
                    shape = CircleShape
                )
                .size(size)
        ) {}
    }
}

@Preview
@Composable
fun WithBorderPreview() {
    MaterialTheme {
        Row(
            horizontalArrangement = Arrangement.spacedBy(-16.dp),
        ) {
            (0..5).forEach {
                WithBorder()
            }
        }
    }
}
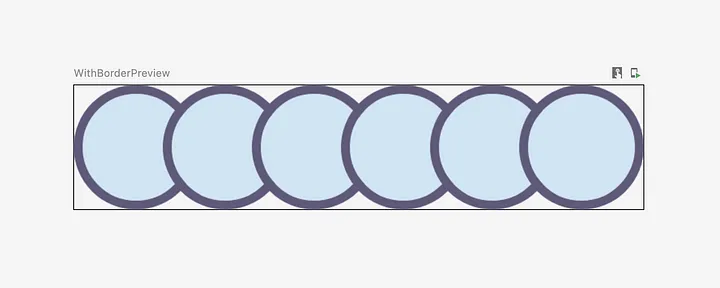
这个解决方案并不可行,原因有二:
1 )边框在项目之间增加边距。这不是什么大问题,因为我可以用负间距重新计算结果。
但它也为自身增加了Row的边界。
我尝试移动偏移量并更新的边界,但没有成功。
2 )边界清晰,无法消除。这意味着每次都显示边框颜色。
如果背后的背景Row未知,或者不是纯色而是渐变,这可能会很烦人。
我选择跳过这个技术方案。
在 DrawScope 中绘图
第二个选项是删除每张图片的负面部分,除了最后一张。
使用三个参数(大小、边距、间距),我可以放置大小合适的圆来排除。
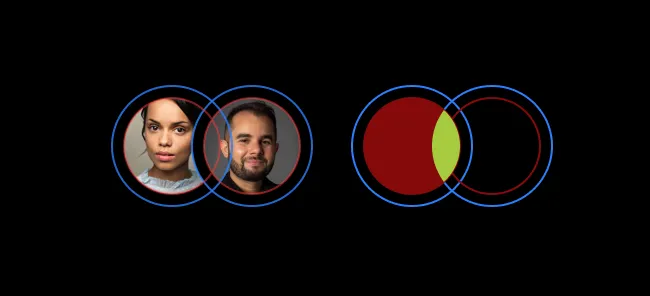
为此,我可以使用drawWithCache修饰符和onDrawWithContent方法。他们提供了在修改后的可组合项上方或下方显示内容的工具。
这样,我可以排除当前个人资料照片和第二张个人资料照片之间的差异:
center x = size.width * 1.5 — negativeSpacingPx
center y = size.height / 2
radius = size.width / 2 + marginPx
结果是graphicalLayer Modifier和drawWithCache功能的组合,如:
.graphicsLayer {
    // Ensure BlendMode.Clear strategy works
    compositingStrategy = CompositingStrategy.Offscreen
}
.drawWithCache {
    val path = Path().apply {
        addOval(
            Rect(
                topLeft = Offset.Zero,
                bottomRight = Offset(size.width, size.height),
            ),
        )
    }
    onDrawWithContent {
        clipPath(path) {
            // this draws the actual image
            // if you don't call drawContent, it won't render anything
            this@onDrawWithContent.drawContent()
        }
        val marginRadius = size.width / 2f + marginPx
        val offset = size.width * 1.5f - negativeSpacingPx
        drawCircle(
            color = Color.Black,
            radius = marginRadius,
            center = Offset(x = offset, y = (size.height / 2f)),
            blendMode = BlendMode.Clear,
        )
    }
}
我剪辑了一条内容大小的路径,以呈现不包括圆形部分的圆圈。
感谢官方文档的提示。
用修改器做
最后,我可以将其提取到修改器扩展中,以使其可重用。结果,我得到了 3 个主要元素。
本身Row参数很少
- 图片之间的(负)间距
- 边距,表示两张个人资料图片之间的边框
- 图片大小
可组合的ProfilePicture
它将使用三个参数 + url + 一个布尔值以应用于圆环去除。如前所述,不会裁剪最后一项。
我正在使用Coil显示来自 URL 的图像。
我为什么要使用链式Modifiers?为了使其更具可读性。
并且因为,最后一项将只使用initialModifier。
applyIf 修饰符
在某些条件下应用的有用功能Modifier。🙂
circleMask 修改器
基本上,您会发现后面的元素见几行之前。
注意:
onDrawingWithContent中使用的size和当前的绘图环境有关。有关详细信息,请参阅drawWithCache和CacheDrawScope文档。
完整代码
完整代码参考如下:
// Usage :
val spacing = 4.dp
val margin = 2.dp
val imageSize = 32.dp

Row(horizontalArrangement = Arrangement.spacedBy(-spacing.dp)) {
    list.forEachIndexed { index, item ->
        val enable = index != (list.size - 1)
        val url = item.thumbUrl
        ProfilePicture(
            url = url,
            imageSize = imageSize,
            margin = margin,
            negativeSpacing = spacing,
            cropped = enable,
        )
    }
}
@Composable
fun ProfilePicture(
    url: String,
    imageSize: Dp,
    margin: Dp = 0.dp,
    negativeSpacing: Dp = 0.dp,
    cropped: Boolean = false,
) {
   val initialModifier = Modifier
      .clip(CircleShape)
      .size(imageSize)
      .aspectRatio(1f)

   val marginPx = margin.dpToPx()
   val negativeSpacingPx = negativeSpacing.dpToPx()

   AsyncImage(
       modifier = initialModifier.applyIf(cropped) {
          circleMask(marginPx, negativeSpacingPx)
       },
       model = ImageRequest.Builder(LocalContext.current)
          .data(url)
          .crossfade(true)
          .build(),
      contentDescription = null,
      contentScale = ContentScale.Crop,
   )
}
fun Modifier.applyIf(
    condition: Boolean,
    modifierFunction: Modifier.() -> Modifier,
) = this.run {
    if (condition) {
        this.modifierFunction()
    } else {
        this
    }
}
fun Modifier.circleMask(
    marginPx: Float,
    negativeSpacingPx: Float,
) = then(
    Modifier
        .graphicsLayer {
            // Ensure BlendMode.Clear strategy works
            compositingStrategy = CompositingStrategy.Offscreen
        }
        .drawWithCache {
            val path = Path().apply {
                addOval(
                    Rect(
                        topLeft = Offset.Zero,
                        bottomRight = Offset(size.width, size.height),
                    ),
                )
            }
            onDrawWithContent {
                clipPath(path) {
                    // this draws the actual image
                    // if you don't call drawContent, it won't render anything
                    this@onDrawWithContent.drawContent()
                }
                val marginRadius = size.width / 2f + marginPx
                val offset = size.width * 1.5f - negativeSpacingPx
                drawCircle(
                    color = Color.Black,
                    radius = marginRadius,
                    center = Offset(x = offset, y = (size.height / 2f)),
                    blendMode = BlendMode.Clear,
                )
            }
        },
)
参考链接
https://medium.com/@bapness/overlapping-profile-pictures-with-jetpack-compose-modifier-b91bc8693d21


 1403
1403


 被折叠的 条评论
为什么被折叠?
被折叠的 条评论
为什么被折叠?
 到【灌水乐园】发言


