


 本文介绍在Jetpack Compose中使用Paging 3实现分页加载与无限滚动。分页加载可一次加载小数据块,提高应用性能。文中构建简单应用,在RecyclerView上显示狗的图像,还阐述了Model、Repository、ViewModel的实现逻辑,并给出了Github代码链接。
在Jetpack Compose中使用Paging 3实现无限滚动
本文将介绍在Jetpack Compose中进行分页加载。分页加载意味着一次只加载应用程序中的小数据块。
假设您在服务器上有大量数据,并且您希望在UI上显示这些数据。显然,您不希望一次性加载所有数据。您希望每次只加载少量数据。
这就是分页的作用,当您在应用程序中向上滚动时,它会加载下一组数据,通过这种方式可以提高应用程序的性能。
基本上,我们将构建一个非常简单的应用程序,通过使用paging 3库在RecyclerView上显示狗的图像。最好的部分是您可以进行无限滚动,而不必担心应用程序的性能问题。
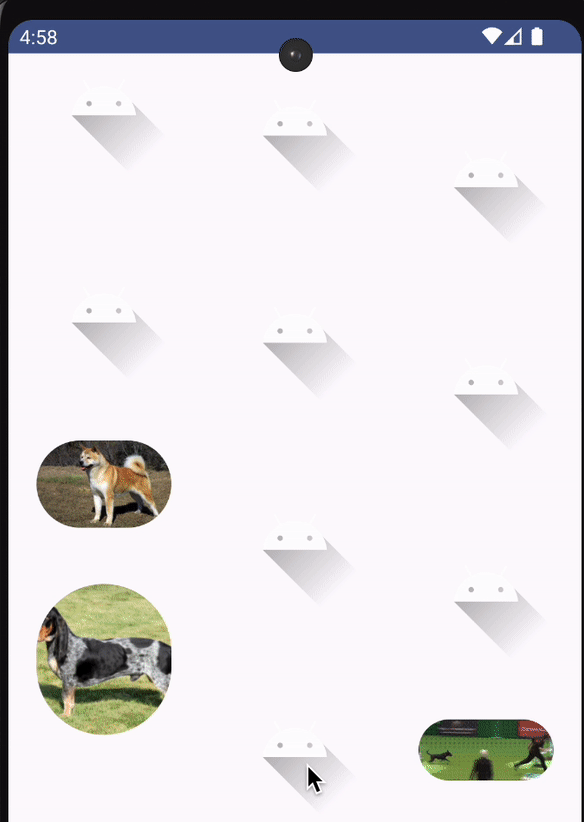
如上所示,在上面的视频中,我们正在RecyclerView上显示狗的图像,最好的部分是当我们向下滚动时,图像是动态加载的。
//Dependencies
val daggerHilt = "2.47"
val coroutine = "1.7.1"

//dagger hilt
implementation("com.google.dagger:hilt-android:$daggerHilt")
kapt("com.google.dagger:hilt-android-compiler:$daggerHilt")
implementation("androidx.hilt:hilt-navigation-compose:1.1.0-alpha01")

//coroutines
implementation("org.jetbrains.kotlinx:kotlinx-coroutines-android:$coroutine")
implementation("org.jetbrains.kotlinx:kotlinx-coroutines-core:$coroutine")
implementation("androidx.lifecycle:lifecycle-runtime-compose:2.7.0-alpha02")

//paging 3
implementation ( "androidx.paging:paging-runtime-ktx:3.2.1")
implementation ("androidx.paging:paging-compose:3.3.0-alpha02")


//retrofit
implementation ("com.squareup.retrofit2:retrofit:2.9.0")
//moshi
implementation("com.squareup.moshi:moshi-kotlin:1.12.0")
implementation ("com.squareup.retrofit2:converter-moshi:2.9.0")

//coil
implementation("io.coil-kt:coil-compose:2.4.0")
这些是我们用于构建此应用程序的依赖项。确保您已经了解dagger hilt、coroutines和retrofit,因为我们只会谈论Paging 3。
Model
data class DogsModel(
  val id:String,
  val url:String
)
首先,我们创建了一个DogsModel文件,它只是一个模式,以便我们可以将其中的数据绑定在一起。
interface ApiService {

    companion object {
        const val BASE_URL = "https://api.thedogapi.com"
    }

    @GET("v1/images/search")
    suspend fun getAllDogs(
        @Query("page") page: Int,
        @Query("limit") limit: Int
    ): List<DogsModel>
}
如您所见,在上面的代码中,我们使用https://api.thedogapi.com API获取狗的图像。
请注意查询参数中,我们传递了页面和限制。当您向下滚动时,页码将增加,而限制将是您想要一次加载的图像数量。
Repository
class DogsRepository @Inject constructor(
    private val apiService:ApiService
) {
    suspend fun getDogs(
        page:Int,
        limit:Int
    ):List<DogsModel> = apiService.getAllDogs(
        page,limit
    )
}
之后,我们创建了一个存储库,在其中编写从服务器获取数据的逻辑。
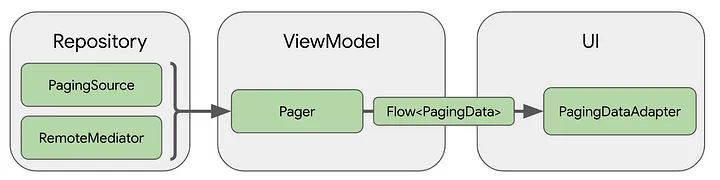
正如您在上面的图像中所注意到的那样,在创建存储库之后,我们必须创建一个PagingSource类,在其中编写我们的分页逻辑。
忘记RemoteMediator,它用于缓存我们在本文中未使用的数据。
class DogsPagingSource @Inject constructor(
    private val repository:DogsRepository
) :PagingSource<Int,DogsModel>() {

    override fun getRefreshKey(state:PagingState<Int,DogsModel> ):Int?= state.anchorPosition

    override suspend fun load(params:LoadParams<Int> ) :LoadResult<Int,DogsModel> {
        val page = params.key? :1
        val response = repository.getDogs(page,params.loadSize )
        return try {
            LoadResult.Page(
                data=response,
                prevKey=if (page == 1) null else page.minus(1),
                nextKey=if (response.isEmpty()) null else page.plus(1)
            )
        } catch (e: IOException) {
            LoadResult.Error(
                e
            )
        } catch (e: HttpException) {
            LoadResult.Error(
                e
            )
        }
    }
}
如您所见,我们创建了一个DogsPagingSource类,该类扩展了PagingSource<Int,DogsModel>()类,这将有助于编写分页逻辑。
<Int,DogsModels>()中的Int表示它将以Int值作为页码输入,DogsModel是服务器响应。
它将覆盖两个重要函数,getRefreshKey函数将帮助您在要刷新数据时使用,它还会获取有关当前加载数据的信息。
load()这里我们将编写实际的分页逻辑。
正如您注意到的,它返回LoadResult,它是包含Page和Error子数据类的密封类。
在成功时,我们将返回Page,否则为Error。
使用LoadParams,我们将找到页面编号和限制,如果无法找到页面编号,则将其传递为1。
在LoadResult.Page中,我们传递响应(从服务器返回的任何结果)。
在prevKey中,如果仅有一页可用,则传递null,否则在向上滚动时减少页面编号。
在nextKey中,如果响应为空,则表示没有可用页面,否则在向下滚动时增加页面编号。
在向上滚动的情况下,我们将减少页面编号,在向下滚动的情况下,我们将增加页面编号。
ViewModel
@HiltViewModel
class DogsViewModel @Inject constructor(
    private val dogsPagingSource: DogsPagingSource
) : ViewModel() {

    private val _dogResponse: MutableStateFlow<PagingData<DogsModel>> =
        MutableStateFlow(PagingData.empty())
    var dogResponse = _dogResponse.asStateFlow()
        private set

    init {
        viewModelScope.launch {
            Pager(
                config = PagingConfig(
                    10, enablePlaceholders = true
                )
            ) {
                dogsPagingSource
            }.flow.cachedIn(viewModelScope).collect {
                _dogResponse.value = it
            }
        }
    }
}
在上面的代码中,我们创建了一个ViewModel,_dogResponse变量的类型是PagingData<T>,它存储来自DogsPagingSource的结果。
在init{}块中,我们调用了Pager,它将limit和PagingSource作为必要参数,并返回结果。
让我们在UI上收集这个结果。
@Composable
fun DogsScreen(
    modifier: Modifier = Modifier,
    viewModel: DogsViewModel = hiltViewModel()
) {
    val response = viewModel.dogResponse.collectAsLazyPagingItems()

    LazyVerticalStaggeredGrid(
        columns = StaggeredGridCells.Fixed(3),
        modifier = modifier.fillMaxSize()
    ) {

        items(response.itemCount) {
            AsyncImage(
                model = ImageRequest.Builder(LocalContext.current)
                    .data(response[it]?.url ?: "-")
                    .crossfade(true)
                    .build(),
                placeholder = painterResource(R.drawable.ic_launcher_foreground),
                contentDescription = "",
                contentScale = ContentScale.Crop,
                modifier = Modifier
                    .padding(20.dp)
                    .clip(CircleShape)
            )
        }

        response.apply {
            when {
                loadState.refresh is LoadState.Loading || loadState.append is LoadState.Loading -> {
                    item {
                        Box(
                            modifier = Modifier.fillMaxWidth(),
                            contentAlignment = Alignment.Center
                        ) {
                            CircularProgressIndicator(
                                modifier = Modifier.align(Alignment.Center)
                            )
                        }
                    }
                }

                loadState.refresh is LoadState.Error || loadState.append is LoadState.Error -> {
                    item {
                        Text(text = "Error")
                    }
                }

                loadState.refresh is LoadState.NotLoading -> {
                }
            }
        }
    }

}
如您所见,首先我们创建了ViewModel的对象,通过collectAsLazyPagingItems()来收集响应。
我们使用LazyVerticalStaggeredGrid来通过Coil库显示图像。
这里的load.refresh表示当您首次加载/出错数据时,而load.append表示当您向下滚动时追加加载/出错数据。
Github
https://github.com/nameisjayant/compose-blogs-repository/tree/main/app/src/main/java/com/nameisjayant/articlesrepository/ui/paging3


 4230
4230

 被折叠的 条评论
为什么被折叠?
被折叠的 条评论
为什么被折叠?
 到【灌水乐园】发言


