


ConstraintLayout是谷歌推出的一个新布局,字面意思是约束布局,距离发布已经有一段时间了,下面会有一个复杂布局的代码对比。
对于ConstraintLayout,有篇文章写了关于它的性能优势:解析ConstraintLayout的性能优势
我们知道,当我们的布局越来越复杂的时候,所使用的嵌套就越来多,性能自然而然的就会有所下降,而ConstraintLayout恰恰就是为了这个操作而诞生的。
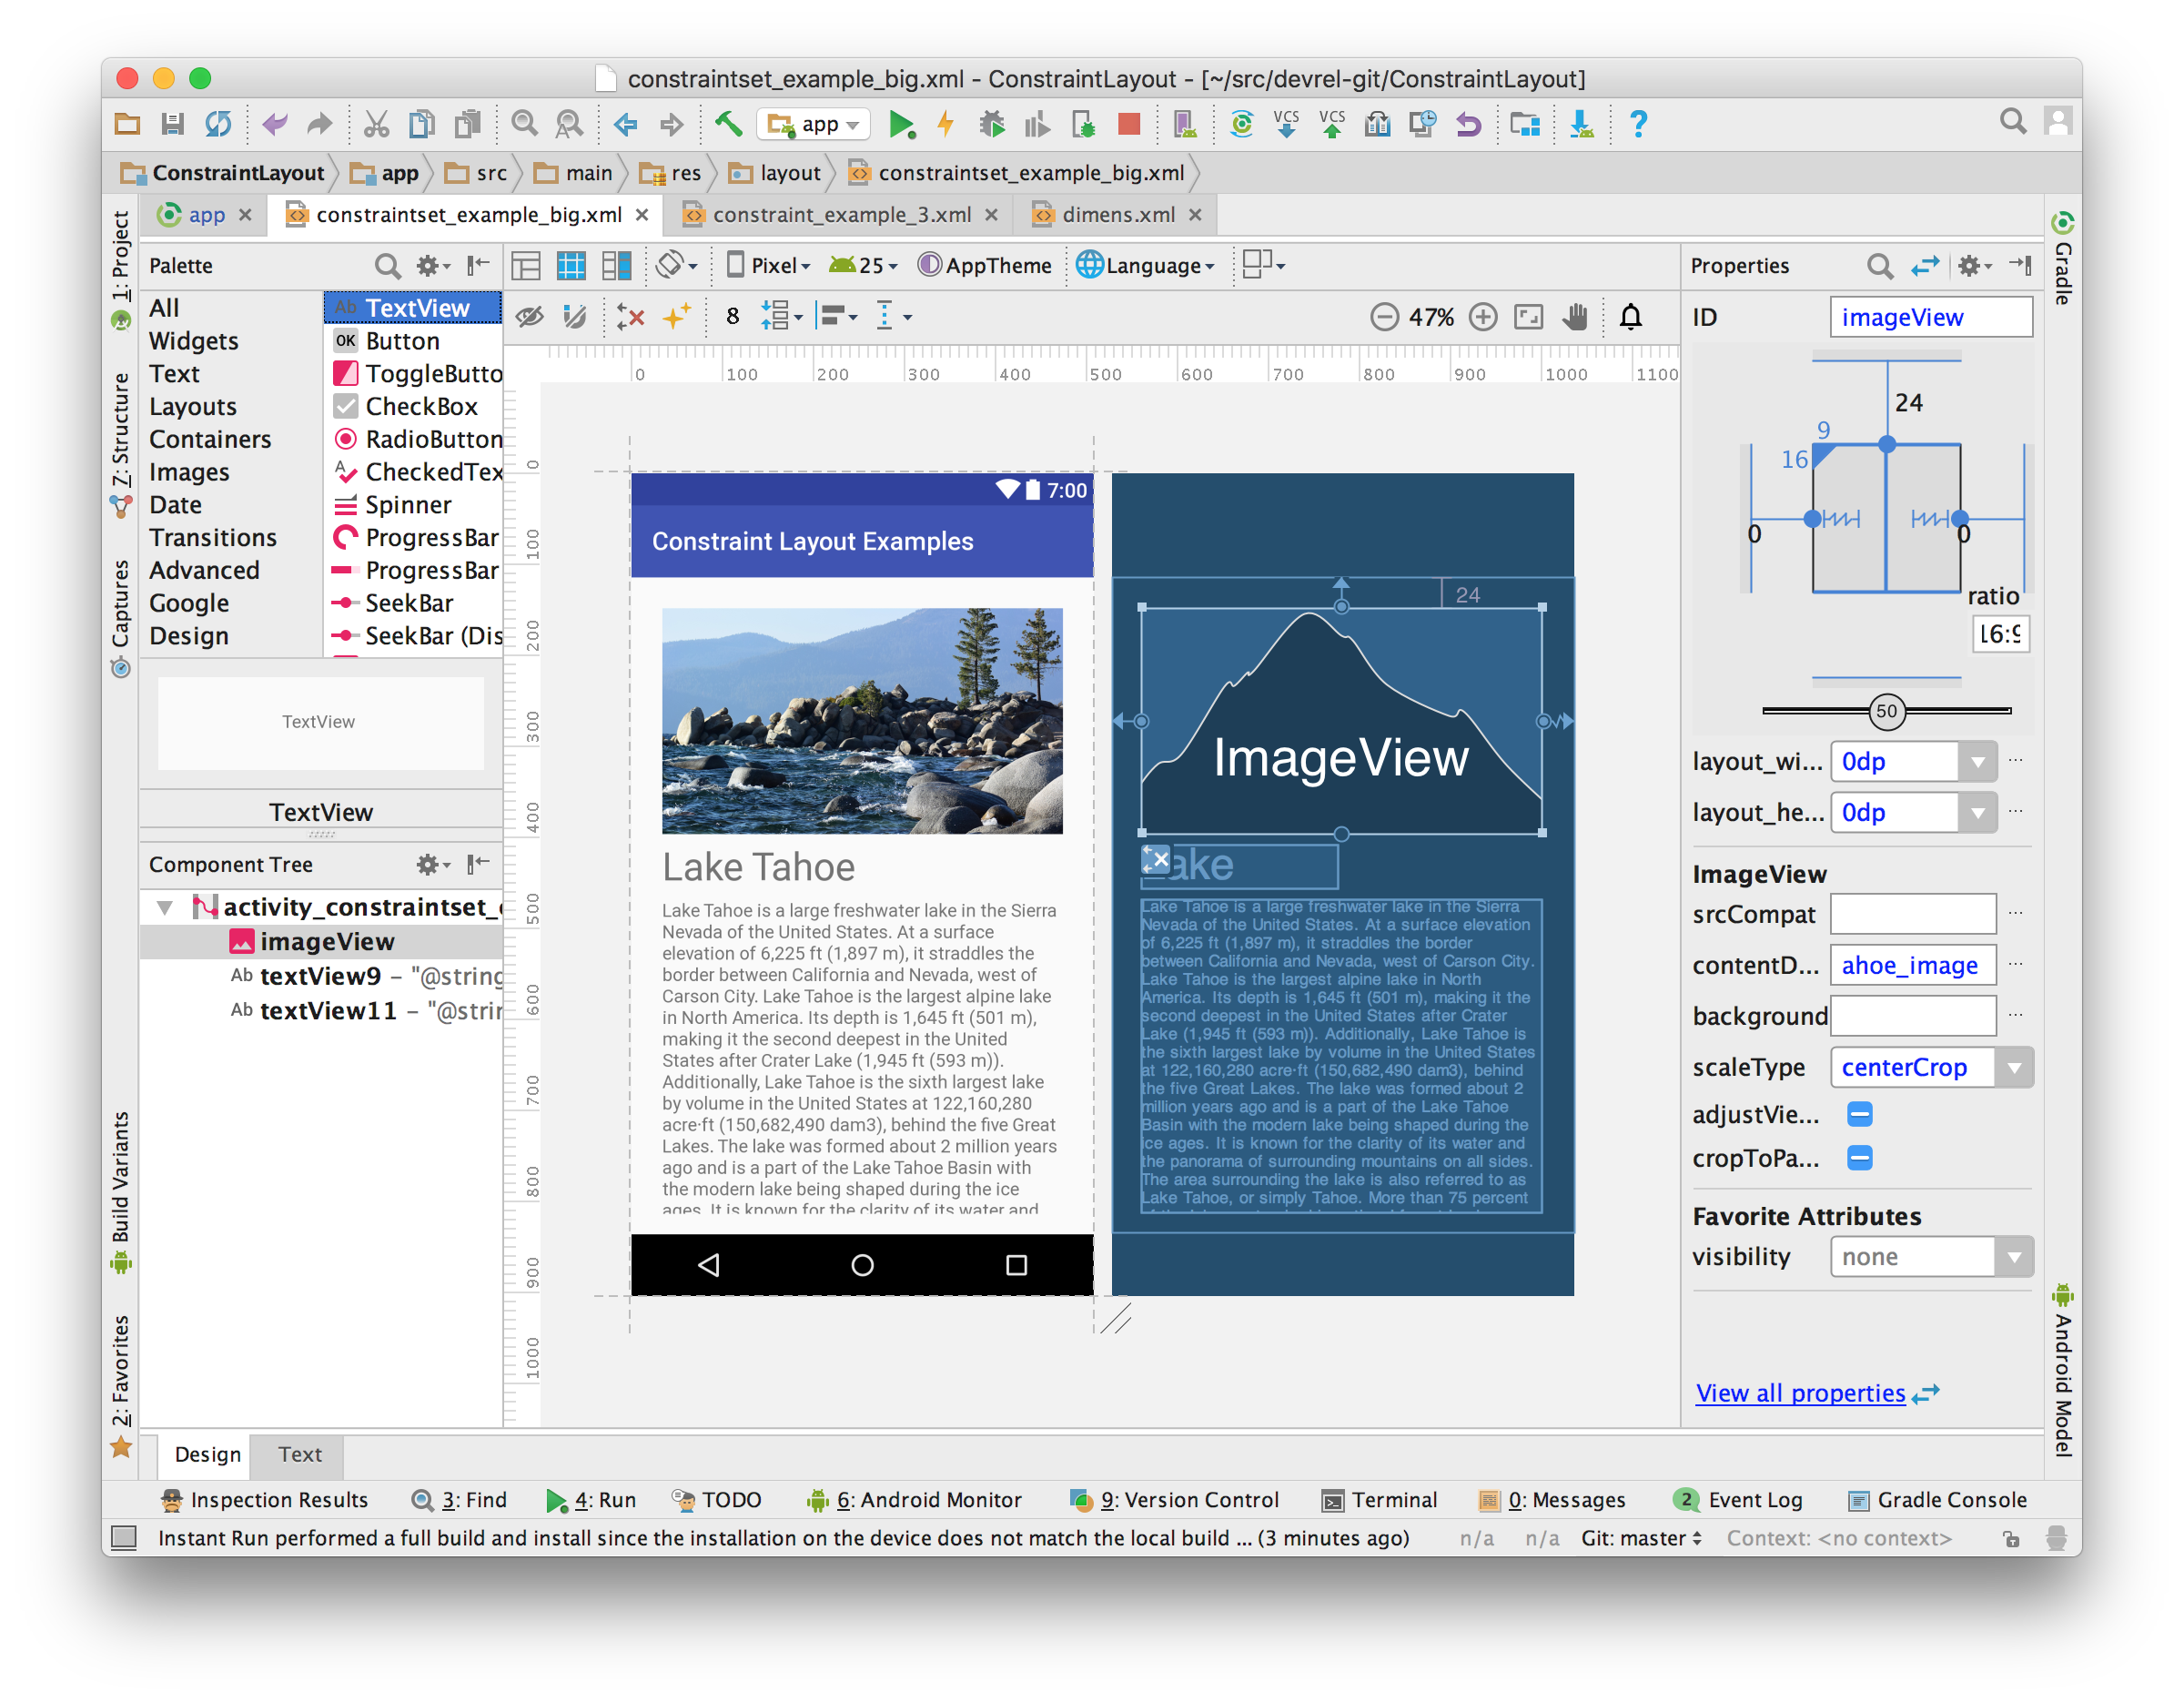
对于ConstraintLayout的可视化操作可以说是非常牛逼啊,参考ConstraintLayout完全解析,但是我个人不习惯用可视化的去拖拽控件,所以在这里来写在xml上面写各种属性。
事前准备
引入ConstraintLayout
在Android Studio 2.3以后,默认创建的布局就是ConstraintLayout布局,如果不是2.3以后的版本,在build.gradle文件中引入ConstraintLayout,当前版本是1.0.2:
dependencies {
    compile 'com.android.support.constraint:constraint-layout:1.0.2'
    // 3.0以前使用compile,3.0以后使用implementation
    // implementation 'com.android.support.constraint:constraint-layout:1.0.2'
}
转换成ConstraintLayout
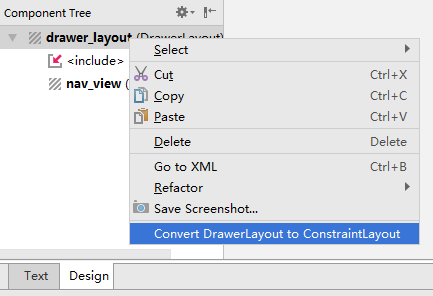
如果你需要将原来的布局转成ConstraintLayout布局的话,可以在打开xml文件后,点击Design选项,然后找到Component Tree窗口,最后右键布局,选择Convert layout to ConstraintLayout选项
对比布局代码
下面我们来通过一个布局,来对比ConstraintLayout和其他布局来实现下面的布局内容的代码:
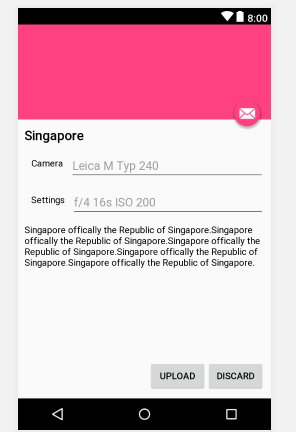
首先有除了ConstraintLayout之外的布局来实现,代码太长,所以省去属性,有能力的可以自己去写一下:
<RelativeLayout>
  <ImageView />
  <FloatingActionButton />
  <RelativeLayout>
    <TextView />
    <LinearLayout>
      <TextView />
      <RelativeLayout>
        <EditText />
      </RelativeLayout>
    </LinearLayout>
    <LinearLayout>
      <TextView />
      <RelativeLayout>
        <EditText />
      </RelativeLayout>
    </LinearLayout>
    <TextView />
  </RelativeLayout>
  <LinearLayout >
    <Button />
    <Button />
  </LinearLayout>
</RelativeLayout>
够复杂的,RelativeLayout布局嵌套LinearLayout布局,里面又嵌套多个布局,严重影响布局的绘制。
那么我们来看使用ConstraintLayout布局之后的代码是怎么样的:
<android.support.constraint.ConstraintLayout xmlns:android="http://schemas.android.com/apk/res/android"
    xmlns:app="http://schemas.android.com/apk/res-auto"
    xmlns:tools="http://schemas.android.com/tools"
    android:layout_width="match_parent"
    android:layout_height="match_parent"
    tools:context="top.jowanxu.constraintlayoutdemo.MainActivity">

    <ImageView
        android:id="@+id/banner"
        android:layout_width="0dp"
        android:layout_height="0dp"
        android:background="@color/colorAccent"
        android:gravity="center"
        app:layout_constraintDimensionRatio="16:6"
        app:layout_constraintEnd_toEndOf="parent"
        app:layout_constraintStart_toStartOf="parent"
        app:layout_constraintTop_toTopOf="parent" />

    <android.support.design.widget.FloatingActionButton
        android:id="@+id/fab"
        android:layout_width="wrap_content"
        android:layout_height="wrap_content"
        android:layout_margin="@dimen/fab_margin"
        app:layout_constraintBottom_toBottomOf="@+id/banner"
        app:layout_constraintEnd_toEndOf="parent"
        app:layout_constraintHorizontal_bias="0.98"
        app:layout_constraintStart_toStartOf="parent"
        app:layout_constraintTop_toBottomOf="@+id/banner"
        app:srcCompat="@android:drawable/ic_dialog_email" />

    <TextView
        android:id="@+id/title"
        android:layout_width="0dp"
        android:layout_height="wrap_content"
        android:layout_marginStart="10dp"
        android:layout_marginTop="10dp"
        android:text="Singapore"
        android:textAppearance="@style/Base.TextAppearance.AppCompat.Title"
        app:layout_constraintEnd_toEndOf="parent"
        app:layout_constraintStart_toStartOf="parent"
        app:layout_constraintTop_toBottomOf="@id/banner" />

    <TextView
        android:id="@+id/camera"
        android:layout_width="wrap_content"
        android:layout_height="wrap_content"
        android:layout_marginStart="10dp"
        android:layout_marginTop="10dp"
        android:padding="10dp"
        android:text="Camera"
        android:textAppearance="@style/TextAppearance.AppCompat.Tooltip"
        app:layout_constraintStart_toStartOf="parent"
        app:layout_constraintTop_toBottomOf="@id/title" />

    <EditText
        android:id="@+id/cameraEdit"
        android:layout_width="0dp"
        android:layout_height="wrap_content"
        android:layout_marginEnd="10dp"
        android:hint="Leica M Typ 240"
        app:layout_constraintEnd_toEndOf="parent"
        app:layout_constraintStart_toEndOf="@+id/camera"
        app:layout_constraintTop_toTopOf="@+id/camera" />

    <TextView
        android:id="@+id/settings"
        android:layout_width="wrap_content"
        android:layout_height="wrap_content"
        android:layout_marginStart="10dp"
        android:layout_marginTop="10dp"
        android:padding="10dp"
        android:text="Settings"
        android:textAppearance="@style/TextAppearance.AppCompat.Tooltip"
        app:layout_constraintStart_toStartOf="parent"
        app:layout_constraintTop_toBottomOf="@+id/cameraEdit" />

    <EditText
        android:id="@+id/settingsEdit"
        android:layout_width="0dp"
        android:layout_height="wrap_content"
        android:layout_marginEnd="10dp"
        android:hint="f/4 16s ISO 200"
        app:layout_constraintEnd_toEndOf="parent"
        app:layout_constraintStart_toEndOf="@+id/settings"
        app:layout_constraintTop_toTopOf="@+id/settings" />

    <TextView
        android:id="@+id/content"
        android:layout_width="0dp"
        android:layout_height="0dp"
        android:layout_margin="10dp"
        android:layout_marginBottom="8dp"
        android:layout_marginEnd="8dp"
        android:layout_marginStart="8dp"
        android:text="Singapore offically the Republic of Singapore.Singapore offically the Republic of Singapore.Singapore offically the Republic of Singapore.Singapore offically the Republic of Singapore.Singapore offically the Republic of Singapore."
        android:textAppearance="@style/Base.TextAppearance.AppCompat.Body1"
        app:layout_constraintBottom_toTopOf="@+id/discard"
        app:layout_constraintEnd_toEndOf="parent"
        app:layout_constraintStart_toStartOf="parent"
        app:layout_constraintTop_toBottomOf="@+id/settingsEdit" />

    <Button
        android:id="@+id/upload"
        android:layout_width="wrap_content"
        android:layout_height="wrap_content"
        android:text="UPLOAD"
        app:layout_constraintBottom_toBottomOf="@+id/discard"
        app:layout_constraintEnd_toStartOf="@+id/discard" />

    <Button
        android:id="@+id/discard"
        android:layout_width="wrap_content"
        android:layout_height="wrap_content"
        android:layout_marginBottom="10dp"
        android:layout_marginEnd="10dp"
        android:text="DISCARD"
        app:layout_constraintBottom_toBottomOf="parent"
        app:layout_constraintEnd_toEndOf="parent" />

</android.support.constraint.ConstraintLayout>
简单概括就是,没有一层嵌套,而且是一个完全扁平的层次结构:
<ConstraintLayout>
    <ImageView/>
    <FloatingActionButton/>
    <TextView/>
    <TextView/>
    <EditText/>
    <TextView/>
    <EditText/>
    <TextView/>
    <Button/>
    <Button/>
</ConstraintLayout>
开始
ConstraintLayout所包含的约束有:
Dimension constraintsRelative positioningCentering positioningMarginsVisibility behavior- Chains
Dimensions constraints
Dimensions constraints字面意思就是尺寸约束,可以设置ConstraintLayout布局的大小,和设置布局里面控件的尺寸约束。
Minimum dimensions on ConstraintLayout
ConstraintLayout布局与其他布局一样可以设置最大尺寸和最小尺寸:
android:minWidthandroid:minHeightandroid:maxWidthandroid:maxHeight
Widgets dimension constraints
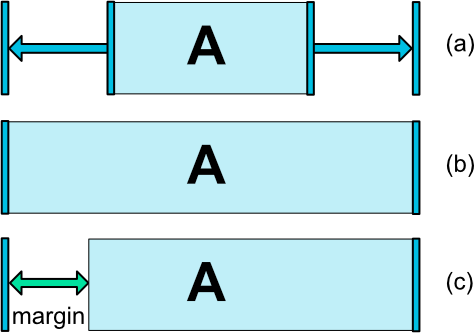
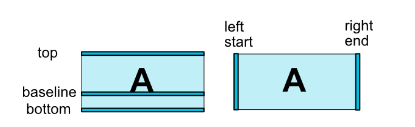
设置布局里面控件的尺寸约束,我们知道,在普通布局里面,我们每个控件的宽高,都是在三个类型里面设置值的:
- 固定的值(如
100dp),对应图上a wrap_content,对应图上amatch_parent,对应图上b,设置margin对应c
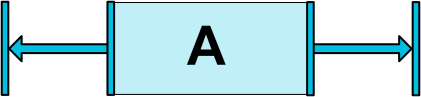
但是在ConstraintLayout布局里面,控件的宽高变为:
- 固定的值(如
100dp),对应图上a wrap_content,对应图上amatch_constraint,也就是0dp,对应图上b,设置margin对应c
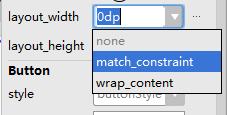
与其他布局不同的是ConstraintLayout里面没有match_parent,而是用0dp也就是match_constraint替换了他,看下官网怎么说的:
Important: MATCH_PARENT is not recommended for widgets contained in a ConstraintLayout. Similar behavior can be defined by using MATCH_CONSTRAINT with the corresponding left/right or top/bottom constraints being set to “parent”.
意思是,ConstraintLayout已经弃用MATCH_PARENT了,通过使用MATCH_CONSTRAINT,同时设置控件的left/right或者top/bottom来约束parent来达到与MATCH_PARENT一样的效果,如:
android:layout_width="0dp"
app:layout_constraintEnd_toEndOf="parent"
app:layout_constraintStart_toStartOf="parent"
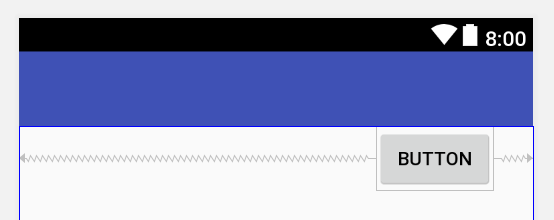
下面举个栗子,将RelativeLayout和ConstraintLayout写一下下面的布局

RelativeLayout里面
    <Button
        android:id="@+id/button"
        android:layout_width="wrap_content"
        android:layout_height="wrap_content"
        android:layout_alignParentStart="true"
        android:layout_alignParentTop="true"
        android:text="Button" />

    <Button
        android:id="@+id/button2"
        android:layout_width="wrap_content"
        android:layout_height="wrap_content"
        android:layout_alignParentTop="true"
        android:layout_toEndOf="@+id/button"
        android:layout_alignParentEnd="true"
        android:text="asdfasdfsdfasdfasdfasdfasdfasdfsadfsdafasdfasdfasdf" />
然后ConstraintLayout布局
    <Button
        android:id="@+id/button1"
        android:layout_width="wrap_content"
        android:layout_height="wrap_content"
        android:text="Button1"
        app:layout_constraintStart_toStartOf="parent"
        app:layout_constraintTop_toTopOf="parent" />

    <Button
        android:id="@+id/button2"
        android:layout_width="wrap_content"
        android:layout_height="wrap_content"
        android:text="asdfasdfsdfasdfasdfasdfasdfasdfsadfsdafasdfasdfasdf"
        app:layout_constraintEnd_toEndOf="parent"
        app:layout_constraintStart_toEndOf="@+id/button1"
        app:layout_constraintTop_toTopOf="parent" />
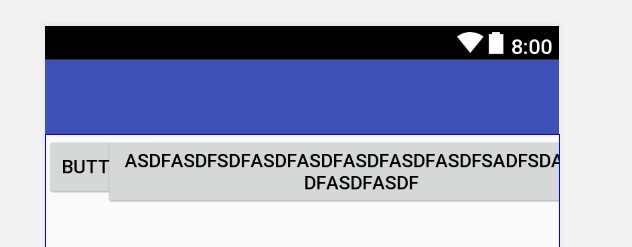
为什么会出现这样的情况呢,跟我们预期的不一样,当一个控件的两边都有约束的时候,会将这个控件居中,当这个控件宽度或者高度特别大的时候(超出屏幕),则会将左右两边超出的距离相同,上面说了,要达到MATCH_PARENT效果,需要将尺寸设置为MATCH_CONSTRAINT也就是0dp,我们来看一下结果:

Radio
ConstraintLayout里面可以设置控件的比例,对应宽高比width:height,属性为:
- layout_constraintDimensionRatio
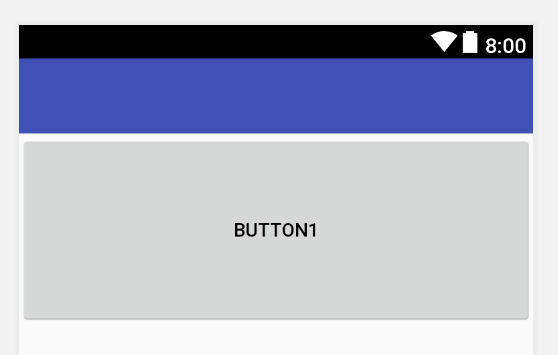
如果我们要把上面的16:6这样的写出来,那么我们先要将左右的约束设置成parent,同时设置宽高为MATCH_CONSTRAINT,然后设置layout_constraintDimensionRatio为16:6:
    <Button
        android:id="@+id/button1"
        android:layout_width="0dp"
        android:layout_height="0dp"
        android:layout_marginTop="8dp"
        android:text="Button1"
        app:layout_constraintDimensionRatio="16:6"
        app:layout_constraintEnd_toEndOf="parent"
        app:layout_constraintStart_toStartOf="parent" />
而在LinearLayout上设置却要这样写:
<LinearLayout xmlns:android="http://schemas.android.com/apk/res/android"
    android:layout_width="match_parent"
    android:layout_height="match_parent"
    android:orientation="vertical"
    android:weightSum="22">

    <Button
        android:id="@+id/button"
        android:layout_width="match_parent"
        android:layout_height="0dp"
        android:layout_weight="6"
        android:text="Button" />
</LinearLayout>
对比下,差别还是很明显的,ConstraintLayout用起来还是非常舒服的。
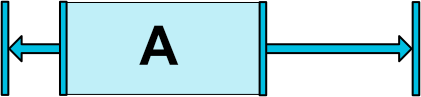
当然,还支持单方向的比例,相对应的方向的尺寸设置为MATCH_CONSTRAINT:
<!-- 宽度比例,对应的宽度即为200dp -->
android:layout_width="0dp"
android:layout_height="100dp"
app:layout_constraintDimensionRatio="W,2:1"
<!-- 高度比例,对应的高度即为100dp -->
android:layout_width="200dp"
android:layout_height="0dp"
app:layout_constraintDimensionRatio="H,2:1"
Relative positioning
Relative positioning字面意思是相对定位,这个的属性类似与相对布局(RelativeLayout)的属性,属性的值包括parent和控件的id如@+id/button,包含:
layout_constraintLeft_toLeftOflayout_constraintLeft_toRightOflayout_constraintRight_toLeftOflayout_constraintRight_toRightOflayout_constraintTop_toTopOflayout_constraintTop_toBottomOflayout_constraintBottom_toTopOflayout_constraintBottom_toBottomOflayout_constraintBaseline_toBaselineOflayout_constraintStart_toEndOflayout_constraintStart_toStartOflayout_constraintEnd_toStartOflayout_constraintEnd_toEndOf
通过上面我们可以看出,这里的属性是layout_constraintXX_toYYOf的,这里的XX和YY分别表示什么样的方向?
我们先来通过一个方向的属性来了解,其他以此类推:
layout_constraintStart_toStartOf、layout_constraintStart_toEndOf和layout_constraintEnd_toStartOf、layout_constraintEnd_toEndOf
    <Button
        android:id="@+id/button1"
        android:layout_width="wrap_content"
        android:layout_height="wrap_content"
        android:text="Button1"
        app:layout_constraintStart_toStartOf="parent"
        app:layout_constraintTop_toTopOf="parent" />

    <Button
        android:id="@+id/button2"
        android:layout_width="wrap_content"
        android:layout_height="wrap_content"
        android:text="Button2"
        app:layout_constraintStart_toEndOf="@+id/button1"
        app:layout_constraintTop_toTopOf="parent" />

    <Button
        android:id="@+id/button3"
        android:layout_width="wrap_content"
        android:layout_height="wrap_content"
        android:text="Button3"
        app:layout_constraintEnd_toEndOf="parent"
        app:layout_constraintTop_toTopOf="parent" />

    <Button
        android:id="@+id/button4"
        android:layout_width="wrap_content"
        android:layout_height="wrap_content"
        android:text="Button4"
        app:layout_constraintEnd_toStartOf="@+id/button3"
        app:layout_constraintStart_toEndOf="@+id/button2"
        app:layout_constraintTop_toTopOf="parent" />
我们来看预览图:
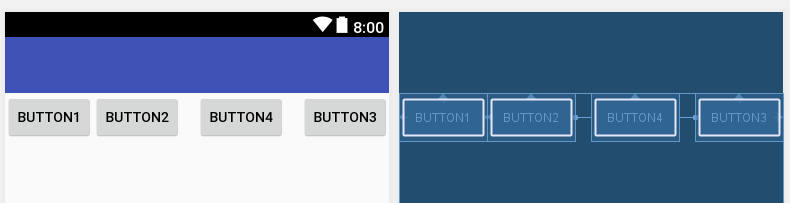
从上面看出,layout_constraintXX_toYYOf属性的XX表示当前控件的位置,YY则表示需要约束的控件的位置,下面是一个控件的各边表示:
Centering positioning and bias
字面意思就是居中定位,当我们在相对布局到时候,如果要居中一个控件的时候
<Button
        android:id="@+id/button"
        android:layout_width="wrap_content"
        android:layout_height="wrap_content"
        android:layout_centerHorizontal="true"
        android:text="Button" />
在ConstraintLayout里面,可以这样将控件居中
<Button
        android:layout_width="wrap_content"
        android:layout_height="wrap_content"
        android:text="button"
        app:layout_constraintLeft_toLeftOf="parent"
        app:layout_constraintRight_toRightOf="parent"/>
预览图都是显示居中

因为在ConstraintLayout里面,每个约束都是类似于在对应方向上,有相反的力 去拉控件,而在这里,则会水平居中显示。
bias
上面说到每个约束都是一个拉力,而bias则表示这个拉力在两边的偏重,对应横向竖向偏重:
layout_constraintHorizontal_biaslayout_constraintVertical_bias
同样用上面的栗子,加入app:layout_constraintHorizontal_bias="0.9"属性,对应左边拉力偏重90%,右边拉力偏重10%:
Margins
ConstraintLayout里面的margin与普通的属性一样,只是值不能为负数。
Note that a margin can only be positive or equals to zero, and takes a Dimension.
Margins when connected to a GONE widget
设置一个控件为GONE时的margin值,下面是包含的属性:
layout_goneMarginStartlayout_goneMarginEndlayout_goneMarginLeftlayout_goneMarginToplayout_goneMarginRightlayout_goneMarginBottom
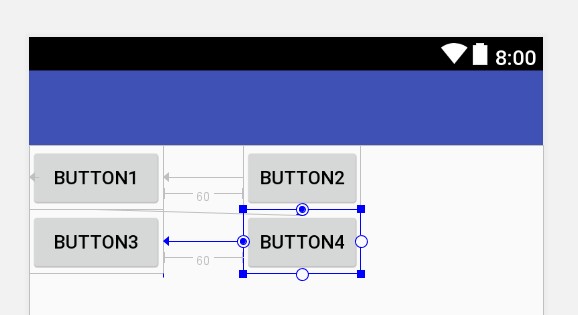
举个栗子:
    <!-- 省去一些代码 -->
    <Button
        android:id="@+id/button1"
        app:layout_constraintStart_toStartOf="parent" />
    <Button
        android:id="@+id/button2"
        android:layout_marginStart="60dp"
        app:layout_constraintStart_toEndOf="@+id/button1"
        app:layout_goneMarginStart="160dp" />
    <Button
        android:id="@+id/button3"
        app:layout_constraintStart_toStartOf="@+id/button1"
        app:layout_constraintTop_toBottomOf="@+id/button2" />
    <Button
        android:id="@+id/button4"
        android:layout_marginStart="60dp"
        app:layout_constraintStart_toEndOf="@+id/button3"
        app:layout_constraintTop_toBottomOf="@+id/button2"
        app:layout_goneMarginStart="160dp" />
预览图:
当我们将button3的设置为GONE的时候,结果为:
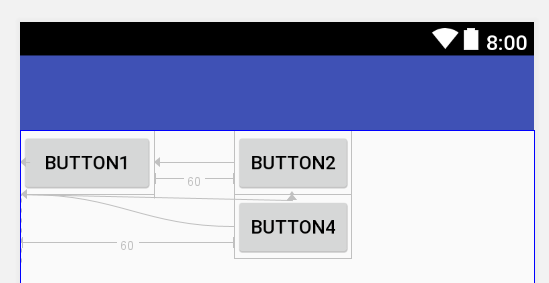
对比可以看出:
- 当设置了
goneMargin属性时候,约束的控件如果不是GONE的时候,则不会生效; - 当
goneMargin属性和margin属性同时存在的时候,margin属性不会生效。
Visibility behavior
字面意思是可见性行为,当一个控件设置为GONE的时候,在布局计算的时候仍会加进去,在布局过程中,将被解析成一个点,所有的margin也将为0,但是对于其他控件的约束仍然存在。
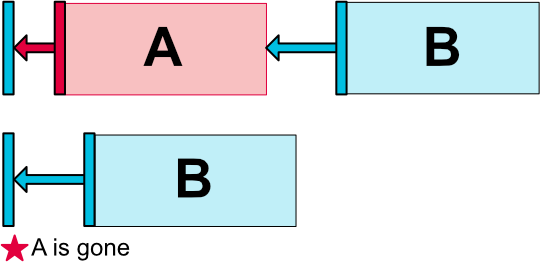
如果我们需要上面的图,在A被隐藏后,仍然保持B的位置不变,那么我们就要设置B的goneMargin的值为A的宽度和margin与B的margin值的和,也就是
goneMarginStart = A.width + A.marginStart + B.marginStart
<!-- 示例代码 -->
<Button
        android:id="@+id/button1"
        android:layout_width="100dp"
        android:layout_height="wrap_content"
        android:layout_marginStart="10dp"
        android:text="Button1"
        android:visibility="gone"
        app:layout_constraintStart_toStartOf="parent"
        app:layout_constraintTop_toTopOf="parent" />

    <Button
        android:id="@+id/button2"
        android:layout_width="100dp"
        android:layout_height="wrap_content"
        android:layout_marginStart="10dp"
        android:text="Button2"
        app:layout_constraintStart_toEndOf="@+id/button1"
        app:layout_constraintTop_toTopOf="parent"
        app:layout_goneMarginStart="120dp" />
总结
ConstraintLayout比传统布局的性能更出色,而且ConstraintLayout对于一些复杂的布局具有天然的优势,所以还没有使用ConstraintLayout的同学,赶紧加入到里面来吧,ConstraintLayout还有一些内容将在下一篇文章介绍(Chain和Guideline)。


 1万+
1万+


 被折叠的 条评论
为什么被折叠?
被折叠的 条评论
为什么被折叠?
 到【灌水乐园】发言


