


原文地址:http://www.pyimagesearch.com/2015/03/30/accessing-the-raspberry-pi-camera-with-opencv-and-Python/
###################################################################

过去一年在PyImageSearch网站上出现了许多受欢迎的博客。Using k-means clustering to find the dominant colors in an image 就是其中很受欢迎的一篇。building a kick-ass mobile document scanner是我最喜欢的文章之一,也是PyImageSearch上连续好几个月的最受欢迎的文章。我写的第一篇教程:Hobbits and Histograms,讲的是如何实现一个简单的图像搜索引擎,今天仍然有很高的点击量。
到目前为止,在PyImageSearch上最受欢迎的文章是我的installing OpenCV and Python on your Raspberry Pi 2 and B+。从这里可以看出大家对于树莓派的热爱-我也计划继续写一些关于OpenCV + 树莓派的文章。
在我出版了树莓派 + OpenCV安装教程后,许多读者希望我继续讨论如何使用Python和OpenCV访问树莓派相机(how to access the Raspberry Pi camera using Python and OpenCV)。
在本文中我们将使用picamera,它提供了一个对于相机模块的纯Python接口。接下来,我将展示如何使用picamera取捕获图像,并使用OpenCV的格式。
IMPORTANT:如果你没有在树莓派上安装和配置好OpenCV和Python,参考我的文章:OpenCV and Python on your Raspberry Pi。
OpenCV and Python versions:
本文运行在Python 2.7/Python3.4 + OpenCV2.4.X/OpenCV3.0+上(我的环境为Python2.7 + OpenCV2.4.11)
Step 1:What do I need?
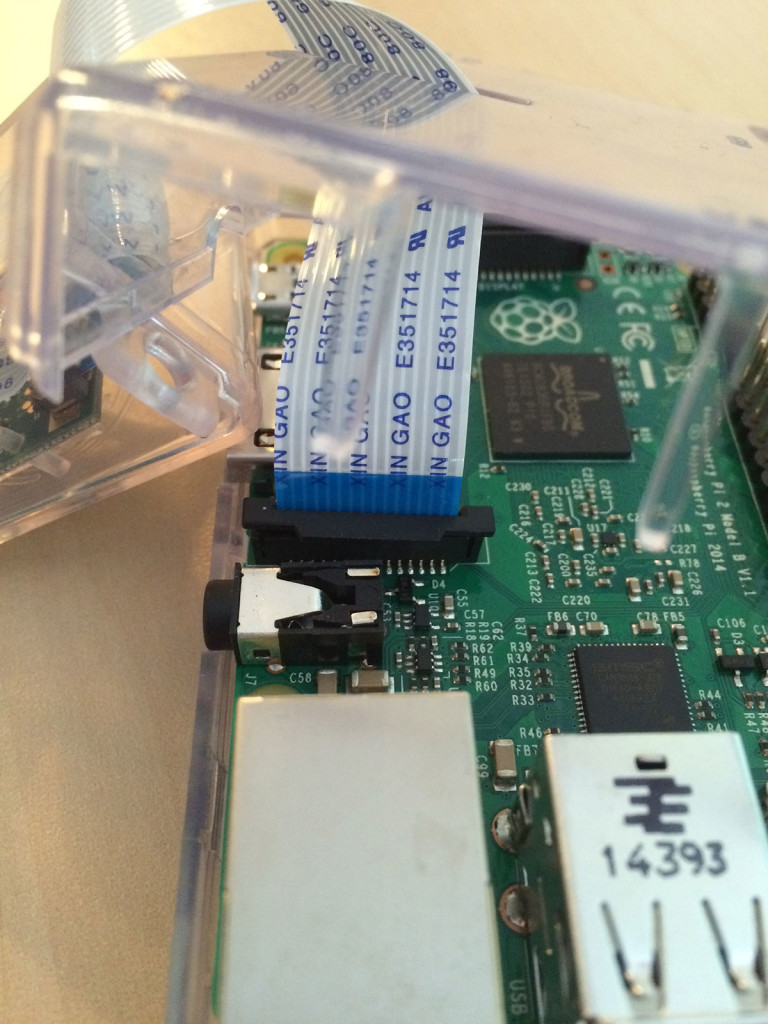
在开始之前,你需要有一个树莓派相机模块。
作者模块购买地址:5MP Raspberry Pi camera board module from Amazon,价钱在$30以下(包括邮钱)。It’s hard to believe that the camera board module is almost as expensive as the Raspberry Pi itself — but it just goes to show how much hardware has progressed over the past 5 years。
假定你已经有了相机模块,安装是很简单的,视频如下:https://youtu.be/GImeVqHQzsE
如果装好的话,应该如下图所示:
Step 2:Enable your camera module.
安装完树莓派相机模块后,需要在系统中打开相机软件。打开一个终端,执行下面命令:
sudo raspi-config
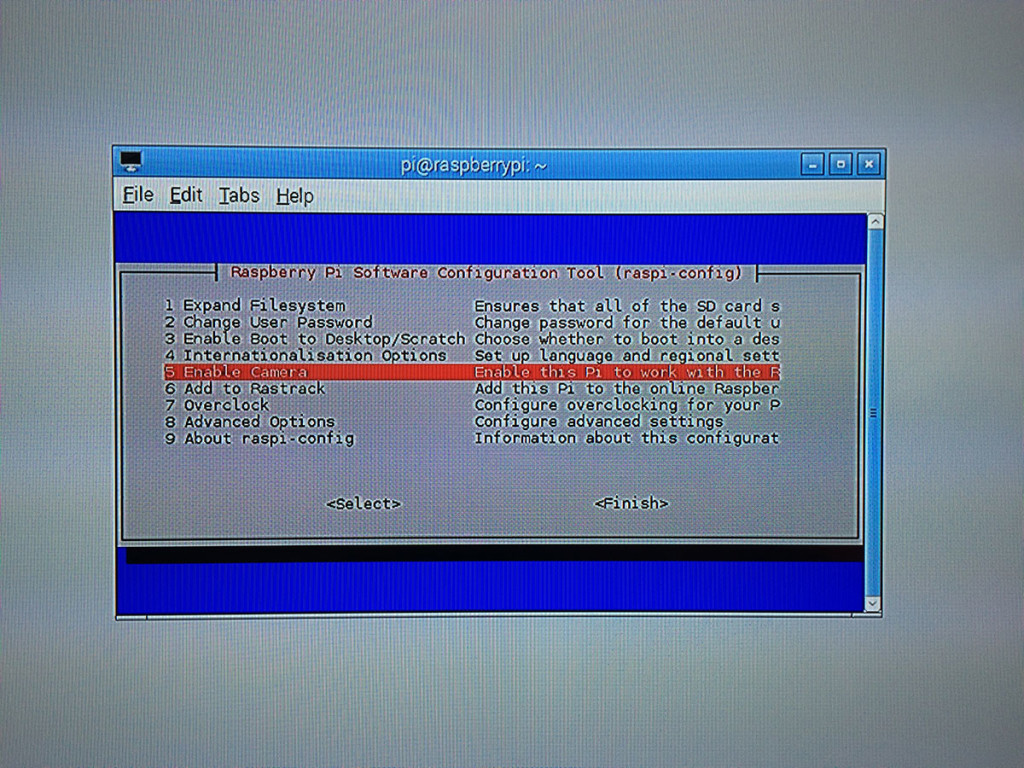
使用方向键向下滚动,点击选项 5:Enable camera去启动软件,然后滚动到Finish按钮,点击退出。最后,重启即可生效。
Step 3:Test out the camera module.
在开始代码运行之前,先进行一次完整性检查,以确保树莓派相机正常工作。
Note: Trust me, you’ll want to run this sanity check before you start working with the code. It’salways good to ensure that your camera is working prior to diving into OpenCV code, otherwise you could easily waste time wondering when your code isn’t working correctly when it’s simply the camera module itself that is causing you problems.
将树莓派与电视连接,摆放位置如下:

打开终端,执行以下命令:
raspistill -o output.jpg我在树莓派上尝试使用这一个命令,但是出现了错误如下图所示:

解决方法:其实是因为没有打开camera软件(http://blog.csdn.net/u012005313/article/details/51439448)
Here’s an example of me taking a photo of my TV monitor (so I could document the process for this tutorial) as the Raspberry Pi snaps a photo of me:
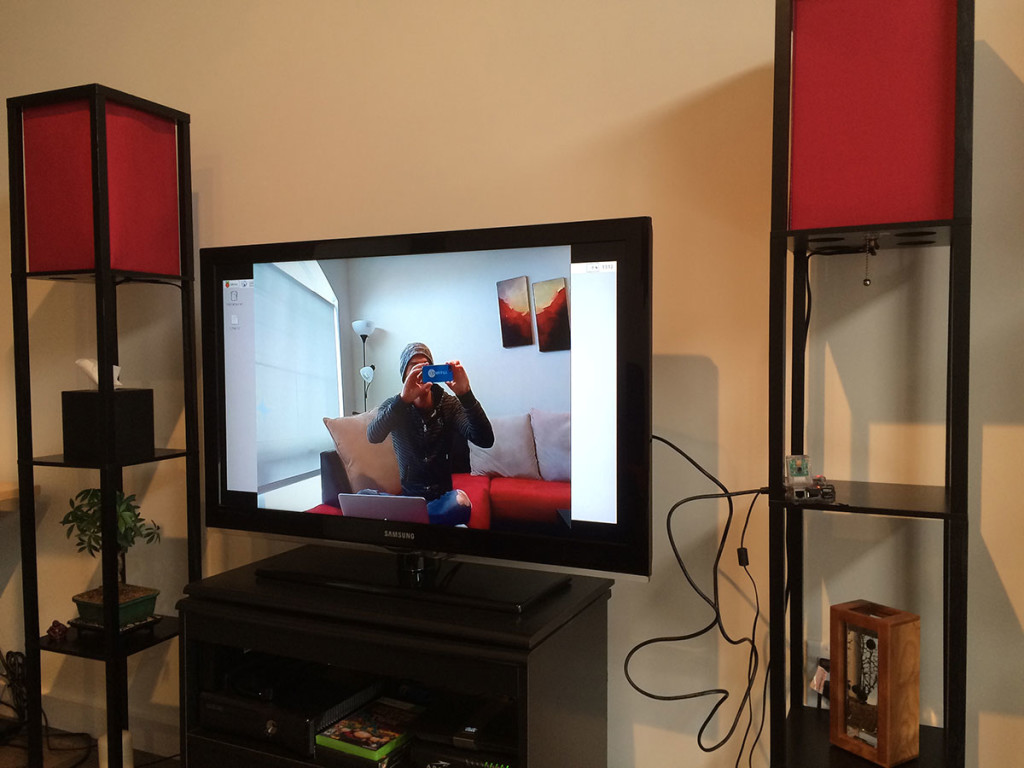
output.jpg图像如下:

很明显,我的树莓派相机可以正确运行!
Step 4:Installing picamera
从上面我们已知树莓派相机可以正确运行。但我们如何使用Python操作呢?
答案就是picamera模块。
在之前的安装教程中我们利用了virtualenv和virtualenvwrapper来安装Python包。现在,我们使用相同步骤(我没有这样做,不打算这样做的可以跳过下面一步):
在安装picamera之前,确保激活cv虚拟环境:
source ~/.profile
workon cv
By sourcing our .profile file, we ensure that we have the paths to our virtual environments setup correctly. And from there we can access our cv virtual environment.
Note: If you are installing the the picamera module system wide, you can skip the previous commands. However, if you are following along from the previous tutorial, you’ll want to make sure you are in the cv virtual environment before continuing to the next command.
然后,我们可以利用pip来安装picamera:
pip install "picamera[array]"当操作picamera模块中的方法来和相机交互时,如果我们需要使用OpenCV,我们需要使用array子模块。在Python中,OpenCV的图像格式为Numpy arrays-而array子模块允许我从树莓派相机中获取Numpy arrays。
(我直接安装了picamera-sudo pip install picamera,并不影响之后的操作)
Step 5:Accesing a single image of your Raspberry Pi using Python and OpenCV
现在,开始编写代码!
打开一个新的文件,命名为test_name.py,加入以下代码:
# import the necessary packages
from picamera.array import PiRGBArray
from picamera import PiCamera
import time
import cv2

# initialize the camera and grab a reference to the raw camera capture
camera = PiCamera()
rawCapture = PiRGBArray(camera)

# allow the camera to warmup
time.sleep(2)

# grab an image from the camera
camera.capture(rawCapture, format="bgr")
image = rawCapture.array

# display the image on screen and wait for a keypress
cv2.imshow("Image", image)
cv2.waitKey(0)
第2-5行导入了相关的包
第8行代码表示初始化PiCamera对象;第9行代码表示grab a reference to the raw capture component。rawCapture对象是及其有用的,首先它可以直接访问相机流(the camera stream),其次避免了压缩流为JPEG格式的时间,因为我们最终得到的是OpenCV图像格式。我强烈推荐在树莓派相机上使用PiRGBArray函数-因为它的性能。
接下来在第12行,我们sleep2秒-必须这样做,为了让相机传感器足够活跃。
第15行我们从相机上捕获了一张图片,保存在rawCapture对象上,并且明确图像颜色排列为BGR而不是RGB-这是因为OpenCV的图像在Python中的格式为BGR而不是RGB。这很重要,不注意这个很可能会产生错误的结果。
最后,第19和第20行展示了捕获的图片。
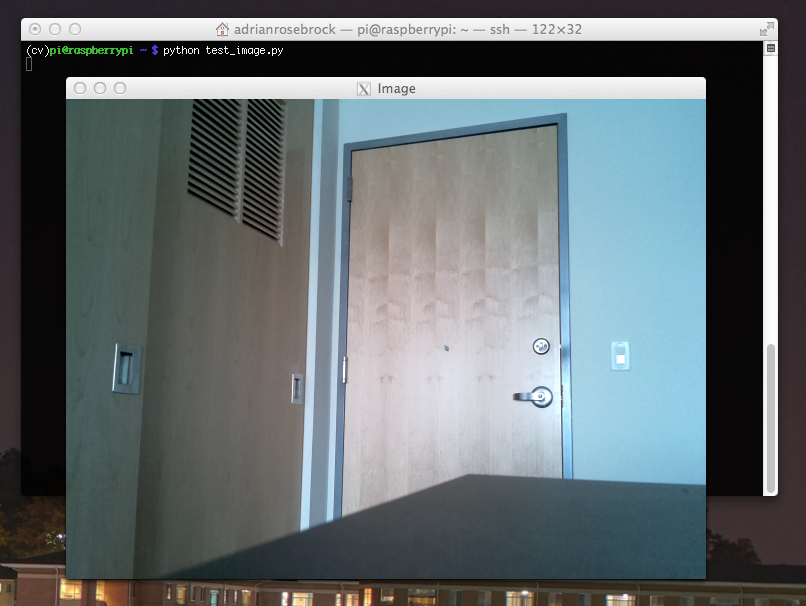
运行上面代码:
python test_image.py如果一切顺利,你能得到一张图片:
Note: I decided to add this section of the blog post after I had finished up the rest of the article, so I did not have my camera setup facing the couch (I was actually playing with some custom home surveillance software I was working on). Sorry for any confusion, but rest assured, everything will work as advertised provided you have followed the instructions in the article!
Step 6:Accessing the video stream of your Raspberry Pi using Python and OpenCV
上面演示了如何使用树莓派相机拍摄一张图片,下面将处理一个视频流。
你可能认为我们会使用cv2.VideoCapture函数-但实际上我并不推荐这个。使用cv2.VideoCapture使可以在树莓派上运行成功,但操作不是简单(你需要安装额外的驱动),实际上你可以避免。
其实我们可以通过picamera模块来快速访问(easily access)原始视频流(the raw video stream)。
打开一个文件,命名为test_video.py,代码如下:
Accessing the Raspberry Pi Camera with OpenCV and PythonPython

# import the necessary packages
from picamera.array import PiRGBArray
from picamera import PiCamera
import time
import cv2

# initialize the camera and grab a reference to the raw camera capture
camera = PiCamera()
camera.resolution = (640, 480)
camera.framerate = 32
rawCapture = PiRGBArray(camera, size=(640, 480))

# allow the camera to warmup
time.sleep(2)

# capture frames from the camera
for frame in camera.capture_continuous(rawCapture, format="bgr", use_video_port=True):
	# grab the raw NumPy array representing the image, then initialize the timestamp
	# and occupied/unoccupied text
	image = frame.array

	# show the frame
	cv2.imshow("Frame", image)
	key = cv2.waitKey(1) & 0xFF

	# clear the stream in preparation for the next frame
	rawCapture.truncate(0)

	# if the `q` key was pressed, break from the loop
	if key == ord("q"):
		break
第8行构造了camera对象,使用它可以和树莓派相机进行交互;
第9行我们设置了相机的分辨率(640x480像素);
第10行设置了帧率(the frame rate,即 frames per second,或者FPS);
在第11行初始化了PIRGBArray对象,同时指定了相同的分辨率。
在第17行代码中,我们调用camera对象的函数capture_continuous来访问视频流。该方法返回一帧图像,这帧图像有一个array属性,表示Numpy array格式的图像-所以在第20行image得到的就是Numpy array格式的图像。all the hard work is done for us on Lines 17 and 20!
第23和24行显示了这帧图片。
注意:在装载下一帧图像之前,必须清空当前帧。第28行执行这一功能。
如果你没有使用第28行代码,Python脚本将会抛出一个错误-so be sure to pay close attention to this when implementing your own applications!
最后,如果使用者点击'q'键,表示退出循环,结束程序。
运行上面代码:
python test_video.py即可使用OpenCV展示视频
As you can see, the Raspberry Pi camera’s video stream is being read by OpenCV and then displayed on screen! Furthermore, the Raspberry Pi camera shows no lag when accessing frames at 32 FPS. Granted, we are not doing any processing on the individual frames, but as I’ll show in future blog posts, the Pi 2 can easily keep up 24-32 FPS even when processing each frame.


 935
935

 被折叠的 条评论
为什么被折叠?
被折叠的 条评论
为什么被折叠?
 到【灌水乐园】发言


