


参考:
Android 线程通信(Handler + Message + Looper) 0 - 前言
Android 使用 Looper 类进行消息队列的创建和管理
主要内容:
Handler运行在子线程Looper.prepare()Looper.loop()Looper浅析Looper终止
Handler 运行在子线程
Handler 运行在子线程
之前的简单使用例子在子线程中发送消息,主线程处理消息。下面代码实现子线程处理消息,在主线程发送消息
创建线程类 MyThread,定义成员变量 Handler,在 run() 方法中创建 Handler 对象,并实现其 handleMessage 方法
class MyThread extends Thread {
    private static final String TAG = "MyThread";
    Handler handler;

    @Override
    public void run() {
        handler = new Handler() {
            @Override
            public void handleMessage(Message msg) {
                Log.e(TAG, "handleMessage: " + Thread.currentThread().getName());
            }
        };

        Log.e(TAG, "run: " + Thread.currentThread().getName());
    }
}
在主线程中创建 MyThread 对象,启动并发送消息
public class MainActivity extends AppCompatActivity {
    private static final String TAG = "MainActivity";

    @Override
    protected void onCreate(Bundle savedInstanceState) {
        super.onCreate(savedInstanceState);
        setContentView(R.layout.activity_main);

        MyThread thread = new MyThread();
        thread.start();

        Log.e(TAG, "onCreate: " + Thread.currentThread().getName());
        try {
            Thread.sleep(2000);
        } catch (InterruptedException e) {
            e.printStackTrace();
        }

        Message msg = Message.obtain(thread.handler, 1, 2, 3);
        msg.sendToTarget();
    }
}
程序在创建 Handler 对象的时候出错:

Looper.prepare()
Looper.prepare()
进入 Handler 类,查看关键代码如下:
final Looper mLooper;
...
public Handler(Callback callback, boolean async) {
    ...

    mLooper = Looper.myLooper();
    if (mLooper == null) {
        throw new RuntimeException(
            "Can't create handler inside thread that has not called Looper.prepare()");
    }
    ...
}
调用类 Looper 的方法 myLooper(),得到 Looper 对象,如果为空,抛出异常
Looper.myLooper() 实现如下:
/**
 * Return the Looper object associated with the current thread.  Returns
 * null if the calling thread is not associated with a Looper.
 */
public static @Nullable Looper myLooper() {
    return sThreadLocal.get();
}
myLooper 方法的作用是返回和当前线程关联的 Looper 对象,如果调用线程没有和一个 Looper 对象绑定,那么返回空
同时,抛出的异常也给出了提示
java.lang.RuntimeException: Can’t create handler inside thread that has not called Looper.prepare()
查看 Looper.prepare 方法实现:
 /** Initialize the current thread as a looper.
  * This gives you a chance to create handlers that then reference
  * this looper, before actually starting the loop. Be sure to call
  * {@link #loop()} after calling this method, and end it by calling
  * {@link #quit()}.
  */
public static void prepare() {
    prepare(true);
}

private static void prepare(boolean quitAllowed) {
    if (sThreadLocal.get() != null) {
        throw new RuntimeException("Only one Looper may be created per thread");
    }
    sThreadLocal.set(new Looper(quitAllowed));
}

private Looper(boolean quitAllowed) {
    mQueue = new MessageQueue(quitAllowed);
    mThread = Thread.currentThread();
}
由上面代码可知,调用 Looper.prepare() 方法后,将会创建一个新的 Looper 对象与当前线程绑定
并且,代码中也提到了,每个线程仅能匹配一个 Looper 对象
修改线程代码,在创建 Handler 对象之前,调用方法 Looper.prepare:
@Override
public void run() {
    Looper.prepare();

    handler = new Handler() {
        @Override
        public void handleMessage(Message msg) {
            Log.e(TAG, "handleMessage: " + Thread.currentThread().getName());
        }
    };

    Log.e(TAG, "run: " + Thread.currentThread().getName());
}
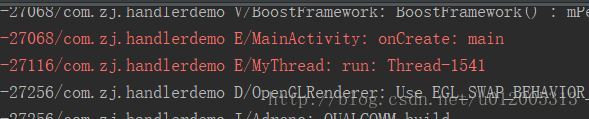
运行成功,但是发送的消息并没有得到处理
Looper.loop()
Looper.loop()
类 Looper 使用方法 loop() 来不断检索消息队列,并发送给对应的 Handler 处理
/**
 * Run the message queue in this thread. Be sure to call
 * {@link #quit()} to end the loop.
 */
public static void loop() {
    final Looper me = myLooper();
    if (me == null) {
        throw new RuntimeException("No Looper; Looper.prepare() wasn't called on this thread.");
    }
    final MessageQueue queue = me.mQueue;

    // Make sure the identity of this thread is that of the local process,
    // and keep track of what that identity token actually is.
    Binder.clearCallingIdentity();
    final long ident = Binder.clearCallingIdentity();

    for (;;) {
        Message msg = queue.next(); // might block
        if (msg == null) {
            // No message indicates that the message queue is quitting.
            return;
        }

        // This must be in a local variable, in case a UI event sets the logger
        final Printer logging = me.mLogging;
        if (logging != null) {
            logging.println(">>>>> Dispatching to " + msg.target + " " +
                    msg.callback + ": " + msg.what);
        }

        final long traceTag = me.mTraceTag;
        if (traceTag != 0 && Trace.isTagEnabled(traceTag)) {
            Trace.traceBegin(traceTag, msg.target.getTraceName(msg));
        }
        try {
            msg.target.dispatchMessage(msg);
        } finally {
            if (traceTag != 0) {
                Trace.traceEnd(traceTag);
            }
        }

        if (logging != null) {
            logging.println("<<<<< Finished to " + msg.target + " " + msg.callback);
        }

        // Make sure that during the course of dispatching the
        // identity of the thread wasn't corrupted.
        final long newIdent = Binder.clearCallingIdentity();
        if (ident != newIdent) {
            Log.wtf(TAG, "Thread identity changed from 0x"
                    + Long.toHexString(ident) + " to 0x"
                    + Long.toHexString(newIdent) + " while dispatching to "
                    + msg.target.getClass().getName() + " "
                    + msg.callback + " what=" + msg.what);
        }

        msg.recycleUnchecked();
    }
}
首先获取当前线程的 Looper 对象,以及对应的消息队列
接下来是一个无限的 for 循环,不断获取消息队列的消息,并发送到 Handler 对象进行处理
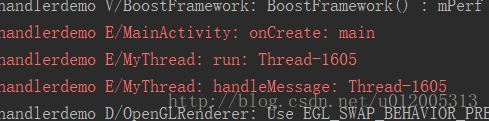
再次修改代码,加入 Looper.loop 方法,运行成功:
public class MainActivity extends AppCompatActivity {
    private static final String TAG = "MainActivity";

    @Override
    protected void onCreate(Bundle savedInstanceState) {
        super.onCreate(savedInstanceState);
        setContentView(R.layout.activity_main);

        MyThread thread = new MyThread();
        thread.start();

        Log.e(TAG, "onCreate: " + Thread.currentThread().getName());
        try {
            Thread.sleep(200);
        } catch (InterruptedException e) {
            e.printStackTrace();
        }

        Message msg = Message.obtain(thread.handler, 1, 2, 3);
        msg.sendToTarget();
    }
}

class MyThread extends Thread {
    private static final String TAG = "MyThread";
    Handler handler;

    @Override
    public void run() {
        Looper.prepare();

        handler = new Handler() {
            @Override
            public void handleMessage(Message msg) {
                Log.e(TAG, "handleMessage: " + Thread.currentThread().getName());
            }
        };

        Log.e(TAG, "run: " + Thread.currentThread().getName());
        Looper.loop();
    }
}
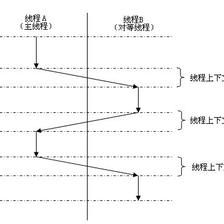
Looper 浅析
Looper 浅析
Looper 类用于为线程管理消息队列,默认线程没有消息队列,所以必须调用 Looper.prepare 方法进行创建,同时调用方法 loop 进行消息的传递
Android 教程给出了一个在线程中处理消息的例程:
class LooperThread extends Thread {
  public Handler mHandler;

  public void run() {
      Looper.prepare();

      mHandler = new Handler() {
          public void handleMessage(Message msg) {
              // process incoming messages here
          }
      };

      Looper.loop();
  }
}
主线程中的 Looper
Android 系统已经在 main 函数运行时启动了消息队列,具体代码在 ActivityThread.java 的 main 方法中:
public static void main(String[] args) {
    ...

    Looper.prepareMainLooper();

    ...

    Looper.loop();

    ...
}
日志记录
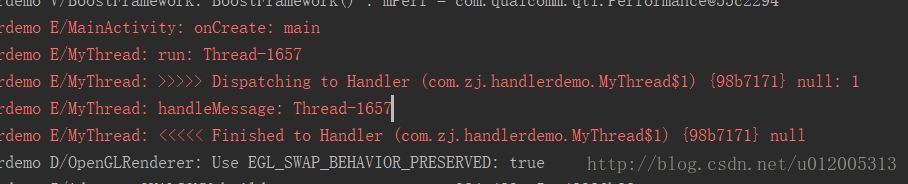
类 Looper 提供了函数 setMessageLogging,可以打印出消息调度开始和结束的信息:
/**
 * Control logging of messages as they are processed by this Looper.  If
 * enabled, a log message will be written to <var>printer</var>
 * at the beginning and ending of each message dispatch, identifying the
 * target Handler and message contents.
 *
 * @param printer A Printer object that will receive log messages, or
 * null to disable message logging.
 */
public void setMessageLogging(@Nullable Printer printer) {
    mLogging = printer;
}
接口 Printer 结构如下:
/**
 * Simple interface for printing text, allowing redirection to various
 * targets.  Standard implementations are {@link android.util.LogPrinter},
 * {@link android.util.StringBuilderPrinter}, and
 * {@link android.util.PrintWriterPrinter}.
 */
public interface Printer {
    /**
     * Write a line of text to the output.  There is no need to terminate
     * the given string with a newline.
     */
    void println(String x);
}
println
仅包含一个函数,Android系统也提供了3个实现类,其中类LogPrinter可以将日志打印在LogCat` 上:
/**
 * Implementation of a {@link android.util.Printer} that sends its output
 * to the system log.
 */
public class LogPrinter implements Printer {
    private final int mPriority;
    private final String mTag;
    private final int mBuffer;

    /**
     * Create a new Printer that sends to the log with the given priority
     * and tag.
     *
     * @param priority The desired log priority:
     * {@link android.util.Log#VERBOSE Log.VERBOSE},
     * {@link android.util.Log#DEBUG Log.DEBUG},
     * {@link android.util.Log#INFO Log.INFO},
     * {@link android.util.Log#WARN Log.WARN}, or
     * {@link android.util.Log#ERROR Log.ERROR}.
     * @param tag A string tag to associate with each printed log statement.
     */
    public LogPrinter(int priority, String tag) {
        mPriority = priority;
        mTag = tag;
        mBuffer = Log.LOG_ID_MAIN;
    }

    /**
     * @hide
     * Same as above, but buffer is one of the LOG_ID_ constants from android.util.Log.
     */
    public LogPrinter(int priority, String tag, int buffer) {
        mPriority = priority;
        mTag = tag;
        mBuffer = buffer;
    }

    public void println(String x) {
        Log.println_native(mBuffer, mPriority, mTag, x);
    }
}
修改上面代码如下:
@Override
public void run() {
    Looper.prepare();

    Looper.myLooper().setMessageLogging(new LogPrinter(Log.ERROR, TAG));

    ...

    Log.e(TAG, "run: " + Thread.currentThread().getName());
    Looper.loop();
}
Looper 终止
Looper 终止
由于 Looper.loop 是一个无限循环,所以如果在线程中绑定消息队列,必须显式终止,Looper 类提供了两个方法 quit() 和 quitSafely()
方法 quit 将舍弃未处理的消息;方法 quitSafely 将处理完消息队列中的消息后在结束
public void quit() {
    mQueue.quit(false);
}

public void quitSafely() {
    mQueue.quit(true);
}
由源码可知,它们均是调用了消息队列的 quit() 方法
void quit(boolean safe) {
    if (!mQuitAllowed) {
        throw new IllegalStateException("Main thread not allowed to quit.");
    }

    synchronized (this) {
        if (mQuitting) {
            return;
        }
        mQuitting = true;

        if (safe) {
            removeAllFutureMessagesLocked();
        } else {
            removeAllMessagesLocked();
        }

        // We can assume mPtr != 0 because mQuitting was previously false.
        nativeWake(mPtr);
    }
}
由源码可知,主线程 Looper 对象不允许结束
如果参数 safe 为空,调用 removeAllMessagesLocked();否则,调用 removeAllFutureMessagesLocked()
private void removeAllMessagesLocked() {
    Message p = mMessages;
    while (p != null) {
        Message n = p.next;
        p.recycleUnchecked();
        p = n;
    }
    mMessages = null;
}

private void removeAllFutureMessagesLocked() {
    final long now = SystemClock.uptimeMillis();
    Message p = mMessages;
    if (p != null) {
        if (p.when > now) {
            removeAllMessagesLocked();
        } else {
            Message n;
            for (;;) {
                n = p.next;
                if (n == null) {
                    return;
                }
                if (n.when > now) {
                    break;
                }
                p = n;
            }
            p.next = null;
            do {
                p = n;
                n = p.next;
                p.recycleUnchecked();
            } while (n != null);
        }
    }
}
最终还是调用 Message 类的 recycleUnchecked() 方法,将实例返回线程池中


 760
760

 被折叠的 条评论
为什么被折叠?
被折叠的 条评论
为什么被折叠?
 到【灌水乐园】发言


