


在图像处理中,除了常用的Opencv外,还有一些常用的图像库,比如Gdal库、CxImage库等。接下来就将常用的Gdal库读取图像数据和生成图像的函数,和简单的库的配置总结下。
函数和相关的源码和需要配置的文件已经打包上传,现在就将相关的注意和配置的步骤说下。
步骤
1、将Include和Lib文件夹复制在工程目录下
2、在工程设置配置中的 VC++ Directories -> Include Directories中,
添加刚复制的Include文件夹下面的Gdal文件夹。
3、在工程设置配置中的 VC++ Directories -> Library Directories中,
添加刚复制的Lib文件夹下面的Gdal文件夹。
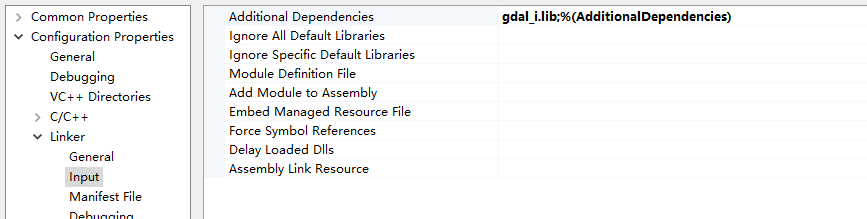
4、在工程设置配置中的 Linker -> Input -> Additional Dependencices中,
添加 gdal_i.lib即可
5、如果需要在Release下同样按照上面的步骤既可以。
6、将gdal200.dll文件复制到Debug或者是Release文件夹下 :
相关读取和生成图像的函数贴在下面:
1、读取图像数据函数
unsigned char** GdalReadImgData(string imgPathSrc, int &nImgWidth, int &nImgHeight, int &nImgBandNum)
{
	//注册、读取图像
	GDALAllRegister();
	CPLSetConfigOption("GDAL_FILENAME_IS_UTF8", "NO");
	GDALDataset* pInDataset1 = (GDALDataset*)GDALOpen(imgPathSrc.c_str(), GA_ReadOnly);
	if (pInDataset1 == NULL)
	{
		cout << "无法打开图像!" << endl;
		GDALDestroyDriverManager();
	}

	//读取图像数据的参数并显示
	nImgWidth = pInDataset1->GetRasterXSize();
	nImgHeight = pInDataset1->GetRasterYSize();
	nImgBandNum = pInDataset1->GetRasterCount();
	cout << "原始图像宽度 = " << nImgWidth << endl;
	cout << "原始图像高度 = " << nImgHeight << endl;
	cout << "原始图像波段 = " << nImgBandNum << endl;

	cout << "Start read the Image data !" << endl;
	int i = 0, j = 0;

	//开辟内存
	unsigned char **pImgData;
	pImgData = new unsigned char *[nImgBandNum];
	for (int m = 0; m < nImgBandNum; m++)
		pImgData[m] = new unsigned char[nImgHeight * nImgWidth];

	for (i = 1; i <= nImgBandNum; i++)
	{
		GDALRasterBand * pInRasterBand1 = pInDataset1->GetRasterBand(i);
		CPLErr error;
		error = pInRasterBand1->RasterIO(GF_Read, 0, 0, nImgWidth, nImgHeight, pImgData[i - 1], nImgWidth, nImgHeight, GDT_Byte, 0, 0);
		if (error == CE_Failure)
		{
			cout << "读取图像数据时出错!" << endl;
			GDALDestroyDriverManager();
		}
	}

	//关闭gdal库相关的波段驱动和释放内存
	cout << "Finished read the Image !" << endl;
	GDALClose(pInDataset1);

	return pImgData;
}
bool GdalCreateImgData(unsigned char **pImageData, int width, int height, int nChannels, string savePath)
{
	//注册驱动
	GDALAllRegister();
	CPLSetConfigOption("GDAL_FILENAME_IS_UTF8", "NO");   //支持中文路径

	GDALDriver *pMemDriver = NULL;
	pMemDriver = GetGDALDriverManager()->GetDriverByName("GTiff");
	if (pMemDriver == NULL)
		return false;

	GDALDataset * pMemDataSet = pMemDriver->Create(savePath.c_str(), width, height, nChannels, GDT_Byte, NULL);
	if (pMemDataSet == NULL)
	{
		cout << "创建图像数据出错!" << endl;
		return  false;
	}
	GDALRasterBand *pBand = NULL;

	for (int i = 1; i <= nChannels; i++)
	{
		pBand = pMemDataSet->GetRasterBand(i);
		CPLErr err = pBand->RasterIO
			(GF_Write,
			0,
			0,
			width,
			height,
			pImageData[i - 1],
			width,
			height,
			GDT_Byte,
			0,
			0);
		if (err == CE_Failure)
		{
			cout << "保存图像数据出错" << endl;
			return  false;
		}
	}

	//关闭驱动
	GDALClose(pMemDataSet);
	GetGDALDriverManager()->DeregisterDriver(pMemDriver);

	cout << "Finished Write the Image data!" << endl;
	return true;
}
以及:
将gdal200.dll文件复制到整个过程的Debug或者是Release文件夹下即可。


 1224
1224


 被折叠的 条评论
为什么被折叠?
被折叠的 条评论
为什么被折叠?
 到【灌水乐园】发言


