


CUnit 安装
本次安装的 Cunit 版本为 2.1.3 。
从CUnit下载网址下载好 CUnit 2.1.3 源码后,依次输入下述命令构建安装 CUnit 。
sudo apt install automake
sudo apt install libtool

~/Downloads$ tar -jxvf CUnit-2.1-3.tar.bz2
~/Downloads$ cd CUnit-2.1-3
~/Downloads/CUnit-2.1-3$ aclocal
~/Downloads/CUnit-2.1-3$ autoheader
~/Downloads/CUnit-2.1-3$ libtoolize
~/Downloads/CUnit-2.1-3$ automake --add-missing
~/Downloads/CUnit-2.1-3$ autoconf
~/Downloads/CUnit-2.1-3$ automake
~/Downloads/CUnit-2.1-3$ ./configure --prefix <install directory>
~/Downloads/CUnit-2.1-3$ make
~/Downloads/CUnit-2.1-3$ sudo make install
以下都假设 <install directory> 为 /opt/CUnit 。
这个时候头文件和库文件分别在 /opt/CUnit/include 和 /opt/CUnit/lib 目录下,
/opt/CUnit/include$ ls
CUnit

/opt/CUnit/lib$ ls
libcunit.a  libcunit.la  libcunit.so  libcunit.so.1  libcunit.so.1.0.1  pkgconfig
不过此时不太方便使用,需要我们手动指定头文件搜索路径和库文件搜索路径。现在我们在系统的头文件和库文件搜索路径下创建个软连接解决这个问题。
tangjia@tangjia-VirtualBox:/usr/local/include$ sudo ln -s /opt/CUnit/include/CUnit/   CUnit
tangjia@tangjia-VirtualBox:/usr/local/include$ ls -l
lrwxrwxrwx 1 root root 25 6月  22 11:10 CUnit -> /opt/CUnit/include/CUnit/

tangjia@tangjia-VirtualBox:/usr/local/lib$ sudo ln -s /opt/CUnit/lib/libcunit.a libcunit.a
tangjia@tangjia-VirtualBox:/usr/local/lib$ ls -l
lrwxrwxrwx 1 root root    25 6月  22 11:11 libcunit.a -> /opt/CUnit/lib/libcunit.a
这样整个 CUnit 就安装好了,现在来测试一下。
创建一个 test.c 文件,输入下述官方例程:
/*
 *  Simple example of a CUnit unit test.
 *
 *  This program (crudely) demonstrates a very simple "black box"
 *  test of the standard library functions fprintf() and fread().
 *  It uses suite initialization and cleanup functions to open
 *  and close a common temporary file used by the test functions.
 *  The test functions then write to and read from the temporary
 *  file in the course of testing the library functions.
 *
 *  The 2 test functions are added to a single CUnit suite, and
 *  then run using the CUnit Basic interface.  The output of the
 *  program (on CUnit version 2.0-2) is:
 *
 *           CUnit : A Unit testing framework for C.
 *           http://cunit.sourceforge.net/
 *
 *       Suite: Suite_1
 *         Test: test of fprintf() ... passed
 *         Test: test of fread() ... passed
 *
 *       --Run Summary: Type      Total     Ran  Passed  Failed
 *                      suites        1       1     n/a       0
 *                      tests         2       2       2       0
 *                      asserts       5       5       5       0
 */

#include <stdio.h>
#include <string.h>
#include "CUnit/Basic.h"

/* Pointer to the file used by the tests. */
static FILE* temp_file = NULL;

/* The suite initialization function.
 * Opens the temporary file used by the tests.
 * Returns zero on success, non-zero otherwise.
 */
int init_suite1(void)
{
   if (NULL == (temp_file = fopen("temp.txt", "w+"))) {
      return -1;
   }
   else {
      return 0;
   }
}

/* The suite cleanup function.
 * Closes the temporary file used by the tests.
 * Returns zero on success, non-zero otherwise.
 */
int clean_suite1(void)
{
   if (0 != fclose(temp_file)) {
      return -1;
   }
   else {
      temp_file = NULL;
      return 0;
   }
}

/* Simple test of fprintf().
 * Writes test data to the temporary file and checks
 * whether the expected number of bytes were written.
 */
void testFPRINTF(void)
{
   int i1 = 10;

   if (NULL != temp_file) {
      CU_ASSERT(0 == fprintf(temp_file, ""));
      CU_ASSERT(2 == fprintf(temp_file, "Q\n"));
      CU_ASSERT(7 == fprintf(temp_file, "i1 = %d", i1));
   }
}

/* Simple test of fread().
 * Reads the data previously written by testFPRINTF()
 * and checks whether the expected characters are present.
 * Must be run after testFPRINTF().
 */
void testFREAD(void)
{
   unsigned char buffer[20];

   if (NULL != temp_file) {
      rewind(temp_file);
      CU_ASSERT(9 == fread(buffer, sizeof(unsigned char), 20, temp_file));
      CU_ASSERT(0 == strncmp(buffer, "Q\ni1 = 10", 9));
   }
}

/* The main() function for setting up and running the tests.
 * Returns a CUE_SUCCESS on successful running, another
 * CUnit error code on failure.
 */
int main()
{
   CU_pSuite pSuite = NULL;

   /* initialize the CUnit test registry */
   if (CUE_SUCCESS != CU_initialize_registry())
      return CU_get_error();

   /* add a suite to the registry */
   pSuite = CU_add_suite("Suite_1", init_suite1, clean_suite1);
   if (NULL == pSuite) {
      CU_cleanup_registry();
      return CU_get_error();
   }

   /* add the tests to the suite */
   /* NOTE - ORDER IS IMPORTANT - MUST TEST fread() AFTER fprintf() */
   if ((NULL == CU_add_test(pSuite, "test of fprintf()", testFPRINTF)) ||
       (NULL == CU_add_test(pSuite, "test of fread()", testFREAD)))
   {
      CU_cleanup_registry();
      return CU_get_error();
   }

   /* Run all tests using the CUnit Basic interface */
   CU_basic_set_mode(CU_BRM_VERBOSE);
   CU_basic_run_tests();
   CU_cleanup_registry();
   return CU_get_error();
}
编译链接执行:
tangjia@tangjia-VirtualBox:~$ gcc -o test test.c -lcunit
tangjia@tangjia-VirtualBox:~$ ./test


或者:
tangjia@tangjia-VirtualBox:~$ gcc -o test testcase.c -I./include -L./lib -lcunit -static
如果使用动态库的方式,需要临时生效环境变量:export LD_LIBRARY_PATH=./lib:$LD_LIBRARY_PATH
可以看见有如下结果:
     CUnit - A unit testing framework for C - Version 2.1-3
     http://cunit.sourceforge.net/


Suite: Suite_1
  Test: test of fprintf() ...passed
  Test: test of fread() ...passed

Run Summary:    Type  Total    Ran Passed Failed Inactive
              suites      1      1    n/a      0        0
               tests      2      2      2      0        0
             asserts      5      5      5      0      n/a

Elapsed time =    0.000 seconds
作者:tang_jia
链接:https://www.jianshu.com/p/250e31aa7280
来源:简书
著作权归作者所有。商业转载请联系作者获得授权,非商业转载请注明出处。
如果能联网的话,直接
yum install CUnit-devel.x86_64
就完成安装了,注意要安装devel版本,这样才能找到头文件。
编写单元测试代码
CUnit的测试是单线程启动,只能注册一个Test Registry, 一次测试(Test Registry)可以运行多个测试包(Test Suite),而每个测试包可以包括多个测试用例(Test Case),每个测试用例又包含一个或者多个断言类的语句。
具体到程序的结构上,一次测试下辖多个Test Suite,它对应于程序中各个独立模块;一个Suite管理多个Test Case,它对应于模块内部函数实现。每个Suite可以含有setup和teardown函数,分别在执行suite的前后调用。
以下给出一个最简单的示例代码,用的时候,把示例代码直接拷贝走,按自己的实际code,稍微改动一下,就可以用了。
代码包括4个文件:
- module.c
- module.h 前两个文件是我们待测试的模块代码。为了简单起见,这里面只有一个函数。
- cunit_sample.c:测试代码所在文件。简单起见,这里只有一个文件,实际可能会将不同模块的测试代码放到不同的文件中。
- Makefile: 执行make clean all生成测试的可执行文件。
源代码
module.c
int func1(int k) {
    if (k < 10) {
        return k;
    } else {
        return k + 1;
    }
}
module.h
#ifndef __CUNIT_SAMPLE_MODULE_
#define __CUNIT_SAMPLE_MODULE_

int func1(int k);

#endif
cunit_sample.c
#include <stdio.h>
#include "CUnit.h"
#include "Automated.h"

#include "module.h"

void utcase_first_case()
{
    int ret = 0;
    ret = func1(10);
    CU_ASSERT_EQUAL(ret, 11);
}

static CU_TestInfo ut_cases[] =
{
    {"case:first_case", utcase_first_case},
    // add more cases here
    CU_TEST_INFO_NULL,
};

int suite_init(void)
{
    return 0;
}

int suite_clean(void)
{
    return 0;
}

static CU_SuiteInfo ut_suites[] =
{
    {"my_first_suite", suite_init, suite_clean, ut_cases},
    CU_SUITE_INFO_NULL,
};

int main() {
    int rc = 0;
    CU_ErrorCode err = CUE_SUCCESS;

    err = CU_initialize_registry();
    if (err != CUE_SUCCESS) {
        fprintf(stderr, "failed to initialize registry, error %d", err);
        rc = 1;
        goto l_out;
    }

    err = CU_register_suites(ut_suites);
    if (err != CUE_SUCCESS) {
        fprintf(stderr, "failed to register suites, error %d, %s", err, CU_get_error_msg());
        rc = 1;
        goto l_clean_register;
    }

    CU_set_output_filename("cunit_sample");

    err = CU_list_tests_to_file();
    if (err != CUE_SUCCESS) {
        fprintf(stderr, "failed to list tests to file, error %d, %s", err, CU_get_error_msg());
        rc = 1;
        goto l_clean_register;
    }

    CU_automated_run_tests();

l_clean_register:
    CU_cleanup_registry();

l_out:
    return rc;
}
Makefile
NY: all clean
RM = rm
RMFLAGS = -fr
CC = gcc

INC = -I /usr/include/CUnit -I .
LIBS = /usr/lib64/libcunit.so
CFLAGS = -fprofile-arcs -ftest-coverage
CFLAGS += $(INC)
BIN = cunit_sample
all: module.c module.h cunit_sample.c
    $(CC) $(CFLAGS) -o module.o -c module.c
    $(CC) $(CFLAGS) -o cunit_sample.o -c cunit_sample.c
    $(CC) $(CFLAGS) $(LIBS) -o $(BIN) module.o cunit_sample.o

clean:
    $(RM) $(RMFLAGS) $(BIN) *.o *.gcda *.gcno *.xml
执行测试用例
执行make clean all后,生成cunit_sample这个可执行文件,直接执行,成功后,会生成两个xml文件,打开cunit_sample-Results.xml,就可以看到每个测试用例的执行结果了。
覆盖率统计
安装lcov
lcov是一个覆盖率的可视化工具,使用
yum install lcov
即可完成安装
在执行测试用例完成后,在源代码所在的目录下(一般我们要看的是源代码的覆盖率),使用以下两个命令,生成代码覆盖率的可视化结果:
lcov -c -d ./ -o app.info # 指定当前目录,也可以指定其它目录
顺利的话,会生成app.info文件
最后一步:
genhtml app.info -o cc_result
顺利的话,会生成cc_result的目录,里面就是覆盖率的统计结果,使用浏览器打开cc_result/index.html即可。
视觉效果如下图:

代码覆盖率统计
可以点击任何一个文件,查看某个文件的具体覆盖信息,这里不就赘述了,希望本文可以帮到你。
五:单元测试覆盖率
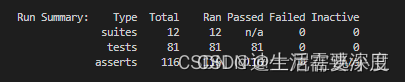
当写完单元测试编译运行后,就会在终端出现上图打印,最左边三个分别表示写了测试函数的.c 文件数、测试函数总数、断言总数。
当完成这一步如果还有覆盖率要求,则使用如下指令:
1, 编译:gcc -fprofile-arcs -ftest-coverage -dumpbase '' -o main test.c func.c
参数:
-fprofile-arcs:使gcc创建一个程序的流图,执行生成.gcda文件
-ftest-coverage:编译生成.gcno文件,用于查代码覆盖率
-dumpbase '' 设置前缀名称
ps:也可直接在makefile中加上 -fprofile-arcs -ftest-coverage -dumpbase ''
2, ./main 执行生成的执行文件
3, lcov --directory . --capture --output-file app.info
4, genhtml -o results app.info (会在路径下生成一个results文件夹,里面的内容就是覆盖率报告,html文件)
————————————————
版权声明:本文为CSDN博主「迪士尼在逃小丑」的原创文章,遵循CC 4.0 BY-SA版权协议,转载请附上原文出处链接及本声明。
原文链接:https://blog.csdn.net/qq_68619457/article/details/128626261


 2680
2680


 被折叠的 条评论
为什么被折叠?
被折叠的 条评论
为什么被折叠?
 到【灌水乐园】发言


