


 本文详细介绍了Android中的ConstraintLayout,包括其优点、基本使用方法如相对定位、外边距和尺寸约束,以及进阶特性如链、引导线、屏障和组的使用。ConstraintLayout能够帮助开发者构建更高效、性能更好的复杂页面布局。
前言
ConstraintLayout是Google在Google I/O 2016大会上发布的一种新的布局容器(ViewGroup),它支持以灵活的方式来放置子控件和调整子控件的大小。ConstraintLayout功能强大,它能实现Android中传统的布局容器FrameLayout、LinearLayout和RelativeLayout所能实现的所有功能。我们可以使用ConstraintLayout来优化页面的布局层次。
为什么推荐使用ConstraintLayout
从Android Studio 2.3版本开始,创建Activity时的默认布局容器变为ConstraintLayout。为什么官方推荐使用ConstraintLayout呢?总结一下,主要有下面这三个原因:
- 减少布局层次。我们知道一个好的布局是浅而宽的,而不是窄而深的。布局层次越浅,即布局层次越少,那么UI测量和布局阶段所花费的时间就越少,UI的性能就越好。通常情况下,我们在使用传统布局容器来实现一些稍微复杂的页面时布局层次很容易就大于等于两层。ConstraintLayout支持构建复杂的页面布局,如果使用它作为页面的布局容器,基本上一层就足够了。
- 性能较好。Google的工程师测量过ConstraintLayout和RelativeLayout的性能,测量结果表明:ConstraintLayout在测量/布局阶段的性能比RelativeLayout大约高40%。
- 扩展性好。ConstraintLayout功能强大,当页面的需求发生变化时很方便进行修改和扩展。
准备工作
要在项目中使用ConstraintLayout,需要在模块的build.gradle文件中添加如下依赖:
dependencies {

    ...
    implementation 'androidx.constraintlayout:constraintlayout:1.1.3'
}
如果项目还没有使用AndroidX,那么添加如下依赖:
dependencies {

    ...
    implementation 'com.android.support.constraint:constraint-layout:1.1.3'
}
基本使用
ConstraintLayout的基本使用主要包括:
- 相对定位
- 外边距
- 尺寸约束
相对定位
相对定位是在ConstraintLayout中放置子控件所需要的必要也是最基本的操作。每个子控件都必须至少有两个约束关系:一个水平方向上的约束关系和一个垂直方向上的约束关系。 如果没有指定约束关系,那么子控件默认放置在父容器的左上角位置。约束关系可以相对于父容器也可以相对于兄弟控件。
ConstraintLayout的约束关系属性与RelativeLayout的属性很相似,可以对比学习:
- layout_constraintTop_toTopOf (约束子控件的顶部与父容器/兄弟控件的顶部对齐)
- layout_constraintTop_toBottomOf (约束子控件的顶部与父容器/兄弟控件的底部对齐)
- layout_constraintBottom_toTopOf (约束子控件的底部与父容器/兄弟控件的顶部对齐)
- layout_constraintBottom_toBottomOf (约束子控件的底部与父容器/兄弟控件的底部对齐)
- layout_constraintLeft_toLeftOf (约束子控件的左边与父容器/兄弟控件的左边对齐)
- layout_constraintLeft_toRightOf (约束子控件的左边与父容器/兄弟控件的右边对齐)
- layout_constraintRight_toLeftOf (约束子控件的右边与父容器/兄弟控件的左边对齐)
- layout_constraintRight_toRightOf (约束子控件的右边与父容器/兄弟控件的右边对齐)
- layout_constraintBaseline_toBaselineOf (约束子控件的文本基线与兄弟控件的文本基线对齐)
在控制子控件居中显示上,ConstraintLayout与通过单一属性来控制居中显示的RelativeLayout不同:水平方向上,当你同时设置了子控件的左边和右边的约束关系时,子控件将水平居中显示;垂直方向上,当你同时设置了子控件的顶部和底部的约束关系时,子控件将垂直居中显示。
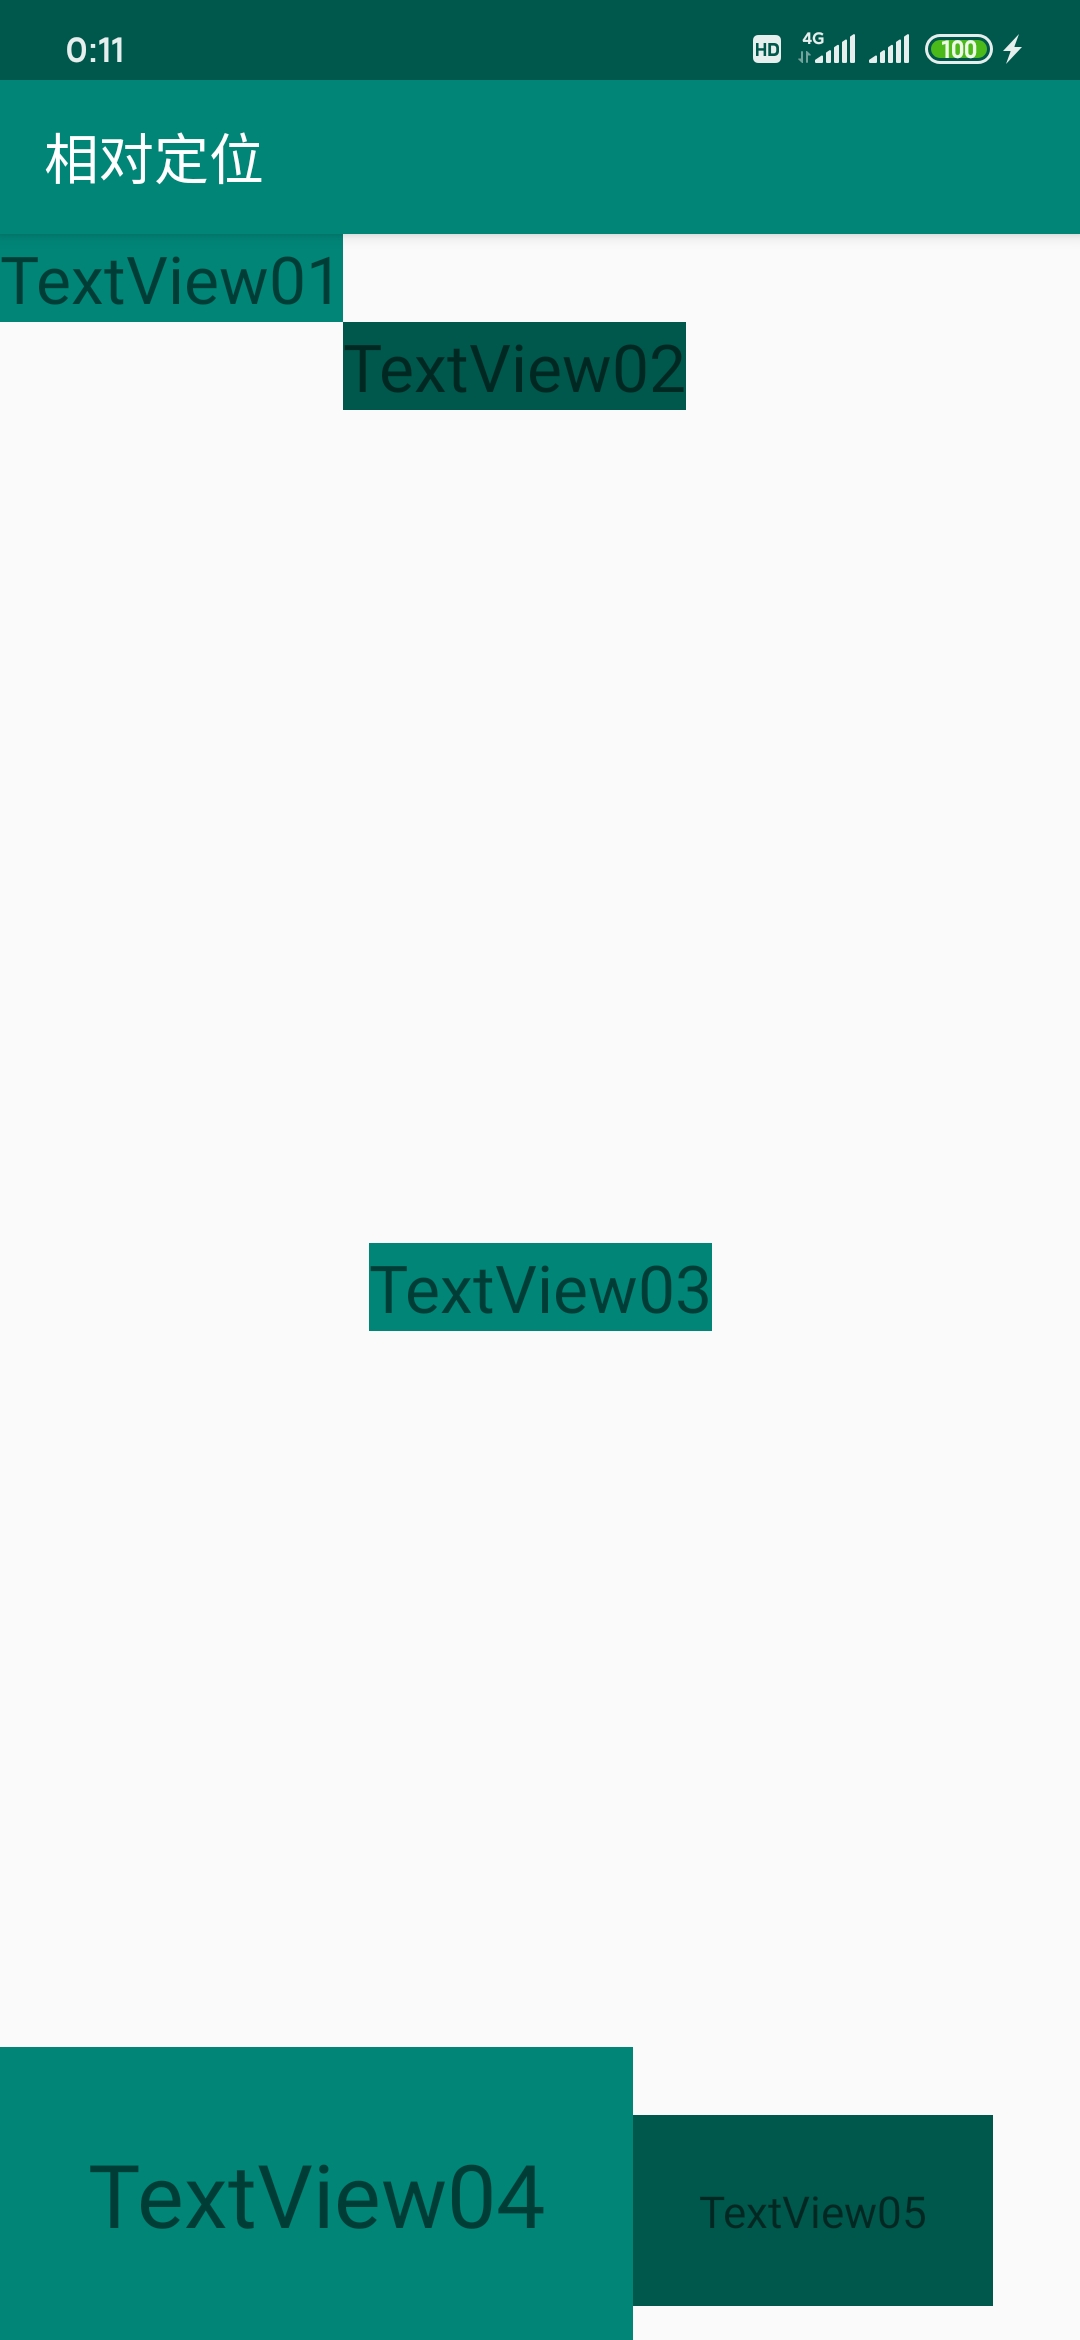
相对定位的示例如下所示:
<?xml version="1.0" encoding="utf-8"?>
<androidx.constraintlayout.widget.ConstraintLayout xmlns:android="http://schemas.android.com/apk/res/android"
    xmlns:app="http://schemas.android.com/apk/res-auto"
    xmlns:tools="http://schemas.android.com/tools"
    android:layout_width="match_parent"
    android:layout_height="match_parent"
    tools:context=".Demo01Activity">

    <!--  示例01:与父容器建立约束关系  -->
    <TextView
        android:id="@+id/tv_01"
        android:layout_width="wrap_content"
        android:layout_height="wrap_content"
        android:background="@color/colorPrimary"
        android:text="TextView01"
        android:textSize="24sp"
        app:layout_constraintTop_toTopOf="parent"
        app:layout_constraintLeft_toLeftOf="parent" />

    <!--  示例02:与兄弟控件建立约束关系  -->
    <TextView
        android:id="@+id/tv_02"
        android:layout_width="wrap_content"
        android:layout_height="wrap_content"
        android:background="@color/colorPrimaryDark"
        android:text="TextView02"
        android:textSize="24sp"
        app:layout_constraintTop_toBottomOf="@id/tv_01"
        app:layout_constraintLeft_toRightOf="@id/tv_01" />

    <!--  示例03:控制子控件居中显示  -->
    <TextView
        android:id="@+id/tv_03"
        android:layout_width="wrap_content"
        android:layout_height="wrap_content"
        android:background="@color/colorPrimary"
        android:text="TextView03"
        android:textSize="24sp"
        app:layout_constraintTop_toTopOf="parent"
        app:layout_constraintBottom_toBottomOf="parent"
        app:layout_constraintLeft_toLeftOf="parent"
        app:layout_constraintRight_toRightOf="parent" />

    <!--  示例04:控制子控件的文本基线相对齐  -->
    <TextView
        android:id="@+id/tv_04"
        android:layout_width="wrap_content"
        android:layout_height="wrap_content"
        android:padding="32dp"
        android:background="@color/colorPrimary"
        android:gravity="center"
        android:text="TextView04"
        android:textSize="32sp"
        app:layout_constraintLeft_toLeftOf="parent"
        app:layout_constraintBottom_toBottomOf="parent" />

    <TextView
        android:id="@+id/tv_05"
        android:layout_width="wrap_content"
        android:layout_height="wrap_content"
        android:padding="24dp"
        android:background="@color/colorPrimaryDark"
        android:gravity="center"
        android:text="TextView05"
        android:textSize="16sp"
        app:layout_constraintBaseline_toBaselineOf="@id/tv_04"
        app:layout_constraintBottom_toBottomOf="parent"
        app:layout_constraintLeft_toRightOf="@id/tv_04" />
</androidx.constraintlayout.widget.ConstraintLayout>
显示效果如下图所示:
外边距
与所有的布局容器一样,ConstraintLayout中的子控件也支持设置外边距。不一样的地方是:要想某个方向上的外边距生效,必须设置了对应方向上的约束关系。 外边距的值只能大于或者等于0。
设置外边距的相关属性如下:
- android:layout_marginTop (设置顶部的外边距)
- android:layout_marginBottom (设置底部的外边距)
- android:layout_marginLeft (设置左边的外边距)
- android:layout_marginRight (设置右边的外边距)
ConstraintLayout还支持当约束关系中的兄弟控件GONE不可见时设置一个新的外边距。以前遇到这种需求时我们很可能需要在代码中设置一个新的外边距,现在有了这个功能就很方便了。相关属性如下:
- layout_goneMarginTop
- layout_goneMarginBottom
- layout_goneMarginLeft
- layout_goneMarginRight
外边距的示例如下所示:
<?xml version="1.0" encoding="utf-8"?>
<androidx.constraintlayout.widget.ConstraintLayout xmlns:android="http://schemas.android.com/apk/res/android"
    xmlns:app="http://schemas.android.com/apk/res-auto"
    xmlns:tools="http://schemas.android.com/tools"
    android:layout_width="match_parent"
    android:layout_height="match_parent"
    tools:context=".Demo02Activity">

    <!--  示例01:设置子控件的外边距  -->
    <TextView
        android:id="@+id/tv_01"
        android:layout_width="wrap_content"
        android:layout_height="wrap_content"
        android:layout_marginTop="200dp"
        android:layout_marginLeft="32dp"
        android:padding="16dp"
        android:background="@color/colorPrimary"
        android:text="TextView01"
        android:textSize="24sp"
        app:layout_constraintTop_toTopOf="parent"
        app:layout_constraintLeft_toLeftOf="parent" />

    <TextView
        android:id="@+id/tv_02"
        android:layout_width="wrap_content"
        android:layout_height="wrap_content"
        android:layout_marginTop=
最低0.47元/天 解锁文章


 699
699

 被折叠的 条评论
为什么被折叠?
被折叠的 条评论
为什么被折叠?
 到【灌水乐园】发言


