


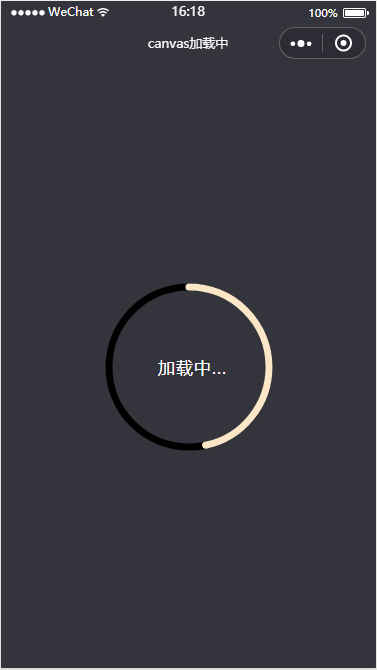
最近微信小程序是真的很火!依稀还记得自己第一次写android的环形对比图(点击打开链接),一晃两年已经过去了。时间过得真快。第一次写博客的时候还是上大三的时候。现在已经工作将近三年了。最近半年由于工作的原因很少写博客,那么现在同样从环形图开始撸小程序,废话少说,直接上图……
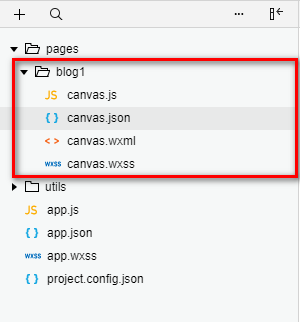
1.首先创建目录如下所示:
2.编写canvas.json的内容
{
  "backgroundTextStyle": "light",
  "navigationBarBackgroundColor": "#34343D",
  "navigationBarTitleText": "canvas加载中",
  "navigationBarTextStyle": "white"
}
3.编写canvas.wxml的内容
<!--pages/blog1/canvas.wxml-->

<view class='container'>
    <view class='progress_box'>
      <!-- 绘制圆环背景 -->
      <canvas class="progress_bg" canvas-id="canvasProgressbg" />
      <!-- 绘制加载中圆弧 -->
      <canvas class="progress_canvas" canvas-id="canvasProgress" />
      <!-- 绘制圆弧中心提示文字 -->
      <view class="progress_text">
        <text class='progress_info'> {{progress_txt}}</text>
      </view>
    </view>
</view>
4.编写canvas.wxss的内容
/* pages/blog1/canvas.wxss */

.container {
  position: fixed;
  width: 100%;
  height: 100%;
  display: flex;
  flex-direction: column;
  justify-content: center;
  align-items: center;
  background-color: #34343d;
}

.progress_box {
  position: absolute;
  width: 220px;
  height: 220px;
  display: flex;
  align-items: center;
  justify-content: center;
  background-color: transparent;
}

.progress_bg {
  position: absolute;
  width: 220px;
  height: 220px;
}

.progress_canvas {
  width: 220px;
  height: 220px;
}

.progress_text {
  position: absolute;
  display: flex;
  align-items: center;
  justify-content: center;
}

.progress_info {
  font-size: 35rpx;
  padding-left: 16rpx;
  letter-spacing: 2rpx;
  color: white;
}
// pages/blog1/canvas.js
Page({

  /**
   * 页面的初始数据
   */
  data: {
    //控制progress
    count: 0, // 设置 计数器 初始为0
    countTimer: null,// 设置 定时器
    progress_txt: '加载中...',// 提示文字
  },

  /**
   * 生命周期函数--监听页面加载
   */
  onLoad: function (options) {
    //绘制背景
    this.drawProgressbg();
    //开始progress
    this.startProgress();
  },

  /**
  * 画progress底部背景
  */
  drawProgressbg: function () {
    // 使用 wx.createContext 获取绘图上下文 context
    var ctx = wx.createCanvasContext('canvasProgressbg')
    // 设置圆环的宽度
    ctx.setLineWidth(7);
    // 设置圆环的颜色
    ctx.setStrokeStyle('#000000');
    // 设置圆环端点的形状
    ctx.setLineCap('round')
    //开始一个新的路径
    ctx.beginPath();
    //设置一个原点(110,110),半径为100的圆的路径到当前路径
    ctx.arc(110, 110, 80, 0, 2 * Math.PI, false);
    //对当前路径进行描边
    ctx.stroke();
    //开始绘制
    ctx.draw();
  },

  /**
   * 画progress进度
   */
  drawCircle: function (step) {
    // 使用 wx.createContext 获取绘图上下文 context
    var context = wx.createCanvasContext('canvasProgress');
    // 设置圆环的宽度
    context.setLineWidth(7);
    // 设置圆环的颜色
    context.setStrokeStyle('#FBE6C7');
    // 设置圆环端点的形状
    context.setLineCap('round')
    //开始一个新的路径
    context.beginPath();
    //参数step 为绘制的圆环周长,从0到2为一周 。 -Math.PI / 2 将起始角设在12点钟位置 ,结束角 通过改变 step 的值确定
    context.arc(110, 110, 80, -Math.PI / 2, step * Math.PI - Math.PI / 2, false);
    //对当前路径进行描边
    context.stroke();
    //开始绘制
    context.draw()
  },

  /**
   * 开始progress
   */
  startProgress: function () {
    this.setData({
      count: 0
    });
    // 设置倒计时 定时器 每100毫秒执行一次,计数器count+1 ,耗时6秒绘一圈
    this.countTimer = setInterval(() => {
      if (this.data.count <= 60) {
        /* 绘制彩色圆环进度条
        注意此处 传参 step 取值范围是0到2,
        所以 计数器 最大值 60 对应 2 做处理,计数器count=60的时候step=2
        */
        this.drawCircle(this.data.count / (60 / 2))
        this.data.count++;
      } else {
        clearInterval(this.countTimer);
        this.startProgress();
      }
    }, 100)
  },

})


 480
480


 被折叠的 条评论
为什么被折叠?
被折叠的 条评论
为什么被折叠?
 到【灌水乐园】发言


