


 本文详细介绍了如何使用tgtadm工具在Linux系统中配置iSCSI目标服务器,包括安装服务、创建和管理target、添加磁盘、设置访问权限、CHAP认证以及配置文件详解。此外,还提到了抓包和相关讨论。
1.简述
组建iscsi网络三种target工具,分别为tgt,iscsi_tgt和targetcli ,之前已经介绍过targetcli 组装iscsi方法,此文重点介绍tgtadm的配置方法。
2.安装服务
#1.安装和配置网络存储服务器tgtadm
yum install scsi-target-utils

#2.启动tgtd服务
service tgtd start
3.基本配置
#1.创建tgtadm
tgtadm --lld iscsi --op new --mode target --tid 2 -T iqn.2021-10.com.happynas.alilu:iscsi-1
#2.查看tgtadm
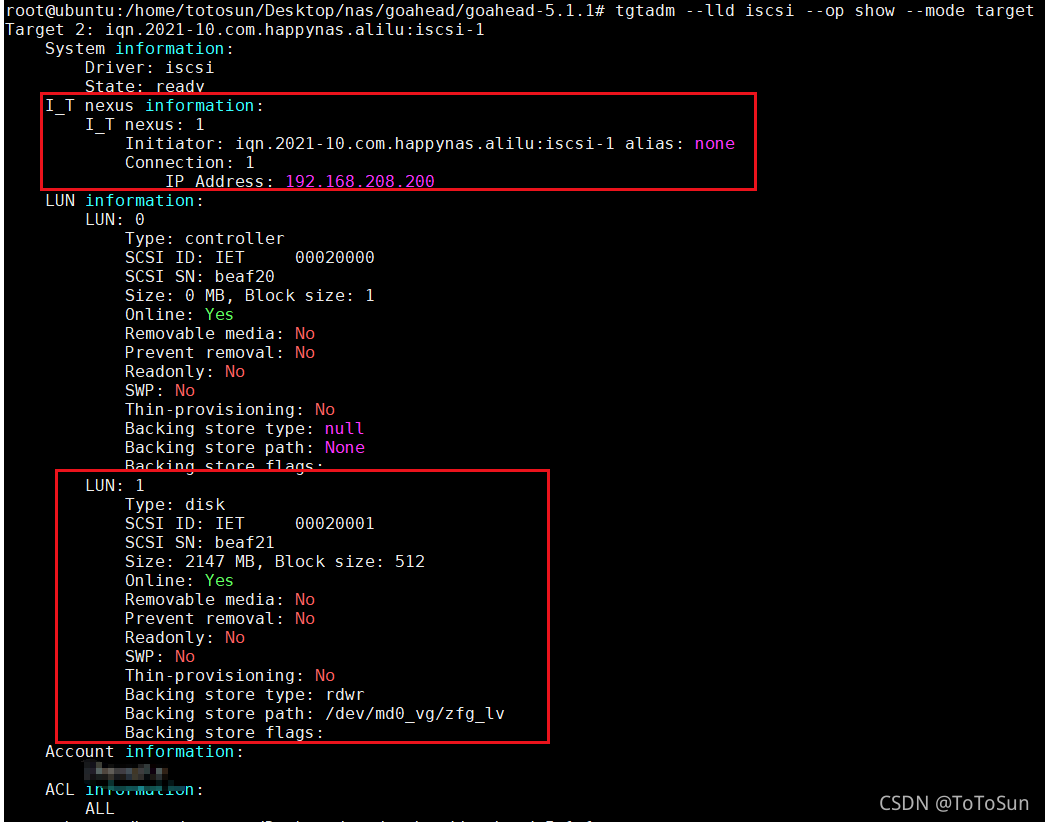
tgtadm --lld iscsi --op show --mode target
#3.添加磁盘到
tgtadm --lld iscsi --op new --mode logicalunit --tid 1 --lun 1 -b /dev/sdb1
tgtadm --lld iscsi --op new --mode logicalunit --tid 1 --lun 2 -b /dev/sdc1
tgtadm --lld iscsi --op new --mode logicalunit --tid 1 --lun 3 -b /dev/md0_vg/zfg_lv
#4.授权一个网段可以访问
tgtadm --lld iscsi --op bind --mode target --tid 1 -I 192.168.80.0/24
#所有设备都可访问
tgtadm -L iscsi -o bind -m target -t 1 -I ALL
#5.其他配置
#查看服务 chkconfig
#启动tgtd 暂停iptables
chkconfig tgtd on
chkconfig iptables off
#将设置保存到配置文件
tgt-admin --dump > /etc/tgt/targets.conf
#查看保存的配置
cat /etc/tgt/targets.conf
#关闭防火墙
service iptables stop
#查看配置
tgt-admin -dump
#6.删除
tgtadm --lld iscsi --op delete --mode logicalunit --tid 1 --lun 1
#7.设置为只读
tgtadm --lld iscsi --mode logicalunit --op update --tid 1 --lun 2 --paramsreadonly=0
#8.把任意访问的授权去掉
tgtadm --lld iscsi --op unbind --mode target --tid 1 -l ALL
#9.设置一个ip访问
tgtadm --lld iscsi --op bind --mode target --tid 1 -l 192.168.80.200
4.CHAP访问
#建立新账号
tgtadm --lld iscsi --op new --mode account --user totosun --password 1qaz@WSX#EDC
#显示账户信息
tgtadm --lld iscsi --op show --mode account

#一个账户和一个target邦定 (bind)
tgtadm --lld iscsi --op bind --mode account --tid 1 --user totosun

#删除账号
tgtadm --lld iscsi --mode account --op delete --user totosun
5.重启生效
编辑/etc/tgt/targets.conf即可
# By default, tgt-admin looks for its config file in /etc/tgt/targets.conf

# This one includes other config files:

include /etc/tgt/temp/*.conf


# Set the driver. If not specified, defaults to "iscsi".

default-driver iscsi


# Set iSNS parameters, if needed

#iSNSServerIP 192.168.111.222
#iSNSServerPort 3205
#iSNSAccessControl On
#iSNS On

# Continue if tgtadm exits with non-zero code (equivalent of
# --ignore-errors command line option)
#ignore-errors yes


# Sample target with one LUN only. Defaults to allow access for all initiators:

<target iqn.2008-09.com.example:server.target1>
    backing-store /dev/LVM/somedevice
</target>


# Similar, but we use "direct-store" instead of "backing-store".
# "direct-store" reads drive parameters with sg_inq command and sets them to
# the target.
# Parameters fatched with sg_inq are:
# - Vendor identification
# - Product identification
# - Product revision level
# - Unit serial number (if present)
# We also specify "incominguser".

<target iqn.2008-09.com.example:server.target2>
    direct-store /dev/sdd
    incominguser someuser secretpass12
</target>


# An example with multiple LUNs, disabled write-cache (tgtd enables write-cache
# by default) and vendor identification set to "MyVendor"

<target iqn.2008-09.com.example:server.target3>
    backing-store /dev/LVM/somedevice1	# Becomes LUN 1
    backing-store /dev/LVM/somedevice2	# Becomes LUN 2
    backing-store /dev/LVM/somedevice3	# Becomes LUN 3
    write-cache off
    vendor_id MyCompany Inc.
</target>


# Similar to the one above, but we fetch vendor_id, product_id, product_rev and
# scsi_sn from the disks.
# Vendor identification (vendor_id) is replaced in all disks by "MyVendor"

<target iqn.2008-09.com.example:server.target4>
    direct-store /dev/sdb	# Becomes LUN 1
    direct-store /dev/sdc	# Becomes LUN 2
    direct-store /dev/sdd	# Becomes LUN 3
    write-cache off
    vendor_id MyCompany Inc.
</target>


# Note that "first-device-first-lun numbering" will work only for simple
# scenarios above, where _only_ direct-store _or_ backing-store is used.
# If you mix backing-store and direct-store, then all backing-store entries
# are processed before direct-store-entries.

<target iqn.2008-09.com.example:server.target4>
    direct-store /dev/sdb	# Becomes LUN 3
    backing-store /dev/sdc	# Becomes LUN 1
    direct-store /dev/sdd	# Becomes LUN 4
    backing-store /dev/sde	# Becomes LUN 2
</target>


# Even more complicated example - each device has different parameters.
# You can use indentation to make the config file more readable.
# Note that LUNs will be assigned more or less randomly here (and still
# backing-store get LUNs assigned before drect-store).
# You can specify multiple mode_page parameters (they are commented out
# in this example).
# Note that some parameters (write-cache, scsi_sn) were specified "globally".
# "Global" parameters will be applied to all LUNs; they can be overwritten
# "locally", per LUN.
# If lun is not specified, it will be allocated automatically (first available).

<target iqn.2008-09.com.example:server.target5>

    <direct-store /dev/sdd>
	vendor_id VENDOR1
	removable 1
	device-type cd
	lun 1
    </direct-store>

    <direct-store /dev/sda>
	vendor_id VENDOR2
	lun 2
    </direct-store>

    <backing-store /dev/sdb1>
	vendor_id back1
	scsi_sn SERIAL
	write-cache on
	# lun 3		# lun is commented out - will be allocated automatically
    </backing-store>

    <backing-store /dev/sdd1>
	vendor_id back2
	#mode_page 8:0:18:0x10:0:0xff....
	#mode_page 8:0:18:0x10:0:0xff....
	#bs-type aio
	#params element_type=4,start_address=500,quantity=3,media_home=/root/tapes
	#params element_type=4,address=500,tid=1,lun=1
	lun 15
    </backing-store>

    # Some more parameters which can be specified locally or globally:
    #scsi_id ...
    #scsi_sn ...
    #vendor_id ...
    #product_id ...
    #product_rev ...
    #sense_format ...
    #removable ...
    #online ...
    #readonly ...
    #path ...
    #mode_page 8:0:18:0x10:0:0xff....
    #mode_page 8:0:18:0x10:0:0xff....
    #device-type ...
    #bs-type ...	# backing store type - default rdwr, can be aio, etc...
    #params element_type=4,start_address=500,quantity=3,media_home=/root/tapes
    #params element_type=4,address=500,tid=1,lun=1
    #allow-in-use yes	# if specified globally, can't be overwritten locally

    write-cache off
    scsi_sn multipath-10

    # Parameters below are only global. They can't be configured per LUN.
    # Only allow connections from 192.168.100.1 and 192.168.200.5
    initiator-address 192.168.100.1
    initiator-address 192.168.200.5

    # Tuning parameters (global, per target)
    #MaxRecvDataSegmentLength 8192
    #MaxXmitDataSegmentLength 8192
    #HeaderDigest None
    #DataDigest None
    #InitialR2T Yes
    #MaxOutstandingR2T 1
    #ImmediateData Yes
    #FirstBurstLength 65536
    #MaxBurstLength 262144
    #DataPDUInOrder Yes
    #DataSequenceInOrder Yes
    #ErrorRecoveryLevel 0
    #IFMarker No
    #OFMarker No
    #DefaultTime2Wait 2
    #DefaultTime2Retain 20
    #OFMarkInt Reject
    #IFMarkInt Reject
    #MaxConnections 1

    # Allowed incoming users
    incominguser user1 secretpass12
    incominguser user2 secretpass23

    # Outgoing user
    outgoinguser userA secretpassA

    # TID of controller
    controller_tid 10
</target>


# The device will have lun 1 unless you specify something else
<target iqn.2008-09.com.example:server.target6>
    backing-store /dev/LVM/somedevice
    lun 10
</target>


# Devices which are in use (by system: mounted, for swap, part of RAID, or by
# userspace: dd, by tgtd for another target etc.) can't be used, unless you use
# --force flag or add 'allow-in-use yes' option
<target iqn.2008-09.com.example:server.target7>
    backing-store /dev/LVM/somedevice
    allow-in-use yes
</target>

<target iqn.2008-09.com.example:server.target8>
    <backing-store /dev/LVM/somedevice>
        scsi_sn serial1
    </backing-store>

    <backing-store /dev/LVM/somedevice2>
        scsi_sn serial2
    </backing-store>

    allow-in-use yes
</target>

# Specify controller TID of target
# Must be unique for all targets
# To reduce risk of duplicating controller TIDs, specify TID for all targets
# or none
<target iqn.2008-09.com.example:server.target9>
    backing-store /dev/LVM/somedevice
    allow-in-use yes
    controller_tid 10
</target>

# Not supported configurations, and therefore, commented out:
#<target iqn.2008-09.com.example:server.badtarget1>
#    backing-store /dev/LVM/somedevice1
#    backing-store /dev/LVM/somedevice2
#    lun 10
#    lun 11
#</target>

#<target iqn.2008-09.com.example:server.badtarget2>
#    <direct-store /dev/sdd>
#        vendor_id VENDOR1
#    </direct-store>
#
#    direct-store /dev/sdc
#</target>

# This one will break the parser:

#<target iqn.2008-09.com.example:server.badtarget3>
#    <direct-store /dev/sdd>
#        vendor_id VENDOR1
#    </direct-store>
#
#    direct-store /dev/sdc
#
#    <direct-store /dev/sdd>
#        vendor_id VENDOR1
#    </direct-store>
#</target>
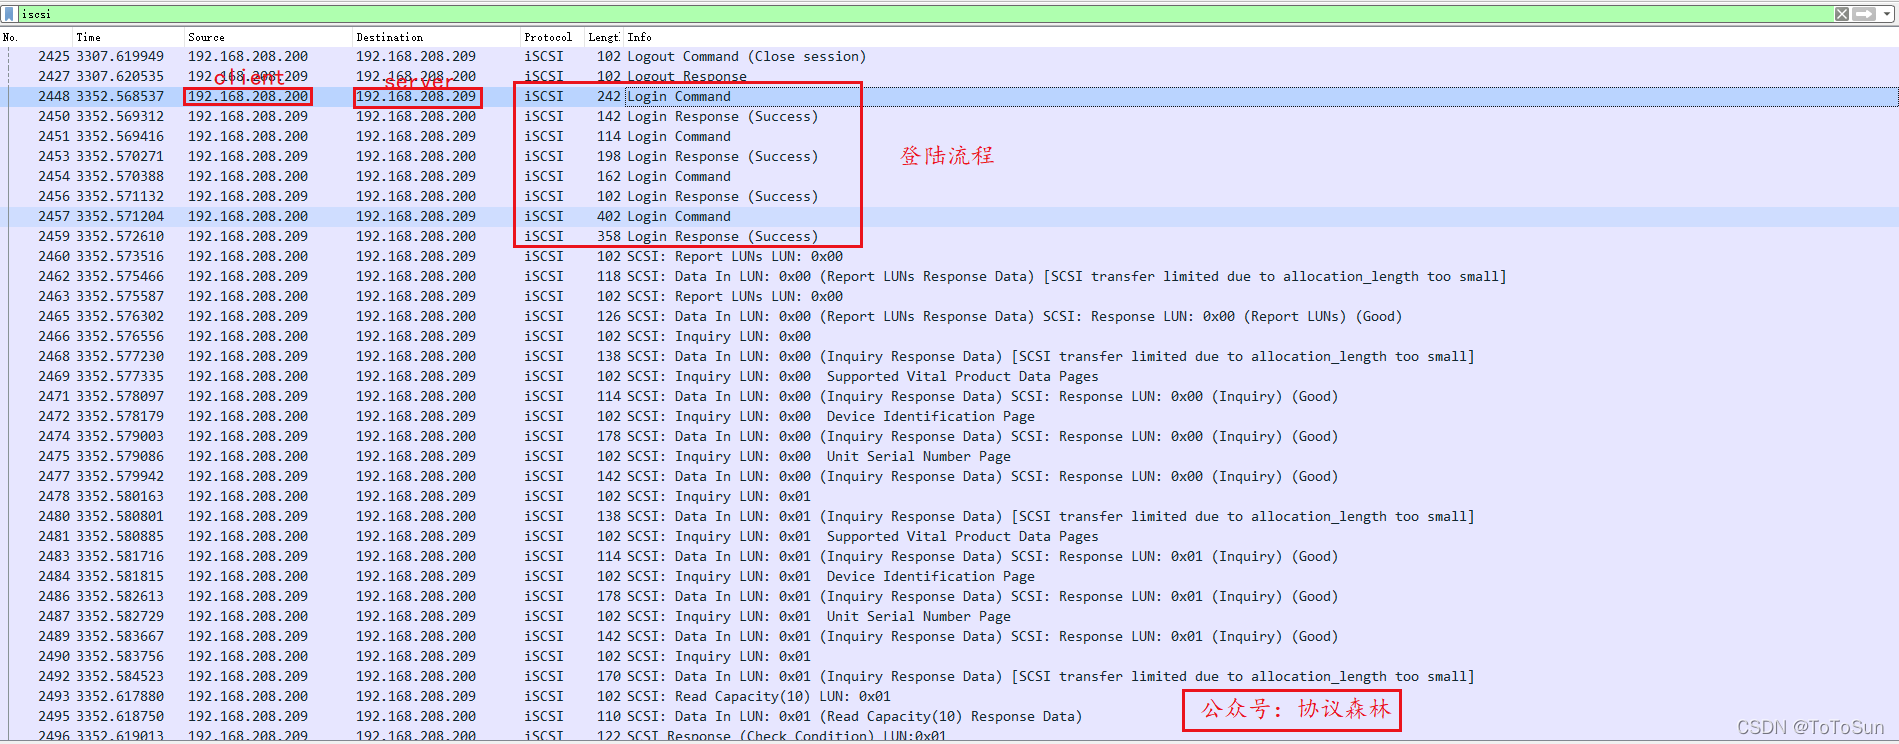
6.抓包
7.加入讨论


 1479
1479

 被折叠的 条评论
为什么被折叠?
被折叠的 条评论
为什么被折叠?
 到【灌水乐园】发言


