


Android动画大方向上分为:View 视图动画(里面又分为补间动画和帧动画)和属性动画
一.view视图动画
1.补间动画
有4种补间动画:放大缩小scale ,旋转 rotate ,平移 translate,透明度动画alpha。
使用方式有两种,第一种是动态代码实现
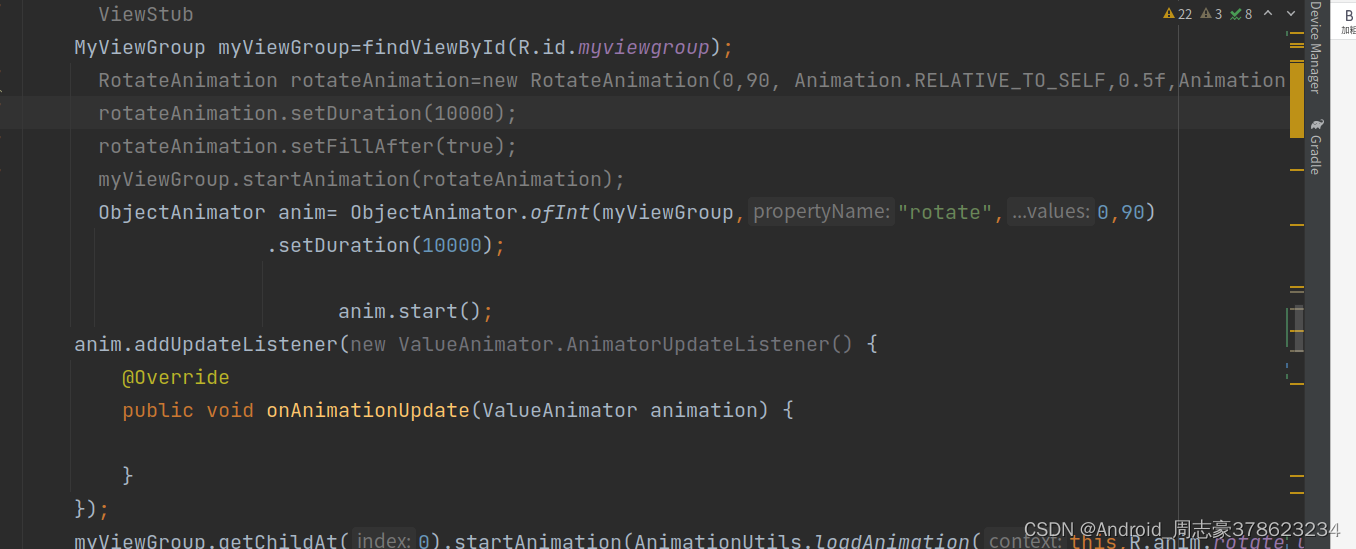
MyViewGroup myViewGroup=findViewById(R.id.myviewgroup);
        RotateAnimation rotateAnimation=new RotateAnimation(0,90, Animation.RELATIVE_TO_SELF,0.5f,Animation.RELATIVE_TO_SELF,0.5f);
        rotateAnimation.setDuration(10000);
        rotateAnimation.setFillAfter(true);
        myViewGroup.startAnimation(rotateAnimation);
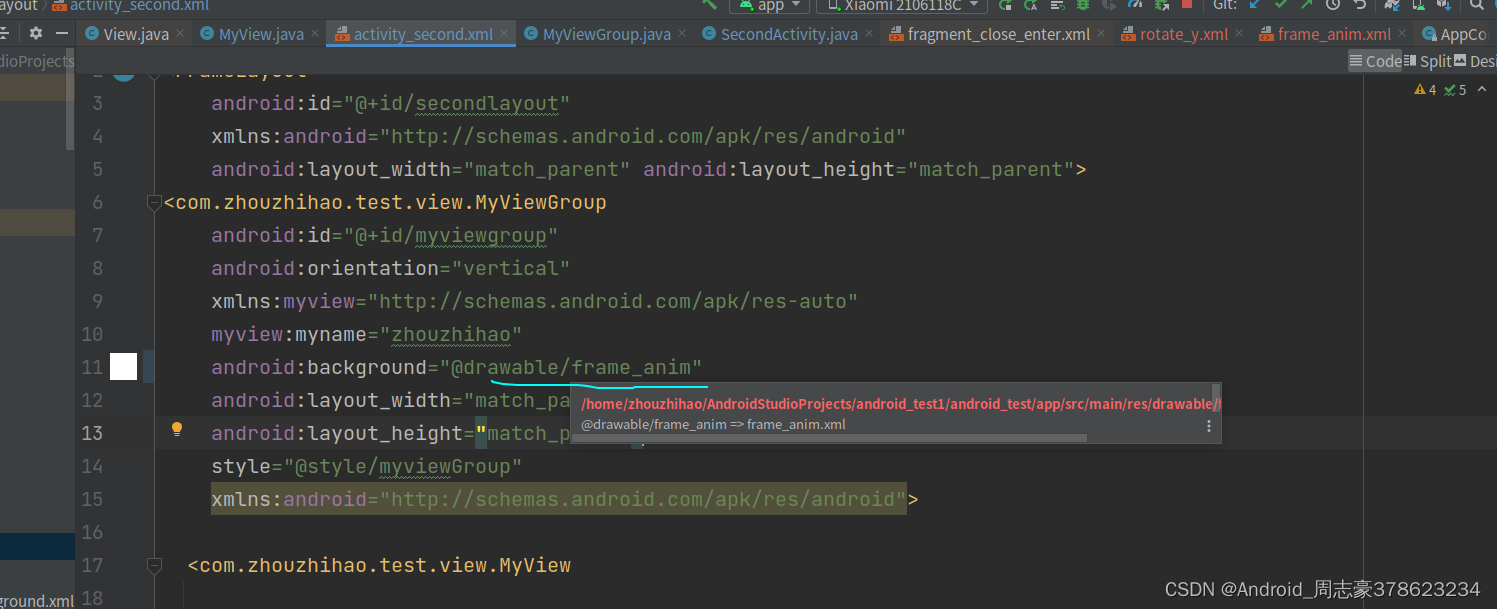
第二种 是.xml 动画。
xml代码
<?xml version="1.0" encoding="utf-8"?>
<set xmlns:android="http://schemas.android.com/apk/res/android">
    <rotate xmlns:android="http://schemas.android.com/apk/res/android"
        android:fromDegrees="0"
        android:toDegrees="90"
        android:pivotX="50%"
        android:pivotY="50%"
        android:fillAfter="true"
        android:duration="10000"
        >

    </rotate>
</set>
myViewGroup.getChildAt(0).startAnimation(AnimationUtils.loadAnimation(this,R.anim.rotate_y));
其他几种几乎一样,不一一说了
2.帧动画
先准备动画文件
<animation-list xmlns:android="http://schemas.android.com/apk/res/android">
<item android:drawable="@color/white" android:duration="1200"></item>
    <item android:drawable="@color/cardview_dark_background" android:duration="1200"></item>

</animation-list>
然后在view中设置background。
在代码中start就可以播放动画了
((AnimationDrawable) myViewGroup.getBackground()).start();
二.属性动画
为什么要引入属性动画,上面说说的动画,是针对view,这就留下了场景的局限性,很多场景我们都是要针对数值,或者是一个对象,不局限于view。这就引入了两个重要的类 ValueAnimation ObjectAnimation。我们先看看使用 ,另外多一句,属性动画是可以代替上面我们所说的传统动画。比如下面的代码:

对任何一个object 的属性都能进行动画,当然对没有视图显示的object 进行监听
 ValueAnimator 的使用,也是可以设置listen监听,从值的变化来驱动动画。
ValueAnimator anim = ValueAnimator.ofFloat(0f, 5f, 3f, 10f);
anim.setDuration(5000);
anim.start();
然后就是Android动画的估值器和插值器
1.3 具体使用
a. 设置方式
插值器在动画的使用有两种方式:在XML / Java代码中设置:
设置方法1:在 动画效果的XML代码中设置插值器属性android:interpolator
<?xml version="1.0" encoding="utf-8"?><scale xmlns:android=“http://schemas.android.com/apk/res/android”
android:interpolator="@android:anim/overshoot_interpolator"
// 通过资源ID设置插值器
android:duration="3000"
android:fromXScale="0.0"
android:fromYScale="0.0"
android:pivotX="50%"
android:pivotY="50%"
android:toXScale="2"
android:toYScale="2" />
设置方法2:在 Java 代码中设置
Button mButton = (Button) findViewById(R.id.Button);
// 步骤1:创建 需要设置动画的 视图View
Animation alphaAnimation = new AlphaAnimation(1,0);
// 步骤2:创建透明度动画的对象 & 设置动画效果
    alphaAnimation.setDuration(3000);
    Interpolator overshootInterpolator = new OvershootInterpolator();
    // 步骤3:创建对应的插值器类对象

    alphaAnimation.setInterpolator(overshootInterpolator);
    // 步骤4:给动画设置插值器

    mButton.startAnimation(alphaAnimation);
    // 步骤5:播放动画
那么使用插值器时的资源ID是什么呢?即有哪些类型的插值器可供我们使用呢?
下面将介绍 Android内置默认的插值器
b. 系统内置插值器类型
Android内置了 9 种内置的插值器实现:
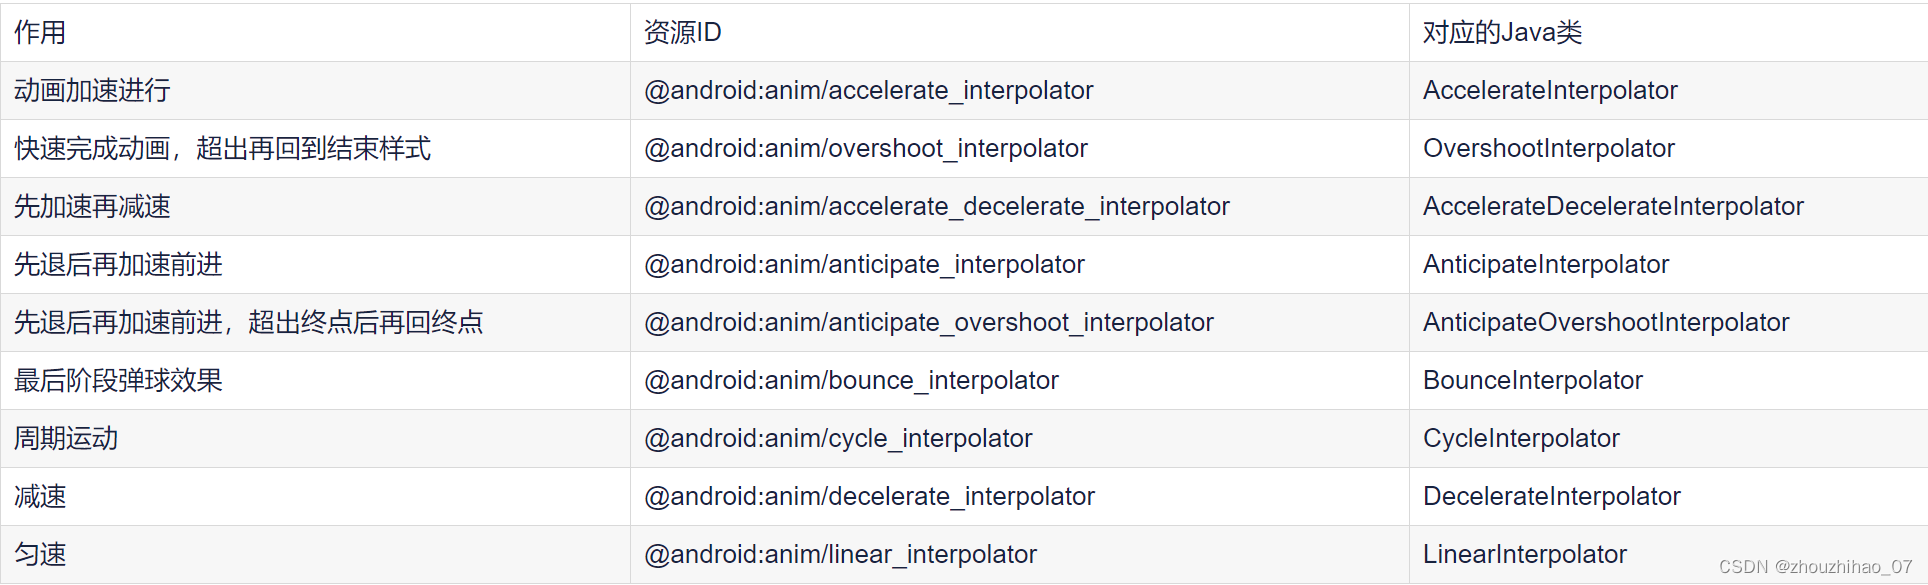
使用时:
当在XML文件设置插值器时,只需传入对应的插值器资源ID即可
当在Java代码设置插值器时,只需创建对应的插值器对象即可
系统默认的插值器是AccelerateDecelerateInterpolator,即先加速后减速
使用Android内置的插值器能满足大多数的动画需求
如果上述9个插值器无法满足需求,还可以自定义插值器
下面将介绍如何自定义插值器(Interpolator)
c. 自定义插值器
本质:根据动画的进度(0%-100%)计算出当前属性值改变的百分比
具体使用:自定义插值器需要实现 Interpolator / TimeInterpolator接口(time这个支持属性动画) & 复写getInterpolation()
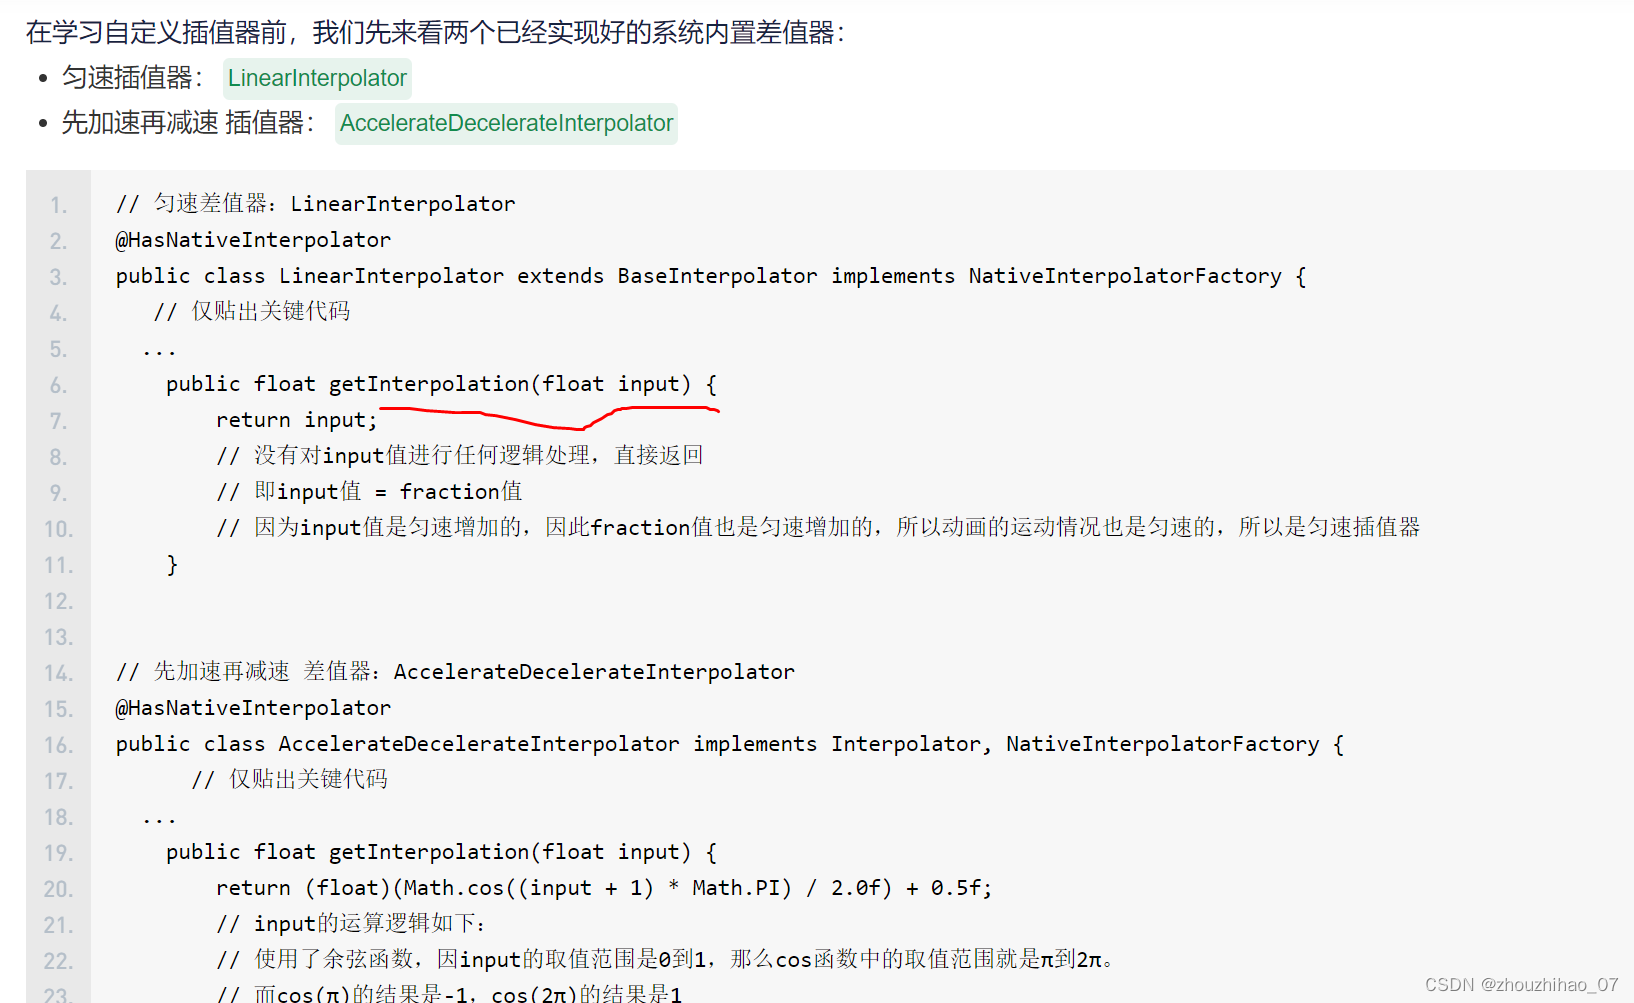
// 先加速再减速 差值器:AccelerateDecelerateInterpolator
@HasNativeInterpolator
public class AccelerateDecelerateInterpolator implements Interpolator, NativeInterpolatorFactory {
      // 仅贴出关键代码
  ...
    public float getInterpolation(float input) {
        return (float)(Math.cos((input + 1) * Math.PI) / 2.0f) + 0.5f;
        // input的运算逻辑如下:
        // 使用了余弦函数,因input的取值范围是0到1,那么cos函数中的取值范围就是π到2π。
        // 而cos(π)的结果是-1,cos(2π)的结果是1
        // 所以该值除以2加上0.5后,getInterpolation()方法最终返回的结果值还是在0到1之间。只不过经过了余弦运算之后,最终的结果不再是匀速增加的了,而是经历了一个先加速后减速的过程
        // 所以最终,fraction值 = 运算后的值 = 先加速后减速
        // 所以该差值器是先加速再减速的
    }


    }
系统默认的估值器有:
IntEvaluator:以整型的形式从初始值 - 结束值 进行过渡
FloatEvaluator:以浮点型的形式从初始值 - 结束值 进行过渡
ArgbEvaluator:以Argb类型的形式从初始值 - 结束值 进行过渡

自定义估值器就是重写evaluate方法
然后总结一下两者的区别如下:
作用不同
插值器(TimeInterpolator)的作用是:根据时间流逝的百分比计算出当前属性值改变的百分比。
估值器(TypeEvaluator)的作用是:根据当前属性改变的百分比来计算改变后的属性值。
从两者自定义需要重写的方法中,那么插值器的input值 和 估值器fraction有什么关系呢?
答:input的值决定了fraction的值:input值经过计算后传入到插值器的getInterpolation(),然后通过实现getInterpolation()中的逻辑算法,根据input值来计算出一个返回值,而这个返回值就是fraction了,他们共同完成了复杂非线性动画效果。


 1026
1026


 被折叠的 条评论
为什么被折叠?
被折叠的 条评论
为什么被折叠?
 到【灌水乐园】发言


