


一、碎片可以在程序运行时动态添加到活动当中。我们可以根据具体情况动态地添加碎片,使得界面定制更加多样化,下面将用个例子来介绍动态调用碎片。
先附上下面例子运行后的效果,效果如下:
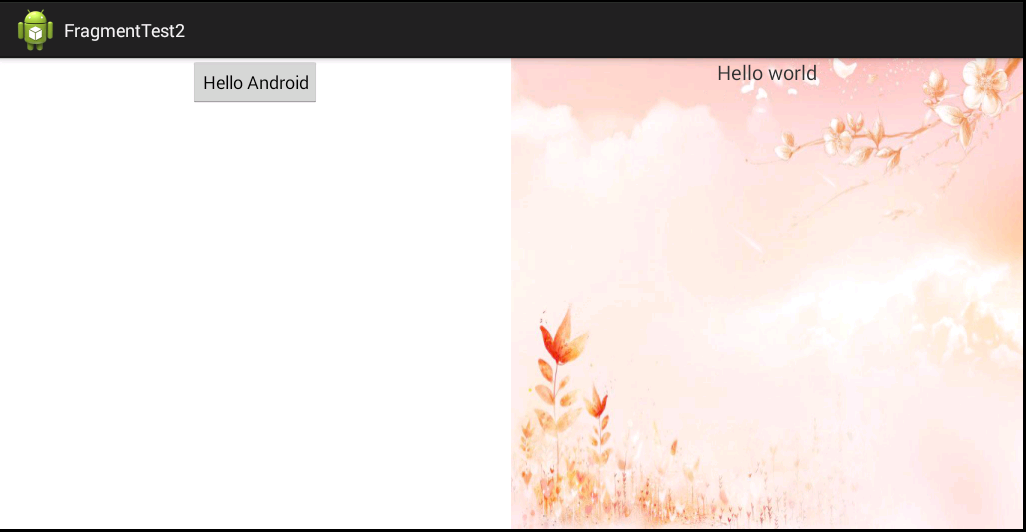
点击左边按钮后动态改变右边的布局,点击按钮后效果如下:

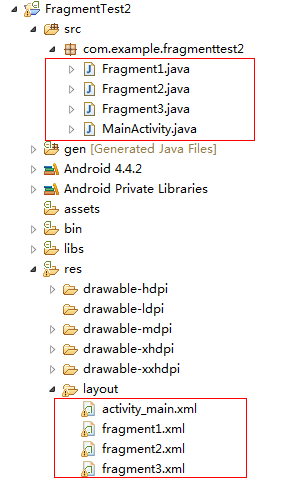
二、首先,新建一个android项目,项目名为FragmentTest2,主要项目结构如下图所示:
1、首先,先新建三个布局文件,分别为fragment1.xml,fragment2.xml、fragment3.xml,代码分别如下:
fragment1.xml:
<?xml version="1.0" encoding="utf-8"?>
<LinearLayout xmlns:android="http://schemas.android.com/apk/res/android"
    android:layout_width="match_parent"
    android:layout_height="match_parent"
    android:orientation="vertical" >

    <Button
        android:id="@+id/button"
        android:layout_width="wrap_content"
        android:layout_height="wrap_content"
        android:layout_gravity="center"
        android:text="Hello Android" />

</LinearLayout>
fragment2.xml:
<?xml version="1.0" encoding="utf-8"?>
<LinearLayout xmlns:android="http://schemas.android.com/apk/res/android"
    android:layout_width="match_parent"
    android:layout_height="match_parent"
    android:orientation="vertical"
    android:background="@drawable/logo" >


        <TextView
        android:layout_width="wrap_content"
        android:layout_height="wrap_content"
        android:layout_gravity="center"
        android:text="Hello world"
        android:textSize="20sp"/>

</LinearLayout>
fragment3.xml:
<?xml version="1.0" encoding="utf-8"?>
<LinearLayout xmlns:android="http://schemas.android.com/apk/res/android"
    android:layout_width="match_parent"
    android:layout_height="match_parent"
    android:orientation="vertical"
    android:background="#FFCCFF" >


    <ImageView
        android:layout_width="wrap_content"
        android:layout_height="wrap_content"
        android:src="@drawable/ic_launcher"
        android:layout_gravity="center"/>

    <TextView
        android:layout_width="wrap_content"
        android:layout_height="wrap_content"
        android:layout_gravity="center"
        android:text="Hello Android"
        android:textSize="20sp"/>

</LinearLayout>
其中fragment1.xml代表左边的碎片布局,fragment2.xml代表右边的布局,fragment3.xml代表点击左边碎片布局的按钮后,右边碎片显示的布局,大家看下代码和刚才的效果图就知道了。
2、新建三个类,分别为Fragment1,Fragment2,Fragment3类,这三个类都继承于Fragment类,代码分别如下:
Fragment1:
package com.example.fragmenttest2;

import android.app.Fragment;
import android.os.Bundle;
import android.view.LayoutInflater;
import android.view.View;
import android.view.ViewGroup;

public class Fragment1 extends Fragment {

    @Override
    public View onCreateView(LayoutInflater inflater, ViewGroup container,
            Bundle savedInstanceState) {
        View view=inflater.inflate(R.layout.fragment1, container);
        return view;
    }

}
Fragment2:
package com.example.fragmenttest2;

import android.app.Fragment;
import android.os.Bundle;
import android.view.LayoutInflater;
import android.view.View;
import android.view.ViewGroup;

public class Fragment2 extends Fragment {

    @Override
    public View onCreateView(LayoutInflater inflater, ViewGroup container,
            Bundle savedInstanceState) {
        View view = inflater.inflate(R.layout.fragment2, container);
        return view;
    }

}
Fragment3:
package com.example.fragmenttest2;

import android.app.Fragment;
import android.os.Bundle;
import android.view.LayoutInflater;
import android.view.View;
import android.view.ViewGroup;

public class Fragment3 extends Fragment {

    @Override
    public View onCreateView(LayoutInflater inflater, ViewGroup container,
            Bundle savedInstanceState) {
        View view=inflater.inflate(R.layout.fragment3, container,false);
        return view;
    }

}
其中这三个类都是加载相应的布局文件。
注意:大家发现了没,第三个类Fragment3的代码有点不同,在实例化View的时候,使用LayoutInflater的inflater()方法里多加了个布尔型的参数,因为此项目的功能会使原始右边碎片的布局改变,即view改变,所以必须要在改变后的那个碎片类加载布局时,实例化View对象时要多一个false参数,对于此项目改变后的碎片为Fragment3,所以就在此加个参数,否则会报错。其实我们可以把上面三个类实例化View对象时多一个参数,也不影响的。
3、接着需改变默认的activity_main布局文件,代码如下:
<LinearLayout xmlns:android="http://schemas.android.com/apk/res/android"
    xmlns:tools="http://schemas.android.com/tools"
    android:layout_width="match_parent"
    android:layout_height="match_parent" >

    <fragment
        android:id="@+id/fragment1"
        android:name="com.example.fragmenttest2.Fragment1"
        android:layout_width="0dp"
        android:layout_height="match_parent"
        android:layout_weight="1"/>

    <FrameLayout
        android:id="@+id/frameLayout"
        android:layout_width="0dp"
        android:layout_height="match_parent"
        android:layout_weight="1" >


        <fragment
            android:id="@+id/fragment2"
            android:name="com.example.fragmenttest2.Fragment2"
            android:layout_width="match_parent"
            android:layout_height="match_parent"/>

    </FrameLayout>

</LinearLayout>
上述代码放入了一个左侧碎片,把右侧碎片放入了FrameLayout布局中,现在放置的右侧碎片为fragment2,所以接下来就需要动态调用碎片,将右侧的碎片改为fragment3,即得在代码中替换FrameLayout里的碎片。
4、接下来修改MianActivity类,代码如下:
package com.example.fragmenttest2;

import android.app.Activity;
import android.app.FragmentManager;
import android.app.FragmentTransaction;
import android.os.Bundle;
import android.view.View;
import android.view.View.OnClickListener;
import android.widget.Button;

public class MainActivity extends Activity implements OnClickListener {
    private Button button;

    @Override
    protected void onCreate(Bundle savedInstanceState) {
        super.onCreate(savedInstanceState);
        setContentView(R.layout.activity_main);
        button = (Button) findViewById(R.id.button);

        button.setOnClickListener(this);
    }

    @Override
    public void onClick(View arg0) {
        // TODO Auto-generated method stub
        switch (arg0.getId()) {
        case R.id.button:
            Fragment3 fragment3 = new Fragment3();// 实例化Fragment3对象
            FragmentManager fragmentManager = getFragmentManager();// 获得FragmentManager对象
            FragmentTransaction fragmentTransaction = fragmentManager
                    .beginTransaction();// 开始事务
            fragmentTransaction.replace(R.id.frameLayout, fragment3);//添加fragment3到容器
            fragmentTransaction.addToBackStack(null);//添加返回栈
            fragmentTransaction.commit();// 提交事务
            break;

        default:
            break;
        }
    }

}
其中这个Activity实现了OnClickListener接口,然后给左侧碎片的按钮添加了单击事件,点击按钮后触发onClick()方法,其中动态调用碎片的逻辑都在点击事件里进行。
结合上述代码可以看出,动态添加碎片主要分五步:
第一步:创建待添加的碎片实例。
第二步:获取到FragmentManager,在一个活动中可直接使用getFragmentManage方法得到。
第三步:开启一个事务,通过调用beginTransaction()方法开启。
第四步:向容器中加入碎片,一般使用replace()方法实现,需要传入容器的id和待添加的碎片实例。
第五步,提交事务,调用commit()方法来完成。
其中第四步向容器里加入碎片,传入容器的id为放置碎片的FrameLayout。
注意:其中我在上述代码中多添加了一句代码,代码如下:
fragmentTransaction.addToBackStack(null);//添加返回栈第一点:此代码的功能为在碎片中模拟返回栈,这样不会使我们动态调用碎片后,点击物理键盘的返回按钮,会直接退出,而是动态调用碎片后,点击返回键,返回的是上一个碎片,模仿类似于返回栈的效果。
第二点:必须在事务提交之前调用了 FragmentTransaction 的 addToBackStack()方法,它可以接收一个名字用于描述返回栈的状态,一般传入 null 即可。
5.部署此程序到平板模拟器中,会达到上图提到的效果,点击按钮右侧碎片改变,点击返回物理键盘,返回到上一个碎片,在点击返回键,便退出此应用。
三、以上内容仅供大家学习参考,谢谢!
上述源码下载:http://download.csdn.net/download/u012561176/9259285


 163
163

 被折叠的 条评论
为什么被折叠?
被折叠的 条评论
为什么被折叠?
 到【灌水乐园】发言


