


首先需要的maven依赖为:
- <!--ehcache-->
- <dependency>
- <groupId>com.googlecode.ehcache-spring-annotations</groupId>
- <artifactId>ehcache-spring-annotations</artifactId>
- <version>${ehcache-spring.version}</version>
- <type>jar</type>
- <scope>compile</scope>
- </dependency>
- <dependency>
- <groupId>net.sf.ehcache</groupId>
- <artifactId>ehcache-core</artifactId>
- <version>${ehcache-core.version}</version>
- </dependency>
spring的maven依赖就不在展示出来。
ehcache需要一个配置文件,为ehcache.xml,内容为:
- <?xml version="1.0" encoding="UTF-8"?>
- <ehcache xmlns:xsi="http://www.w3.org/2001/XMLSchema-instance"
- xsi:noNamespaceSchemaLocation="http://ehcache.org/ehcache.xsd" updateCheck="false">
- <diskStore path="java.io.tmpdir" /> <!-- 缓存存放目录(此目录为放入系统默认缓存目录),也可以是”D:/cache“ java.io.tmpdir -->
- <defaultCache
- maxElementsInMemory="10000"
- eternal="false"
- timeToIdleSeconds="120"
- timeToLiveSeconds="120"
- overflowToDisk="true"
- maxElementsOnDisk="10000000"
- diskPersistent="false"
- diskExpiryThreadIntervalSeconds="120"
- memoryStoreEvictionPolicy="LRU"
- />
- <!--
- name:Cache的唯一标识
- maxElementsInMemory:内存中最大缓存对象数
- maxElementsOnDisk:磁盘中最大缓存对象数,若是0表示无穷大
- eternal:Element是否永久有效,一但设置了,timeout将不起作用
- overflowToDisk:配置此属性,当内存中Element数量达到maxElementsInMemory时,Ehcache将会Element写到磁盘中
- timeToIdleSeconds:设置Element在失效前的允许闲置时间。仅当element不是永久有效时使用,可选属性,默认值是0,也就是可闲置时间无穷大
- timeToLiveSeconds:设置Element在失效前允许存活时间。最大时间介于创建时间和失效时间之间。仅当element不是永久有效时使用,默认是0.,也就是element存活时间无穷大
- diskPersistent:是否缓存虚拟机重启期数据
- diskExpiryThreadIntervalSeconds:磁盘失效线程运行时间间隔,默认是120秒
- diskSpoolBufferSizeMB:这个参数设置DiskStore(磁盘缓存)的缓存区大小。默认是30MB。每个Cache都应该有自己的一个缓冲区
- memoryStoreEvictionPolicy:当达到maxElementsInMemory限制时,Ehcache将会根据指定的策略去清理内存。默认策略是LRU(最近最少使用)。你可以设置为FIFO(先进先出)或是LFU(较少使用)
- -->
- </ehcache>
在spring的applicationContext.xml的配置文件的编写为:
- <!-- 引用ehCache的配置 -->
- <bean id="defaultCacheManager" class="org.springframework.cache.ehcache.EhCacheManagerFactoryBean">
- <property name="configLocation">
- <value>classpath:/ehcache.xml</value>
- </property>
- </bean>
- <!-- 定义ehCache的工厂,并设置所使用的Cache name -->
- <bean id="ehCache" class="org.springframework.cache.ehcache.EhCacheFactoryBean">
- <property name="cacheManager">
- <ref local="defaultCacheManager"/>
- </property>
- <property name="cacheName">
- <value>DEFAULT_CACHE</value>
- </property>
- </bean>
如此配置,基本spring整合ehcache就完成了,但还是要单独测试一下,编写一个测试程序:
- package cn.com.ecache;
- import cn.com.container.ServiceProvinder;
- import net.sf.ehcache.Cache;
- import net.sf.ehcache.Element;
- import org.junit.Test;
- /**
- * Created by Administrator on 2016/1/24.
- */
- public class TestEcache {
- @Test
- public void Test() {
- Cache cache = (Cache) ServiceProvinder.getService("ehCache");
- Element lgElement = new Element("loginName", "xiaxuan");
- Element pwElement = new Element("password", "xiaxuan");
- cache.put(lgElement);
- cache.put(pwElement);
- System.out.println(cache.get("loginName"));
- }
- }
测试结果为:
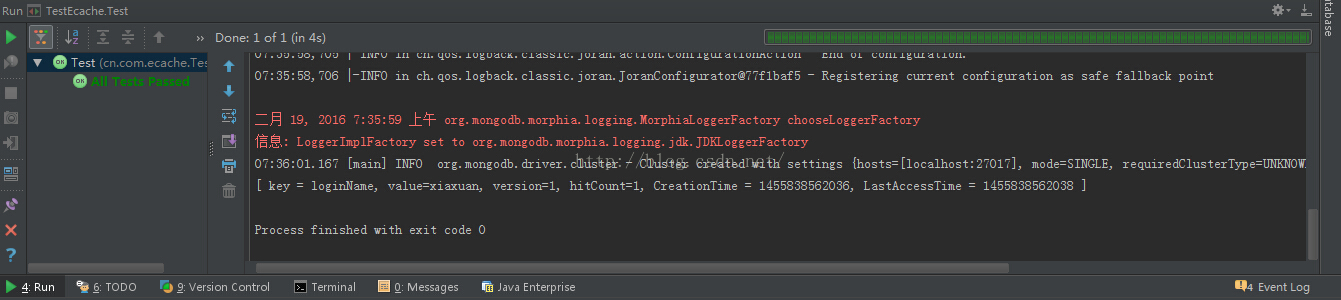
既可以存放数据到缓存中,又可以从缓存中拿到数据,spring和ehcache的整合基本成功。
如上,就是spring和ehcache整合。


 1525
1525

 被折叠的 条评论
为什么被折叠?
被折叠的 条评论
为什么被折叠?
 到【灌水乐园】发言


