


目录
前言
在之前的文章《springboot实战-自动配置》中,介绍了在springboot中如何实现自定义组件以及自动配置加载的源码分析,从分析中知道,@Import注解在自动配置中发挥着重要作用。从Import的英文中,很清晰的表达了是用于导入的作用,一般用于导入@Configuration注解的类、继承ImportSelector接口或者继承ImportBeanDefinitionRegistrar接口的类,下面将会举例说明这两种用法。来,上代码!!!
代码实战
第一种:导入@Configuration
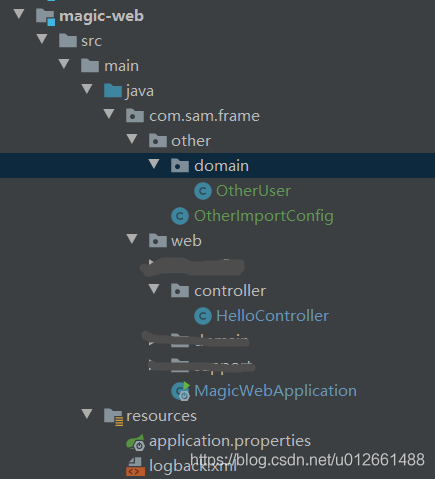
1、先创建一个springboot的web项目:
maven引入:
        <dependency>
            <groupId>org.springframework.boot</groupId>
            <artifactId>spring-boot-starter-web</artifactId>
        </dependency>
2、创建配置类OtherImportConfig.java
通常我们会把配置类放到启动类MagicWebApplication的同级目录(com.sam.frame.web)或者子目录下面,这次先特意放到其他非同级目录(com.sam.frame.other)目录下
package com.sam.frame.other;

import com.sam.frame.other.domain.OtherUser;
import org.springframework.context.annotation.Bean;
import org.springframework.context.annotation.Configuration;

@Configuration
public class OtherImportConfig {

    @Bean
    public OtherUser otherUser() {
        return new OtherUser("otherSam");
    }

}
3、创建Bean类OtherUser.java
package com.sam.frame.other.domain;


public class OtherUser {

    private String name;

    public OtherUser(String name) {
        this.name = name;
    }

    public String getName() {
        return name;
    }

    public void setName(String name) {
        this.name = name;
    }
}
4、创建测试Controller类TestController.java
package com.sam.frame.web.controller;

import com.alibaba.fastjson.JSONObject;
import com.sam.frame.other.domain.OtherUser;
import com.sam.frame.sms.sender.SmsSender;
import org.springframework.web.bind.annotation.GetMapping;
import org.springframework.web.bind.annotation.RequestMapping;
import org.springframework.web.bind.annotation.RestController;

import javax.annotation.Resource;

@RestController
@RequestMapping(value = "/hello", produces = "application/json; charset=utf-8")
public class HelloController {

    @Resource
    private OtherUser otherUser;

    @GetMapping(value = "/other")
    public String other() {
        return "hello world!" + otherUser.getName();
    }

}
5、最后是启动类MagicWebApplication.java
package com.sam.frame.web;

import com.sam.frame.other.OtherImportConfig;
import org.springframework.boot.SpringApplication;
import org.springframework.boot.autoconfigure.SpringBootApplication;
import org.springframework.context.annotation.Import;

@SpringBootApplication
public class MagicWebApplication {

    public static void main(String[] args) {
        SpringApplication.run(MagicWebApplication.class, args);
    }

}
6、启动MagicWebApplication.java
咦,这时候发现启动失败了,控制台报错信息:
Consider defining a bean of type 'com.sam.frame.other.domain.OtherUser' in your configuration.我们的配置类OtherImportConfig.java没有实现Bean类OtherUser.java的实例注册IOC容器中。
为什么呢,因为springboot只会扫描启动类同包目录或者子包目录下注解的@Configuration类,还有加载/resources/META-INF/spring.factories配置文件的类。
7、使用注解@Import
我们修改下启动类,加上@Import(OtherImportConfig.class)
package com.sam.frame.web;

import com.sam.frame.other.OtherImportConfig;
import org.springframework.boot.SpringApplication;
import org.springframework.boot.autoconfigure.SpringBootApplication;
import org.springframework.context.annotation.Import;

@SpringBootApplication
// 这里引入之前创建的配置类OtherImportConfig
@Import(OtherImportConfig.class)
public class MagicWebApplication {

    public static void main(String[] args) {
        SpringApplication.run(MagicWebApplication.class, args);
    }

}
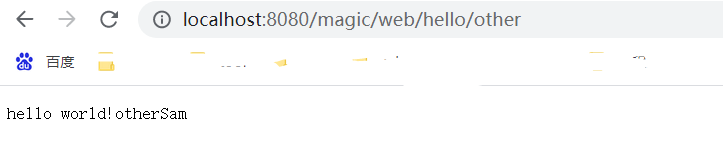
启动,请求成功了
从这里我们可以知道import注解的作用:可以导入其他非启动包下的配置类进行初始化bean;
第二种:导入继承ImportSelector接口类
实现ImportSelector接口类,在@Import注解导入后,springboot启动会执行ImportSelector接口实现类里的selectImports(AnnotationMetadata annotationMetadata)方法获取需要加载的配置类名列表,这样可以实现加载多个配置。
1、创建MyImportSelector类
package com.sam.frame.other;

import org.springframework.context.annotation.ImportSelector;
import org.springframework.core.type.AnnotationMetadata;

import java.util.function.Predicate;

// 继承ImportSelector接口类
public class MyImportSelector implements ImportSelector {

    @Override
    public String[] selectImports(AnnotationMetadata annotationMetadata) {
        // 返回创建的配置类OtherImportConfig的类名
        String otherImportConfigName = OtherImportConfig.class.getName();
        return new String[]{otherImportConfigName};
    }

    @Override
    public Predicate<String> getExclusionFilter() {
        return null;
    }
}
2、启动类MagicWebApplication.java
package com.sam.frame.web;

import com.sam.frame.other.MyImportSelector;
import org.springframework.boot.SpringApplication;
import org.springframework.boot.autoconfigure.SpringBootApplication;
import org.springframework.context.annotation.Import;

@SpringBootApplication
// 引入MyImportSelector类
@Import(MyImportSelector.class)
public class MagicWebApplication {

    public static void main(String[] args) {
        SpringApplication.run(MagicWebApplication.class, args);
    }

}
启动验证,http://localhost:8080/magic/web/hello/other 成功。
3、使用Enable注解的方式使Import导入配置生效
通常我们在设计的时候,不会直接在启动类加上注解@Import,会创建类似于springboot的@EnableAutoConfiguration的一个注解@EnableMyImport来实现配置的加载
package com.sam.frame.other;

import org.springframework.context.annotation.Import;

import java.lang.annotation.ElementType;
import java.lang.annotation.Retention;
import java.lang.annotation.RetentionPolicy;
import java.lang.annotation.Target;

@Target(ElementType.TYPE)
@Retention(RetentionPolicy.RUNTIME)
// 这里使用Import来导入配置
@Import(MyImportSelector.class)
public @interface EnableMyImport {
}
启动类修改为:
package com.sam.frame.web;

import com.sam.frame.other.EnableMyImport;
import org.springframework.boot.SpringApplication;
import org.springframework.boot.autoconfigure.SpringBootApplication;

@SpringBootApplication
// 采用注解方式来使用@Import导入配置
@EnableMyImport
public class MagicWebApplication {

    public static void main(String[] args) {
        SpringApplication.run(MagicWebApplication.class, args);
    }

}
启动验证,http://localhost:8080/magic/web/hello/other 成功。


 680
680


 被折叠的 条评论
为什么被折叠?
被折叠的 条评论
为什么被折叠?
 到【灌水乐园】发言


