


3.0 多线程
(1)基本概念
- 进程:系统中正常运行的一个应用程序(每个进程之间都是独立,且均运行在专用并受保护的内存空间中)。
- 线程:线程是进程的基本执行单元(每个进程至少有一个线程)。
- 线程的串行:一个线程执行多个任务时,只能单个执行(同一时间内,一个线程只能执行一个任务、线程是进程中一条执行路径)。
- 多线程:一个进程开启多条线程,每个线程可并行(同时)执行不同任务(多线程技术可提高程序的执行效率)。
- 线程同步/同步锁/互斥锁:多条线程在同一条线上(按顺序)执行。
- 线程通信:在一个进程中,线程往往不是孤立存在的,多个线程之间是存在有通信关系的(体现:1.数据传递;2.任务转接)
(2)多线程原理
- 1.同一时间,CPU只能处理一条线程,只有一条线程在工作
- 2.多线程并发执行时,其实是CPU快速的在线程之间调度
- 3.如果CPU调度线程的时间足够快,就造成了多线程并发执行的假象
(3)多线程的优缺点
- 优点:
- 1.能够适当的提高程序的执行效率
- 2.能够适当提高资源的利用率(CPU、内存的利用率)
- 缺点:
- 线程会占用一定内存控件(默认主线程占1M,子线程占512KB)。线程过多将降低程序的性能。
- 线程越多,CPU在调度线程上的开销越大。
- 增加程序设计复杂度:如线程间通信、多线程的数据共享等。
(4)主线程
- 主线程:一个IOS程序运行后,默认开启一条线程,该线程称“主线程”或“UI线程”
- 主线程作用:1.显示/刷新UI界面;2.处理UI事件(点击、滚动、拖拽等)。
- 主线程使用的注意事项:不要将比较耗时的操作放置在主线程中(会严重影响UI的流畅度,造成”卡”的感觉,体验度下降)。
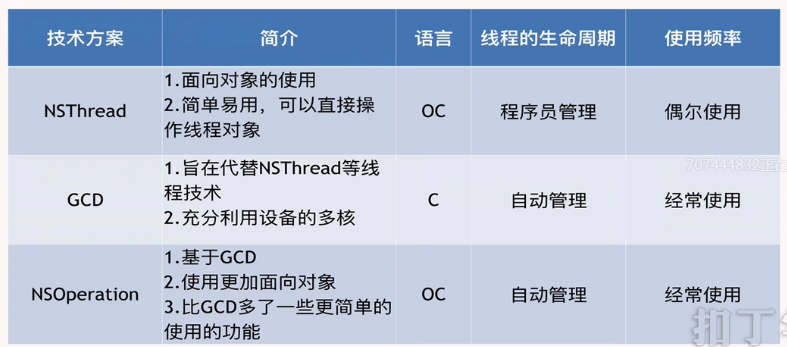
(5)多线程的使用方案
(6)其他
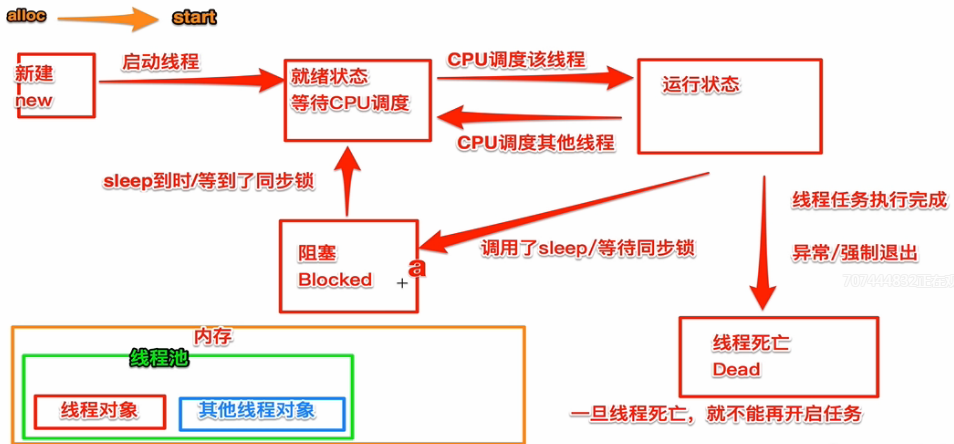
- 线程阻塞:调用sleep、等待同步锁会进入阻塞(sleep到时、等到同步锁会进入就绪状态等待调度)
- 线程死亡:线程任务执行完毕、异常、强制退出会造成线程死亡(一旦线程死亡,不能再开启任务)
3.1 NSThreaed
- initWithTarget:创建线程
- detachNewThreadSelector:类方法创建并启动线程
- lock:线程加锁
- unlock:线程解锁
- sleepForTimeInterval:线程休眠
1.. 同步锁/互斥锁/线程同步
- (1)优点:
- 有效的防止因多线程抢夺资源造成的数据安全问题;
- (2)缺点:
- 因为线程等待,需要消耗大量的CPU资源;
@interface NSThreaedViewController ()
{
    NSThread *_thread01;
    NSThread *_thread02;
    NSInteger _counter;
    NSLock *_lock;
}

@end

@implementation NSThreaedViewController

- (void)viewDidLoad {
    [super viewDidLoad];
    self.view.backgroundColor = [UIColor whiteColor];

    _lock = [[NSLock alloc] init];

    NSArray *ary = @[@"启动线程01", @"启动线程02", @"启动线程03", @"线程休眠01", @"线程休眠02", @"强制退出线程"];
    NSUInteger number = [ary count];
    for(int i=0; i<number; i++){
        UIButton *btn = [UIButton buttonWithType:UIButtonTypeSystem];

        btn.frame = CGRectMake(100, 100+80*i, 80, 40);

        [btn addTarget:self action:@selector(pressBtn:) forControlEvents:UIControlEventTouchDown];

        btn.tag = 101 + i;

        [btn setTitle:ary[i] forState:UIControlStateNormal];

        [self.view addSubview:btn];
    }
    // Do any additional setup after loading the view from its nib.
}

- (void)pressBtn :(UIButton *)btn
{
    switch (btn.tag) {
        case 101:
        {
            /*创建一个线程对象
             P1:线程对象运行函数的拥有者
             P2:线程处理函数
             P3:线程参数*/
            NSThread *newT = [[NSThread alloc] initWithTarget:self selector:@selector(createThread:) object:@"线程01"];

            //启动并且运行线程;
            [newT start];
            break;
        }
        case 102:
        {
            //创建并启动线程
            //不能赋值,因为没有返回值
            [NSThread detachNewThreadSelector:@selector(createThread:) toTarget:self withObject:@"线程02"];
            break;
        }
        case 103:
        {
            //开一个后台线程(子线程)
            [self performSelectorInBackground:@selector(createThread:) withObject:@"线程03"];
            break;
        }
        case 104:
        {
            [self performSelectorInBackground:@selector(createThreadSleep:) withObject:@"休眠线程01"];
            break;
        }
        case 105:
        {
            [self performSelectorInBackground:@selector(createThreadSleep:) withObject:@"休眠线程02"];
            break;
        }
        case 106:
        {
            [self performSelectorInBackground:@selector(createThreadSleep:) withObject:@"强制退出线程"];
            break;
        }
        default:
            break;
    }
}

-(void)createThread :(NSString *)str{
    if(![str isEqualToString:@"线程03"]){
        //第一种方法加同步锁
        for(int i=0; i<2500; i++){
            [_lock lock];

            _counter++;

            [_lock unlock];

            NSLog(@"%ld", _counter);
        }

        //第二种方法加同步锁
//        @synchronized(self) {
//            for(int i=0; i<2500; i++){
//
//                _counter++;
//
//                NSLog(@"%ld", _counter);
//            }
//        }


        NSLog(@"thread01: %ld", _counter);
    }
    else if([str isEqualToString:@"线程03"]){
        NSLog(@"线程03 %@", str);

        //waitUntilDone: YES:回调函数执行完成,再执行下面代码
        //                NO:同步执行下面代码
        [self performSelectorOnMainThread:@selector(returnThread:) withObject:@"回调函数" waitUntilDone:YES];

        NSLog(@"回调函数成功");
    }

    NSLog(@"线程:%@, 输出参数:%@", [NSThread currentThread], str);
}

-(void) returnThread:(NSString *)str
{
    NSLog(@"在回调函数中");
}


-(void) createThreadSleep : (NSString *)str
{
    //线程休眠
    NSLog(@"线程:%@,参数:%@", [NSThread currentThread], str);

    if([str isEqualToString:@"休眠线程01"]){
        //第一种方法
        //P1:时间(秒)
        [NSThread sleepForTimeInterval:2];
    }
    else if([str isEqualToString:@"休眠线程02"]){
        //第二种方法
        //P1:传入定制的时间
        [NSThread sleepUntilDate:[NSDate dateWithTimeIntervalSinceNow:5]];
    }
    else if([str isEqualToString:@"强制退出线程"]){
        for(int i=0; i<1000; i++){

            NSLog(@"%d", i);

            if(i == 200){
                [NSThread exit];
            }
        }

    }

    NSLog(@"再次执行线程");
}
3.2 NSOperation
- NSOperationQueue:任务队列
- NSInvocationOperation:任务对象类型
- initWithTarget:创建任务
- addOperation:operation:添加任务到队列中
- setMaxConcurrentOperationCount:设置同时并发的任务数量
1) 步骤
- 1.将需要执行的操作封装到NSOperation中
- 2.将NSOperation对象添加到NSOperationQueue中
- 3.系统将自动将NSOperationQueue’中的NSOperation取出来
- 4.将取出来的NSOperation封装的操作放到一条线程中执行
2) 作用
- 如果将NSOperation添加到NSOperationQueue中,系统会异步执行NSOperation的操作
3) 挂起和取消
- 挂起:需要暂停队列的任务的执行时候使用(Suspended为”YES”即可)
- 注意:1.当任务处于执行状态,设置队列挂起不会影响其执行,受影响的是那些还没有执行的任务; 2.当队列设置为挂起状态后,可以通过修改其状态再次恢复任务。
- 取消:当取消任务后,任务不可恢复。(- (void)cancelAllOperations)
- 注意:若任务操作是自定义NSOperation类型的话,执行完一个耗时操作后,需加是否取消任务的判断,再去执行另外一个耗时操作。
4) 程序
- OperationViewController.m
#import "OperationViewController.h"
#import "customOperation.h"

#define IMAGE_URL @"http://pic33.nipic.com/20130916/3420027_192919547000_2.jpg"

@interface OperationViewController ()

@property (nonatomic, strong) NSOperationQueue *queueOne;

@end

@implementation OperationViewController

- (void)viewDidLoad {
    [super viewDidLoad];

    [self.view setBackgroundColor:[UIColor whiteColor]];

    NSArray *arr = @[@"invocation", @"BlockOperation", @"自定义", @"任务队列", @"依赖关系", @"最大并发数", @"任务挂起/恢复(先按“最大。。”)", @"任务取消"];
    NSUInteger count = [arr count];
    for (int i=0; i<count; i++) {
        UIButton *btn = [UIButton buttonWithType:UIButtonTypeSystem];

        btn.frame = CGRectMake(80, 80+50*i, 60, 40);

        [btn setTitle:arr[i] forState:UIControlStateNormal];

        btn.tag = 100 + i;

        [btn sizeToFit];

        [btn addTarget:self action:@selector(btnAcntion:) forControlEvents:UIControlEventTouchDown];

        [self.view addSubview: btn];
    }

    // Do any additional setup after loading the view.
}

-(void)btnAcntion :(UIButton *)btn
{
    switch (btn.tag) {
        case 100:   //invocation
            [self invocationOperation];
            break;
        case 101:
            [self BlockOperation];
            break;
        case 102:
            [self custom];
            break;
        case 103:
            [self mainQueue];
            break;
        case 104:
            [self depenDency];
            break;
        case 105:
            [self maxConcurreatCount];
            break;
        case 106:
            [self suspdendAndCancel:@"suspdend"];
            break;
        case 107:
            [self suspdendAndCancel:@"cancel"];
            break;
        default:
            break;
    }
}

//invocationOperation
- (void) invocationOperation
{
    //默认情况下,调用start方法后,并不回开启新的线程去执行操作,而是在当线程中进行同步操作
    //只有讲NSOperation放到NSOperationQueue中才会执行异步操作

    NSInvocationOperation *ip = [[NSInvocationOperation alloc] initWithTarget:self selector:@selector(invocationOperationAction) object:nil];

    //开启任务
    [ip start];

//    [self per]
}
- (void) invocationOperationAction
{
    NSLog(@"----1---%@", [NSThread currentThread]);
}


//BlockOperation
- (void) BlockOperation
{
    //只要NSBlockOperation封装的操作数大于1,就回开启线程,异步执行

    //在主线程中完成
    NSBlockOperation *bp = [NSBlockOperation blockOperationWithBlock:^{
        NSLog(@"----2---%@", [NSThread currentThread]);
    }];

    //额外任务,在子线程中执行
    [bp addExecutionBlock:^{
        NSLog(@"----3 ---%@", [NSThread currentThread]);
    }];

    [bp start];
}


// 自定义(需要重写main方法)
- (void) custom {
    [super didReceiveMemoryWarning];

    customOperation *co = [[customOperation alloc] init];

    [co start];
}


// 主队列
- (void) mainQueue
{
    // 创建队列(默认创建并行队列)
    NSOperationQueue *queue = [[NSOperationQueue alloc] init];

    NSInvocationOperation *op = [[NSInvocationOperation alloc] initWithTarget:self selector:@selector(mainAction:) object: @"op"];

    NSInvocationOperation *opT = [[NSInvocationOperation alloc] initWithTarget:self selector:@selector(mainAction:) object: @"opT"];

    // 将操作放置于队列中, 不需要用start开启
    [queue addOperation: op];
    [queue addOperation: opT];

    [queue addOperationWithBlock:^{
        NSLog(@"-----6---- %@", [NSThread currentThread]);
    }];
}

-(void)mainAction :(NSString *)str
{
    if([str isEqualToString: @"op"]){
        NSLog(@"-----4---- %@", [NSThread currentThread]);
    }
    else if([str isEqualToString: @"opT"]){
        NSLog(@"-----5---- %@", [NSThread currentThread]);
    }

}

// 任务依赖  --- 如果一依赖二, 等二执行完成,再执行一
- (void)depenDency
{
    // 任务之间不能相互依赖
    NSOperationQueue *queue = [[NSOperationQueue alloc] init];

    NSBlockOperation *bp = [NSBlockOperation blockOperationWithBlock:^{
        NSLog(@"任务一:%@", [NSThread currentThread]);
    }];

    NSBlockOperation *bpTwo = [NSBlockOperation blockOperationWithBlock:^{
        NSLog(@"任务二:%@", [NSThread currentThread]);
    }];

    NSBlockOperation *bpThree = [NSBlockOperation blockOperationWithBlock:^{
        NSLog(@"任务三:%@", [NSThread currentThread]);
    }];

    // 前者依赖于后者,先执行后者,再执行前者
    [bpTwo addDependency: bp];

    [queue addOperation: bp];
    [queue addOperation: bpTwo];
    [queue addOperation: bpThree];
}

// 最大并发数量
- (void)maxConcurreatCount
{
    NSOperationQueue *queue = [[NSOperationQueue alloc] init];

    queue.maxConcurrentOperationCount = 2;

    [queue addOperationWithBlock:^{
        for(int i=0; i<1000; i++){
            NSLog(@"线程一,%@, %d", [NSThread currentThread], i);
        }
    }];

    [queue addOperationWithBlock:^{
        for(int i=0; i<1000; i++){
            NSLog(@"线程二,%@, %d", [NSThread currentThread], i);
        }
    }];

    [queue addOperationWithBlock:^{
        for(int i=0; i<1000; i++){
            NSLog(@"线程三,%@, %d", [NSThread currentThread], i);
        }
    }];

    self.queueOne = queue;
}

// 任务挂起与取消
- (void)suspdendAndCancel : (NSString *)str
{
    if([str isEqualToString: @"suspdend"]){
        if(!self.queueOne.suspended){
            self.queueOne.suspended = YES;
        }
        else{
            self.queueOne.suspended = NO;
        }
    }
    //如果是自定义的队列需要在自定义中使用self.cancelled判断是否已经取消.若无判断将继续执行
    else if([str isEqualToString:@"cancel"]){
        [self.queueOne cancelAllOperations];
    }
}- customOperation.m
    - (void) main{
    NSLog(@"---4-----%@", [NSThread currentThread]);
}
3.3 GCD
(1)基本概念
- Grand Central Dispatch(伟大的中枢调度器)(纯C语言)
- GCD会自动利用更多的CPU内核(如双核、四核)
- GCD会自动管理线程的生命周期(创建线程、调度任务、销毁线程)
- 程序员只需要告诉GCD执行的任务,不需要编写任何线程管理代码
- 队列:存放任务
- 使用步骤:1.定制任务;2.将任务添加到队列中–GCD会自动将队列的任务取出,放到对应的线程中执行(任务取出遵守队列的FIFO原则:先进先出,后进后出)
- 任务执行方式:同步任务、异步方式(同步:在当前线程中执行任务,不能开启新线程能力;异步:可在新线程中执行任务,能开启新线程的能力)
- 队列类型:并发队列、串行队列(并发队列:在异步函数下,可多个任务并发执行,会自动开启多个线程同事执行任务;串行队列:任务一个一个执行(需要等前一个线程完成)。
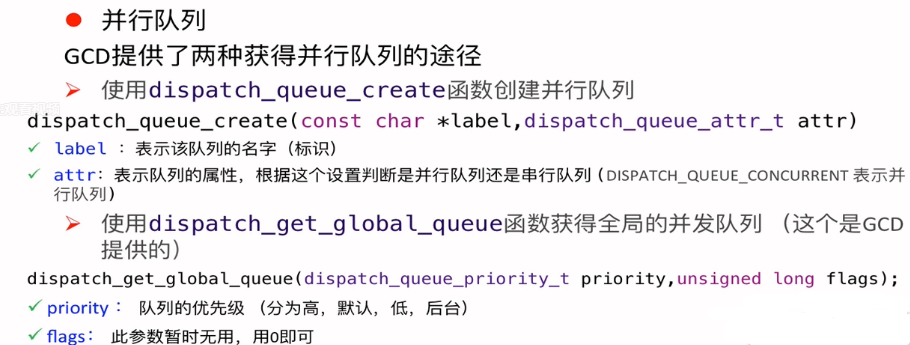
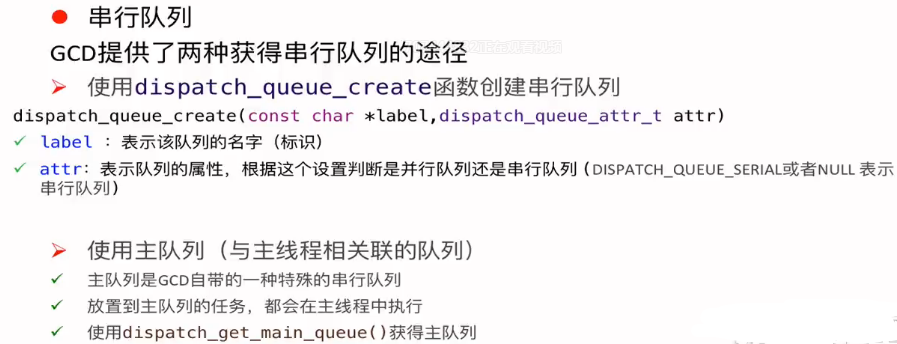
(2)队列的创建
(3) 程序
#import "GCDViewController.h"
#define IMAGE_URL @"http://pic33.nipic.com/20130916/3420027_192919547000_2.jpg"
@interface GCDViewController ()
@property (nonatomic, strong) IBOutlet UIImageView *imageView;
@end
@implementation GCDViewController
- (void)viewDidLoad {
[super viewDidLoad];
[self.view setBackgroundColor: [UIColor whiteColor]];
self.imageView = [[UIImageView alloc] initWithFrame:CGRectMake(0, 300, 200, 150)];
NSArray *arr = @[@"并行队列", @"线程通信", @"串行队列", @"主队列", @"全程队列"];
NSUInteger count = [arr count];
for(int i=0; i<count; i++){
UIButton *btn = [UIButton buttonWithType: UIButtonTypeSystem];
btn.frame = CGRectMake(80, 80 + i * 50, 70, 40);
[btn setTitle:arr[i] forState: UIControlStateNormal];
btn.tag = 100 + i;
[btn sizeToFit];
[btn addTarget:self action:@selector(btnAcntion:) forControlEvents:UIControlEventTouchDown];
[self.view addSubview: btn];
}
// Do any additional setup after loading the view.
}
-(void)btnAcntion: (UIButton *)btn
{
switch (btn.tag) {
case 100: //并行同步队列
[self concurrentSync];
break;
case 101: //线程通信
[self concurrentAsync];
break;
case 102: //串行队列
[self serialSync];
break;
case 103: //主队列
[self mainSync];
break;
case 104: //全程队列
[self globalSync];
break;
default:
break;
}
}
#pragma mark -
#pragma mark -- 并发任务 --
- (void)concurrentSync
{
//并发队列 + 同步任务 = 不会开启新的线程,任务是逐个执行
//并发队列 + 异步任务 = 会开启新的线程,任务是并发执行
// 创建并发队列
dispatch_queue_t queue = dispatch_queue_create("concurrentQueue", DISPATCH_QUEUE_CONCURRENT);
// 在队列里面添加任务
// 同步任务:dispatch_sync
// 异步任务:dispatch_async
dispatch_sync(queue, ^{
for(int i=0; i<5; i++){
NSLog(@"第一个任务:%@", [NSThread currentThread]);
}
});
dispatch_sync(queue, ^{
for(int i=0; i<5; i++){
NSLog(@"第二个任务:%@", [NSThread currentThread]);
}
});
}
#pragma mark -
#pragma mark -- 串行队列 --
- (void) serialSync
{
//串行队列 + 同步任务 = 不会开启新的线程,任务是逐个执行
//串行队列 + 异步任务 = 会开启新的线程,任务是逐个执行
//创建串行队列
dispatch_queue_t queue = dispatch_queue_create("queue", NULL);
dispatch_sync(queue, ^{
for(int i=0; i<5; i++){
NSLog(@"第一个任务:%@", [NSThread currentThread]);
}
});
dispatch_sync(queue, ^{
for(int i=0; i<5; i++){
NSLog(@"第二个任务:%@", [NSThread currentThread]);
}
});
}
#pragma mark -
#pragma mark -- 线程通信 --
-(void)concurrentAsync
{
dispatch_async(dispatch_get_global_queue(DISPATCH_QUEUE_PRIORITY_DEFAULT, 0), ^{
//耗时操作
NSData *data = [NSData dataWithContentsOfURL:[NSURL URLWithString: IMAGE_URL]];
UIImage *image = [UIImage imageWithData: data];
// 回归到主线程
// 同步:先打印“回归主线程”, 再打印“子线程”。
// 异步:先打印“子线程”,再打印“回归主线程”;
dispatch_async(dispatch_get_main_queue(), ^{
NSLog(@"回归主线程");
self.imageView.image = image;
[self.view addSubview: self.imageView];
});
NSLog(@"子线程");
});
}
#pragma mark -
#pragma mark -- 全局队列 --
-(void)globalSync
{
//全局队列 + 同步任务 = 不会开启新的线程,任务是逐个执行
//全局队列 + 异步任务 = 不会开启新的线程,任务是并发执行
dispatch_queue_t queue = dispatch_get_global_queue(DISPATCH_QUEUE_PRIORITY_DEFAULT, 0);
dispatch_sync(queue, ^{
for(int i=0; i<5; i++){
NSLog(@"第一个任务:%@", [NSThread currentThread]);
}
});
dispatch_sync(queue, ^{
for(int i=0; i<5; i++){
NSLog(@"第二个任务:%@", [NSThread currentThread]);
}
});
}
#pragma mark -
#pragma mark -- 主队列 --
-(void) mainSync
{
//全局队列 + 同步任务 = 会造成死锁的线程
//全局队列 + 异步任务 = 不会开启新的线程,任务是逐个执行
//获取主队列
dispatch_queue_t queue = dispatch_get_main_queue();
dispatch_async(queue, ^{
for(int i=0; i<5; i++){
NSLog(@"第一个任务:%@", [NSThread currentThread]);
}
});
dispatch_async(queue, ^{
for(int i=0; i<5; i++){
NSLog(@"第二个任务:%@", [NSThread currentThread]);
}
});
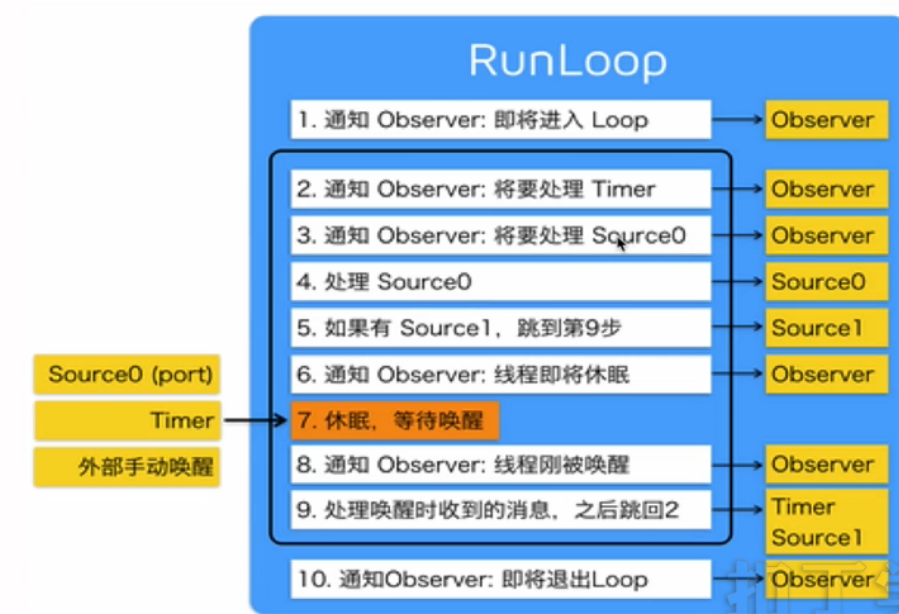
}3.4 Runloop
- 内部实现:do-while循环实现
- 作用:1.保证程序的持续运行;2.处理APP的各种事件(滑动、定时器);3.节省CPU资源,提高程序性能
(1)RunLoop与与线程
- 1.每条线程都有唯一的一个与之对应的RunLoop对象。
- 2.主线程的RunLoop随着程序已自动创建好,但是子线程的RunLoop需要手动创建。
- 3.获得主线程的RunLoop的方法是[NSRunLoop mainRunLoop]。
- 4.创建子线程的RunLoop的方法是[NSRunLoop currentRunLoop];(原理需在CFRunLoop中查看)
- 【注意】:苹果不允许创建RunLoop,只提供上述两种获得RunLoop方法。
- 逻辑处理
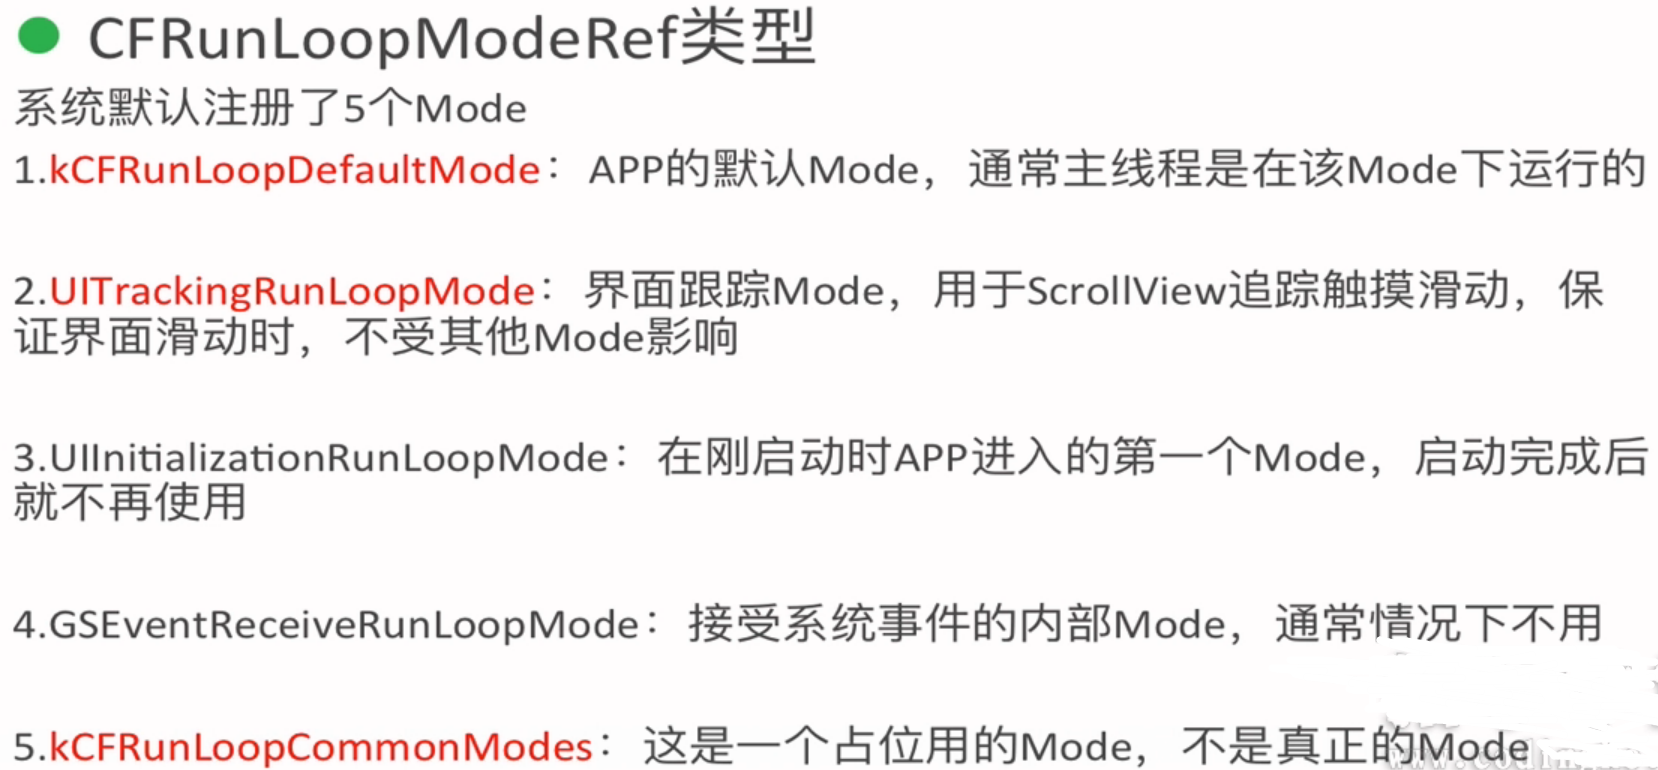
(2)CFRunLoopModeRef
- 1.CFRunLoopModeRef的代表了RunLoop的运行模式。
- 2.一个RunLoop可以包含多个Mode,每个Mode包含多个Source/Timer/Observer。
- 3.每次RunLoop启动时,只能指定其中的一个Mode,这个Mode被称为currentMode。
- 4.如果需要切换Mode,需要退出RunLoop再重新指定Mode进入(原因:分离不同组的Source/Timer/Observer,让其互不影响)。
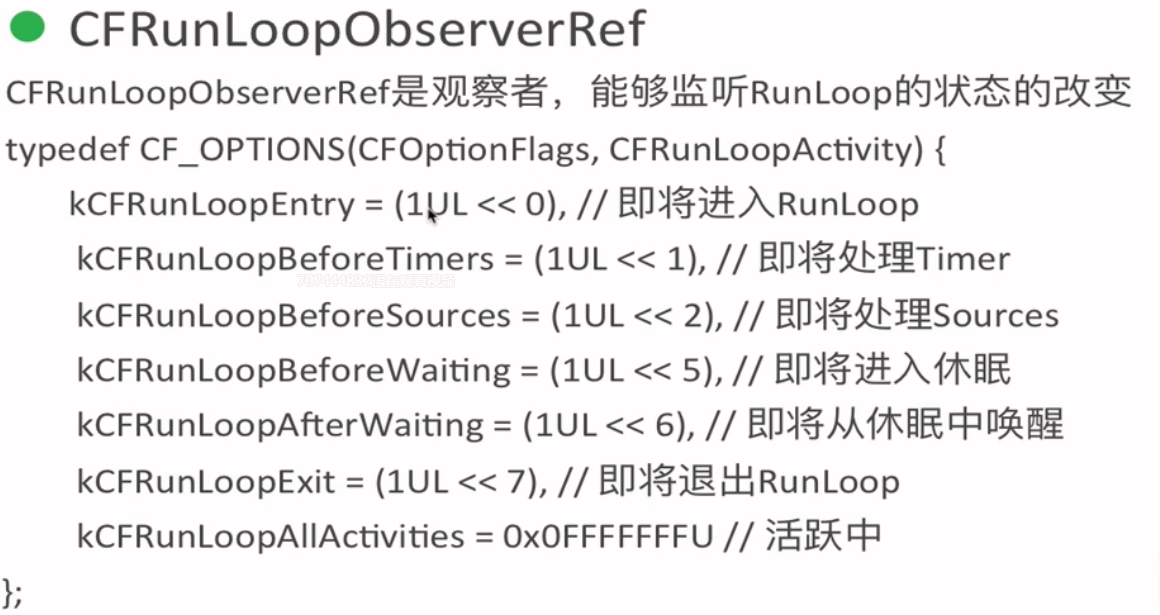
- 状态
- 类型
(3)程序
    - (void)viewDidLoad {
    [super viewDidLoad];

    [self performSeector];
    [self timer];
    // Do any additional setup after loading the view from its nib.
}

-(void)performSeector{
    [self performSelector:@selector(run) withObject:nil afterDelay:2 inModes:@[NSRunLoopCommonModes]];
}

- (IBAction)btnAction:(UIButton *)sender {
    // 如果给runLoop 添加观察者,需要CF类

    CFRunLoopObserverRef observer = CFRunLoopObserverCreateWithHandler(CFAllocatorGetDefault(), kCFRunLoopAllActivities, YES, 0, ^(CFRunLoopObserverRef observer, CFRunLoopActivity activity) {
        NSLog(@"----%lu", activity);
    });

    CFRunLoopAddObserver(CFRunLoopGetCurrent(), observer, kCFRunLoopDefaultMode);
}

- (void) timer{
    // 自动加在runLoop下,可以直接运行
    //    [NSTimer scheduledTimerWithTimeInterval:2.0 target:self selector:@selector(run) userInfo:nil repeats:YES];

    NSTimer *timer = [NSTimer scheduledTimerWithTimeInterval:2.0 target:self selector:@selector(run) userInfo:nil repeats:YES];

    // 只应用于默认模式下, TextView滚动模式下不执行
    //    [[NSRunLoop currentRunLoop] addTimer:timer forMode:NSDefaultRunLoopMode];

    // 只能运行于滚动模式下
    //    [[NSRunLoop currentRunLoop] addTimer:timer forMode:UITrackingRunLoopMode];

    // 滚动和不滚动都能运行
    // NSRunLoopCommonModes它只是一个标记, 模式有:UITrackingRunLoopMode、NSDefaultRunLoopMode
    [[NSRunLoop currentRunLoop] addTimer:timer forMode:NSRunLoopCommonModes];
}

-(void)run
{
    NSLog(@"Run");
}


 930
930


 被折叠的 条评论
为什么被折叠?
被折叠的 条评论
为什么被折叠?
 到【灌水乐园】发言


