


前面的简单队列案例、work queue案例中一条消息只能有一个消费者,消费后就会删除。
发布订阅模式与之前案例的区别就是允许将同一消息发送给多个消费者。实现方式是加入exchange(交换机)。
之前消息是发送直接到达队列,现在是先发给exchange。再由exchange转发给队列。
常见exchange类型包括:
Fanout:广播
Direct:路由
Topic:话题
注意:exchage负责消息路由,而不是存储,路由失败则消息丢失。
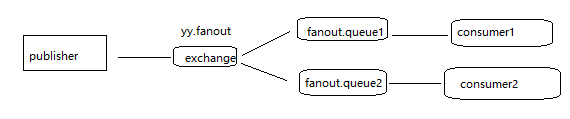
Fanout Exchange
Fanout Exchange会将接收到的消息路由到每一个跟其绑定的queue,也称为广播路由。
eg:
- 在consumer服务中,利用代码声明队列、交换机、并将两者绑定。
- 在consumer服务中,编写两个消费者方法,分别监听fanout.queue1和fanout.queue2。
- 在publisher中编写测试方法,向yy.fanout发送消息。
声明配置类
package com.yy.comsumer.config;


import org.springframework.amqp.core.Binding;
import org.springframework.amqp.core.BindingBuilder;
import org.springframework.amqp.core.FanoutExchange;
import org.springframework.amqp.core.Queue;
import org.springframework.context.annotation.Bean;
import org.springframework.context.annotation.Configuration;

@Configuration
public class FanoutConfig {

    //yy.fanout 声明交换机
    @Bean
    public FanoutExchange fanoutExchange(){
        return new FanoutExchange("yy.fanout");
    }

    //fanout.queue1 声明第1个队列
    @Bean
    public Queue fanoutQueue(){
        return new Queue("fanout.queue1");
    }

    //绑定 绑定队列1和交换机
    @Bean
    public Binding fanoutBinding1(Queue fanoutQueue,FanoutExchange fanoutExchange){
        return BindingBuilder.bind(fanoutQueue).to(fanoutExchange);
    }


    //fanout.queue2 声明第2个队列
    @Bean
    public Queue fanoutQueue2(){
        return new Queue("fanout.queue2");
    }

    //绑定 绑定队列2和交换机
    @Bean
    public Binding fanoutBinding2(Queue fanoutQueue2,FanoutExchange fanoutExchange){
        return BindingBuilder.bind(fanoutQueue2).to(fanoutExchange);
    }


}
定义完配置类启动后。Spring读取到这些Bean就会自动到MQ去声明,绑定。


添加测试类
package com.yy.spring;

import org.junit.Test;
import org.junit.runner.RunWith;
import org.springframework.amqp.rabbit.core.RabbitTemplate;
import org.springframework.beans.factory.annotation.Autowired;
import org.springframework.boot.test.context.SpringBootTest;
import org.springframework.test.context.junit4.SpringRunner;

@RunWith(SpringRunner.class)
@SpringBootTest
public class SpringAmqpTest {
    @Autowired
    private RabbitTemplate rabbitTemplate;

    @Test
    public void testSendMessage2SimpleQueue(){
        String queueName="simple.queue";
        String message="hello,string amqp!";
        rabbitTemplate.convertAndSend(queueName,message);
    }

    @Test
    public void testSendMessage2WorkQueue() throws InterruptedException {
        String queueName="simple.queue";
        String message="hello,message__";
        for (int i = 1; i < 50; i++) {
            rabbitTemplate.convertAndSend(queueName,message + i);
            Thread.sleep(20);
        }

    }


    @Test
    public void testSendFanoutExchange()  {
        //交换机名称
        String exchangeName = "yy.fanout";
        // 消息
        String message = "Hi ya every one!";
        // 发送消息
        rabbitTemplate.convertAndSend(exchangeName,"",message);

    }

}
启动后查看到消息发送到了所有消费者

Direct Exchange
Direct Exchange 会将接收到的消息根据规则路由到指定的Queue,因此称为路由模式。
- 每一个Queue都与Exchange设置一个BindingKey
- 发布者发送消息时,指定消息的RoutingKey
- Exchange将消息路由到BindingKey与消息RoutingKey一致的队列
- 一个队列可以绑定多个Key
eg:
- 在consumer利用@RabbitListener声明Exchange、Queue、RoutingKey,编写两个消费者,分别监听direct.queue1和direct.queue2。
2 . 在publisher中编写测试方法,向itcast.direct发送消息。
编写两个消费者listenDirectQueue1、listenDirectQueue2
package com.yy.comsumer.listener;

import org.springframework.amqp.core.ExchangeTypes;
import org.springframework.amqp.rabbit.annotation.Exchange;
import org.springframework.amqp.rabbit.annotation.Queue;
import org.springframework.amqp.rabbit.annotation.QueueBinding;
import org.springframework.amqp.rabbit.annotation.RabbitListener;
import org.springframework.stereotype.Component;

import java.time.LocalDate;
import java.time.LocalTime;

@Component
//声明为bean,让Spring能够找到
public class SpringRabbitListener {

//    @RabbitListener(queues = "simple.queue")
//    //告诉spring要监听了队列
//    public void listenerSimpleQueueMessage(String msg) throws InterruptedException{
//        //String 是列表发的什么类型,此处就对应定义为什么消息
//        System.out.println("Spring 消费者接收到消:【" + msg +"】");
//    }

//    @RabbitListener(queues = "simple.queue")
//    //告诉spring要监听了队列
//    public void listenerWorkQueue(String msg) throws InterruptedException{
//        //String 是列表发的什么类型,此处就对应定义为什么消息
//        System.out.println("消费者1 接收到消:【" + msg +"】" + LocalTime.now());
//        Thread.sleep(20);
//    }
//
//    @RabbitListener(queues = "simple.queue")
//    //告诉spring要监听了队列
//    public void listenerWorkQueue2(String msg) throws InterruptedException{
//        //String 是列表发的什么类型,此处就对应定义为什么消息
//        System.err.println("消费者2.......接收到消:【" + msg +"】" + LocalTime.now());
//        Thread.sleep(200);
//    }


    @RabbitListener(queues = "fanout.queue1")
    //告诉spring要监听了队列
    public void listenerFanoutQueue1(String msg) throws InterruptedException{
        //String 是列表发的什么类型,此处就对应定义为什么消息
        System.err.println("消费者接收到fanout.queue1消息:【" + msg +"】" + LocalTime.now());
        Thread.sleep(200);
    }


    @RabbitListener(queues = "fanout.queue2")
    //告诉spring要监听了队列
    public void listenerFanoutQueue2(String msg) throws InterruptedException{
        //String 是列表发的什么类型,此处就对应定义为什么消息
        System.err.println("消费者接收到fanout.queue2消息:【" + msg +"】" + LocalTime.now());
        Thread.sleep(200);
    }

    @RabbitListener(bindings = @QueueBinding(
            value = @Queue(name = "direct.queue1"),
            exchange = @Exchange(name = "yy.direct",type = ExchangeTypes.DIRECT),
            key = {"red","blue"}
    ))
    //使用注解,声明队列,交换机,绑定的key,这样就不需要像fanout一样声明配置类
    public void listenDirectQueue1(String msg){
        System.err.println("消费者接收到direct.queue1消息:【" + msg +"】" + LocalTime.now());
    }

    @RabbitListener(bindings = @QueueBinding(
            value = @Queue(name = "direct.queue2"),
            exchange = @Exchange(name = "yy.direct",type = ExchangeTypes.DIRECT),
            key = {"red","yellow"}
    ))
    //使用注解,声明队列,交换机,绑定的key,这样就不需要像fanout一样声明配置类
    public void listenDirectQueue2(String msg){
        System.err.println("消费者接收到direct.queue2消息:【" + msg +"】" + LocalTime.now());
    }
}
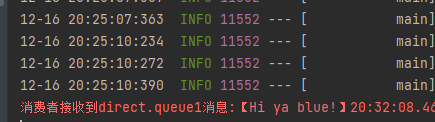
启动后就可以查看到direct的Exchange


编写测试方法testSendDirectExchange
package com.yy.spring;

import org.junit.Test;
import org.junit.runner.RunWith;
import org.springframework.amqp.rabbit.core.RabbitTemplate;
import org.springframework.beans.factory.annotation.Autowired;
import org.springframework.boot.test.context.SpringBootTest;
import org.springframework.test.context.junit4.SpringRunner;

@RunWith(SpringRunner.class)
@SpringBootTest
public class SpringAmqpTest {
    @Autowired
    private RabbitTemplate rabbitTemplate;

    @Test
    public void testSendMessage2SimpleQueue(){
        String queueName="simple.queue";
        String message="hello,string amqp!";
        rabbitTemplate.convertAndSend(queueName,message);
    }

    @Test
    public void testSendMessage2WorkQueue() throws InterruptedException {
        String queueName="simple.queue";
        String message="hello,message__";
        for (int i = 1; i < 50; i++) {
            rabbitTemplate.convertAndSend(queueName,message + i);
            Thread.sleep(20);
        }

    }


    @Test
    public void testSendFanoutExchange()  {
        //交换机名称
        String exchangeName = "yy.fanout";
        // 消息
        String message = "Hi ya every one!";
        // 发送消息
        rabbitTemplate.convertAndSend(exchangeName,"",message);

    }


    @Test
    public void testSendDirectExchange()  {
        //交换机名称
        String exchangeName = "yy.direct";
        // 消息
        String message = "Hi ya blue!";
        // 发送消息
        rabbitTemplate.convertAndSend(exchangeName,"blue",message);

    }

}
发布订阅TopicExchange
TopicExchange与DirectExchange类似,区别在于routingKey必须是多个单词的列表,并且以.分割。
Queue与Exchange指定BindingKey时可以使用通配符:
#:代指0个或多个单词。
*:代指一个单词
eg:
一个绑定china.#
一个绑定#.news
- 在consumer利用@RabbitListener声明Exchange、Queue、RoutingKey,编写两个消费者,分别监听topic.queue1和topic.queue2。
- 在publisher中编写测试方法,向yy.topic发送消息。
编写消费者,监听topic
package com.yy.comsumer.listener;

import org.springframework.amqp.core.ExchangeTypes;
import org.springframework.amqp.rabbit.annotation.Exchange;
import org.springframework.amqp.rabbit.annotation.Queue;
import org.springframework.amqp.rabbit.annotation.QueueBinding;
import org.springframework.amqp.rabbit.annotation.RabbitListener;
import org.springframework.stereotype.Component;

import java.time.LocalDate;
import java.time.LocalTime;

@Component
//声明为bean,让Spring能够找到
public class SpringRabbitListener {

//    @RabbitListener(queues = "simple.queue")
//    //告诉spring要监听了队列
//    public void listenerSimpleQueueMessage(String msg) throws InterruptedException{
//        //String 是列表发的什么类型,此处就对应定义为什么消息
//        System.out.println("Spring 消费者接收到消:【" + msg +"】");
//    }

//    @RabbitListener(queues = "simple.queue")
//    //告诉spring要监听了队列
//    public void listenerWorkQueue(String msg) throws InterruptedException{
//        //String 是列表发的什么类型,此处就对应定义为什么消息
//        System.out.println("消费者1 接收到消:【" + msg +"】" + LocalTime.now());
//        Thread.sleep(20);
//    }
//
//    @RabbitListener(queues = "simple.queue")
//    //告诉spring要监听了队列
//    public void listenerWorkQueue2(String msg) throws InterruptedException{
//        //String 是列表发的什么类型,此处就对应定义为什么消息
//        System.err.println("消费者2.......接收到消:【" + msg +"】" + LocalTime.now());
//        Thread.sleep(200);
//    }


//    @RabbitListener(queues = "fanout.queue1")
//    //告诉spring要监听了队列
//    public void listenerFanoutQueue1(String msg) throws InterruptedException{
//        //String 是列表发的什么类型,此处就对应定义为什么消息
//        System.err.println("消费者接收到fanout.queue1消息:【" + msg +"】" + LocalTime.now());
//        Thread.sleep(200);
//    }
//
//
//    @RabbitListener(queues = "fanout.queue2")
//    //告诉spring要监听了队列
//    public void listenerFanoutQueue2(String msg) throws InterruptedException{
//        //String 是列表发的什么类型,此处就对应定义为什么消息
//        System.err.println("消费者接收到fanout.queue2消息:【" + msg +"】" + LocalTime.now());
//        Thread.sleep(200);
//    }
//
//    @RabbitListener(bindings = @QueueBinding(
//            value = @Queue(name = "direct.queue1"),
//            exchange = @Exchange(name = "yy.direct",type = ExchangeTypes.DIRECT),
//            key = {"red","blue"}
//    ))
//    //使用注解,声明队列,交换机,绑定的key,这样就不需要像fanout一样声明配置类
//    public void listenDirectQueue1(String msg){
//        System.err.println("消费者接收到direct.queue1消息:【" + msg +"】" + LocalTime.now());
//    }
//
//    @RabbitListener(bindings = @QueueBinding(
//            value = @Queue(name = "direct.queue2"),
//            exchange = @Exchange(name = "yy.direct",type = ExchangeTypes.DIRECT),
//            key = {"red","yellow"}
//    ))
//    //使用注解,声明队列,交换机,绑定的key,这样就不需要像fanout一样声明配置类
//    public void listenDirectQueue2(String msg){
//        System.err.println("消费者接收到direct.queue2消息:【" + msg +"】" + LocalTime.now());
//    }


    @RabbitListener(bindings = @QueueBinding(
            value = @Queue(name = "topic.queue1"),
            exchange = @Exchange(name = "yy.topic",type = ExchangeTypes.TOPIC),
            key = "china.#"
    ))
    //使用注解,声明队列,交换机,绑定的key,这样就不需要像fanout一样声明配置类
    public void listenTopicQueue1(String msg){
        System.err.println("消费者接收到topic.queue1消息:【" + msg +"】" + LocalTime.now());
    }

    @RabbitListener(bindings = @QueueBinding(
            value = @Queue(name = "topic.queue2"),
            exchange = @Exchange(name = "yy.topic",type = ExchangeTypes.TOPIC),
            key = "#.news"
    ))
    //使用注解,声明队列,交换机,绑定的key,这样就不需要像fanout一样声明配置类
    public void listenTopicQueue2(String msg){
        System.err.println("消费者接收到topic.queue2消息:【" + msg +"】" + LocalTime.now());
    }
}
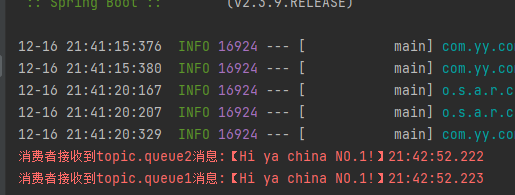
向yy.topic发送消息
package com.yy.spring;

import org.junit.Test;
import org.junit.runner.RunWith;
import org.springframework.amqp.rabbit.core.RabbitTemplate;
import org.springframework.beans.factory.annotation.Autowired;
import org.springframework.boot.test.context.SpringBootTest;
import org.springframework.test.context.junit4.SpringRunner;

@RunWith(SpringRunner.class)
@SpringBootTest
public class SpringAmqpTest {
    @Autowired
    private RabbitTemplate rabbitTemplate;

    @Test
    public void testSendMessage2SimpleQueue(){
        String queueName="simple.queue";
        String message="hello,string amqp!";
        rabbitTemplate.convertAndSend(queueName,message);
    }

    @Test
    public void testSendMessage2WorkQueue() throws InterruptedException {
        String queueName="simple.queue";
        String message="hello,message__";
        for (int i = 1; i < 50; i++) {
            rabbitTemplate.convertAndSend(queueName,message + i);
            Thread.sleep(20);
        }

    }


    @Test
    public void testSendFanoutExchange()  {
        //交换机名称
        String exchangeName = "yy.fanout";
        // 消息
        String message = "Hi ya every one!";
        // 发送消息
        rabbitTemplate.convertAndSend(exchangeName,"",message);

    }


    @Test
    public void testSendDirectExchange()  {
        //交换机名称
        String exchangeName = "yy.direct";
        // 消息
        String message = "Hi ya blue!";
        // 发送消息
        rabbitTemplate.convertAndSend(exchangeName,"blue",message);

    }


    @Test
    public void testSendTopicExchange()  {
        //交换机名称
        String exchangeName = "yy.topic";
        // 消息
        String message = "Hi ya china NO.1!";
        // 发送消息
        rabbitTemplate.convertAndSend(exchangeName,"china.news",message);

    }

}


 135
135


 被折叠的 条评论
为什么被折叠?
被折叠的 条评论
为什么被折叠?
 到【灌水乐园】发言


