


Android 的界面配置在项目res\layout 路径的XML 文件。
XML 的根标签代表界面的布局模式。用来设置一个界面的控件布局。
当然布局里面还可以有其他布局。
<LinearLayout>...</LinearLayout> 线性布局
<RelativeLayout>...</RelativeLayout> 相对布局
<FrameLayout>...</FrameLayout> 帆布局
<TableLayout>...</TableLayout> 表格布局
<AbsoluteLayout>...</AbsoluteLayout> 绝对布局
线性布局
线性布局是比较常用的布局方式,而线性布局分两种排列方式,一种是水平,一种是垂直。
线性布局的排列方式由根标签的android:orientation 属性进行设置。
垂直布局
android:orientation="vertical" 为垂直布局
<?xml version="1.0" encoding="utf-8"?>
<LinearLayout xmlns:android="http://schemas.android.com/apk/res/android"
    android:layout_width="match_parent"
    android:layout_height="match_parent"
    android:orientation="vertical" >

    <Button
        android:id="@+id/button2"
        android:layout_width="wrap_content"
        android:layout_height="wrap_content"
        android:text="Button1" />

    <Button
        android:id="@+id/button1"
        android:layout_width="wrap_content"
        android:layout_height="wrap_content"
        android:text="Button1" />

    <Button
        android:id="@+id/button3"
        android:layout_width="wrap_content"
        android:layout_height="wrap_content"
        android:text="Button1" />

</LinearLayout>

水平布局
android:orientation="horizontal" 为水平布局
<?xml version="1.0" encoding="utf-8"?>
<LinearLayout xmlns:android="http://schemas.android.com/apk/res/android"
    android:layout_width="match_parent"
    android:layout_height="match_parent"
    android:orientation="horizontal" >

    <Button
        android:id="@+id/button2"
        android:layout_width="wrap_content"
        android:layout_height="wrap_content"
        android:text="Button1" />

    <Button
        android:id="@+id/button1"
        android:layout_width="wrap_content"
        android:layout_height="wrap_content"
        android:text="Button1" />

    <Button
        android:id="@+id/button3"
        android:layout_width="wrap_content"
        android:layout_height="wrap_content"
        android:text="Button1" />

</LinearLayout>

相对布局
相对布局也是android 里面比较常用的布局方式,它可以相对屏幕布局,也可以相对控件布局。
根据屏幕相对布局
android:layout_alignParentLeft="true" 控件左边显示
android:layout_centerInParent="true" 控件居中显示
android:layout_alignParentRight="true" 控件右边显示
android:layout_alignParentBottom="true" 控件下边显示
<?xml version="1.0" encoding="utf-8"?>
<RelativeLayout xmlns:android="http://schemas.android.com/apk/res/android"
    android:layout_width="match_parent"
    android:layout_height="match_parent" >

    <Button
        android:layout_width="wrap_content"
        android:layout_height="wrap_content"
        android:layout_alignParentLeft="true"
        android:layout_centerInParent="true"
        android:text="button1"
        />


    <Button
        android:layout_width="wrap_content"
        android:layout_height="wrap_content"
        android:layout_alignParentRight="true"
        android:layout_alignParentBottom="true"
        android:text="button2"
        />
</RelativeLayout>
根据控件相对布局
android:layout_below 根据控件的id进行控件相对布局。
<?xml version="1.0" encoding="utf-8"?>
<RelativeLayout xmlns:android="http://schemas.android.com/apk/res/android"
    android:layout_width="match_parent"
    android:layout_height="match_parent" >

    <TextView
        android:id="@+id/text1"
        android:layout_width="wrap_content"
        android:layout_height="wrap_content"
        android:layout_alignParentLeft="true"
        android:background="#ccc"
        android:textSize="20dp"
        android:text="hello gril !! " />

    <TextView
        android:layout_width="wrap_content"
        android:layout_height="wrap_content"
        android:layout_alignParentRight="true"
        android:layout_below="@+id/text1"
        android:background="#ccc"
         android:textSize="20dp"
        android:text="hello boy" />

    <LinearLayout
        android:layout_width="match_parent"
        android:layout_height="wrap_content"
        android:layout_alignParentBottom="true"
        android:orientation="horizontal" >

        <EditText
            android:layout_width="match_parent"
            android:layout_height="wrap_content"
            android:layout_weight="1" />

        <Button
            android:background="#2177C7"
            android:layout_width="wrap_content"
            android:layout_height="wrap_content"
            android:text="send" />
    </LinearLayout>

</RelativeLayout>
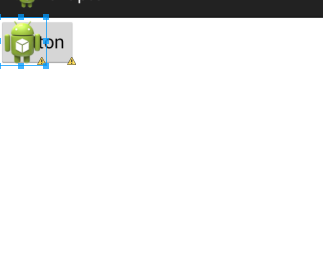
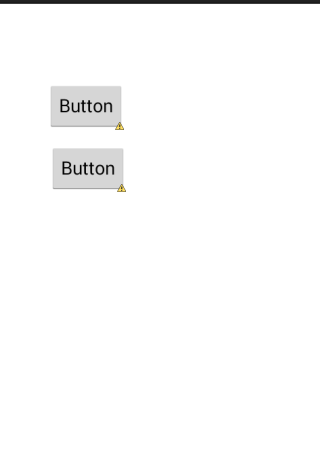
帆布局
帆布局应用非常少,它的布局规则是所有控件在左上角显示。
<?xml version="1.0" encoding="utf-8"?>
<FrameLayout xmlns:android="http://schemas.android.com/apk/res/android"
    android:layout_width="match_parent"
    android:layout_height="match_parent" >

    <Button
        android:id="@+id/button1"
        android:layout_width="wrap_content"
        android:layout_height="wrap_content"
        android:text="Button" />

    <ImageView
        android:id="@+id/imageView1"
        android:layout_width="wrap_content"
        android:layout_height="wrap_content"
        android:src="@drawable/ic_launcher" />

</FrameLayout>
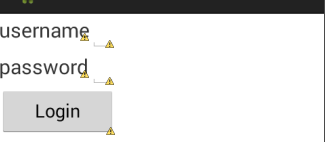
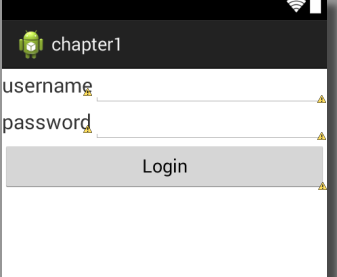
表格布局
表格布局应用场景不是很多。但是也是比较简单的。
表格布局不能知道宽度,只能知道高度。
表格的行数由TableRow 绝定。
表格的列数由TableRow 里的控件个数决定。
<TableRow></TableRow> 创建一行
android:layout_span 合并表格
<?xml version="1.0" encoding="utf-8"?>
<TableLayout xmlns:android="http://schemas.android.com/apk/res/android"
    android:layout_width="match_parent"
    android:layout_height="match_parent"
    >

    <TableRow >
        <TextView android:textSize="20dp" android:text="username"/>
        <EditText/>
    </TableRow>

    <TableRow >
        <TextView android:textSize="20dp" android:text="password"/>
        <EditText/>
    </TableRow>
     <TableRow>
        <Button android:layout_span="2" android:text="Login"/>
    </TableRow>


</TableLayout>
上图的表格布局的控件没有足够的应用屏幕宽度。
android:stretchColumns="1" 第二列填充剩余屏幕
<?xml version="1.0" encoding="utf-8"?>
<TableLayout xmlns:android="http://schemas.android.com/apk/res/android"
    android:layout_width="match_parent"
    android:layout_height="match_parent"

    android:stretchColumns="1"
    >

    <TableRow >
        <TextView android:textSize="20dp" android:text="username"/>
        <EditText/>
    </TableRow>

    <TableRow >
        <TextView android:textSize="20dp" android:text="password"/>
        <EditText/>
    </TableRow>
     <TableRow>
        <Button android:layout_span="2" android:text="Login"/>
    </TableRow>


</TableLayout>
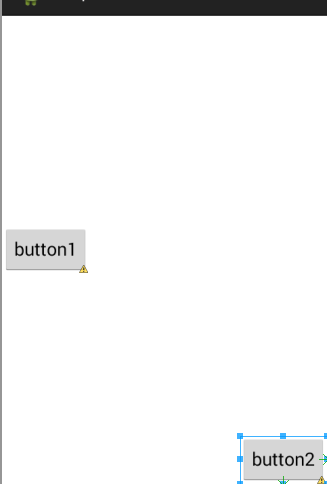
绝对布局
绝对布局是通过屏幕的坐标来控制控件的位置,由于兼容性较差,应用不是很广泛。
android:layout_x 设置垂直坐标
android:layout_y 设置水平坐标
<?xml version="1.0" encoding="utf-8"?>
<AbsoluteLayout xmlns:android="http://schemas.android.com/apk/res/android"
    android:layout_width="match_parent"
    android:layout_height="match_parent" >
    <Button
        android:id="@+id/button1"
        android:layout_width="wrap_content"
        android:layout_height="wrap_content"
        android:layout_x="46dp"
        android:layout_y="77dp"
        android:text="Button" />

    <Button
        android:id="@+id/button2"
        android:layout_width="wrap_content"
        android:layout_height="wrap_content"
        android:layout_x="48dp"
        android:layout_y="138dp"
        android:text="Button" />

</AbsoluteLayout>


 3077
3077

 被折叠的 条评论
为什么被折叠?
被折叠的 条评论
为什么被折叠?
 到【灌水乐园】发言


