


文章目录
vue+node+mysql全栈项目完整记录
写在前面
因工作需要,近半年一直在写B/S架构的项目。博主作为门外汉coder,其实刚开始会的语言只有Python和matlab。matlab作为博主研究生期间写论文的主要工具,参加工作以后就很少用了。后面因为要做数据分析相关的工作,所以自己学了一下Python,包括qt界面开发相关的技术。个人觉得Python作为后端开发语言,其实已经很强大了。现在在后端开发领域之所以java依旧是王者,主要是因为很多项目都是java开发的,用java维护起来更加方便。被大家诟病的弱类型语言,其实Python3已经可以强制类型了。再者,被大家诟病的运行效率低,讲真,除非那种非常大的项目,Python操作起来还是没有压力的,至少博主到目前为止没有发现任何问题。随着工作难度的加大,后期博主也自学了java,确实比Python难度大,到目前为止,还没学明白,尤其是javaweb开发那一套,学完就忘。再到后面,学习JavaScript,发现前后端都可以使用JavaScript进行开发,于是就一门心思投入到JavaScript的学习中了。
博主谈一些JavaScript的学习体会吧。JavaScript也是一门弱类型语言,不会强制数据的类型,这和Python非常像。但是typescript已经解决这个问题了,不过个人觉得没有必要硬要通过是否强制类型来区分程序语言的好坏。就小型web项目而言,如果前后端都是使用JavaScript进行开发,根本就无需对数据类型进行强制规定,也不需要使用泛型(可能个人的开发还比较基础,目前来说没有需要使用泛型的地方)。JavaScript有个优点,那就是语法简单,甚至比Python还要简单。而且JavaScript是前端必备三剑客之一。语法简单,前端后端都能开发,那还要啥自行车呢。所以博主选择将JavaScript作为主力语言进行web项目开发。
这半年,博主跟着B站的up前前后后写了10来个web项目了。也来谈谈个人的体会吧:
- 很多web项目都只有前端,后端随便给个接口地址,而这些接口地址往往是不固定的,过一段时间就没了,尤其是那些培训机构给的接口
- 有些web项目有后端开发,但80%的后端都是java开发的,比如非常火的若依后台管理系统。倒不是说java开发后端不好,java是后端最主流的语言,不过学习成本太大了,我梳理了一下,大致要学的内容有:java基础+maven管理工具+SSM框架+springboot,没有大半年的学习时间,根本没法入门
- 少部分web项目前后端都是JavaScript开发的,不过现在倾向使用分布式数据库(MongoDB),虽然这个学习成本不大,但博主是真用不到,博主工作中都是用的关系型数据,oracle,postgresql和MySQL都用过,其中MySQL用的最多
这样一下来,可供学习的资源就非常有限了。博主选定的技术栈如下:
- 后端:node开发环境,数据库使用MySQL,使用express构建服务器框架
- 前端:vue框架,axios前后端跨域访问,vuex数据管理,elementUI搭建页面
而且这半年,在个人gitee上已经上传了很多前后端分离web项目,B站上也录了一些项目的演示视频。不过一直想做的一件事就是把一个完整的项目开发记录下来,离春节还有几天,且这几天工作并没有那么忙,鼓足勇气写起来吧
写完回过头来看,感觉自己写的很乱,确实不如视频课程清晰,先就这样吧
项目最终界面展示
项目的演示视频如下:
登录界面

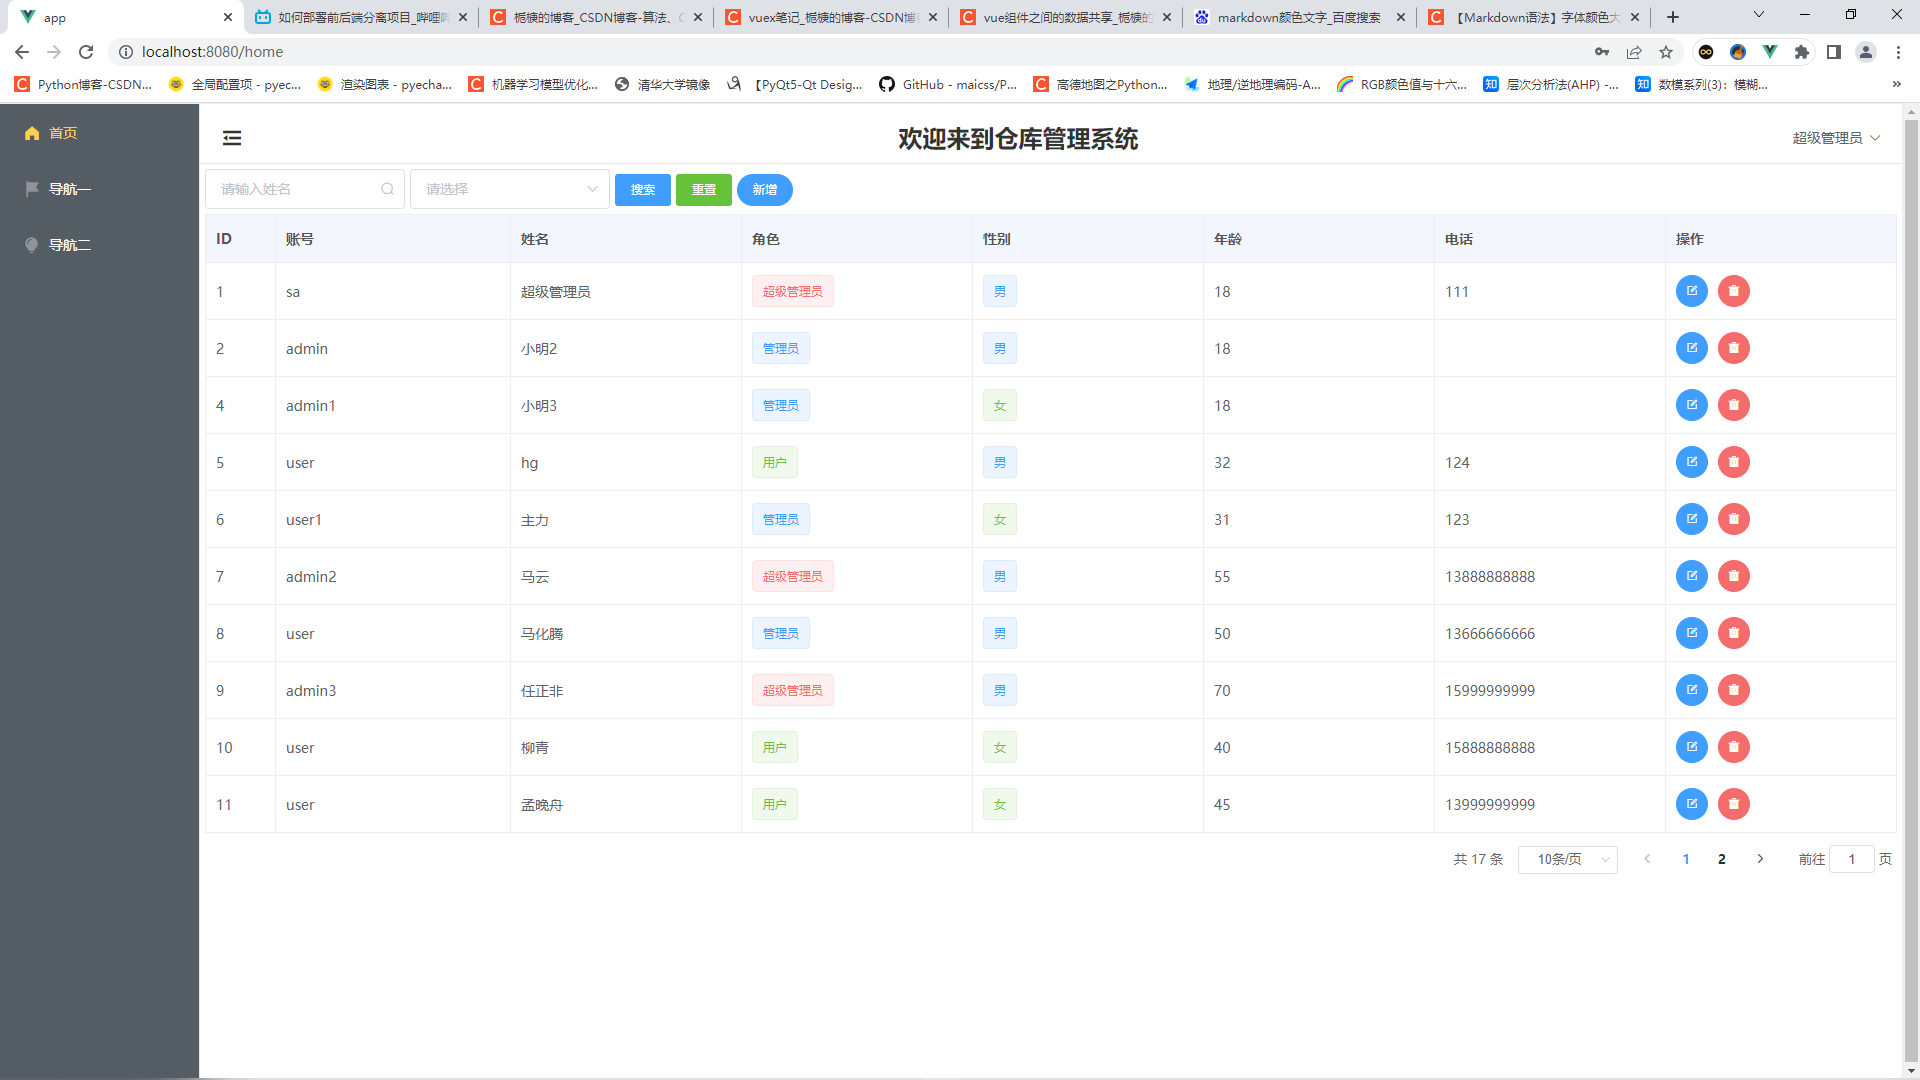
首页界面
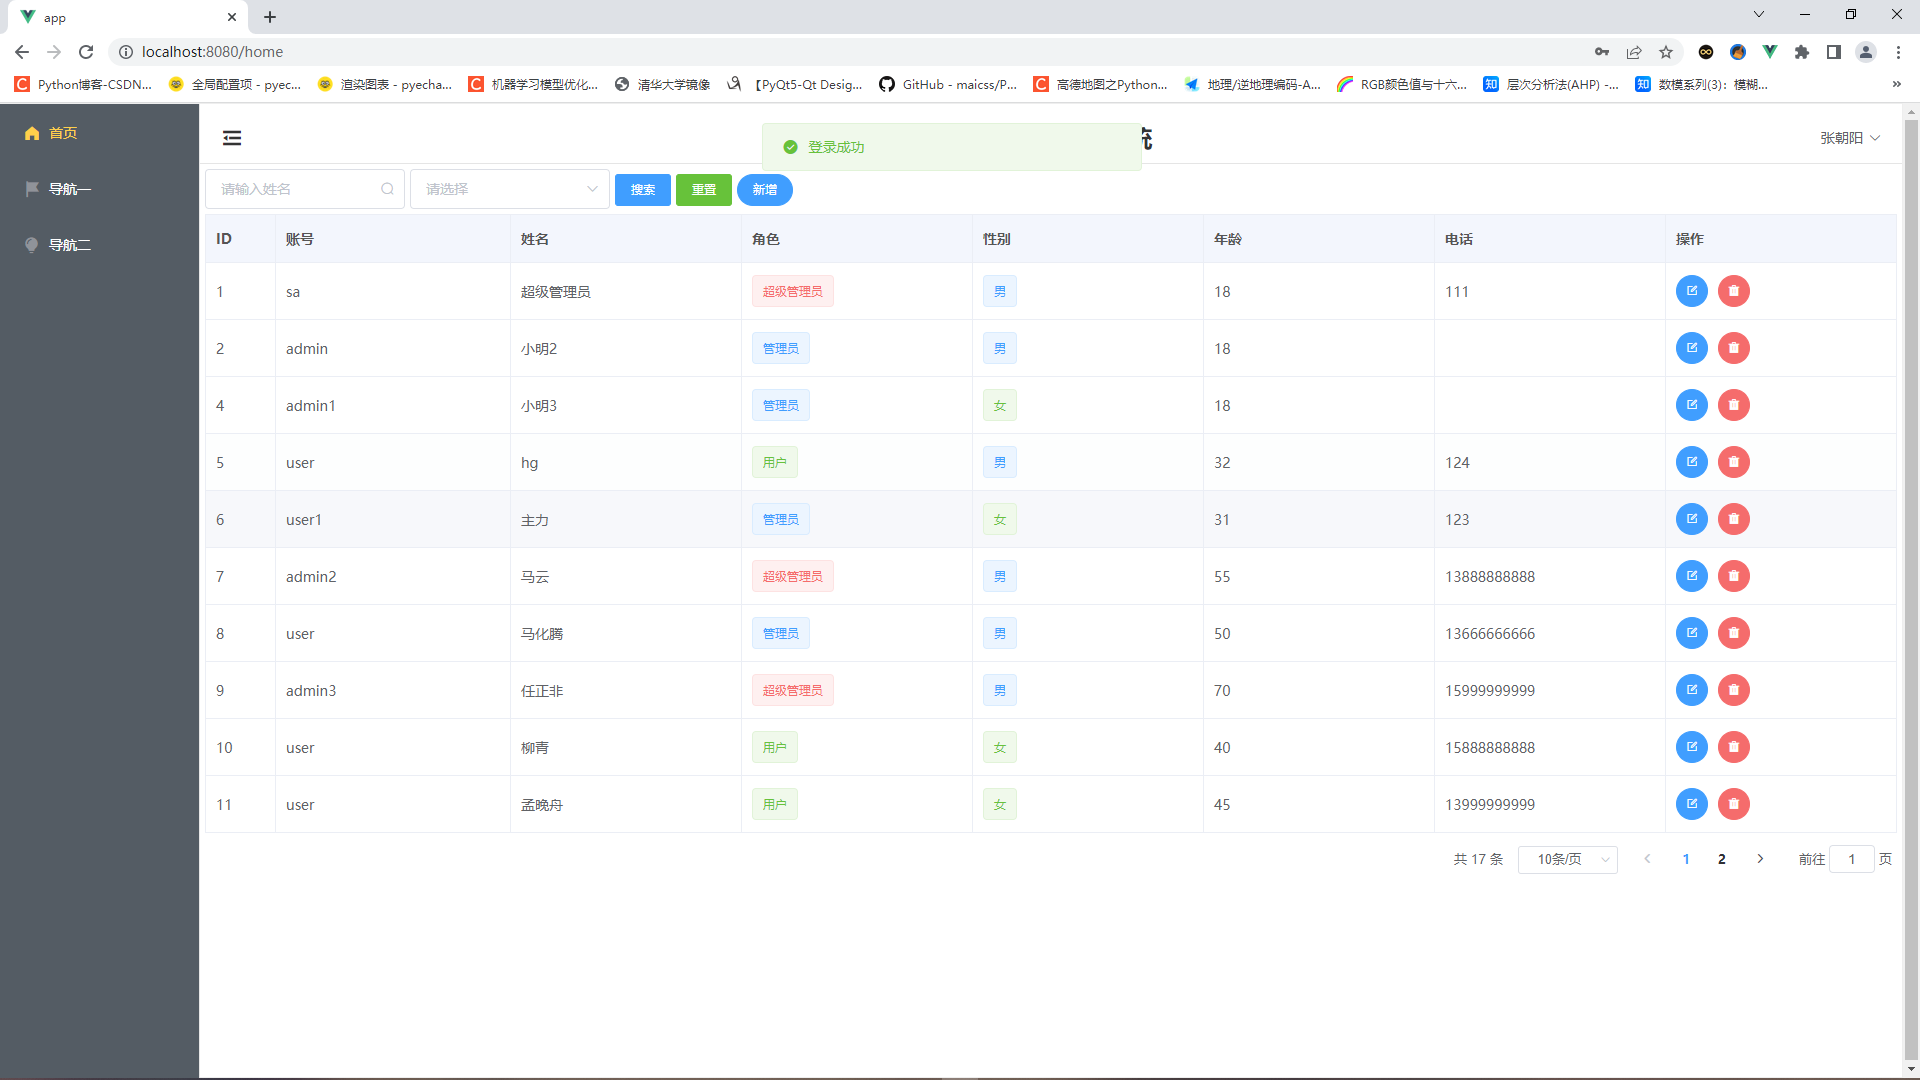
目前重点就写了这两个界面,其他界面基本上都差不多了。比较复杂的是第二个界面,上面有数据的增删改查功能,以及页面的布局设计,可以看出来,整体上还是很有elementUI的风格的
项目框架搭建
后端
创建后端项目
首先搭建后端框架
新建文件wms>api
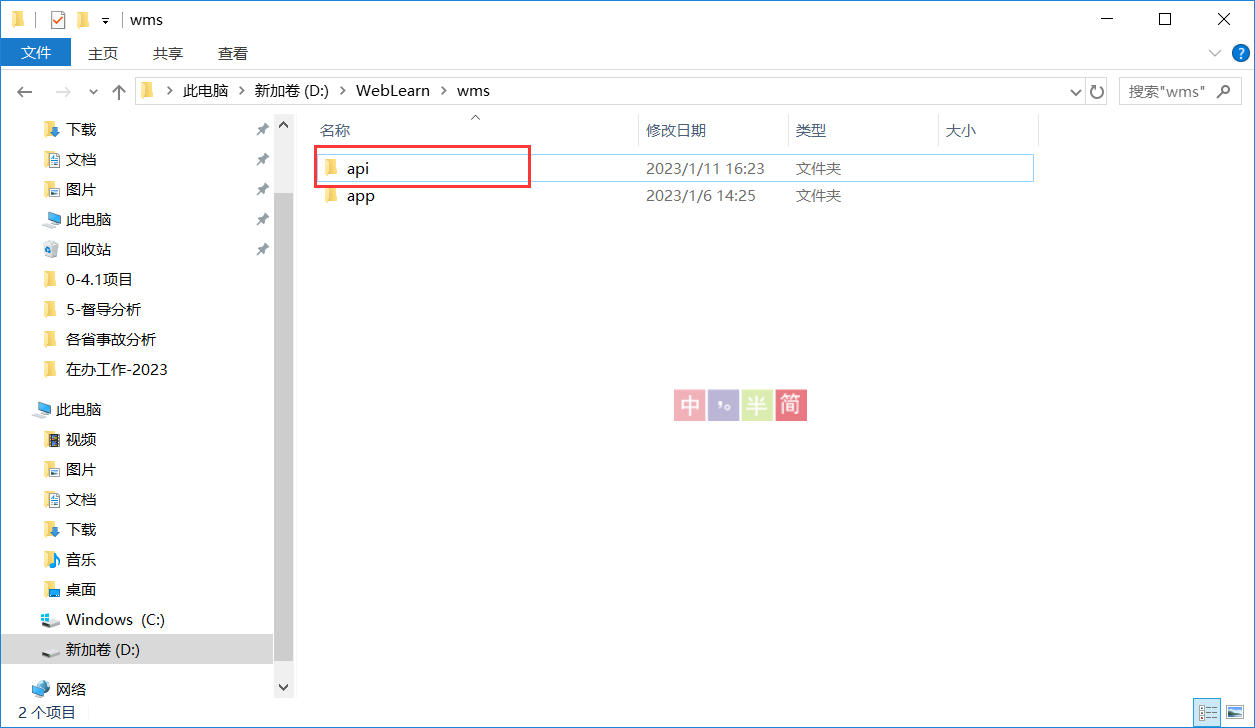
api是后端接口的文件夹,需要手动创建。app是前端页面的文件夹,后面使用vue脚手架创建
使用vscode打开api文件夹,并新建终端,在终端输入npm init -y,将会生成package.json文件
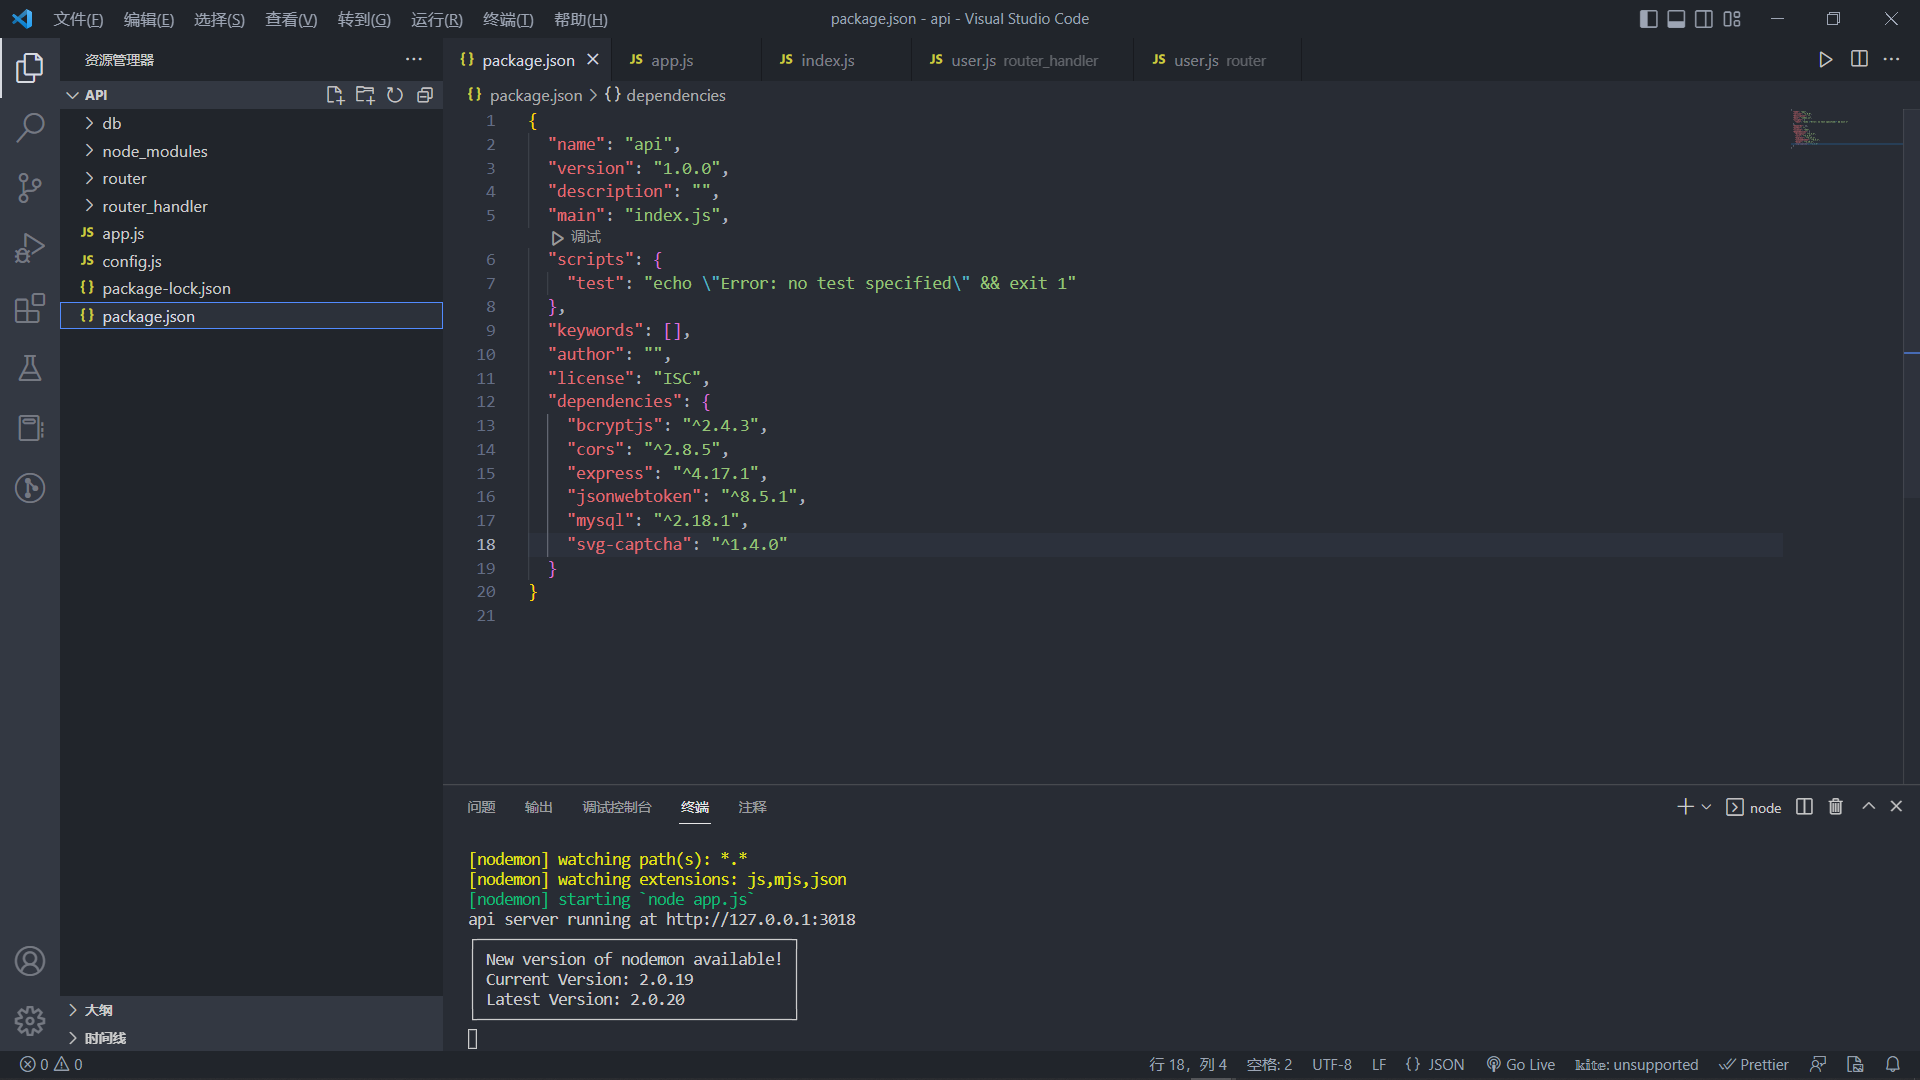
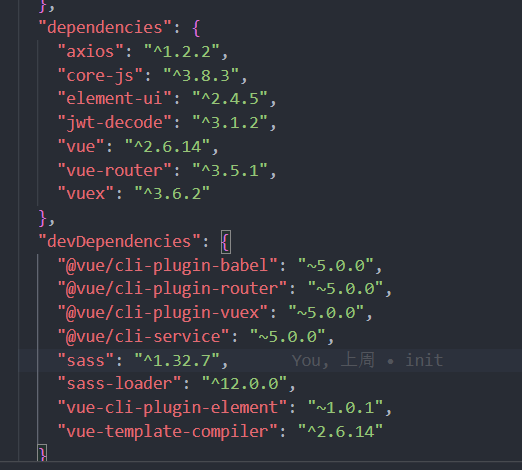
需要安装的包有:
"dependencies": {
    "bcryptjs": "^2.4.3",
    "cors": "^2.8.5",
    "express": "^4.17.1",
    "jsonwebtoken": "^8.5.1",
    "mysql": "^2.18.1",
    "svg-captcha": "^1.4.0"
  }
把这个内容拷贝到package.json文件中,然后终端输入npm i,即可安装这些包
编写入口文件
api根目录下创建app.js文件,在app.js中填入以下代码:
const express = require('express')
const cors = require('cors')
const bodyParser = require('body-parser')

const app = express()
app.use(cors())
app.use(express.urlencoded({extended: false}))
app.use(bodyParser.json())

// const userRouter = require('./router/user')
// app.use('/api/user', userRouter)

app.listen(3018, () => {
    console.log('api server running at http://127.0.0.1:3018')
})
我注释起来的两行代码是后面要用的,创建项目之初不需要。全局安装nodemon,终端输入nodemon app.js即可启动项目。
数据库及数据库使用
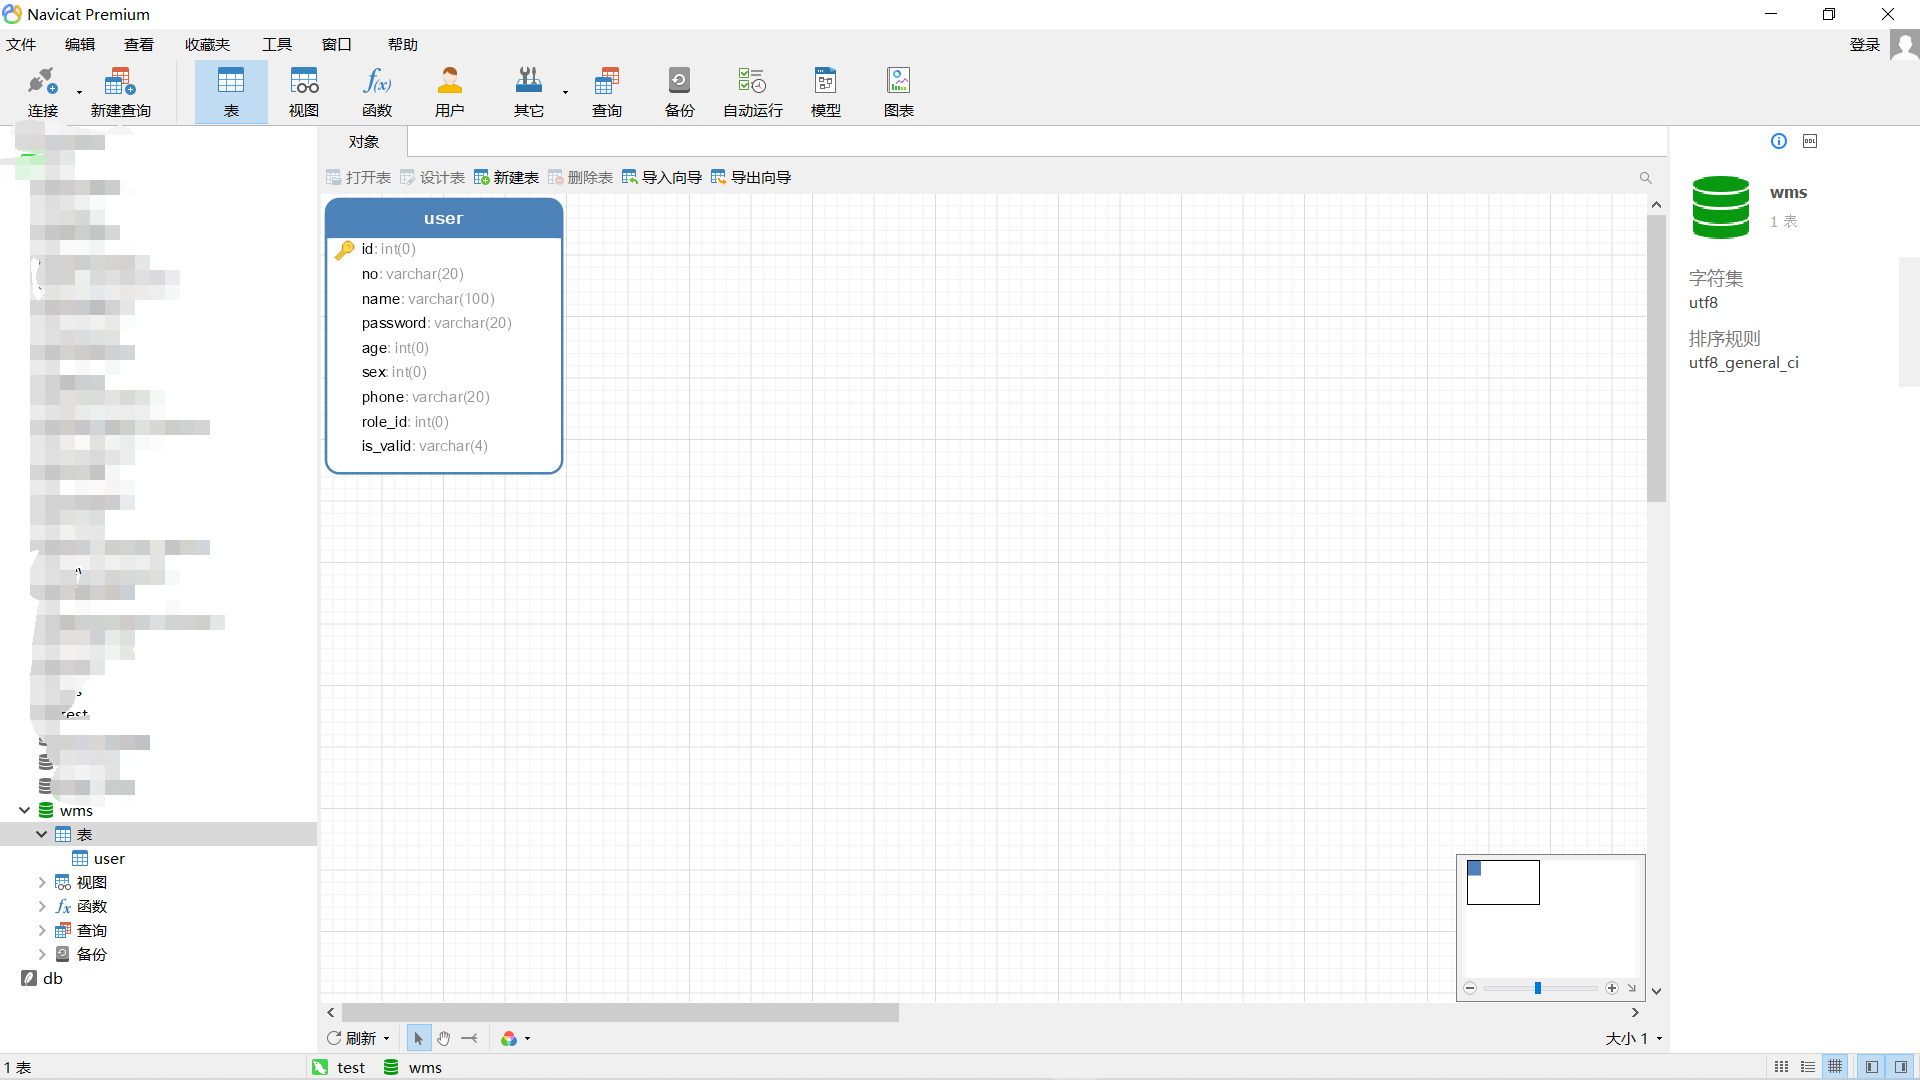
在mysql中创建wms数据库,并创建user表,可以自己写几条数据进去
这没啥好说的,在根目录下创建db/index.js文件,填入如下代码
const mysql = require('mysql');

db = mysql.createPool({
    host: '127.0.0.1',
    user: 'root',
    password: 'xxxxxx',  // 这里使用自己数据库的密码
    database: 'wms'
})

module.exports = db
前端
创建前端项目
在wms根目录下进入终端,输入vue create app, 选择router、store、scss预处理器,使用vue2开发
使用elementUI
终端输入
vue add element
选择全部引入
必要包安装
router、store和element在创建项目时已经引入安装,还有以下几个包是必须要的
- axios访问服务器
- jwt-decode解码token需要
主要这两个
设置跨域访问,全局挂载axios
跨域我习惯在后端设置,在前面的代码中(后端app.js),app.use(cors())即是设置跨域访问的
全局挂载axios在入口文件main.js中,以下是main.js的全部代码
import Vue from 'vue'
import App from './App.vue'
import router from './router'
import store from './store'
import './plugins/element.js'
import './assets/global.css'
import axios from 'axios'

Vue.config.productionTip = false
axios.defaults.baseURL = 'http://127.0.0.1:3018/api/'
Vue.prototype.$axios = axios

new Vue({
  router,
  store,
  render: h => h(App)
}).$mount('#app')
axios.defaults.baseURL = 'http://127.0.0.1:3018/api/'设置后端接口的通用部分地址
Vue.prototype.$axios = axios全局挂载
页面上使用this.$axios即可发起请求
删除无用的文件和代码
vue创建项目并使用router后,会在component文件夹下生成About.vue和Home.vue两个文件,这两个是无用的,且helloworld.vue也没啥用,可直接删除。主组件App.vue中很多代码都无用,可直接删除,删除后自己添加一个路由视图即可
App.vue中的代码
<template>
  <div id="app">
    <router-view></router-view>
  </div>
</template>

<script>

</script>

<style>
html,
body {
  margin: 0;
  padding: 0;
}

#app {
  height: 100vh;

}
</style>
设置统一的页面样式
我看很多大佬在写的时候,都是搞一大堆通用的css代码放进去,主要是设置所有页面的页边距、字体等内容,然后在main.js中引入即可全局使用,在上面的main.js中,import './assets/global.css'这行代码就是引入全局样式的代码,global.css是我自己写的,很简单两行代码
global.css
* {
    margin: 0;
    padding: 0;
}
至此,基础的框架已经差不多了,接下来将进入主页面的编写
主页面
页面设计
总体页面设计如下
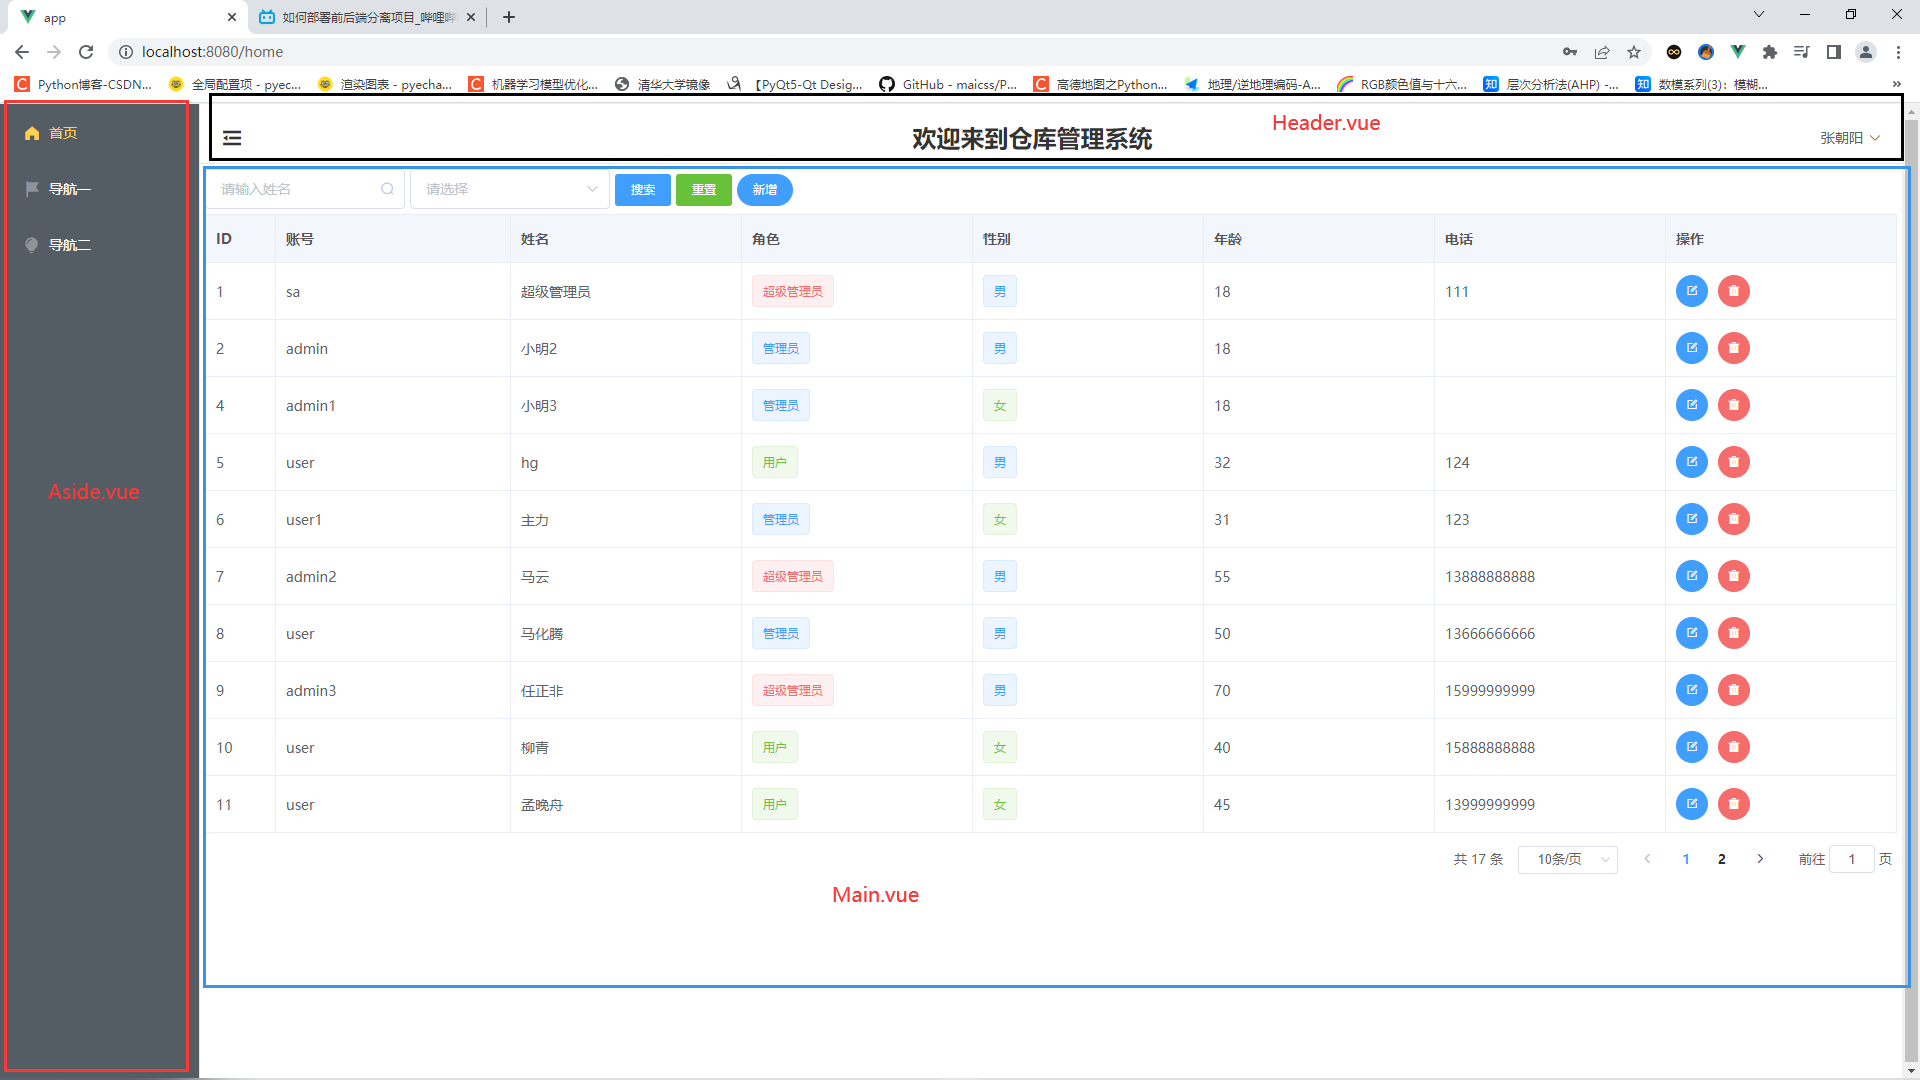
分成三个组件(当然这三个组件也可以写在一个文件中,但违背了vue框架的初衷),分别是侧边栏Aside.vue,头部Header.vue,主体部分Main.vue
所以,第一步应该是写一个主页页面。在views文件夹下创建Main.vue文件,代码如下
<template>
    <div>
        <el-container style="height: 100vh; border: 1px solid #eee">
            <el-aside :width="asideWidth" style="background-color: rgb(238, 241, 246);height: 100vh;margin-left: -1px">
                <Aside></Aside>
            </el-aside>

            <el-container style="height: 100vh;">
                <el-header
                    style="text-align: right; font-size: 12px;border-bottom: rgba(168, 168, 168, 0.3) 1px solid;">
                    <Header></Header>
                </el-header>

                <el-main>
                    <router-view></router-view>
                </el-main>
            </el-container>
        </el-container>
    </div>
</template>

<script>
import Aside from '../components/Aside.vue';
import Header from '../components/Header.vue'
// import Main from '../components/Main.vue';
export default {
    data() {
        return {

        }
    },
    components: { Aside, Header },
    methods: {

    },
    computed: {
        asideWidth(){
            return this.$store.state.asideWidth
        }
    },

}
</script>

<style scoped>
.el-header {
    /* background-color: #B3C0D1; */
    color: #333;
    line-height: 60px;
}

.el-main {
    padding: 5px;
}

.el-aside {
    color: #333;
}
</style>
先别看script和style部分,先看template的框架
最外面那个div其实可以不要,我写习惯了。因为里面就只有一个el-container大标签,如果还有其他标签的话,div就必须要写了,这个和vue3差别挺大
el-container标签下,有块内容,分别对应侧边栏(Aside.vue)、顶部栏(Header.vue)和页面主体部分(el-main标签),其中顶部栏和页面主体部分又是组合在一起放在同一个el-container标签下的
而这里最重要的“页面主体部分”并没有写死,而是给了一个router-view标签,这是vue的路由视图标签,也就是说,这里的内容会根据路由的变化而变化
至此,已经出现两个router-view了,这里不太好理解(至少是对于我来说很不好理解,我是写了十来个项目后才稍微搞清楚了点)
- 第一个
router-view出现在主组件App.vue中,也就是说,进入http://localhost:8080/这个路由,就应该由视图来提供页面 - 第二个
router-view出现在Main.vue组件中,也就是说Main.vue作为App.vue的一个组件,为App.vue提供一个页面,而Main.vue应该有其他组件为其提供页面
既然到了这里,那么自然而然的进入了路由,接下来将进行路由的设置
路由设计
路由设计的思路理一下
首先是为App.vue提供视图的路由,有两个,一个是登录页面,一个是主界面
其次是为主界面Main.vue提供视图的路由,也就是侧边栏上“首页”、”导航一“、”导航二“以及还有一个显示个人信息的页面
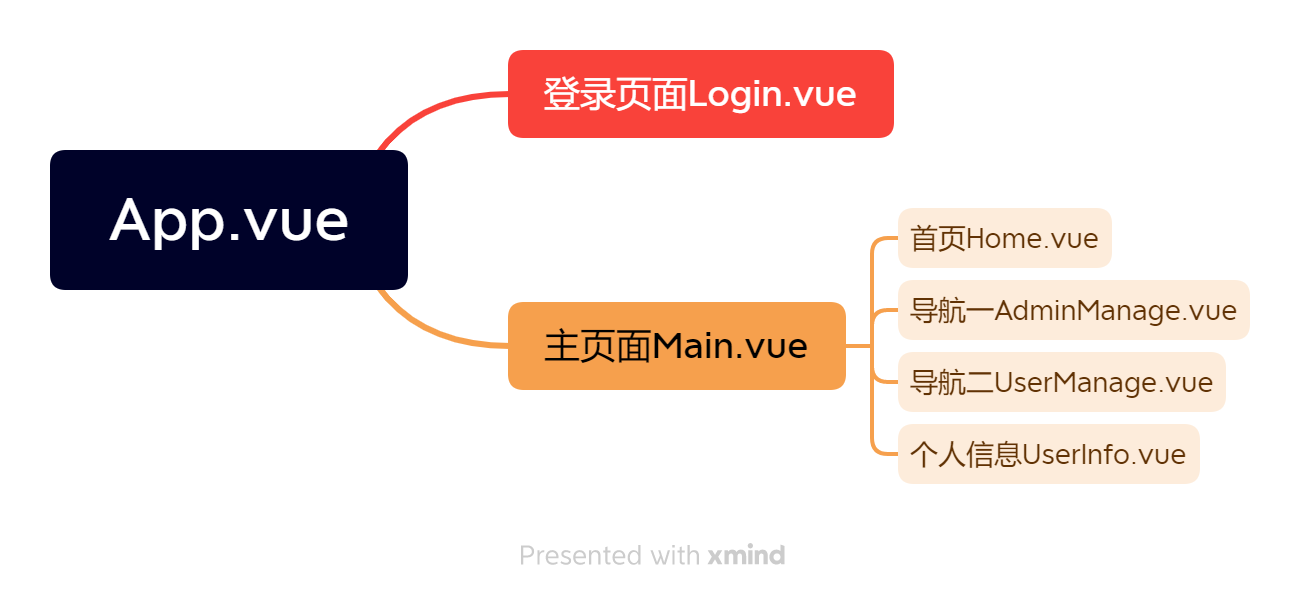
基本路由就这样了
看一下路由文件中的代码(router/index.js)
import Vue from "vue";
import VueRouter from "vue-router";
import Main from "../views/Main.vue";

Vue.use(VueRouter);

const routes = [
  {
    path: "/",
    redirect: "/home",
    component: Main,
    children: [
      {
        path: "/home",
        name: "home",
        component: () => import("../views/Home.vue"),
      },
      {
        path: "/userinfo",
        component: () => import("../views/UserInfo.vue"),
      },
      {
        path: "/admin",
        name: "admin",
        component: () => import("../views/AdminManage.vue"),
      },
      {
        path: "/user",
        name: "user",
        component: () => import("../views/UserManage.vue"),
      },
    ],
  },

  {
    path: "/login",
    name: "login",
    component: () => import("../views/Login.vue"),
  },
];

const router = new VueRouter({
  mode: "history",
  base: process.env.BASE_URL,
  routes,
});

export default router;
router数组中的内容是自己写的,对照上面的图片,其实就挺好理解了
登录页面
再看一下登录页面,登录页面的路由是http://localhost:8080/login,当然如果token过期,访问主页时,会直接跳转到这个登录页面,这是后话
登录页面有两个注意点:
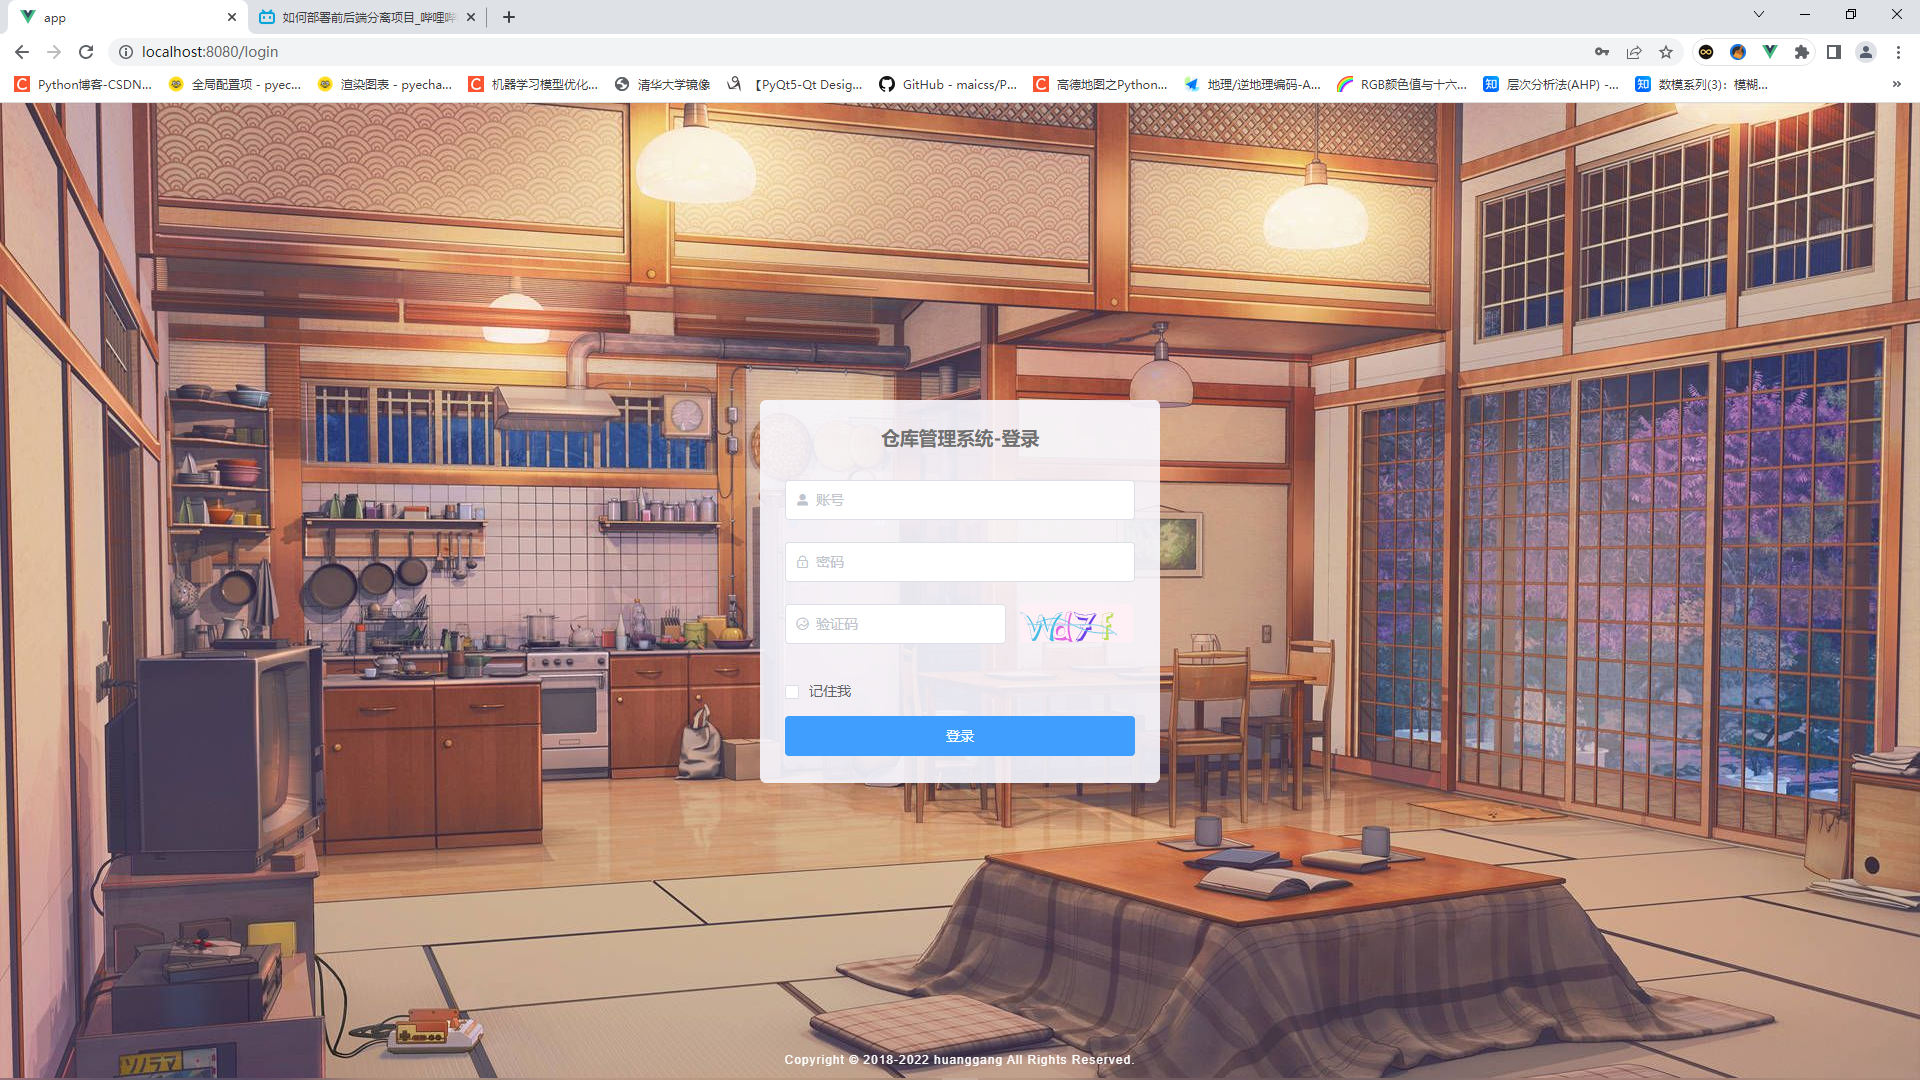
其实挺简单的一个页面,就是一个表单,但是表单的需要设计一下,里面还有个验证码
前端
先上前端代码
<template>
    <div class="login">
        <el-form class="login-form" :model="loginForm" ref="loginForm" :rules="rules">
            <h3 class="title">仓库管理系统-登录</h3>
            <el-form-item prop="no">
                <el-input placeholder="账号" type="text" prefix-icon="el-icon-user-solid" v-model="loginForm.no">
                </el-input>
            </el-form-item>
            <el-form-item prop="password">
                <el-input placeholder="密码" type="password" prefix-icon="el-icon-lock"
                    v-model="loginForm.password">
                </el-input>
            </el-form-item>
            <el-form-item prop="checkCode">
                <el-input placeholder="验证码" prefix-icon="el-icon-picture-outline-round"
                    v-model="loginForm.checkCode" style="width: 63%" @keyup.enter.native="submit('loginForm')">
                </el-input>
                <div class="login-code">
                    <!-- <img :src="codeUrl" class="login-code-imgs" @click="getCode"/>
          -->
                    <div @click="getCode" v-html="code" style="vertical-align:middle"></div>
                </div>
            </el-form-item>
            <el-checkbox v-model="loginForm.rememberme" style="margin: 0 0 15px 0;">记住我</el-checkbox>
            <el-form-item>
                <el-button style="width: 100%" @click="submit('loginForm')" type="primary">登录</el-button>
            </el-form-item>
        </el-form>
        <div class="el-login-footer">
            <span>Copyright © 2018-2022 huanggang All Rights Reserved.</span>
        </div>
    </div>
</template>

<script>
// import { getCodeImg } from '@/api/login'
import jwt_decode from 'jwt-decode'
export default {
    data() {
        return {
            loginForm: {
                no: '',
                password: '',
                checkCode: '',
                rememberme: false
            },
            codeUrl: '',
            code: '',
            codeText: '',
            redirect: undefined,

            rules: {
                no: [
                    { required: true, message: "用户名不能为空", trigger: "blur" },
                    { min: 2, max: 30, message: "长度在 2 到 30 个字符", trigger: "blur" }
                ],
                password: [
                    { required: true, message: "密码不能为空", trigger: "blur" },
                    { min: 3, max: 30, message: "长度在 6 到 30 个字符", trigger: "blur" }
                ],
                checkCode: [{ required: true, message: "验证码不能为空", trigger: "blur" }]
            }
        }
    },
    watch: {
        $route: {
            handler: function (route) {
                // console.log('gsdrouter', route)
                this.redirect = route.query && route.query.redirect
            },
            immediate: true,
        }
    },
    methods: {
        submit(formName) {
            this.$refs[formName].validate(valid => {
                if (valid) {
                    if (this.loginForm.checkCode.toLowerCase() == this.codeText.toLowerCase()) {
                        this.$axios.post('/user/login', this.loginForm)
                            .then(res => {
                                // console.log(res)
                                const { token } = res.data
                                localStorage.setItem('wmstoken', token)

                                const decode = jwt_decode(token)
                                // console.log(decode)
                                const userInfo = {
                                    no: decode.no,
                                    name: decode.name,
                                    token
                                }
                                // console.log(userInfo)
                                this.$store.commit('setUser', userInfo)

                                this.$message({
                                    type: "success",
                                    message: '登录成功'
                                })

                                this.$router.push({ path: this.redirect || '/' })
                            })
                            .catch(err => {
                                console.log(err)
                                this.$message.error('登录失败,请检查用户名及密码是否正确!')
                            })
                    } else { this.$message.error('验证码错误!') }

                } else {
                    this.$message({
                        type: "error",
                        message: '错误提交申请'
                    })
                    return false
                }
            })

        },
        getCode() {
            this.$axios.get('/user/checkCode')
                .then(res => {
                    // console.log(res)
                    this.code = res.data.data
                    this.codeText = res.data.text
                })
        }
    },
    created() {
        this.getCode()
    }
}
</script>

<style scoped lang="scss">
.login {
    display: flex;
    height: 100%;
    background: url(../assets/images/login-background.jpg);
    background-size: cover;
    justify-content: center;
    align-items: center;
}

.title {
    text-align: center;
    color: #707070;
    margin: 0 auto 30px;
}

.login-form {
    box-sizing: border-box;
    width: 400px;
    border-radius: 6px;
    background-color: rgba(248, 248, 255, 0.9);
    padding: 25px 25px 5px 25px;
}

.el-login-footer {
    height: 40px;
    line-height: 40px;
    position: fixed;
    bottom: 0;
    color: #fff;
    font-size: 12px;
    letter-spacing: 1px;
    font-family: Arial;
}

.login-code {
    width: 33%;
    float: right;

    div {
        cursor: pointer;
    }
}

.login-code-imgs {}
</style>
看代码,表单的输入框都设置了校验规则,这是elementUI提供的,还是很好用的
验证码由后端提供, getCode()方法即为获取验证码的方法,看下我前面两篇博客,应该还挺好理解
后端
应有两个接口,一个是登录的接口,一个是验证码的接口
登录接口
我习惯把接口函数和接口请求分开写
- 创建router文件夹,新建user.js文件,里面编写user相关的接口请求
- 创建router_handle文件夹,新建user.js文件,里面编写user相关的请求函数
直接上代码
router_handle/user.js
const db = require("../db/index");
const svgCaptcha = require("svg-captcha");
const config = require("../config");
const jwt = require("jsonwebtoken");

// 登录
exports.login = (req, res) => {
  const user = req.body;
  const sql = "select * from user where no = ?";
  db.query(sql, user.no, (err, results) => {
    if (err) return res.status(400).json(err);
    if (results.length !== 1) return res.status(400).json("用户不存在");
    if (results[0].password != user.password)
      return res.status(400).json("用户名或密码错误,请重新输入");

    const user_info = {
      id: results[0].id,
      no: results[0].no,
      name: results[0].name,
    };
    const tokenStr = jwt.sign(user_info, config.jwtSecretKey, {
      expiresIn: "10h",
    });
    res.json({
      status: 200,
      message: "登录成功",
      token: "Bearer " + tokenStr,
    });
  });
};


// 验证码
exports.checkCode = (req, res) => {
  const img = svgCaptcha.create({
    size: 4,
    ignoreChars: "0o1l",
    color: true,
    noise: 2,
    background: "#FFF0F5",
    height: 38,
    width: 113,
  });
  res.send(img);
};
写法基本固定,登录成功后,向前端传递信息,最重要的就是token信息,这里的token是加密了的,秘钥是我自己随便写的一个字符串,存在根目录下的config.js文件中
验证码接口
代码已经写在上面了,写法也基本固定,根据自己的需求设置要忽略的字符、噪声的条数、背景颜色、宽高等
接口请求
即router/user.js中的代码
const { urlencoded } = require('express');
const express = require('express');
const router = express.Router();

const userHandler = require('../router_handler/user.js')
// router.get('/list', userHandler.list)
// router.post('/add', userHandler.add)
// router.post('/mod/:id', userHandler.mod)
// router.post('/delete/:id', userHandler.delete)
// router.post('/searchByName', userHandler.searchByName)

router.get('/checkCode', userHandler.checkCode)
router.post('/login', userHandler.login)

module.exports = router
我注释起来的那几条是后面要用到的
前后端数据交互
真不知道怎么写,说简单其实也挺复杂的,就是要理解这么个过程
前端发送ajax(axios)请求,点击登录按钮的时候,触发submit(formName) 方法(本节的前端代码里面)
逻辑如下:

第一次用draw.io,画的太丑请见谅
这个图结合前面的代码看,基本上就能看明白是怎么回事了
图上有一个向vuex提交数据,代码中有this.$store.commit('setUser', userInfo),这是怎么一回事,接下来进入vuex的相关内容
vuex数据共享
前面说了,创建vue项目时,需要使用store,就是这里的vuex了,这个vuex是一个全局数据管理工具。怎么个意思呢,就是组件之间要传递数据,共享数据,可以用vuex。当然也可以不用vuex,不用的原因就是太复杂了,有简单的数据共享方式,可以实现父子传值、兄弟传值,参见我的博客——vue组件之间的数据共享
怎么说呢,如果只是简单地数据共享,那么就使用上面的父传子、子传父好了,有些项目,数据相当复杂,组件之间的父子关系也很复杂,那么传来传去就很繁琐了,因此,需要有个空间来存储这个值,vuex就是干这个事情的,创建项目时,引入了store,这个单词本身就有仓库、存储的意思,是不是很巧妙
登录成功后,前端将用户信息保存下来,并把数据保存到vuex中,到底是怎么进行的呢
其实vuex还挺复杂的,我自己也有一篇博客记录,参见–vuex笔记,看完这个博客应该还是一脸懵逼,很正常,必须得自己写才能领悟其中的奥义
总体来说,就5个步骤,最常用的是state和mutations,当然,很多人喜欢用actions,我理解的actions就是异步的mutations
回到代码,登录时,有几行关键代码涉及vuex,如下:
const { token } = res.data
const decode = jwt_decode(token)
const userInfo = {
                  	no: decode.no,
                  	name: decode.name,
                  	token
                  }
this.$store.commit('setUser', userInfo)
jwt_decode把token解析出来,然后创建个userInfo对象来存储解析后的用户账号和姓名,并把原始的token也放进去
然后调用store的commit方法,this.$store.commit('setUser', userInfo)这个commit对应的mutations,而actions对应的是dispatch,这里要注意区分。另外,commit方法有两个参数,前面的setUser是mutations中的方法名,userinfo是要传递的数据
已经写到这里了,那不得不把store/index.js放出来了,看一下代码
import Vue from "vue";
import Vuex from "vuex";

Vue.use(Vuex);

export default new Vuex.Store({
  state: {
    isCollapse: false,
    asideWidth: "200px",
    iconDirection: "el-icon-s-fold",
    userInfo: {
      no: "",
      name: "",
      token: "",
    },
  },
  getters: {
    userInfo: state => state.userInfo
  },
  mutations: {
    collapseMenu(state) {
      state.isCollapse = !state.isCollapse;
      if (state.isCollapse) {
        state.asideWidth = "64px";
        state.iconDirection = "el-icon-s-unfold";
      } else {
        state.asideWidth = "200px";
        state.iconDirection = "el-icon-s-fold";
      }
    },
    setUser(state, payload) {
      state.userInfo = payload;
    },
    clearUser(state) {
      state.userInfo = {
        no: "",
        name: "",
        token: "",
      };
    },
  },
  actions: {},
  modules: {},
});
这里的store是我写完所有项目后的内容,因此只需要关注mutations中的setUser和state中的userInfo,这里就和组件中的commit关联起来了,setUser其实是将组件中传递过来的userinfo写入到state中,那么其他页面想用的时候,随时用就可以了
主页面-侧边栏
登录页面相对来说比较简单,但主页面涉及路由跳转,而且分成了三块,所以拆分进行记录
先介绍侧边栏Aside.vue
先上代码:
<template>
    <el-menu style="height: 100vh" background-color="#545c64" text-color="#fff" active-text-color="#ffd04b"
        default-active="/home" :collapse="isCollapse" :collapse-transition="false" router>
        <el-menu-item index="/home">
            <i class="el-icon-s-home"></i>
            <span slot="title">首页</span>
        </el-menu-item>

        <el-menu-item index="/admin">
            <i class="el-icon-s-flag"></i>
            <span slot="title">导航一</span>
        </el-menu-item>
        <el-menu-item index="/user">
            <i class="el-icon-s-opportunity"></i>
            <span slot="title">导航二</span>
        </el-menu-item>
    </el-menu>
</template>

<script>
export default {
    data() {
        return {

        }
    },
    computed: {
        isCollapse() {
            return this.$store.state.isCollapse
        }
    }
}
</script>

<style>

</style>
注意看el-menu标签中的参数,一个个介绍吧
-
style="height: 100vh"侧边栏应垂直铺满屏幕 -
background-color="#545c64"侧边栏的背景色,就像下面这个颜色这里的背景色是:#545c64 -
text-color="#fff"文字字体是白色 -
active-text-color="#ffd04b"激活状态下的颜色 -
default-active="/home"默认激活的路由 -
:collapse="isCollapse"这玩意儿挺重要,就是说是不是要展开侧边栏,true是折叠,false是展开,**点击Header.vue中的一个图标就会切换状态,看,这就又用到了vuex了,**这也是写到store中用来全局共享的数据 -
:collapse-transition="false"展开/折叠动画要不要,false就是不要 -
router这个相当重要,!important=10000,这关系到点击侧边栏上的文字能不能实现路由的跳转,这里如果不写,就得在每个item上面去写一个router-link了。写了router后,就可以直接在item中直接写上index="/home"这种路由了,这里的路由要和router/index.js中的路由保持一致
然后看script吧
script中,只有一个计算属性,就是控制侧边栏是否展开的
对比store/index.js中的state.iscollapse和组件中的写法,这里不需要用到mutations,直接取值就好,更改值在Header.vue组件中
主页面–头部导航栏
先上代码
<template>
    <div style="display: flex; justify-content: space-between; align-items: center;">
        <div style="margin-top: 8px">
            <i :class="iconDirection" @click="handleCollapse" style="font-size:24px;cursor: pointer;"></i>
        </div>
        <h1 class="middle" style="font-size: 24px">欢迎来到仓库管理系统</h1>
        <div class="right">
            <el-dropdown trigger="click">
                <span>{{ user.name }}</span>
                <i class="el-icon-arrow-down" style="margin-left: 5px"></i>
                <el-dropdown-menu slot="dropdown">
                    <el-dropdown-item @click.native="toUser">个人资料</el-dropdown-item>
                    <el-dropdown-item @click.native="logout">退出</el-dropdown-item>
                </el-dropdown-menu>
            </el-dropdown>
        </div>
    </div>
</template>

<script>
export default {
    date() {
        return {}
    },
    methods: {
        toUser() {
            this.$router.push('/userinfo')
        },
        logout() {
            localStorage.removeItem('wmstoken')
            this.$store.commit('clearUser')
            this.$router.push('/login')
        },
        handleCollapse() {
            this.$store.commit('collapseMenu')
        }
    },
    computed: {
        iconDirection() {
            return this.$store.state.iconDirection
        },
        user() {
            return this.$store.state.userInfo
        }
    }
}
</script>

<style>

</style>
头部导航栏还挺复杂的,实现了这么几个功能
- 侧边栏是否展开,根据状态,更改控制图标的类型(其实就是箭头的方向)
- 下拉用户信息,点击用户姓名,可以跳转查看用户名和注销
计算属性的说明
这里最关键的是两个计算属性:
-
iconDirection图标方向,有两个值,el-icon-s-fold和el-icon-s-unfold,切换图标方向的图示,这里从store/index.js中可以看明白
回顾一下代码
export default new Vuex.Store({
  state: {
    isCollapse: false,
    asideWidth: "200px",
    iconDirection: "el-icon-s-fold",

  },
  getters: {},
  mutations: {
    collapseMenu(state) {
      state.isCollapse = !state.isCollapse;
      if (state.isCollapse) {
        state.asideWidth = "64px";
        state.iconDirection = "el-icon-s-unfold";
      } else {
        state.asideWidth = "200px";
        state.iconDirection = "el-icon-s-fold";
      }
    },
    setUser(state, payload) {
      state.userInfo = payload;
    },
    clearUser(state) {
      state.userInfo = {
        no: "",
        name: "",
        token: "",
      };
    },
  },
  actions: {},
  modules: {},
});
点击折叠侧边栏后,还要更改侧边栏的宽度,当然不是写在这里的,写在我们的Main.vue组件中,因此要回顾一下Main.vue主页面上的代码,asideWidth在这个组件中使用的
<el-aside :width="asideWidth" style="background-color: rgb(238, 241, 246);height: 100vh;margin-left: -1px">
   <Aside></Aside>
</el-aside>
看完整的Main.vue代码,发现script中也有个计算属性,计算的就是asideWidth值
用户信息的使用
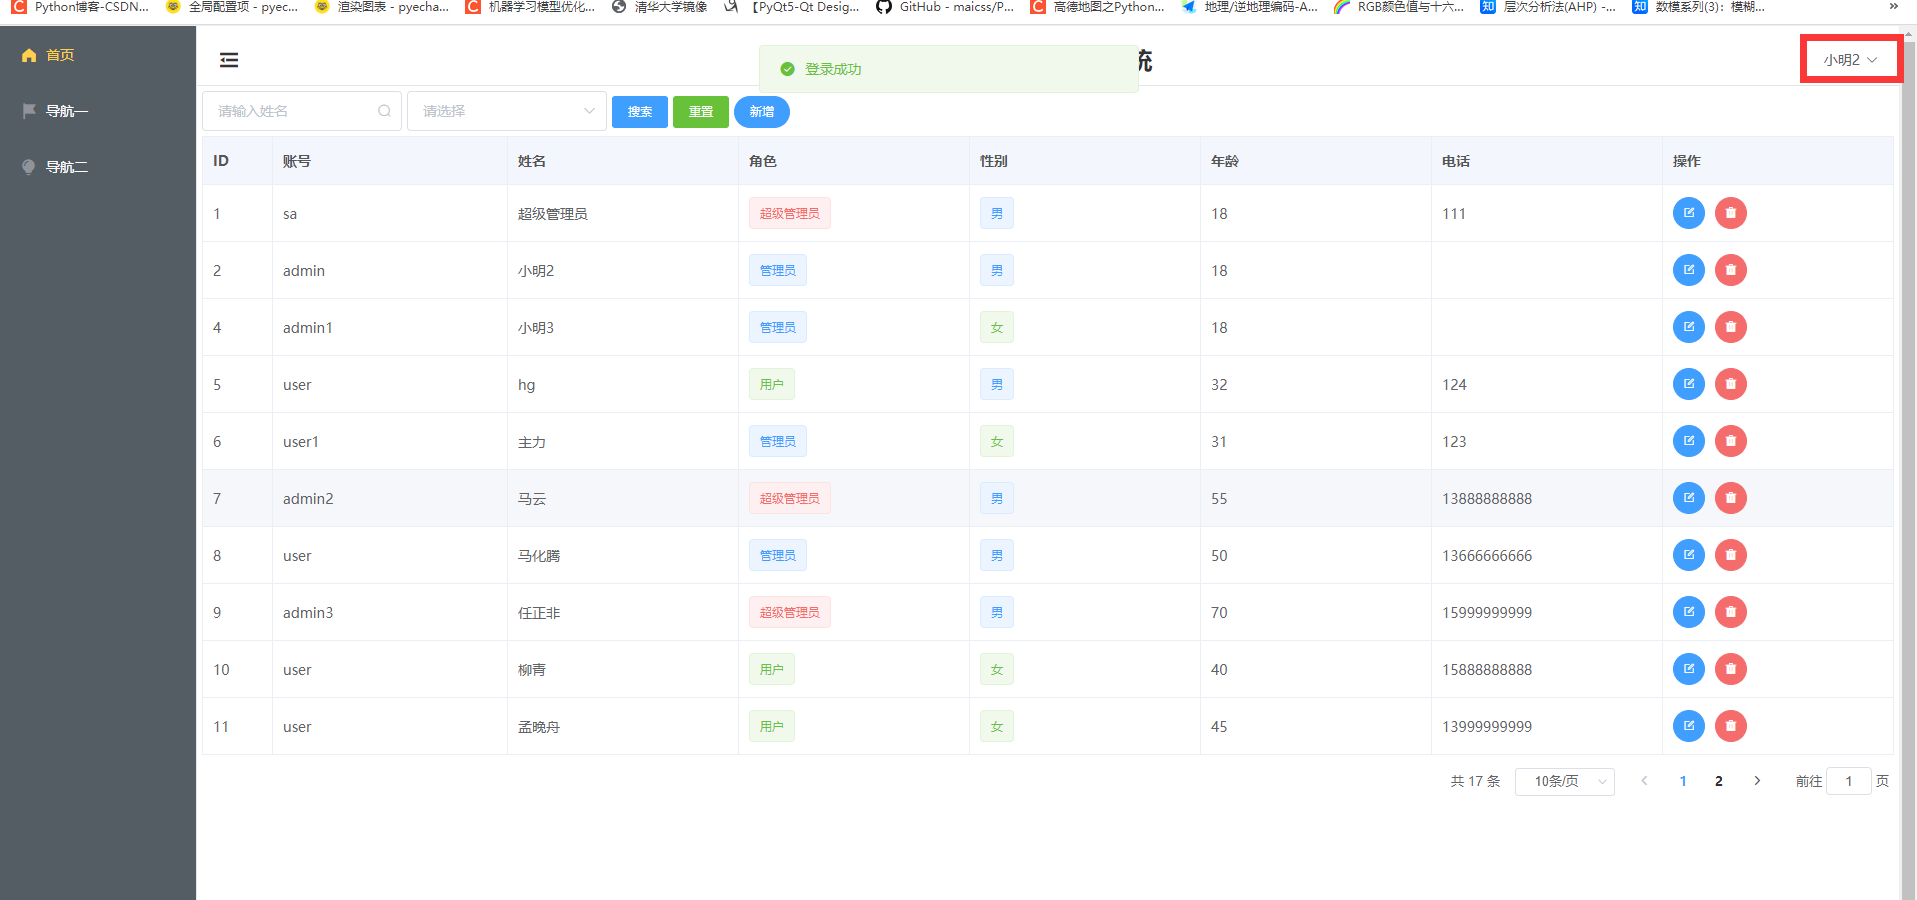
用户信息userinfo,userinfo.name放在顶部栏的右侧下拉中
作为计算属性,在标签中直接使用模板语法就可以了
<span>{{ user.name }}</span>
当使用不同的账户进行登录时,能显示不同的用户名
主页面–动态页面之home页面
其实这个项目就一个home页面,也是点击首页后跳转的页面,创建views/Home.vue文件,还是先上代码
<template>
    <div>
        <div class="search" style="margin-bottom: 5px">
            <el-input placeholder="请输入姓名" style="width: 200px" suffix-icon="el-icon-search" v-model="searchContent"
                @keyup.enter.native="handleSearch"></el-input>
            <el-select v-model="sex" placeholder="请选择" style="margin-left: 5px; width: 200px">
                <el-option v-for="item in sexs" :key="item.value" :label="item.label" :value="item.value">
                </el-option>
            </el-select>
            <el-button type="primary" style="margin-left: 5px" size="small" @click="handleSearch">搜索</el-button>
            <el-button type="success" style="margin-left: 5px" size="small" @click="handleReset">重置</el-button>

            <el-button type="primary" style="margin-left: 5px" size="small" @click="handleAdd" round>新增</el-button>

        </div>
        <el-table :data="tableData" :header-cell-style="{ background: '#f3f6fd', color: '#555' }" border>
            <el-table-column prop="id" label="ID" width="70">
            </el-table-column>
            <el-table-column prop="no" label="账号">
            </el-table-column>
            <el-table-column prop="name" label="姓名">
            </el-table-column>
            <el-table-column prop="role_id" label="角色">
                <template slot-scope="scope">
                    <el-tag
                        :type="scope.row.role_id === 0 ? 'danger' : (scope.row.role_id === 1 ? 'primary' : 'success')"
                        disable-transitions>{{
                            scope.row.role_id === 0 ? '超级管理员' : (scope.row.role_id === 1 ? '管理员'
                                : '用户')
                        }}</el-tag>
                </template>
            </el-table-column>
            <el-table-column prop="sex" label="性别">
                <template slot-scope="scope">
                    <el-tag :type="scope.row.sex === 1 ? 'primary' : 'success'" disable-transitions>{{
                        scope.row.sex ===
                            1 ? '男' : '女'
                    }}</el-tag>
                </template>
            </el-table-column>
            <el-table-column prop="age" label="年龄">
            </el-table-column>
            <el-table-column prop="phone" label="电话">
            </el-table-column>
            <el-table-column prop="operate" label="操作">
                <template slot-scope="scope">
                    <el-button type="primary" icon="el-icon-edit-outline" title="编辑" size="small"
                        @click="handleEdit(scope.$index, scope.row)" circle>
                    </el-button>
                    <el-button type="danger" icon="el-icon-delete-solid" size="small" title="删除"
                        @click="handleDelete(scope.$index, scope.row)" circle></el-button>
                </template>
            </el-table-column>
        </el-table>
        <!-- 分页 -->
        <div class="pagination">
            <el-pagination @size-change="handleSizeChange" @current-change="handleCurrentChange"
                :current-page.sync="paginations.page_index" :page-sizes="paginations.page_sizes"
                :page-size="paginations.page_size" :layout="paginations.layout" :total="paginations.total">
            </el-pagination>
        </div>

        <el-dialog :title="title" :visible.sync="centerDialogVisible" width="30%" center>
            <el-form ref="form" :model="form" label-width="100px" :rules="rules">
                <el-form-item label="账号" prop="no">
                    <el-col :span="20">
                        <el-input v-model="form.no" :disabled="isAbled"></el-input>
                    </el-col>
                </el-form-item>
                <el-form-item label="姓名" prop="name">
                    <el-col :span="20">
                        <el-input v-model="form.name"></el-input>
                    </el-col>
                </el-form-item>
                <el-form-item label="密码" prop="password">
                    <el-col :span="20">
                        <el-input v-model="form.password"></el-input>
                    </el-col>
                </el-form-item>
                <el-form-item label="年龄" prop="age">
                    <el-col :span="20">
                        <el-input v-model="form.age"></el-input>
                    </el-col>
                </el-form-item>
                <el-form-item label="性别">
                    <el-radio-group v-model="form.sex">
                        <el-radio label="1">男</el-radio>
                        <el-radio label="2">女</el-radio>
                    </el-radio-group>
                </el-form-item>
                <el-form-item label="电话" prop="phone">
                    <el-col :span="20">
                        <el-input v-model="form.phone"></el-input>
                    </el-col>
                </el-form-item>

            </el-form>
            <span slot="footer" class="dialog-footer">
                <el-button @click="centerDialogVisible = false" size="small">取 消</el-button>
                <el-button type="primary" @click="submitForm('form')" size="small">确 定</el-button>
            </span>
        </el-dialog>
    </div>
</template>

<script>
export default {
    data() {
        return {
            tableData: [],
            allTableData: [],  // 存放所有表格数据以及搜索后的数据
            filterTableData: [],  // 存放所有表格数据供搜索
            paginations: {
                page_index: 1,  // 当前页
                total: 0,  // 总数
                page_size: 10,  // 默认每页显示多少条
                page_sizes: [5, 10, 15, 20],  // 选择每页显示多少条
                layout: "total, sizes, prev, pager, next, jumper"
            },
            searchContent: '',
            sex: '',
            sexs: [
                { value: 1, label: '男' },
                { value: 2, label: '女' },

            ],
            centerDialogVisible: false,
            form: {
                no: '',
                name: '',
                password: '',
                age: '',
                phone: '',
                sex: '1',
                role_id: '2',
                id: ''
            },
            rules: {
                no: [
                    { required: true, message: '请输入账号', trigger: 'blur' },
                    { min: 2, max: 10, message: '长度在2-10个字符', trigger: 'blur' }
                ],
                name: [
                    { required: true, message: '请输入姓名', trigger: 'blur' },
                    { min: 2, max: 10, message: '长度在2-10个字符', trigger: 'blur' }
                ],
                password: [
                    { required: true, message: '请输入密码', trigger: 'blur' },
                    { min: 3, max: 10, message: '长度在3-10个字符', trigger: 'blur' }
                ],
                age: [
                    { required: true, message: '请输入年龄', trigger: 'blur' },
                    { pattern: /^(?:[1-9][0-9]?|1[01][0-9]|120)$/, message: '请输入正确的年龄', trigger: 'blur' }
                ],
                phone: [
                    { required: true, message: '请输入手机号', trigger: 'blur' },
                    { pattern: /^1[3-9]\d{9}$/, message: '请输入正确的手机号', trigger: 'blur' }
                ]
            },
            title: '新增用户',
            operateType: 'add',
            isAbled: false,
        }
    },
    methods: {
        getUser() {
            this.$axios.get('/user/list')
                .then(res => {
                    if (res.data.status === 200) {
                        // this.tableData = res.data.results
                        this.allTableData = res.data.results
                        this.filterTableData = res.data.results
                        this.setPaginations()
                    }
                    // console.log(res)
                })
        },
        handleEdit(index, row) {
            // console.log(row)
            this.operateType = 'mod'
            this.centerDialogVisible = true
            this.isAbled = true
            this.title = '编辑用户'
            this.form = row
            this.form.sex = row.sex.toString()
            this.form.password = ''

        },
        handleDelete(index, row) {
            this.$confirm('此操作将永久删除该用户,是否继续?', "提示", {
                confirmButtonText: '确定',
                cancelButtonText: '取消',
                type: 'warning'
            }).then(() => {
                this.$axios.post(`/user/delete/${row.id}`)
                    .then(res => {
                        this.$message({
                            type: 'success',
                            message: '删除成功'
                        })
                        this.getUser()
                    })
            })
        },

        // 分页相关函数
        setPaginations() {
            this.paginations.total = this.allTableData.length
            this.paginations.page_index = 1
            this.tableData = this.allTableData.filter((item, index) => index < this.paginations.page_size)
            // console.log(this.allTableData[0])

        },
        handleSizeChange(page_size) {
            this.paginations.page_index = 1
            this.paginations.page_size = page_size
            this.tableData = this.allTableData.filter((item, index) => {
                return index < page_size
            })

        },
        // 页面跳转
        handleCurrentChange(page) {
            const index = this.paginations.page_size * (page - 1)
            const nums = this.paginations.page_size * page
            const tables = []
            for (let i = index; i < nums; i++) {
                if (this.allTableData[i]) tables.push(this.allTableData[i])
            }
            this.tableData = tables
        },

        // 搜索
        handleSearch() {
            if (!this.searchContent && !this.sex) {
                this.$message({ type: 'warning', message: '请输入用户姓名或性别进行查询' })
                this.getUser()
                return
            }
            // 这里有两种方法可以实现通过姓名的模糊查询
            // 第一种,在返回的数据中,通过filter函数模糊查询,使用filter中的includes方法实现模糊查询
            // 加入性别后,这里的查询显得有点啰嗦了,后面还需要改进
            if (this.searchContent && this.sex) {
                this.allTableData = this.filterTableData.filter((item, index) => {
                    return item.name.includes(this.searchContent) && item.sex === this.sex
                })
                this.setPaginations()
            }
            if (this.searchContent && !this.sex) {
                this.allTableData = this.filterTableData.filter((item, index) => {
                    return item.name.includes(this.searchContent)
                })
                this.setPaginations()
            }
            if (!this.searchContent && this.sex) {
                this.allTableData = this.filterTableData.filter((item, index) => {
                    return item.sex === this.sex
                })
                this.setPaginations()
            }


            // 第二种,后端写了模糊查询的接口,接口为/user/searchByName,然后传递name参数,注意,这里之前使用的get请求,
            // 后来发现get请求不适用于传参的请求,改成post请求后就可以正常获取数据了,
            // 由于还有一个是通过性别来查询,我在后端没有写性别查询的接口,所以这里就使用第一种查询方法了
            // this.$axios.post('/user/searchByName', { name: this.searchContent })
            //     .then(res => {
            //         if (res.data.status === 200) {
            //             this.allTableData = res.data.results
            //             this.setPaginations()
            //         } else {
            //             this.$message.warning('请求数据出错')
            //         }
            //     })
        },

        // 重置按钮的点击函数
        handleReset() {
            this.searchContent = ''
            this.sex = ''
            this.getUser()
        },

        // 新增按钮的点击函数
        handleAdd() {
            this.centerDialogVisible = true
            this.operateType = 'add'
            this.isAbled = false
            this.resetForm()
        },


        // 提交新增或编辑按钮的回调函数
        submitForm(formName) {
            const url = this.operateType == 'add' ? '/user/add' : `/user/mod/${this.form.id}`
            this.$refs[formName].validate(valid => {
                if (valid) {
                    this.$axios.post(url, this.form)
                        .then(res => {
                            if (res.data.status === 200) {
                                this.$message.success('操作成功!')
                                this.centerDialogVisible = false
                                this.resetForm()
                                this.getUser()
                            } else {
                                this.$message.error('操作失败,请更换账号重试!')
                            }
                        })
                        .catch(err => {
                            this.$message.error('操作失败,请更换账号重试!')
                            this.form.no = ''
                        })
                } else {
                    this.$message.warning('请输入有效的数据')
                }
            })
        },

        // 重置表单中的内容
        resetForm() {
            this.form = {
                no: '',
                name: '',
                password: '',
                age: '',
                phone: '',
                sex: '1'
            }
            // this.$refs.form.resetFields()
        }

    },
    created() {
        this.getUser()
    },
}
</script>

<style scoped>
.pagination {
    float: right;
    margin-top: 10px;
}
</style>
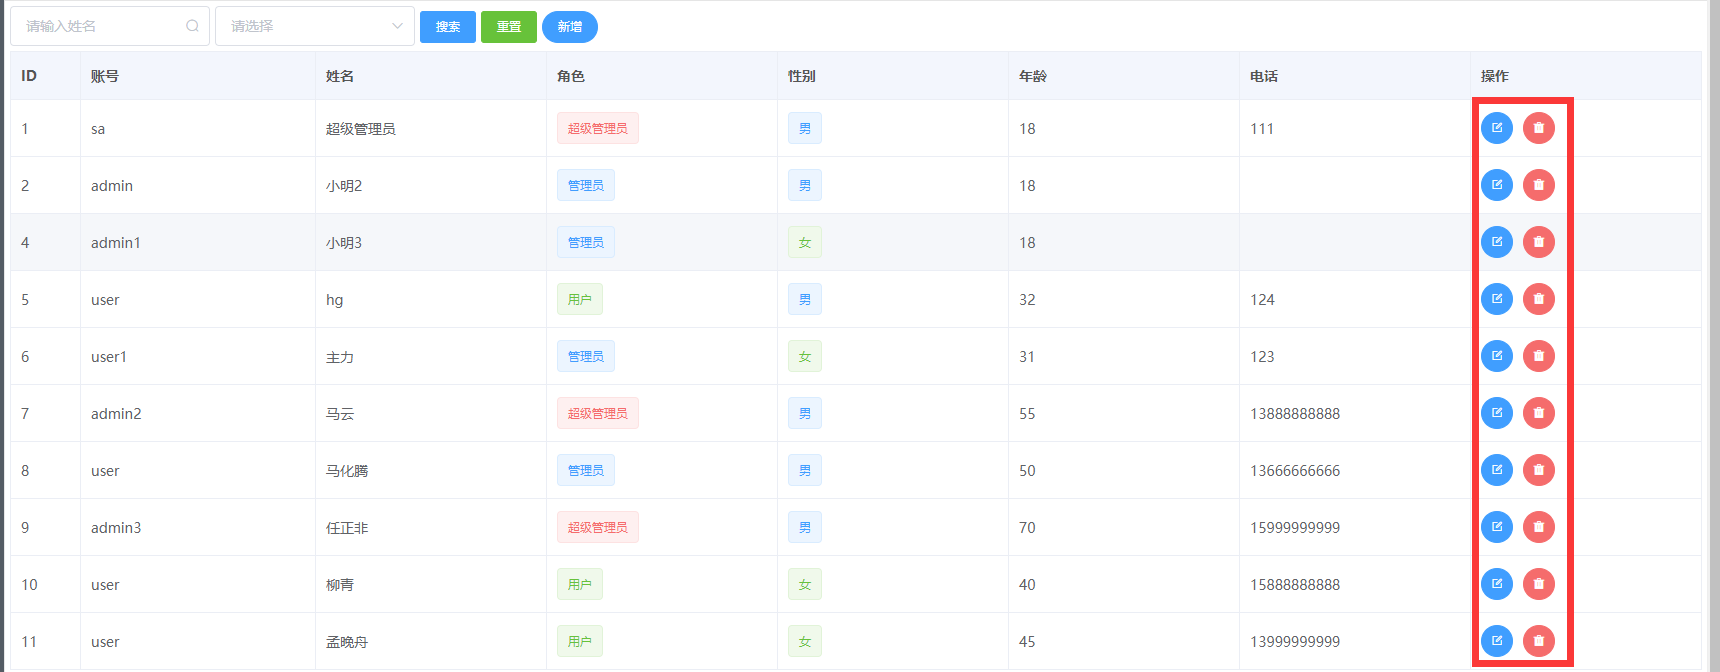
来回顾一下页面:
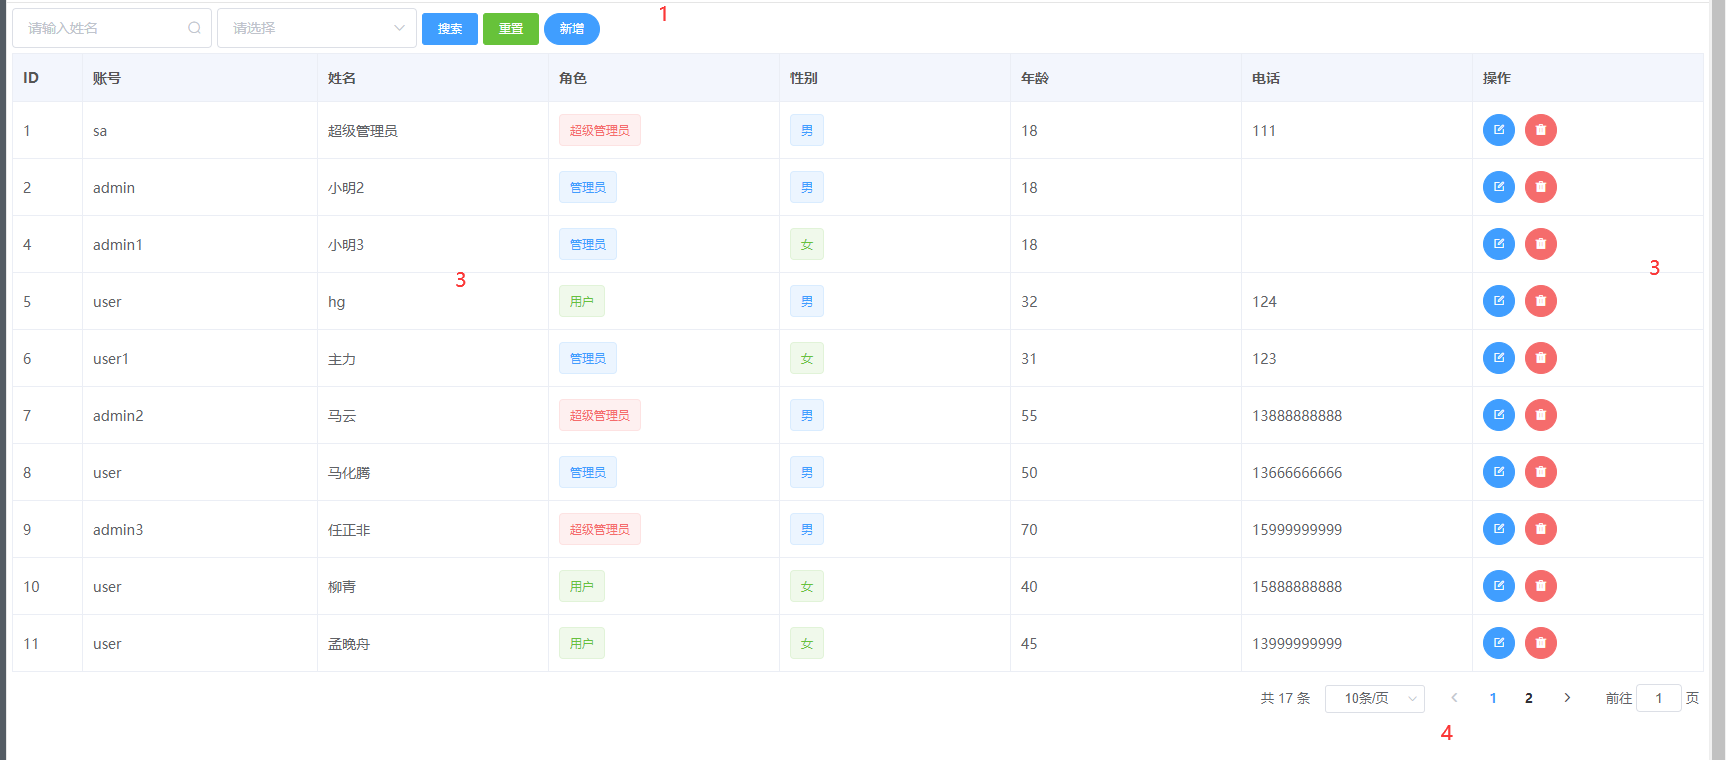
代码比较长,分别解释一下,我把它分成4个部分
- 顶部有一个两个搜索输入框,一个搜索姓名,一个搜索性别,3个按钮,一个搜索,一个重置,一个新增
- 主要部分是一个表格,展示后端传递过来的数据
- 单条数据的删、改
- 分页
其中2中的新增和3中的单条数据的改,共用一个el-dialog对话框,点击的时候,跳出对话框来新增或更改数据
顶部输入框与按钮
页面框架
<div class="search" style="margin-bottom: 5px">
	<el-input placeholder="请输入姓名" style="width: 200px" suffix-icon="el-icon-search" v-model="searchContent" @keyup.enter.native="handleSearch"></el-input>
    <el-select v-model="sex" placeholder="请选择" style="margin-left: 5px; width: 200px">
    	<el-option v-for="item in sexs" :key="item.value" :label="item.label" :value="item.value">
        </el-option>
	</el-select>
    <el-button type="primary" style="margin-left: 5px" size="small" @click="handleSearch">搜索</el-button>
    <el-button type="success" style="margin-left: 5px" size="small" @click="handleReset">重置</el-button>

    <el-button type="primary" style="margin-left: 5px" size="small" @click="handleAdd" round>新增</el-button>
</div>
相关的JavaScript代码
    data() {
        return {
            searchContent: '',
            sex: '',
            sexs: [
                { value: 1, label: '男' },
                { value: 2, label: '女' },

            ],

        }
    },
		// 搜索
        handleSearch() {
            if (!this.searchContent && !this.sex) {
                this.$message({ type: 'warning', message: '请输入用户姓名或性别进行查询' })
                this.getUser()
                return
            }
            // 这里有两种方法可以实现通过姓名的模糊查询
            // 第一种,在返回的数据中,通过filter函数模糊查询,使用filter中的includes方法实现模糊查询
            // 加入性别后,这里的查询显得有点啰嗦了,后面还需要改进
            if (this.searchContent && this.sex) {
                this.allTableData = this.filterTableData.filter((item, index) => {
                    return item.name.includes(this.searchContent) && item.sex === this.sex
                })
                this.setPaginations()
            }
            if (this.searchContent && !this.sex) {
                this.allTableData = this.filterTableData.filter((item, index) => {
                    return item.name.includes(this.searchContent)
                })
                this.setPaginations()
            }
            if (!this.searchContent && this.sex) {
                this.allTableData = this.filterTableData.filter((item, index) => {
                    return item.sex === this.sex
                })
                this.setPaginations()
            }


            // 第二种,后端写了模糊查询的接口,接口为/user/searchByName,然后传递name参数,注意,这里之前使用的get请求,
            // 后来发现get请求不适用于传参的请求,改成post请求后就可以正常获取数据了,
            // 由于还有一个是通过性别来查询,我在后端没有写性别查询的接口,所以这里就使用第一种查询方法了
            // this.$axios.post('/user/searchByName', { name: this.searchContent })
            //     .then(res => {
            //         if (res.data.status === 200) {
            //             this.allTableData = res.data.results
            //             this.setPaginations()
            //         } else {
            //             this.$message.warning('请求数据出错')
            //         }
            //     })
        },

        // 重置按钮的点击函数
        handleReset() {
            this.searchContent = ''
            this.sex = ''
            this.getUser()
        },

        // 新增按钮的点击函数
        handleAdd() {
            this.centerDialogVisible = true
            this.operateType = 'add'
            this.isAbled = false
            this.resetForm()
        },
-
el-input输入框是通过姓名来查找用户,
suffix-icon="el-icon-search"后置搜索图标,@keyup.enter.native="handleSearch"绑定原生回车键到handleSearch方法,这和后面的搜索按钮功能是一样的 -
el-select是选择器,
v-model的值为当前被选中的el-option的 value 属性值,还有一个label值,就是页面上显示的选择器的实际值 -
按钮1——搜索键,根据选定条件(name+sex)查询数据,绑定的是
handleSearch()方法,我这里写的有点复杂了,写了4个if,感觉有点low。比较好的选择是后端提供接口,然后直接返回数据进行显示就行了(实际上我也这么做了,后来放弃了)。但是,我在写代码的时候,逻辑上是name框和sex选择器有可能两个都有数据,有可能只其中一个有数据,有可能两个都没数据,那么,后端写接口的时候,要分好几种情况去写,所以我觉得后端可以把全部的数据的提供给前端,实际上就只写一个接口,然后前端要什么数据就自己取好了(这种思路经常被我终端开发的LP鄙视,她的想法是前端需要什么数据,后端就应该提供什么,而不是一股脑的都给前端,增加前端的工作量)。分这么几种情况:
- 两个框都没数据,那么直接提示就可以了
- 两个框都有数据,使用JavaScript自己的filter函数,匹配两个数据
- 其中一个框有数据,也是使用filter函数,匹配一个数据
-
按钮2——重置按钮,这个按钮相对简单,把输入框里的数据清空,同时重新获取一下后端的数据填充到表格里面即可
-
按钮3——新增按钮,这个按钮比较复杂,要和下面表格中的修改按钮联合起来使用,怎么个逻辑呢,来解释一下:
- 点击新增按钮,跳出一个对话框,这个对话框是个form表单,结构如下图:
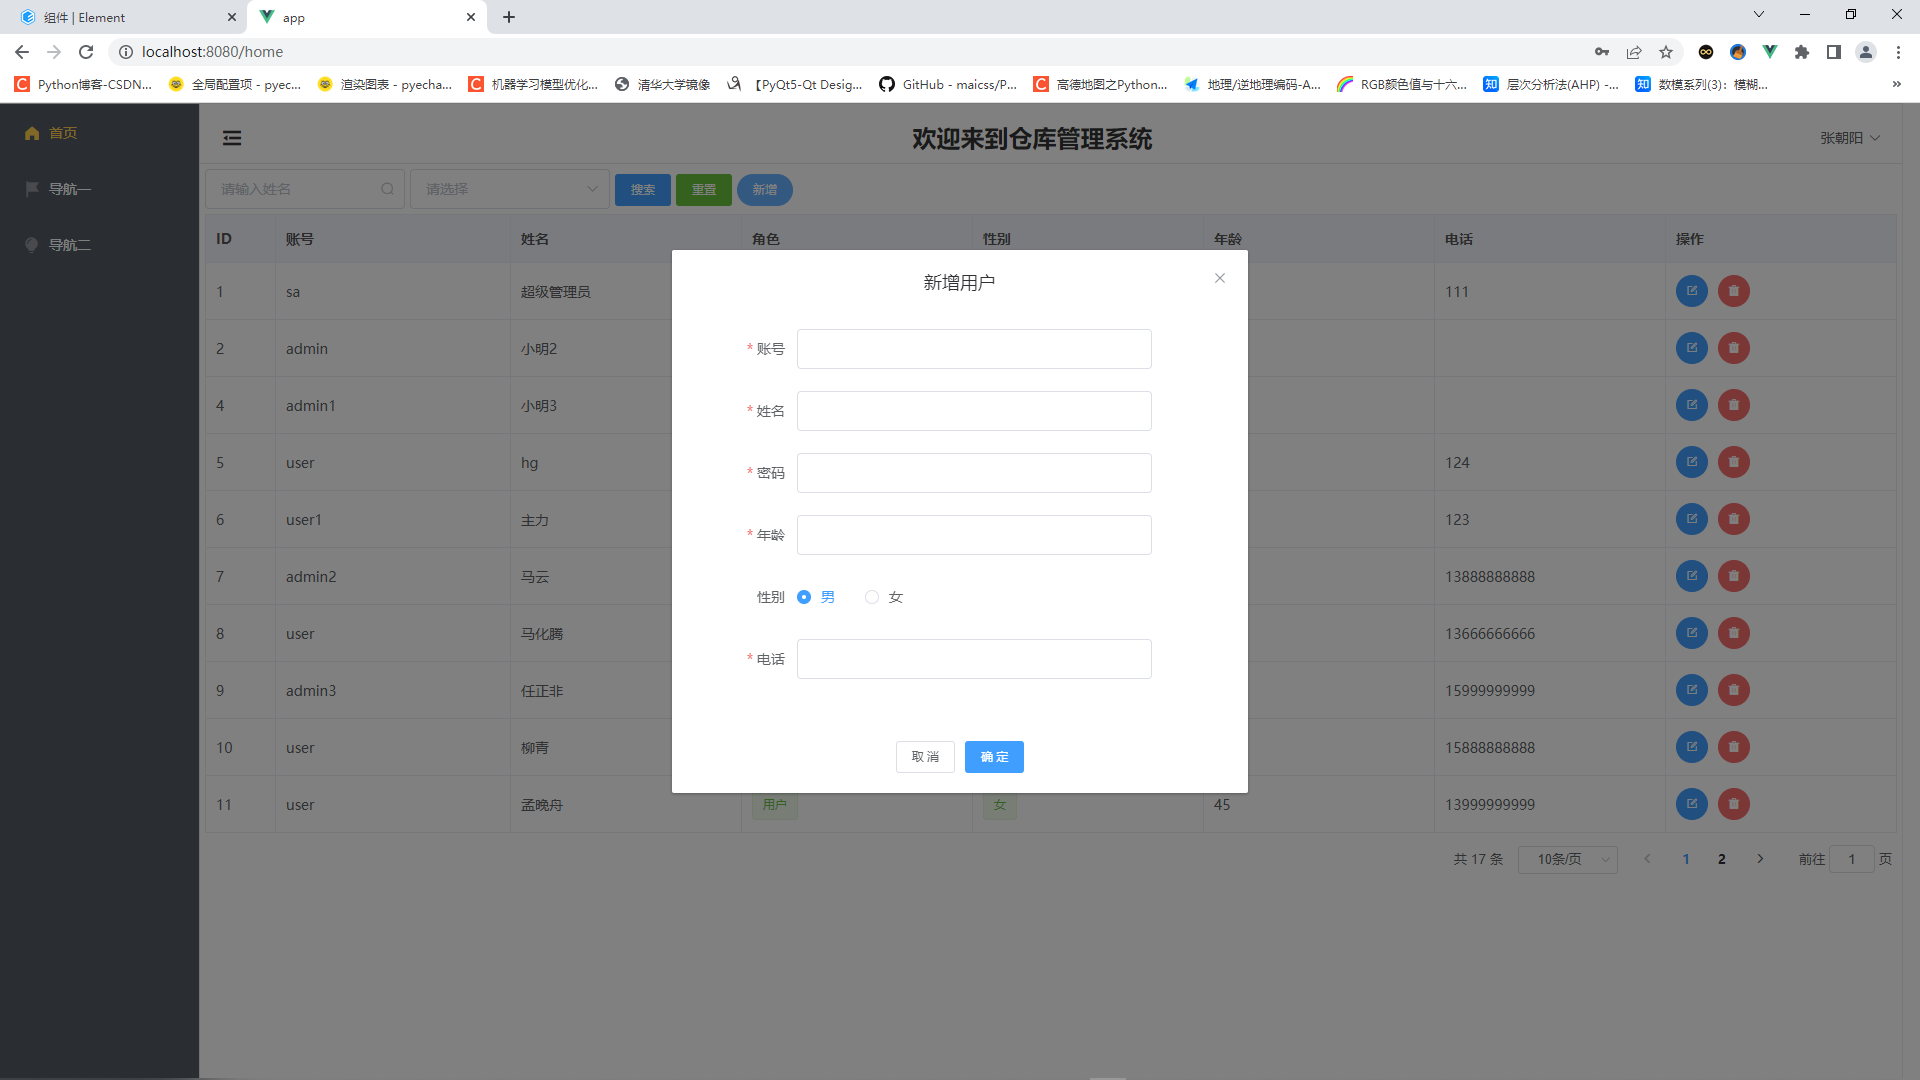
相应的代码如下:
html结构
        <el-dialog :title="title" :visible.sync="centerDialogVisible" width="30%" center>
            <el-form ref="form" :model="form" label-width="100px" :rules="rules">
                <el-form-item label="账号" prop="no">
                    <el-col :span="20">
                        <el-input v-model="form.no" :disabled="isAbled"></el-input>
                    </el-col>
                </el-form-item>
                <el-form-item label="姓名" prop="name">
                    <el-col :span="20">
                        <el-input v-model="form.name"></el-input>
                    </el-col>
                </el-form-item>
                <el-form-item label="密码" prop="password">
                    <el-col :span="20">
                        <el-input v-model="form.password"></el-input>
                    </el-col>
                </el-form-item>
                <el-form-item label="年龄" prop="age">
                    <el-col :span="20">
                        <el-input v-model="form.age"></el-input>
                    </el-col>
                </el-form-item>
                <el-form-item label="性别">
                    <el-radio-group v-model="form.sex">
                        <el-radio label="1">男</el-radio>
                        <el-radio label="2">女</el-radio>
                    </el-radio-group>
                </el-form-item>
                <el-form-item label="电话" prop="phone">
                    <el-col :span="20">
                        <el-input v-model="form.phone"></el-input>
                    </el-col>
                </el-form-item>

            </el-form>
            <span slot="footer" class="dialog-footer">
                <el-button @click="centerDialogVisible = false" size="small">取 消</el-button>
                <el-button type="primary" @click="submitForm('form')" size="small">确 定</el-button>
            </span>
        </el-dialog>
JavaScript
<script>
export default {
    data() {
        return {

            centerDialogVisible: false,
            form: {
                no: '',
                name: '',
                password: '',
                age: '',
                phone: '',
                sex: '1',
                role_id: '2',
                id: ''
            },
            rules: {
                no: [
                    { required: true, message: '请输入账号', trigger: 'blur' },
                    { min: 2, max: 10, message: '长度在2-10个字符', trigger: 'blur' }
                ],
                name: [
                    { required: true, message: '请输入姓名', trigger: 'blur' },
                    { min: 2, max: 10, message: '长度在2-10个字符', trigger: 'blur' }
                ],
                password: [
                    { required: true, message: '请输入密码', trigger: 'blur' },
                    { min: 3, max: 10, message: '长度在3-10个字符', trigger: 'blur' }
                ],
                age: [
                    { required: true, message: '请输入年龄', trigger: 'blur' },
                    { pattern: /^(?:[1-9][0-9]?|1[01][0-9]|120)$/, message: '请输入正确的年龄', trigger: 'blur' }
                ],
                phone: [
                    { required: true, message: '请输入手机号', trigger: 'blur' },
                    { pattern: /^1[3-9]\d{9}$/, message: '请输入正确的手机号', trigger: 'blur' }
                ]
            },
            title: '新增用户',
            operateType: 'add',
            isAbled: false,
        }
    },
    methods: {
        getUser() {
            this.$axios.get('/user/list')
                .then(res => {
                    if (res.data.status === 200) {
                        // this.tableData = res.data.results
                        this.allTableData = res.data.results
                        this.filterTableData = res.data.results
                        this.setPaginations()
                    }
                    // console.log(res)
                })
        },
        // 提交新增或编辑按钮的回调函数
        submitForm(formName) {
            const url = this.operateType == 'add' ? '/user/add' : `/user/mod/${this.form.id}`
            this.$refs[formName].validate(valid => {
                if (valid) {
                    this.$axios.post(url, this.form)
                        .then(res => {
                            if (res.data.status === 200) {
                                this.$message.success('操作成功!')
                                this.centerDialogVisible = false
                                this.resetForm()
                                this.getUser()
                            } else {
                                this.$message.error('操作失败,请更换账号重试!')
                            }
                        })
                        .catch(err => {
                            this.$message.error('操作失败,请更换账号重试!')
                            this.form.no = ''
                        })
                } else {
                    this.$message.warning('请输入有效的数据')
                }
            })
        },


    },
    created() {
        this.getUser()
    },
}
</script>
代码已经比较复杂了,表单的title是可以变换的,点击新增的时候是新增用户,点击编辑的时候是编辑用户。新增时里面的数据是空的,编辑时填充了数据。表单的提交,无论是新增还是编辑,都是使用的同一个方法,不过接口要区分。因此,点击新增按钮,对应的方法如下:
 // 新增按钮的点击函数
        handleAdd() {
            this.centerDialogVisible = true
            this.operateType = 'add'
            this.isAbled = false
            this.resetForm()
        },
this.centerDialogVisible = true显示对话框this.operateType = 'add'将操作类型修改为’add’,this.isAbled = false控制账号输入可用this.resetForm()将原始表单内容清空,可以在最上面的代码中看一下resetForm()是怎样清空的
其实写到这里,就应该开始介绍后端接口怎么写了,因为顶部输入框中的搜索按钮、重置按钮和新增对话框都需要调用接口处理数据,但后面也都要用到接口数据,所以还是打算把主页面写完再一起写后端
中间的数据表格
逻辑很简单,页面创建时即调用后端接口,获取数据,把数据渲染到表格中,因此要使用vue提供的生命周期钩子,相关代码如下
html结构
        <el-table :data="tableData" :header-cell-style="{ background: '#f3f6fd', color: '#555' }" border>
            <el-table-column prop="id" label="ID" width="70">
            </el-table-column>
            <el-table-column prop="no" label="账号">
            </el-table-column>
            <el-table-column prop="name" label="姓名">
            </el-table-column>
            <el-table-column prop="role_id" label="角色">
                <template slot-scope="scope">
                    <el-tag
                        :type="scope.row.role_id === 0 ? 'danger' : (scope.row.role_id === 1 ? 'primary' : 'success')"
                        disable-transitions>{{
                            scope.row.role_id === 0 ? '超级管理员' : (scope.row.role_id === 1 ? '管理员'
                                : '用户')
                        }}</el-tag>
                </template>
            </el-table-column>
            <el-table-column prop="sex" label="性别">
                <template slot-scope="scope">
                    <el-tag :type="scope.row.sex === 1 ? 'primary' : 'success'" disable-transitions>{{
                        scope.row.sex ===
                            1 ? '男' : '女'
                    }}</el-tag>
                </template>
            </el-table-column>
            <el-table-column prop="age" label="年龄">
            </el-table-column>
            <el-table-column prop="phone" label="电话">
            </el-table-column>
            <el-table-column prop="operate" label="操作">
                <template slot-scope="scope">
                    <el-button type="primary" icon="el-icon-edit-outline" title="编辑" size="small"
                        @click="handleEdit(scope.$index, scope.row)" circle>
                    </el-button>
                    <el-button type="danger" icon="el-icon-delete-solid" size="small" title="删除"
                        @click="handleDelete(scope.$index, scope.row)" circle></el-button>
                </template>
            </el-table-column>
        </el-table>
JavaScript
<script>
export default {
    data() {
        return {
            tableData: [],
            allTableData: [],  // 存放所有表格数据以及搜索后的数据
            filterTableData: [],  // 存放所有表格数据供搜索

        }
    },
    methods: {
        getUser() {
            this.$axios.get('/user/list')
                .then(res => {
                    if (res.data.status === 200) {
                        // this.tableData = res.data.results
                        this.allTableData = res.data.results
                        this.filterTableData = res.data.results
                        this.setPaginations()
                    }
                    // console.log(res)
                })
        },
        handleEdit(index, row) {
            // console.log(row)
            this.operateType = 'mod'
            this.centerDialogVisible = true
            this.isAbled = true
            this.title = '编辑用户'
            this.form = row
            this.form.sex = row.sex.toString()
            this.form.password = ''

        },
        handleDelete(index, row) {
            this.$confirm('此操作将永久删除该用户,是否继续?', "提示", {
                confirmButtonText: '确定',
                cancelButtonText: '取消',
                type: 'warning'
            }).then(() => {
                this.$axios.post(`/user/delete/${row.id}`)
                    .then(res => {
                        this.$message({
                            type: 'success',
                            message: '删除成功'
                        })
                        this.getUser()
                    })
            })
        },

        // 提交新增或编辑按钮的回调函数
        submitForm(formName) {
            const url = this.operateType == 'add' ? '/user/add' : `/user/mod/${this.form.id}`
            this.$refs[formName].validate(valid => {
                if (valid) {
                    this.$axios.post(url, this.form)
                        .then(res => {
                            if (res.data.status === 200) {
                                this.$message.success('操作成功!')
                                this.centerDialogVisible = false
                                this.resetForm()
                                this.getUser()
                            } else {
                                this.$message.error('操作失败,请更换账号重试!')
                            }
                        })
                        .catch(err => {
                            this.$message.error('操作失败,请更换账号重试!')
                            this.form.no = ''
                        })
                } else {
                    this.$message.warning('请输入有效的数据')
                }
            })
        },

        // 重置表单中的内容
        resetForm() {
            this.form = {
                no: '',
                name: '',
                password: '',
                age: '',
                phone: '',
                sex: '1'
            }
            // this.$refs.form.resetFields()
        }

    },
    created() {
        this.getUser()
    },
}
</script>
代码太长,我只选择了相关的代码,其实没有多大的难度,主要的就是getUser()发起axios数据请求,然后把数据渲染上去就行了,当然还涉及分页,后面再说
数据删除和编辑
就是每一行数据后面的两个按钮,如下
代码已经放在上面一小节中了
编辑
先看编辑,点击那个蓝色的圆形按钮,跳出编辑对话框,如下:

对比一下上面的新增用户,可以看出区别来,首先顶部的title变成了编辑用户,其次,有数据填充了,另外第一个输入框——账户是禁用的,来看一下这个handleEdit(index, row)方法
        handleEdit(index, row) {
            // console.log(row)
            this.operateType = 'mod'
            this.centerDialogVisible = true
            this.isAbled = true
            this.title = '编辑用户'
            this.form = row
            this.form.sex = row.sex.toString()
            this.form.password = ''

        },
这个方法传递了两个参数,第一个index,是表格的索引,第二个row,是这一行的数据,怎么传过来的呢,看一下表格结构
            <el-table-column prop="phone" label="电话">
            </el-table-column>
            <el-table-column prop="operate" label="操作">
                <template slot-scope="scope">
                    <el-button type="primary" icon="el-icon-edit-outline" title="编辑" size="small"
                        @click="handleEdit(scope.$index, scope.row)" circle>
                    </el-button>
                    <el-button type="danger" icon="el-icon-delete-solid" size="small" title="删除"
                        @click="handleDelete(scope.$index, scope.row)" circle></el-button>
                </template>
            </el-table-column>
我这里特意多放了一个电话的el-table-column标签作为对比,elementUI通过<template slot-scope="scope">这一标签为操作方法提供实参,如果不需要传递参数,简单写一下如电话那个table即可
删除
删除比编辑要简单,逻辑是点击红色的圆形按钮后,弹出确认框,如下

当继续点击确认后,将通过post请求删除该条数据,并调用getUser()方法刷新数据,点击取消就关闭对话框
分页
分页的写法固定,好多页面我都是这么写的,可以回过头去看一下上面的代码
但是要注意,我是前端做的分页,很多大佬喜欢在后端分页。差异在于,后端分页需要把分页的参数传给后端;前端分页的话,后端只需要写一个接口,返回所有数据后匹配一下分页参数取回数据即可。所以争论又来了,前端分页好还是后端分页好,如果是全栈,那无所谓,如果是后端coder,当然觉得前端分页好,反之亦反,无解
主页面–后端数据接口
终于要接着写后端了,良心话,node后端比前端写起来前端要纯粹,都是JavaScript程序,而且我还比较习惯es5语法。但也有头疼的地方,就是各种异步查询异常复杂,稍微复杂一点的数据处理接口写起来经常会返回不了数据,基本原因都是因为异步查询导致的,常规的解决方案是使用promise或者async/await,遇到问题了再说吧
先上一下我的完整的后端接口,实现数据的增删改查
router_handler/user.js文件
const db = require("../db/index");
const svgCaptcha = require("svg-captcha");
const config = require("../config");
const jwt = require("jsonwebtoken");

exports.list = (req, res) => {
  const sql = "select * from user";
  db.query(sql, (err, results) => {
    if (err) return res.status(400).json(err);
    res.json({
      status: 200,
      results,
    });
  });
};

exports.add = (req, res) => {
  const user = req.body;
  const searchSql = "select * from user where no = ?";
  db.query(searchSql, user.no, (err, results) => {
    if (results.length !== 0) {
      return res.status(400).json("账号已存在,请更换账号");
    } else {
      const sql = "insert into user set ?";
      db.query(sql, user, (err, results) => {
        if (err) return res.status(400).json(err);
        res.json({
          status: 200,
          result: user,
        });
      });
    }
  });
};

exports.mod = (req, res) => {
  const user = req.body;
  const sql = "update user set ? where id = ?";
  db.query(sql, [user, req.params.id], (err, result) => {
    if (err) return res.status(400).json(err);
    if (result.affectedRows !== 1) return res.status(400).json("添加失败");
    res.json({
      status: 200,
      result: user,
    });
  });
};

exports.delete = (req, res) => {
  const sql = "delete from user where id = ?";
  db.query(sql, req.params.id, (err, result) => {
    if (err) return res.status(400).json(err);
    if (result.affectedRows !== 1) return res.status(400).json("删除失败");
    res.status(200).json("删除成功");
  });
};

exports.searchByName = (req, res) => {
  const name = req.body.name;
  if (!name) return res.status(400).json("请求体中无name");
  const seachParam = "%" + name + "%";
  const sql = "select * from user where name like ?";
  db.query(sql, seachParam, (err, results) => {
    if (err) return res.status(400).json(err);
    res.json({
      status: 200,
      results,
    });
  });
};

// 登录相关
// 验证码
exports.checkCode = (req, res) => {
  const img = svgCaptcha.create({
    size: 4,
    ignoreChars: "0o1l",
    color: true,
    noise: 2,
    background: "#FFF0F5",
    height: 38,
    width: 113,
  });
  res.send(img);
};

// 登录
exports.login = (req, res) => {
  const user = req.body;
  const sql = "select * from user where no = ?";
  db.query(sql, user.no, (err, results) => {
    if (err) return res.status(400).json(err);
    if (results.length !== 1) return res.status(400).json("用户不存在");
    if (results[0].password != user.password)
      return res.status(400).json("用户名或密码错误,请重新输入");

    const user_info = {
      id: results[0].id,
      no: results[0].no,
      name: results[0].name,
    };
    const tokenStr = jwt.sign(user_info, config.jwtSecretKey, {
      expiresIn: "10h",
    });
    res.json({
      status: 200,
      message: "登录成功",
      token: "Bearer " + tokenStr,
    });
  });
};
看代码,就7个处理函数,有两个前面已经提到,就是登录相关的验证码和登录查询,登录这里,写的不够好,按理说密码不应该使用明文的,但我懒得去搞了,就用明文吧
接下来看一下后端的结构地址文件
router/user.js文件
const express = require('express');
const router = express.Router();

const userHandler = require('../router_handler/user.js')
router.get('/list', userHandler.list)
router.post('/add', userHandler.add)
router.post('/mod/:id', userHandler.mod)
router.post('/delete/:id', userHandler.delete)
router.post('/searchByName', userHandler.searchByName)

router.get('/checkCode', userHandler.checkCode)
router.post('/login', userHandler.login)

module.exports = router
分别对应上面7个路由处理函数
这里不想再过多的解释后端接口是怎么写的了,总之要注意一点的就是可能会遇到异步查询的问题,有几个思路
- 写一个异步的db.query方法
- db.query并行查询
我觉得第一个好
导航一页面
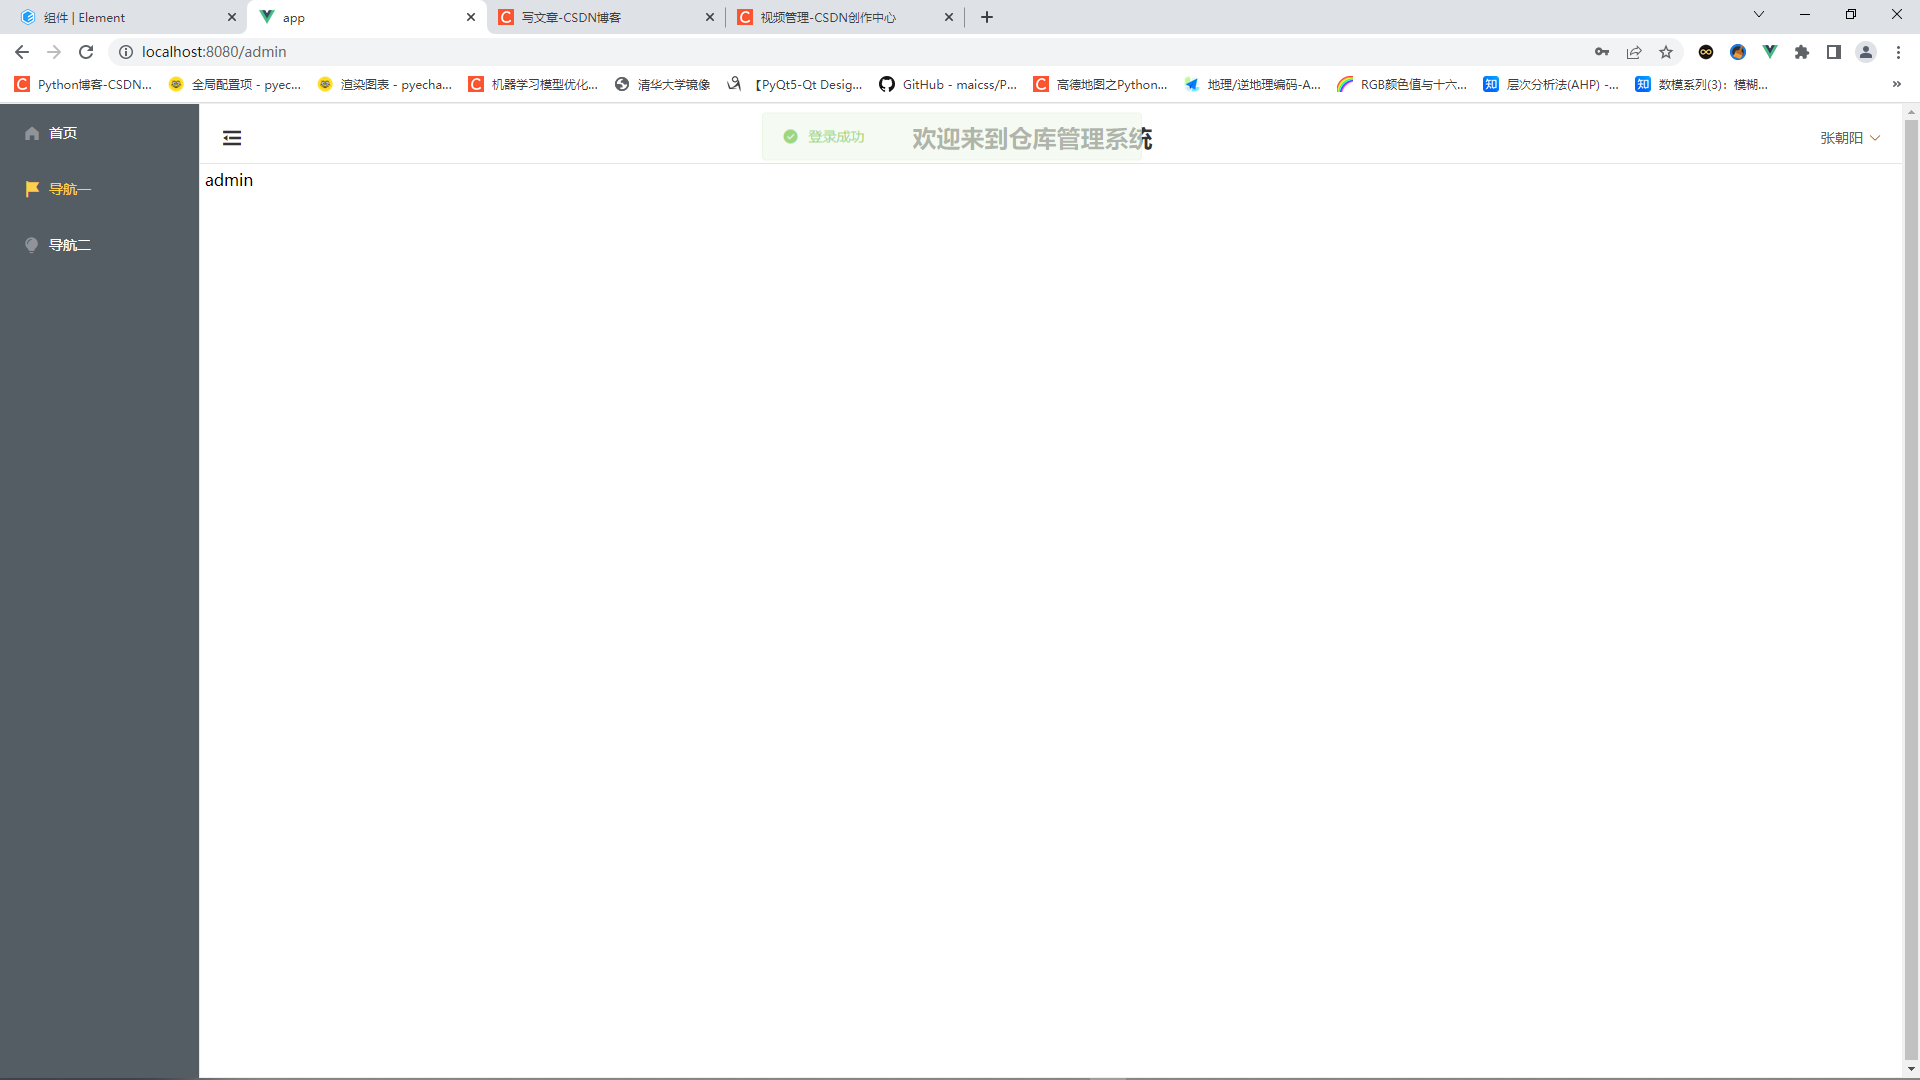
本来想重新写一下页面功能的,但想了一下,其实和主页面重复了很多,后面就没写了
逻辑是点击侧边导航一item,主界面main部分将跳转到导航一
简单写了一个vue组件,代码如下
<template>
  <span>admin</span>
</template>

<script>
export default {

}
</script>

<style>

</style>
显示如下
导航二页面
与导航一页面一样,不再放了
写在后面
终于完整写完了,虽然很多地方还不是很清楚,但至少以后写项目时,可参考的内容就多了一些
当然,代码我也上传到gitee了
前端代码地址:https://gitee.com/hgandzl/vue-wms-app
后端代码地址:https://gitee.com/hgandzl/vue-wms-api
项目演示视频:https://live.csdn.net/v/270576?spm=1001.2014.3001.5501
仓库管理系统
保持学习,保持进步,完结~~


 8214
8214

 被折叠的 条评论
为什么被折叠?
被折叠的 条评论
为什么被折叠?
 到【灌水乐园】发言


