用消息中心的目的是解耦,消息(数据)在多个系统中传递,各个系统自主处理各自的事物。为此,根据RabbitMQ官方教程,我们逐渐开展研究。
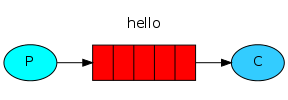
首先,研究第一模式"Hello World!",我们将会设计两个程序,一个发送Hello world,另一个接收这个数据并且打印到屏幕。
整体的设计如下图:
一、建立工程
1、通过http://start.spring.io/分别建立HelloSending、HelloReceiving
2、下载、解压,依次导入eclipse
3、修改pom.xml,以便于热部署
4、增加日志文件logback.xml
5、修改application.properties,其中HelloSending为
- #服务器配置
- spring.application.name=rabbitmq-hello-sending
- server.port=9080
- #rabbitmq连接参数
- spring.rabbitmq.host=localhost
- spring.rabbitmq.port=5672
- spring.rabbitmq.username=test
- spring.rabbitmq.password=123456
HelloReceiving为
- #服务器配置
- spring.application.name=rabbitmq-hello-receiving
- server.port=9090
- #rabbitmq连接参数
- spring.rabbitmq.host=localhost
- spring.rabbitmq.port=5672
- spring.rabbitmq.username=test
- spring.rabbitmq.password=123456
二、编制sending
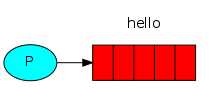
sending,实现消息发送到队列
1、配置文件。增加类HelloRabbitConfig,编制代码为
- package com.example;
-
- import org.springframework.amqp.core.Queue;
- import org.springframework.context.annotation.Bean;
- import org.springframework.context.annotation.Configuration;
-
- @Configuration
- public class HelloRabbitConfig {
-
- @Bean
- public Queue helloQueue() {
- return new Queue("hello");
- }
- }
2、消息发送。增加类HelloSender,编制代码为
- package com.example;
-
- import java.util.Date;
-
- import org.slf4j.Logger;
- import org.slf4j.LoggerFactory;
- import org.springframework.amqp.core.AmqpTemplate;
- import org.springframework.beans.factory.annotation.Autowired;
- import org.springframework.stereotype.Component;
-
- @Component
- public class HelloSender {
-
- protected static Logger logger=LoggerFactory.getLogger(HelloSender.class);
-
- @Autowired
- private AmqpTemplate rabbitTemplate;
-
- public String send(String name) {
- String context = "hello "+name+" --" + new Date();
- logger.debug("HelloSender: " + context);
- this.rabbitTemplate.convertAndSend("hello", context);
- return context;
- }
- }
3、RestController。增加类HelloController,编制代码为
- package com.example;
-
- import org.slf4j.Logger;
- import org.slf4j.LoggerFactory;
- import org.springframework.beans.factory.annotation.Autowired;
- import org.springframework.web.bind.annotation.PathVariable;
- import org.springframework.web.bind.annotation.RequestMapping;
- import org.springframework.web.bind.annotation.RestController;
-
- @RestController
- public class HelloController {
- protected static Logger logger=LoggerFactory.getLogger(HelloController.class);
-
- @Autowired
- private HelloSender helloSender;
-
- @RequestMapping("/send/{name}")
- public String helloworld(@PathVariable String name) {
- return helloSender.send(name);
- }
- }
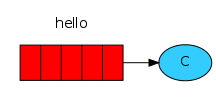
三、编制Receiving
1、配置文件。增加类HelloRabbitConfig,编制代码为
- package com.example;
-
- import org.springframework.amqp.core.Queue;
- import org.springframework.context.annotation.Bean;
- import org.springframework.context.annotation.Configuration;
-
- @Configuration
- public class HelloRabbitConfig {
-
- @Bean
- public Queue helloQueue() {
- return new Queue("hello");
- }
- }
2、接收消息,增加类HelloReceiver,编制代码为
- package com.example;
-
- import org.slf4j.Logger;
- import org.slf4j.LoggerFactory;
- import org.springframework.amqp.rabbit.annotation.RabbitHandler;
- import org.springframework.amqp.rabbit.annotation.RabbitListener;
- import org.springframework.stereotype.Component;
-
- @Component
- @RabbitListener(queues = "hello")
- public class HelloReceiver {
- protected static Logger logger = LoggerFactory.getLogger(HelloReceiver.class);
-
- @RabbitHandler
- public void process(String hello) {
- logger.debug("HelloReceiver : " + hello);
- }
- }
四、运行工程
1、在工程HelloSending所在文件夹打开cmd,运行mvn spring-boot:run
2、在工程HelloReceiving所在文件夹打开cmd,运行mvn spring-boot:run
3、在浏览器中输入http://localhost:9080/send/上帝
在两个工程的控制台,查看日志
五、小节
1、这两个工程,其实就是上节工程的重构。这两个工程唯一的区别就是一个包含发送类,一个包含接收类而已。
2、通过这两个工程,我们实现了基本的系统间通讯。
3、生产者、消费者,彼此之间不需要认识的,一个往垃圾堆中扔垃圾,一个从垃圾中检出垃圾。
下一节,我们研究一个人扔垃圾多个人检垃圾的问题。


 3291
3291

 被折叠的 条评论
为什么被折叠?
被折叠的 条评论
为什么被折叠?
 到【灌水乐园】发言


