


今天来谈谈Android基本布局使用最常见的两种布局,分别是LinearLayout和RelativeLayout,其实用法也没有太多,基本记住几个属性加上灵活使用嵌套就能实现各种灵活的布局了。
LinearLayout 布局
android:layout_gravity— 属于定义子节点在父节点的位置布局android:gravity— 属于定义子节点内容在子节点内的位置布局
以上两个属性适用于LinearLayout及其子节点。
LinearLayout 一般要要求你设置一个布局方向
<LinearLayout
xmlns:android="http://schemas.android.com/apk/res/android"
    xmlns:tools="http://schemas.android.com/tools"
    android:layout_width="match_parent"
    android:layout_height="match_parent"
    android:orientation="vertical" >
orientation有2个属性:
- vertical 设置布局方向为竖直
- horizontal 设置布局方向为水平
在设置了属性之后,使用
andoir:layout_gravity的时候有一点需要注意就是- 对齐方式为水平时,
layout_gravity属性中设置为left right 2个属性失效 - 对齐方式为竖直时,
layout_graviry属性中设置为top buttom 2个属性失效
在LinearLayout 中还有一个非常重要的属性:android:layout_weight,为权重 , 该属性有一些特点,我先用一句话来解析这个属性: 权重是指按比例分配剩余空间。比如说:假如我设置了LinearLayout的对齐方式为水平时,权重添加在子节点中,系统会默认先分配了指定android:layout_width 属性的值之后,剩余的空间再按比例分配。下面来个例子说明一下吧:
<?xml version="1.0" encoding="utf-8"?>
<LinearLayout xmlns:android="http://schemas.android.com/apk/res/android"
    android:layout_width="match_parent"
    android:layout_height="match_parent"
    android:orientation="vertical" >

    <TextView
        android:layout_width="20dp"
        android:layout_weight="1"
        android:height="20dp" />

    <TextView
        android:layout_width="20dp"
        android:layout_weight="1"
        android:height="20dp" />

    <TextView
        android:layout_width="20dp"
        android:layout_weight="1"
        android:height="20dp" />

</LinearLayout>
上面的例子为3个TextView设置了权重为1,然后LinearLayout是match_parent,对其方式为竖直,意味着权重是对高度起作用的。每个TextView设置了高度,系统在分配高度的时候,会先分配每个TextView的20dp高度之后,剩余的高度才会按权重比例分配。所以可能会有些人在设置了权重之后也达不到想要的效果,通常我们都是配合宽度或者高度为0dip使用的,google官方也是建议我们这样做的。
认识了以上这些属性之后,在配合LinearLayout嵌套灵活使用,基本上能应付一些比较复杂的布局了。
RelativeLayout 布局
首先我们对布局的属性做一个总结:
对齐方式
以align 为前缀的属性:
- layout_alignParentLeft —— 在父节点的左边
- layout_alignParentRight ——在父节点的右边
- layout_alignParentTop ——-在父节点顶部
- layout_alignParentButtom ——在父节点底部
- layout_alignTop——与另一个节点顶部对齐
- layout_alignLeft——与另一个节点左边对齐
- layout_alignRight——与另一个节点右边对齐
- layout_alignButtom——与另一个节底部对齐
以上属性前四个是相对于父节点来说的,值为true或者false;后四个是相对同级节点来说的,值为其他节点的id 。相信对英语不是太差的都能区别4个属性的意思~~~
以center为前缀的:
- layout_centerInParent ——在父空间中间
- layout_centerHorizontal ——在父空间竖直方向中心
- layout_centerVertical ——在父空间水平方向中心
以上3个属性取值都是true或者false。
设置在相对另一个控件的位置
- layout_toRightOf ——在另一个节点右边
- layout_toLeftOf ——在另一个节点左边
- layout_below——在另一个节点下面
- layout_above——在另一个节点上面
以上属性取值为 另一个节点的 id 值。
除了认识以上一些属性之外,还需要灵活运用各种属性组合使用,才能达到效果。有一个小技巧,比如在:android:layout_width="wrap_content" 的情况下,想要设置一个控件随着另一个控件的宽度变化而变化,可以设置控件左右对齐即android:alignLeft and android:alignRight
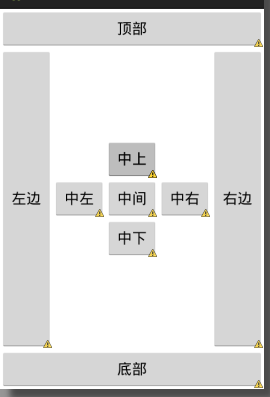
我这里列举一个RelativeLayout的使用:
<?xml version="1.0" encoding="utf-8"?>
<RelativeLayout xmlns:android="http://schemas.android.com/apk/res/android"
    android:layout_width="match_parent"
    android:layout_height="match_parent" >

    <Button
        android:id="@+id/center"
        android:layout_width="wrap_content"
        android:layout_height="wrap_content"
        android:layout_centerInParent="true"
        android:text="中间" />

    <Button
        android:id="@+id/top"
        android:layout_width="match_parent"
        android:layout_height="wrap_content"
        android:layout_alignParentTop="true"
        android:layout_centerHorizontal="true"
        android:text="顶部" />

    <Button
        android:id="@+id/buttom"
        android:layout_width="match_parent"
        android:layout_height="wrap_content"
        android:layout_centerHorizontal="true"
        android:layout_alignParentBottom="true"
        android:text="底部" />

    <Button
        android:layout_width="wrap_content"
        android:layout_height="match_parent"
        android:layout_above="@id/buttom"
        android:layout_alignParentLeft="true"
        android:layout_below="@id/top"
        android:text="左边" />

    <Button
        android:layout_width="wrap_content"
        android:layout_height="wrap_content"
        android:layout_above="@id/buttom"
        android:layout_alignParentRight="true"
        android:layout_below="@id/top"
        android:text="右边" />

    <Button
        android:layout_width="wrap_content"
        android:layout_height="wrap_content"
        android:layout_above="@id/center"
        android:layout_alignLeft="@id/center"
        android:layout_alignRight="@id/center"
        android:text="中上" />

    <Button
        android:layout_width="wrap_content"
        android:layout_height="wrap_content"
        android:layout_above="@id/center"
        android:layout_alignLeft="@id/center"
        android:layout_alignRight="@id/center"
        android:text="中上" />

    <Button
        android:layout_width="wrap_content"
        android:layout_height="wrap_content"
        android:layout_alignLeft="@id/center"
        android:layout_alignRight="@id/center"
        android:layout_below="@id/center"
        android:text="中下" />

    <Button
        android:layout_width="wrap_content"
        android:layout_height="wrap_content"
        android:layout_alignTop="@id/center"
        android:layout_alignBottom="@id/center"
        android:layout_toLeftOf="@id/center"
        android:text="中左" />

    <Button
        android:layout_width="wrap_content"
        android:layout_height="wrap_content"
        android:layout_alignBottom="@id/center"
        android:layout_alignTop="@id/center"
        android:layout_toRightOf="@id/center"
        android:text="中右" />


</RelativeLayout>
效果图如下:
以上就是相对布局的基本使用了,对于android开发来讲,这两种布局用的最多,其他还有3中布局:FrameLayou and AbsulteLayout and TableLayout 我这边就不列出来了,大家可以尝试一下,相信英语不错的朋友都能从中看出用法。


 354
354

 被折叠的 条评论
为什么被折叠?
被折叠的 条评论
为什么被折叠?
 到【灌水乐园】发言


