


研究了一阵kivy,万事从头来。
Tutorials » A Simple Paint App
In the following tutorial, you will be guided through the creation of yourfirst widget. This provides powerful and important knowledge whenprogramming Kivy applications, as it lets you create completely new userinterfaces with custom elements for your specific purpose.
Basic Considerations
When creating an application, you have to ask yourself three important questions:
- What data does my application process? A:我的app将要处理什么数据?
- How do I visually represent that data? B:数据的表现形式是怎么样的?
- How does the user interact with that data? C:用户怎么交互这些数据?
If you want to write a very simple line drawing application for example, youmost likely want the user to just draw on the screen with his/her fingers.That’s how the userinteracts with your application. While doing so,your application would memorize the positions where the user’s finger were,so that you can later draw lines between those positions. So the pointswhere the fingers were would be yourdata and the lines that you drawbetween them would be your visual representation.
假设你想做个画直线的app,例如,你更多的想用户通过手指画在屏幕上。其实这就是上面所说的C,当做了这些,你的app将会记录用户手指的位置,以至于稍后你可以依据这些位置画线。那么这些点就是你的数据(也就是A),这个生成的线就是表现形式(也就是B)
In Kivy, an application’s user interface is composed of Widgets. Everythingthat you see on the screen is somehow drawn by a widget. Often you wouldlike to be able to reuse code that you already wrote in a differentcontext, which is why widgets typically represent one specific instancethat answers the three questions above. A widget encapsulates data,defines the user’s interaction with that data and draws its visualrepresentation.You can build anything from simple to complex user interfaces bynesting widgets. There are many widgets built in, such as buttons, slidersand other common stuff. In many cases, however, you need a custom widgetthat is beyond the scope of what is shipped with Kivy (e.g. amedical visualization widget).
Kivy中,app的用户接口是由窗口小部件组成。所有你在屏幕上看到的都是widget画的。通常你更喜欢重复利用你写过的代码在不同的环境中,这也就是为什么widget通常出现在一个特定的实例里头。这很好的解释了上述ABC三个问题。widget囊括了数据,定义了用户与数据之间交互,并画出它的表现形式。通过嵌套widget,你可以从简单到复杂创建任何用户接口。这里内置有许多widget,就像按钮等。在许多情况下,但是,你需要自定义widget。
So keep these three questions in mind when you design your widgets. Try towrite them in a minimal and reusable manner (i.e. a widget does exactlywhat its supposed to do and nothing more. If you need more, write morewidgets or compose other widgets of smaller widgets. We try to adhere to theSingle Responsibility Principle).
所以当你要设计你的widget的时候,记住这三个点。试着将他们写的小并且可利用的方式。(也就是,一个widget为其所用,别太天花乱坠。)如果你要的更多的widget,写更多的widget或者组成其他小型的widget。我们试着坚持这个原则:https://en.wikipedia.org/wiki/Single_responsibility_principle(没看)
Paint Widget
We’re sure one of your childhood dreams has always been creating your ownmultitouch paint program. Allow us to help you achieve that. In thefollowing sections you will successively learn how to write a program likethat using Kivy. Make sure that you have read and understoodCreate an application. You have? Great! Let’s get started!
~~~。允许我们协助你实现这个童年梦想。接下来部分你将会学习如何编程(其实也就是使用kivy)。确定你已经读了创建APP。
Initial Structure
Let’s start by writing the very basic code structure that we need. By the way,all the different pieces of code that are used in this section are alsoavailable in theexamples/guide/firstwidget directory that comes with Kivy,so you don’t need to copy & paste it all the time.Here is the basic code skeleton that we will need:
先从 一个非常基础的代码结构开始,顺便说一下,在这里所有不同片段的代码,是来自在examples/guide/firstwidget下的文件。所以你没必要每次拷贝复制。这里有我们需要的基本的代码骨架
1 2 3 4 5 6 7 8 9 10 11 12 13 14 15 |
from kivy.app import App
from kivy.uix.widget import Widget


class MyPaintWidget(Widget):
    pass


class MyPaintApp(App):
    def build(self):
        return MyPaintWidget()


if __name__ == '__main__':
    MyPaintApp().run()
|
This is actually really simple. Save it as paint.py.If you run it, you should only see a black screen.As you can see, instead of using a built-in widget such as a Button (seeCreate an application), we are going to write our own widget to do the drawing.We do that by creating a class that inherits fromWidget (line 5-6) and although that class does nothingyet, we can still treat it like a normal Kivy widget (line 11).Theif __name__... construct (line 14) is a Python mechanism that preventsyou from executing the code in the if-statement when importing from the file,i.e. if you writeimport paint, it won’t do something unexpected butjust nicely provide the classes defined in the file.
这很简单,保存它。如果运行它,你应只是看到一个黑屏(哦,是的)。如你所见,与其使用内置widget作为Button,我们将写自己的widget去绘画。通过创建一个类继承自Widget即使类没有任何东西,我们仍旧可以对待它像一个kivy的widget。14行是python的机制,自行百度。
Note
You may be wondering why you have to import App and Widget separately,instead of doing something likefrom kivyimport *. While shorter,this would have the disadvantage ofpolluting your namespaceand make the start of the application potentially much slower.It can also introduce ambiguity into class and variable naming,so is generally frowned upon in the Python community. The way we do it isfaster and cleaner.
你可能想知道为什么你必须要做个导入app动作,而这个动作又跟widget分开来写。而不是导入全部组件。更短的那句(也就是导入全部),会影响你app的速度。它也产生类里头的歧义和变量命名,通常python社区也是对此不赞同的。所以我们的方式更加快速和纯净。
Adding Behaviour
Let’s now add some actual behaviour to the widget, i.e. make it react to userinput. Change the code like so:
现在我们加些实际行为给widget,也就是对用户输入的东西起敏感的反应。修改如下:
1 2 3 4 5 6 7 8 9 10 11 12 13 14 15 16 |
from kivy.app import App
from kivy.uix.widget import Widget


class MyPaintWidget(Widget):
    def on_touch_down(self, touch):
        print(touch)


class MyPaintApp(App):
    def build(self):
        return MyPaintWidget()


if __name__ == '__main__':
    MyPaintApp().run()
|
This is just to show how easy it is to react to user input. When aMotionEvent (i.e. a touch, click, etc.) occurs,we simply print the information about the touch object to the console.You won’t see anything on the screen, but if you observe the command-line fromwhich you are running the program, you will see a message for every touch.This also demonstrates that a widget does not have tohave a visual representation.
多么简单实现了这功能。我们简单的打印关于touch对象信息到控制台。你在屏幕上看不到任何东西,命令行则会输出一些信息。这恰恰印证了widget需要一个可视化的表现形式。
Now that’s not really an overwhelming user experience. Let’s add some codethat actually draws something into our window:
现在这个用户体验还不足以鼓舞人心,继续加代码
1 2 3 4 5 6 7 8 9 10 11 12 13 14 15 16 17 18 19 20 21 22 |
from kivy.app import App
from kivy.uix.widget import Widget
from kivy.graphics import Color, Ellipse


class MyPaintWidget(Widget):

    def on_touch_down(self, touch):
        with self.canvas:
            Color(1, 1, 0)
            d = 30.
            Ellipse(pos=(touch.x - d / 2, touch.y - d / 2), size=(d, d))


class MyPaintApp(App):

    def build(self):
        return MyPaintWidget()


if __name__ == '__main__':
    MyPaintApp().run()
|
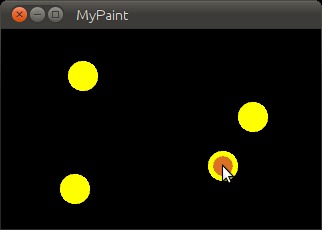
If you run your code with these modifications, you will see that every timeyou touch, there will be a small yellow circle drawn where you touched.How does it work?
- Line 9: We use Python’s
withstatement with the widget’sCanvasobject. This is like anarea in which the widget can draw things to represent itself on thescreen. By using thewithstatement with it, all successivedrawing commands that are properly indented will modify this canvas.Thewithstatement also makes sure that after our drawing,internal state can be cleaned up properly.- with语句 ,这就像是一块区域里头widget可以画东西去表现它。通过使用with语句,所有的连续绘画指令~也确保我们绘画后,内部状态可以被正确清理。
- Line 10: You might have guessed it already: This sets the
Colorfor successivedrawing operations to yellow (default color format is RGB, so (1, 1, 0) isyellow). This is true until anotherColoris set.Think of this as dipping your brushes in that color, which you canthen use to draw on a canvas until you dip the brushes into another color.- Line 11: We specify the diameter for the circle that we are about todraw. Using a variable for that is preferable since we need to referto that value multiple times and we don’t want to have to change itin several places if we want the circle bigger or smaller.
- Line 12: To draw a circle, we simply draw an
Ellipsewith equal widthand height. Since we want the circle to be drawn where the usertouches, we pass the touch’s position to the ellipse.Note that we need to shift the ellipse by-d/2in the x and ydirections (i.e. left and downwards) because the position specifies thebottom left corner of the ellipse’s bounding box, and we want it to becentered around our touch.
That was easy, wasn’t it?It gets better! Update the code to look like this:
1 2 3 4 5 6 7 8 9 10 11 12 13 14 15 16 17 18 19 20 21 22 23 24 25 26 |
from kivy.app import App
from kivy.uix.widget import Widget
from kivy.graphics import Color, Ellipse, Line


class MyPaintWidget(Widget):

    def on_touch_down(self, touch):
        with self.canvas:
            Color(1, 1, 0)
            d = 30.
            Ellipse(pos=(touch.x - d / 2, touch.y - d / 2), size=(d, d))
            touch.ud['line'] = Line(points=(touch.x, touch.y))

    def on_touch_move(self, touch):
        touch.ud['line'].points += [touch.x, touch.y]


class MyPaintApp(App):

    def build(self):
        return MyPaintWidget()


if __name__ == '__main__':
    MyPaintApp().run()
|
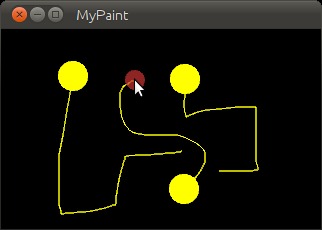
-
This is what has changed:
-
- Line 3: We now not only import the
Ellipsedrawing instruction,but also theLinedrawing instruction. If you look at the documentation forLine, you will see thatit accepts apointsargument that has to be a list of 2D pointcoordinates, like(x1, y1,x2, y2, ...,xN, yN). - Line 13: This is where it gets interesting.
touch.udis a Pythondictionary (type <dict>) that allows us to storecustom attributesfor a touch. - 这里比较有趣,touch.ud是一个python 字典,允许我们存储自定义的touch属性
- Line 13: We make use of the Line instruction that we imported andset a Line up for drawing. Since this is done in
on_touch_down,there will be a new line for every new touch. By creating the lineinside thewithblock, the canvas automatically knows about theline and will draw it. We just want to modify the line later, so westore a reference to it in thetouch.uddictionary under thearbitrarily chosen but aptly named key ‘line’.We pass the line that we’re creating the initial touch positionbecause that’s where our line will begin. - 我们利用导入的Line 指令并且放置Line来绘画。从on_touch_down做完动作,你每次的touch都会有line产生。通过在with语句块创建Line,canvas画布自动认知这line并画出来,我们只需要稍后定义这line,所以我们在touch.ud字典存储了一个引用指向它(键名我们定为line)。我们要传递这个正在初始化touch位置的line,因为这个是直线的起点。
- Lines 15: We add a new method to our widget. This is similar to the
on_touch_downmethod, but instead of being called when anewtouch occurs, this method is being called when an existing touch(for whichon_touch_downwas already called) moves, i.e. itsposition changes. Note that this is thesameMotionEventobject with updatedattributes. This is something we found incredibly handy and you willshortly see why. - 我们增加了一个新的方法到我们 的widget:on_touch_move。这虽然类似on_touch_down方法,但是,当一个新的touch发生时,它不会被called,此方法只有当一个已经存在的touch并出现move动作(要on_touch_down已经被called后,其实就是你按下后再移动才会出现直线的意思)。注意,这是跟MotionEvent一样的对象,只是带了一个最新的属性。这的确很方便,你很快就知道为什么。
- Line 16: Remember: This is the same touch object that we got in
on_touch_down, so we can simply access the data we stored awayin thetouch.uddictionary!To the line we set up for this touch earlier, we now add the currentposition of the touch as a new point. We know that we need to extendthe line because this happens inon_touch_move, which is onlycalled when the touch has moved, which is exactly why we want toupdate the line.Storing the line in thetouch.udmakes it a whole loteasier for us as we don’t have to maintain our own touch-to-linebookkeeping. - 记住:这是同一个touch对象,因为这个对象是从on_touch_down来的。所以我们可以便捷地连接我们存储在touch.ud字典里头的data!针对我们早前为该touch放置的直线,现在加个touch的当前位置信息作为一个新的point指针。我们的确需要扩展line,因为这个发生在on_touch_move方法中,这方法只发生在touch加移动的时候,这也是为什么我们想要更新这line(说白了就是你在按下触摸的时候,直线的起点都是在你这个相对的位置上,所以你要更新你直线起点的位置信息。)
- Line 3: We now not only import the
So far so good. This isn’t exactly beautiful yet, though. It looks a bitlike spaghetti bolognese. How about giving each touch its own color?Great, let’s do it:
到目前为止,一切还算顺利。尽管这还不算完美啊。这看着像意大利牛肉面。来个每次touch都有它自己的颜色怎么样?就这么干!
1 2 3 4 5 6 7 8 9 10 11 12 13 14 15 16 17 18 19 20 21 22 23 24 25 26 27 28 |
from random import random
from kivy.app import App
from kivy.uix.widget import Widget
from kivy.graphics import Color, Ellipse, Line


class MyPaintWidget(Widget):

    def on_touch_down(self, touch):
        color = (random(), random(), random())
        with self.canvas:
            Color(*color)
            d = 30.
            Ellipse(pos=(touch.x - d / 2, touch.y - d / 2), size=(d, d))
            touch.ud['line'] = Line(points=(touch.x, touch.y))

    def on_touch_move(self, touch):
        touch.ud['line'].points += [touch.x, touch.y]


class MyPaintApp(App):

    def build(self):
        return MyPaintWidget()


if __name__ == '__main__':
    MyPaintApp().run()
|
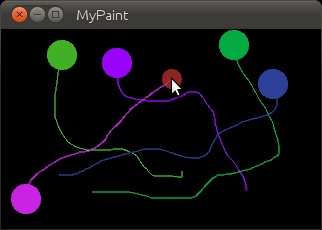
Here are the changes:
- Line 1: We import Python’s random() function that will give usrandom values in the range of [0., 1.).
- Line 10: In this case we simply create a new tuple of 3 randomfloat values that will represent a random RGB color. Since we dothis in
on_touch_down, every new touch will get its own color.Don’t get confused by the use oftuples.We’re just binding the tuple tocolorfor use as a shortcutwithin this method because we’re lazy.- Line 12: As before, we set the color for the canvas. Only this timewe use the random values we generated and feed them to the colorclass using Python’s tuple unpacking syntax (since the Color classexpects three individual color components instead of just 1. If wewere to pass the tuple directly, that would be just 1 value beingpassed, regardless of the fact that the tuple itself contains 3values).
- 早前,我们对画布convas设置颜色。仅仅这一次我们使用了随机数来满足color类,用的是python的元组语句(现在就传了一个参数,而不是传统的三个实参),如果直接传个元组名称,将会只有一个随机值传给color类,采用*元组名称,那么就可以传入三个值。
This looks a lot nicer already! With a lot of skill and patience, youmight even be able to create a nice little drawing!
Note
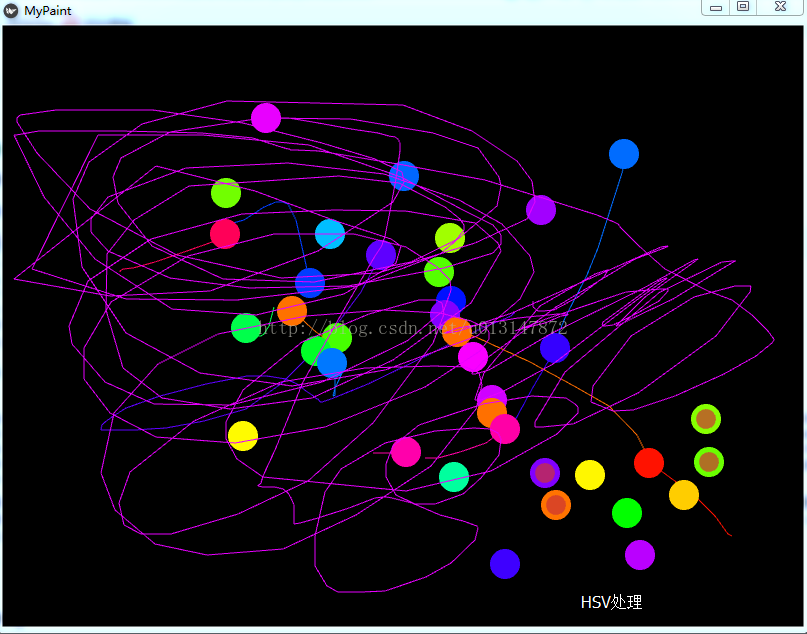
Since by default the Colorinstructions assume RGB mode and we’re feeding a tuple with threerandom float values to it, it might very well happen that we end upwith a lot of dark or even black colors if we are unlucky. That wouldbe bad because by default the background color is dark as well, so youwouldn’t be able to (easily) see the lines you draw.There is a nice trick to prevent this: Instead of creating a tuple withthree random values, create a tuple like this: (random(), 1., 1.).Then, when passing it to the color instruction, set the mode to HSVcolor space:Color(*color, mode='hsv'). This way you will have asmaller number of possible colors, but the colors that you get willalways be equally bright: only the hue changes.
默认Color类我们都是传个RGB的三个float值进去,如果人衰,最终很可能我们看到的就是黑漆漆的一片。默认的背景颜色是黑色的情况下,这让人很烦恼,你也不会看到你画出的line。这有个手段解决:不是创建一个带三个随机值的元组,而是类似这种的元组:(random(), 1., 1.)然后,当传递它到color构造器时设置mode为HSV:Color(*color, mode='hsv')。反正就是更加鲜亮一点,下面给个对比图:
没做修改的图:
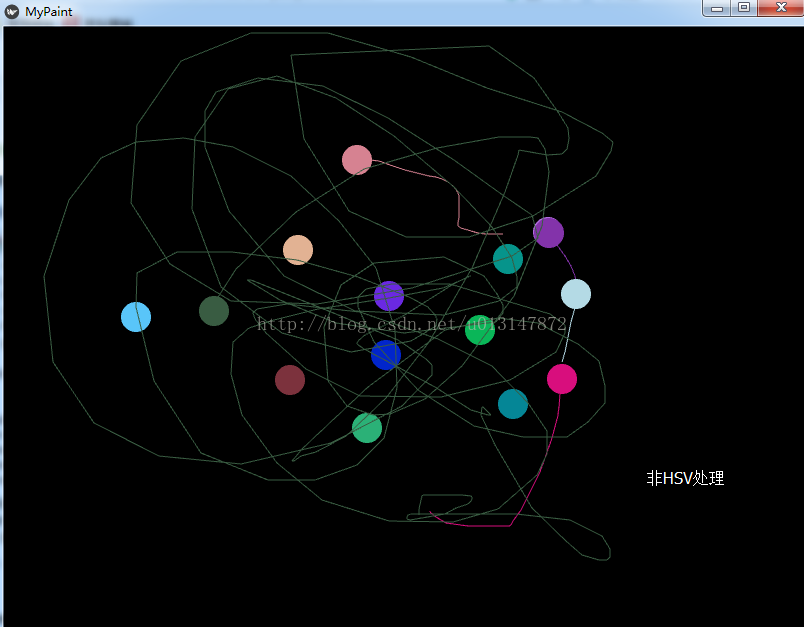
Hsv处理后:
Bonus Points
At this point, we could say we are done. The widget does what it’ssupposed to do: it traces the touches and draws lines. It even drawscircles at the positions where a line begins.
讲到这里,可以说已经差不多了。widget也做了它该做的事:追踪touch和绘画出line,它设置可以绘画圆
But what if the user wants to start a new drawing? With the current code,the only way to clear the window would be to restart the entire application.Luckily, we can do better. Let us add aClear button that erases all thelines and circles that have been drawn so far.There are two options now:
如果用户想重现开始一个绘画怎么办?当前的代码,只能说重启程序来达到目的。幸运的是,我们可以做的更好。也就是加个Clear按钮去擦除这个画板,现在有两种可供选择:
- We could either create the button as a child of our widget. That wouldimply that if you create more than one widget, every widget gets its ownbutton. If you’re not careful, this will also allow users to draw on topof the button, which might not be what you want.
- 我们既可以从widget创建一个子类,然后创建一个按钮到这个子类。这也意味着你要做多几个widget,每个widget会有它自己的按钮,如果你没留神,用户将可以在按钮这个图标上乱画,这个要注意了。
- Or we set up the button only once, initially, in our app class andwhen it’s pressed we clear the widget.
- 或者我们只设置这个按钮一次,最初,在我们的app类里头并且按一次就清除掉widget
For our simple example, it doesn’t really matter that much. For largerapplications you should give some thought to who does what in your app.We’ll go with the second option here so that you see how you can build upyour application’s widget tree in your app class’s build()method. We’ll also change to the HSV color space (see preceding note):
我们这个简单的例子,不会带来太多的麻烦。针对大型的应用,你要花费点心思在谁将用你的app。在这里我们将继续第二部分,以至于你可以看到在app类中的build()方法如何建立起你的应用widget树。我们也将会改变到HSV颜色空间
1 2 3 4 5 6 7 8 9 10 11 12 13 14 15 16 17 18 19 20 21 22 23 24 25 26 27 28 29 30 31 32 33 34 35 36 37 38 |
from random import random
from kivy.app import App
from kivy.uix.widget import Widget
from kivy.uix.button import Button
from kivy.graphics import Color, Ellipse, Line


class MyPaintWidget(Widget):

    def on_touch_down(self, touch):
        color = (random(), 1, 1)
        with self.canvas:
            Color(*color, mode='hsv')
            d = 30.
            Ellipse(pos=(touch.x - d / 2, touch.y - d / 2), size=(d, d))
            touch.ud['line'] = Line(points=(touch.x, touch.y))

    def on_touch_move(self, touch):
        touch.ud['line'].points += [touch.x, touch.y]


class MyPaintApp(App):

    def build(self):
        parent = Widget()
        self.painter = MyPaintWidget()
        clearbtn = Button(text='Clear')
        clearbtn.bind(on_release=self.clear_canvas)
        parent.add_widget(self.painter)
        parent.add_widget(clearbtn)
        return parent

    def clear_canvas(self, obj):
        self.painter.canvas.clear()


if __name__ == '__main__':
    MyPaintApp().run()
|
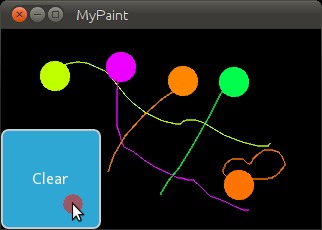
Here’s what happens:
- Line 4: We added an import statement to be able to use the
Buttonclass.- Line 25: We create a dummy
Widget()object as a parent for bothour painting widget and the button we’re about to add. This is justa poor-man’s approach to setting up a widget tree hierarchy. Wecould just as well use a layout or do some other fancy stuff.Again: this widget does absolutely nothing except holding the twowidgets we will now add to it as children.- 我们创建个摆设widget()对象作为一个parent给我们的绘画widget和button,这只是一个穷人的做法去设置widget分层树。我们也可以使用一个layout或者其他有趣的stuff.这个widget完全不做任何事,只是容纳两个widgets作为children
- Line 26: We create our
MyPaintWidget()as usual, only this timewe don’t return it directly but bind it to a variable name.跟往常一样创建MyPaintWidget(),只是这一次不做return返回而是bind一个变量名painter给它
- Line 27: We create a button widget. It will have a label on it thatdisplays the text ‘Clear’.
- 我们创建一个button widget,它会有个label显示出Clear
- Line 28: We then bind the button’s on_release event (which is fired whenthe button is pressed and then released) to thecallback functionclear_canvas defined on below on Lines 33 & 34.
- 我们然后bind一个按钮事件(on_release ,这个事件将在按钮按压并释放后触发)到一个回调函数(clear_canvas)
- Line 29 & 30: We set up the widget hierarchy by making both thepainter and the clearbtn children of the dummy parent widget.That meanspainter and clearbtn are now siblings in the usual computerscience tree terminology.
- 我们通过创建painter和clear按钮作为虚设的parent widget的子widget,设置成widget分层。这意味着painter和clearbtn情同姐妹。
- Line 33 & 34: Up to now, the button did nothing. It was there,visible, and you could press it, but nothing would happen.We change that here: we create a small, throw-away function that isgoing to be ourcallback functionwhen the button is pressed. The function just clears the painter’scanvas’ contents, making it black again.
- 到目前为止,按钮没做什么事。作为回调函数
Note
The Kivy Widget class, by design, is kept simple. There are no generalproperties such as background color and border color. Instead, the examplesand documentation illustrate how to easily handle such simple thingsyourself, as we have done here, setting the color for the canvas, anddrawing the shape. From a simple start, you can move to more elaboratecustomization. Higher-level built-in widgets, deriving from Widget, suchas Button, do have convenience properties such as background_color, butthese vary by widget. Use the API docs to see what is offered by a widget,and subclass if you need to add more functionality.
Kivy的widget类,保持一贯的简约。这里没有像一般的属性比如什么背景颜色和边框颜色。取而代之的是,例子和文档解释如何容易去处理。正如我现在所做的,设置canvas的颜色,画一些图形形状。通过简单的开始,你可以移步到更加详细的定制化工作中。高级的内置widgets,从Widget类里头来,例如Button,的确有便捷的属性例如背景颜色。使用API文档去看看widget可以提供什么,和利用它的子类让你的app更加强悍。
Congratulations! You’ve written your first Kivy widget. Obviously this wasjust a quick introduction. There is much more to discover. We suggesttaking a short break to let what you just learned sink in. Maybe draw somenice pictures to relax? If you feel like you’ve understood everything andare ready for more, we encourage you to read on.


 2116
2116


 被折叠的 条评论
为什么被折叠?
被折叠的 条评论
为什么被折叠?
 到【灌水乐园】发言


