


写在前面:github上面的Text-Detection-with-FRCN项目是基于py-faster-rcnn项目在场景文字识别领域的扩展。
和py-faster-rcnn相比,该项目的主要改动为:将检测类别换成了背景和文字,并且更改了数据集。
对于初学者而言,要实现一个自己的baseline,第一步可以尝试训练别人已经实现了的网络,看看整个的运行流程是怎么样的。那么,接下来,我就记录一下我自己在训练和测试过程中遇到的问题。大家在参考的时候可以参照Text-Detection-with-FRCN项目中的README.md文件。
一.编译部分
在编译caffe的时候,可能会遇到一些问题,这里,我来介绍一下我遇到的问题。
1.Makefile.config.example文件修改问题
切换到caffe目录:cd $Text-Detection-with-FRCN/py-faster-rcnn/caffe-fast-rcnn
修改Makefile.config.example文件:
(1)去掉USE_CUDNN := 1的注释
# cuDNN acceleration switch (uncomment to build with cuDNN).
USE_CUDNN := 1
(2)去掉WITH_PYTHON_LAYER := 1的注释
# Uncomment to support layers written in Python (will link against Python libs)
WITH_PYTHON_LAYER := 1
2.CUDNN版本问题
在上一步中,修改了Makefile.config.example问题,再执行如下指令:
cp Makefile.config.example Makefile.config
make -16 && make pycaffe
在make的过程中,可能出现由于CUDNN版本问题导致的错误:
In file included from ./include/caffe/util/device_alternate.hpp:40:0,
                     from ./include/caffe/common.hpp:19,
                     from src/caffe/common.cpp:7:
    ./include/caffe/util/cudnn.hpp: In function ‘void caffe::cudnn::createPoolingDesc(cudnnPoolingStruct**, caffe::PoolingParameter_PoolMethod, cudnnPoolingMode_t*, int, int, int, int, int, int)’:
    ./include/caffe/util/cudnn.hpp:127:41: error: too few arguments to function ‘cudnnStatus_t cudnnSetPooling2dDescriptor(cudnnPoolingDescriptor_t, cudnnPoolingMode_t, cudnnNanPropagation_t, int, int, int, int, int, int)’
             pad_h, pad_w, stride_h, stride_w));
                                             ^
    ./include/caffe/util/cudnn.hpp:15:28: note: in definition of macro ‘CUDNN_CHECK’
         cudnnStatus_t status = condition; \
                                ^
    In file included from ./include/caffe/util/cudnn.hpp:5:0,
                     from ./include/caffe/util/device_alternate.hpp:40,
                     from ./include/caffe/common.hpp:19,
                     from src/caffe/common.cpp:7:
    /usr/local/cuda-7.5//include/cudnn.h:803:27: note: declared here
     cudnnStatus_t CUDNNWINAPI cudnnSetPooling2dDescriptor(
                               ^
    make: *** [.build_release/src/caffe/common.o] Error 1
这是由于当前版本的caffe的cudnn实现与系统所安装的cudnn的版本不一致引起的。
解决办法:
下载最新版的caffe
1)将./include/caffe/util/cudnn.hpp换成最新版的caffe里的cudnn.hpp;
2)将./include/caffe/layers里面,所有以cudnn开头的文件,都换成最新版的caffe里面相应的同名文件;
3)将./src/caffe/layers里面,所有以cudnn开头的文件,都换成最新版的caffe里面相应的同名文件。
tips:其他部分的以cudnn开头的文件,就不要动了。
二.准备数据集
在Text-Detection-with-FRCN项目的readme中,给出了coco-text数据集的制作方式。下面,就来具体说明。
1.下载数据集
切换目录:cd $Text-Detection-with-FRCN/datasets/script
原指令为:./fetch_dataset.sh coco-text,可能会出现-bash: ./fetch_dataset.sh: Permission denied的错误。
可先运行:chmod +x ./fetch_dataset.sh
再运行: ./fetch_dataset.sh coco-text
下载到的数据集包括:train2014.zip文件和COCO_Text.json,下面,需要将数据进行格式化,与原py-faster-rcnn中的pascal_voc的数据格式进行统一。
2.数据格式化
(1)pascal_voc数据集的格式为:
--Annotations
--*.xml
--JPEGImages
--*.jpg
--ImageSets
--Main
......
图像文件夹(JPEGImages):例如2008_000200.jpg
标记文件夹(Annotations):例如2008_000200.xml:
<annotation>
<folder>VOC2012</folder>
<filename>2008_000200.jpg</filename>
<source>
<database>TheVOC2008 Database</database>
<annotation>PASCALVOC2008</annotation>
<image>flickr</image>
</source>
<size>
<width>500</width>
<height>375</height>
<depth>3</depth>
</size>
<segmented>0</segmented>
<object>
<name>person</name>
<bndbox>
<xmin>119</xmin>
<ymin>76</ymin>
<xmax>184</xmax>
<ymax>311</ymax>
</bndbox>
</object>
......
区分训练样本与测试样本(ImageSets):
以test.txt为例:
2008_000001
2008_000004
2008_000005
2008_000006
(2)coco-text的格式为:
图片集:Train2014.zip:COCO_train2014_000000378466.jpg
文件标记:
COCO_Text.json
{"imgs":
{"378466":{"width": 612, "file_name":"COCO_train2014_000000378466.jpg", "set":"train", "id": 378466, "height": 612},
"370250":{"width": 427, "file_name":"COCO_train2014_000000370250.jpg", "set": "test","id": 370250, "height": 640},
"36606":{"width": 640, "file_name":"COCO_train2014_000000036606.jpg", "set": "val","id": 36606, "height": 480}
(3)将coco-text的数据集格式转换为pascal_voc的格式
切换目录:cd $Text-Detection-with-FRCN/datasets/script
运行指令:./format_annotation.py --dataset coco-text
在format_annotation.py中:
1.format_coco_text函数,是利用coco-text.json中的信息,生成类似于pascal_voc的ImageSets文件夹中的信息。
2.os.system('./ann2voc2007.sh ' + args.dataset),是调用相同文件夹下面的ann2voc2007.m文件,来生成类似于pascal_voc的Annotations文件夹中的信息。
如果不想花时间安装matlib,可以将ann2voc2007.m改写为python文件,效果是一样的。
改写后的代码如下:(具体原理可参考:利用python生成xml文件)
#coding:utf-8
from PIL import Image
from xml.dom.minidom import Document
import os

def main():
	imgpath = 'JPEGImages/'
	txtpath = 'images.annotations'
	xmlpath_new = 'Annotations/'
	coco = {}

	# 得到图像的标注信息
	file_object = open(txtpath,'rU')
	try:
	    for line in file_object:
			line = line.rstrip('\n')
			strs = line.split(' ')
			print strs[0]
			foldername = 'VOC2007'

			# 用xml替换jpg,得到同名文件
			xmlname = strs[0].replace('.jpg','.xml')
			info = Image.open(imgpath + strs[0])
			# read image size
			(width,height) = info.size
			strs[2] = max(int(strs[2]), 1)
			strs[3] = max(int(strs[3]), 1)
			strs[4] = min(int(strs[4]), width);
			strs[5] = min(int(strs[5]), height);

			# 过滤异常
			if strs[2] >= strs[4] or strs[3] >= strs[5] or strs[2] <=0 or strs[3] <= 0 or strs[4] > width or strs[5] > height:
				continue

			if os.path.exists(imgpath + strs[0]):
				if xmlname in coco:
					Createnode = coco[xmlname]
					object_node = Createnode.createElement('object')

					Root = Createnode.getElementsByTagName('annotation')[0]
					Root.appendChild(object_node)

					node=Createnode.createElement('name')
					node.appendChild(Createnode.createTextNode(strs[1]))
					object_node.appendChild(node)

					node=Createnode.createElement('pose')
					node.appendChild(Createnode.createTextNode('Unspecified'))
					object_node.appendChild(node)

					node=Createnode.createElement('truncated')
					node.appendChild(Createnode.createTextNode('0'))
					object_node.appendChild(node)

					node=Createnode.createElement('difficult')
					node.appendChild(Createnode.createTextNode('0'))
					object_node.appendChild(node)

					bndbox_node=Createnode.createElement('bndbox')
					object_node.appendChild(bndbox_node)

					node=Createnode.createElement('xmin')
					node.appendChild(Createnode.createTextNode(str(strs[2])))
					bndbox_node.appendChild(node)

					node=Createnode.createElement('ymin')
					node.appendChild(Createnode.createTextNode(str(strs[3])))
					bndbox_node.appendChild(node)

					node=Createnode.createElement('xmax')
					node.appendChild(Createnode.createTextNode(str(strs[4])))
					bndbox_node.appendChild(node)

					node=Createnode.createElement('ymax')
					node.appendChild(Createnode.createTextNode(str(strs[5])))
					bndbox_node.appendChild(node)
				else:
					Createnode=Document()  #创建DOM文档对象

					Root=Createnode.createElement('annotation') #创建根元素
					Createnode.appendChild(Root)

					# folder
					folder=Createnode.createElement('folder')
					folder.appendChild(Createnode.createTextNode(foldername))
					Root.appendChild(folder)

					# filename
					filename = Createnode.createElement('filename')
					filename.appendChild(Createnode.createTextNode(strs[0]))
					Root.appendChild(filename)

					# source
					source_node = Createnode.createElement('source')
					Root.appendChild(source_node)

					node = Createnode.createElement('database')
					node.appendChild(Createnode.createTextNode('MS COCO-Text'))
					source_node.appendChild(node)

					node = Createnode.createElement('annotation')
					node.appendChild(Createnode.createTextNode('MS COCO-Text 2014'))
					source_node.appendChild(node)

					node=Createnode.createElement('image')
					node.appendChild(Createnode.createTextNode('NULL'))
					source_node.appendChild(node)

					node=Createnode.createElement('flickrid');
					node.appendChild(Createnode.createTextNode('NULL'));
					source_node.appendChild(node);

					# owner
					owner_node=Createnode.createElement('owner')
					Root.appendChild(owner_node)

					node=Createnode.createElement('flickrid')
					node.appendChild(Createnode.createTextNode('NULL'))
					owner_node.appendChild(node)

					node=Createnode.createElement('name')
					node.appendChild(Createnode.createTextNode('ligen'))
					owner_node.appendChild(node)

					# size
					size_node=Createnode.createElement('size')
					Root.appendChild(size_node)

					node=Createnode.createElement('width')
					node.appendChild(Createnode.createTextNode(str(width)))
					size_node.appendChild(node)

					node=Createnode.createElement('height');
					node.appendChild(Createnode.createTextNode(str(height)))
					size_node.appendChild(node)

					node=Createnode.createElement('depth')
					node.appendChild(Createnode.createTextNode('3'))
					size_node.appendChild(node)

					# segmented
					node=Createnode.createElement('segmented')
					node.appendChild(Createnode.createTextNode('0'))
					Root.appendChild(node)

					# object
					object_node=Createnode.createElement('object')
					Root.appendChild(object_node)

					node=Createnode.createElement('name')
					node.appendChild(Createnode.createTextNode(strs[1]))
					object_node.appendChild(node)

					node=Createnode.createElement('pose')
					node.appendChild(Createnode.createTextNode('Unspecified'))
					object_node.appendChild(node)

					node=Createnode.createElement('truncated')
					node.appendChild(Createnode.createTextNode('0'))
					object_node.appendChild(node)

					node=Createnode.createElement('difficult')
					node.appendChild(Createnode.createTextNode('0'))
					object_node.appendChild(node)

					bndbox_node=Createnode.createElement('bndbox')
					object_node.appendChild(bndbox_node)

					node=Createnode.createElement('xmin')
					node.appendChild(Createnode.createTextNode(str(strs[2])))
					bndbox_node.appendChild(node)

					node=Createnode.createElement('ymin')
					node.appendChild(Createnode.createTextNode(str(strs[3])))
					bndbox_node.appendChild(node)

					node=Createnode.createElement('xmax')
					node.appendChild(Createnode.createTextNode(str(strs[4])))
					bndbox_node.appendChild(node)

					node=Createnode.createElement('ymax')
					node.appendChild(Createnode.createTextNode(str(strs[5])))
					bndbox_node.appendChild(node)

					coco[xmlname] = Createnode

	finally:
	     file_object.close()
	print 'begin load xml...'
	for key in coco:
		print key
		f = open(xmlpath_new + key,'w')
		f.write(coco[key].toprettyxml(indent = '\t'))
		f.close()

if __name__ == "__main__":
	main()
最后,再运行rm_headline.sh。就得到我们所需要的数据集。
我得到的文件目录如下:

在Annotations的目录下,
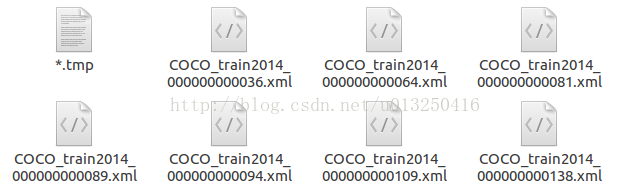
在JPEGImages的目录下,
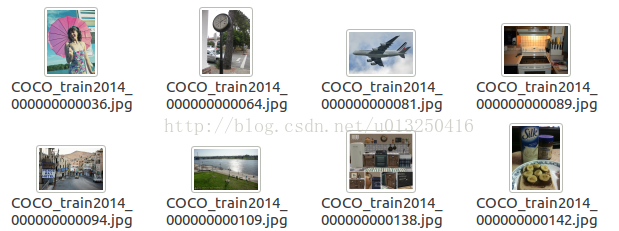
在ImageSets的目录下,


以train.txt为例,包含的内容为:
COCO_train2014_000000351622
COCO_train2014_000000058397
COCO_train2014_000000282380
COCO_train2014_000000223830
......
均为文件名
3.创建软链接
软链接就是:ln -s 源文件 目标文件
在代码中给出的数据集的目录为:train_data
因此,需要将上面得到的coco-text的目录链接到train_data上。
在github的readme中,给出的软链接操作为:
# link your data folder to train_data
cd $Text-Detection-with-FRCN/datasets/
ln -s train_data coco-text    # $YOUR_DATA
但是在我实际操作的时候,是需要:
ln -s coco-text train_data 的。
三.下载预训练模型
首先,下载在imagenet上面预先训练好的模型。
# finetune on this model, you can also use one model you train before
cd $Text-Detection-with-FRCN/py-faster-rcnn
./data/scripts/fetch_imagenet_models.sh
# download it takes long!
可能由于这个项目clone “py-faster-rcnn” 的时间比较早,这里面/data/scripts文件夹下面,fetch_imagenet_models.sh中的下载url已经不能用了。该文件夹下面的其他.sh文件中的url应该也都失效了。
新的py-faster-rcnn中已经对此做了更正。fetch_imagenet_models.sh中的url可改为:
......
6 FILE=imagenet_models.tgz
7 URL=https://dl.dropbox.com/s/gstw7122padlf0l/imagenet_models.tgz?dl=0
8 CHECKSUM=ed34ca912d6782edfb673a8c3a0bda6d
.....
具体更改位置为第8行。
注意:下载需要翻墙。
三.开始训练
切换目录:cd $Text-Detection-with-FRCN/py-faster-rcnn/
运行指令:
./experiments/scripts/faster_rcnn_end2end.sh 0 VGG16 pascal_voc
需要注意的是:在运行指令的时候,需要切换到指定的目录。
运行的时候,可能会保错:
1)TypeError: 'numpy.float64' object cannot be interpreted as an index
这两个问题的出现,都是由于Numpy的版本问题。在numpy 1.12.0中,不支持float index。类似于x[1.0, 3.0],会被看作无效。
解决这个问题,有如下可能的解决办法:
1.对numpy进行降级
sudo pip install -U numpy==1.11.0
但是这种做法,可能会引入新的错误:
ImportError: numpy.core.multiarray failed to import
解决这个问题是要升级numpy ,于是又升回去:pip install -U numpy
所以,只能逐个将float类型转换为int类型
2.目前发现的几处需要进行修改的地方:
1.添加astype(np.int)
lib/roi_data_layer/minibatch.py line 26:将fg_rois_per_image = np.round(cfg.TRAIN.FG_FRACTION * rois_per_image)
改为:fg_rois_per_image = np.round(cfg.TRAIN.FG_FRACTION * rois_per_image).astype(np.int)
同理,其他需要在末尾添加.astype(np.int) 的地方:
lib/datasets/ds_utils.py line 12 : hashes = np.round(boxes * scale).dot(v)
lib/fast_rcnn/test.py line 129 : hashes = np.round(blobs['rois'] * cfg.DEDUP_BOXES).dot(v)
lib/rpn/proposal_target_layer.py line 60 : fg_rois_per_image = np.round(cfg.TRAIN.FG_FRACTION * rois_per_image)
2.强制转化为int类型
lib/roi_data_layer/minibatch.py line173:将cls = clss[ind] 改为:cls = int(clss[ind])
lib/rpn/proposal_target_layer.py line 124:将cls = clss[ind] 改为:cls = int(clss[ind])
四.训练模型
当解决了上面所有的问题,我们就可以开始训练了。
具体训练过程:
1.创建输入层
layer_factory.hpp:77 Creatinglayer input-data
net.cpp:106 CreatingLayer input-data
net.cpp:411 input-data-> data
net.cpp:411 input-data-> im_info
net.cpp:411 input-data-> gt_boxes
net.cpp:150 Settingup input-data
net.cpp:157 Topshape: 1 3 600 1000 (1800000)
net.cpp:157 Topshape: 1 3 (3)
net.cpp:157 Topshape: 1 4 (4)
net.cpp:165 Memoryrequired for data: 7200028
............
2.创建卷积层
layer_factory.hpp:77 Creatinglayer conv1_1
net.cpp:106 CreatingLayer conv1_1
net.cpp:454 conv1_1<- data_input-data_0_split_0
net.cpp:411 conv1_1-> conv1_1
net.cpp:150 Settingup conv1_1
net.cpp:157 Topshape: 1 64 600 1000 (38400000)
net.cpp:165 Memoryrequired for data: 175200084
............
3.创建激活层
layer_factory.hpp:77 Creatinglayer relu1_1
net.cpp:106 CreatingLayer relu1_1
net.cpp:454 relu1_1<- conv1_1
net.cpp:397 relu1_1-> conv1_1 (in-place)
net.cpp:150 Settingup relu1_1
net.cpp:157 Topshape: 1 64 600 1000 (38400000)
net.cpp:165 Memoryrequired for data: 328800084
............
判断是否需要反向计算(back forward)
部分需要反向计算:
net.cpp:226 loss_bboxneeds backward computation.
loss_clsneeds backward computation.
bbox_predneeds backward computation.
cls_scoreneeds backward computation.
fc7_drop7_0_splitneeds backward computation.
............
部分不需要反向计算:
net.cpp:228pool2does not need backward computation.
relu2_2does not need backward computation.
conv2_2does not need backward computation.
relu2_1does not need backward computation.
conv2_1does not need backward computation.
input-datadoes not need backward computation.
............
整个网络初始化完毕:
net.cpp:270 Thisnetwork produces output loss_bbox
Thisnetwork produces output loss_cls
Thisnetwork produces output rpn_cls_loss
Thisnetwork produces output rpn_loss_bbox
Networkinitialization done.
solver.cpp:60 Solverscaffolding done.
开始迭代,输出结果:
solver.cpp:229 Iteration0, loss = 1.98441
solver.cpp:245:
Trainnet output #0: loss_bbox = 0.00188451 (* 1 = 0.00188451 loss)
Trainnet output #1: loss_cls = 0.484446 (* 1 = 0.484446 loss)
Trainnet output #2: rpn_cls_loss = 0.766564 (* 1 = 0.766564 loss)
Trainnet output #3: rpn_loss_bbox = 0.484638 (* 1 = 0.484638 loss)
sgd_solver.cpp:106:Iteration0, lr = 0.001
solver.cpp:229 Iteration20, loss = 1.58353
solver.cpp:245:
Trainnet output #0: loss_bbox = 0.00184912 (* 1 = 0.00184912 loss)
Trainnet output #1: loss_cls = 0.213403 (* 1 = 0.213403 loss)
Trainnet output #2: rpn_cls_loss = 0.444577 (* 1 = 0.444577 loss)
Trainnet output #3: rpn_loss_bbox = 0.818097 (* 1 = 0.818097 loss)
sgd_solver.cpp:106:Iteration20, lr = 0.001
.......
solver.cpp:229 Iteration69980, loss =0.374131
solver.cpp:245:
Trainnet output #0: loss_bbox =0.00462239 (* 1 =0.00462239 loss)
Trainnet output #1: loss_cls =0.00527413 (* 1 =0.00527413 loss)
Trainnet output #2: rpn_cls_loss =0.0607663 (* 1 =0.0607663 loss)
Trainnet output #3: rpn_loss_bbox =0.139714 (* 1 =0.139714 loss)
sgd_solver.cpp:106:Iteration69980, lr = 0.001
real 681m44.284s
user 565m0.152s
sys 115m29.578s
生成的模型
保存在:
/Text-Detection-with-FRCN/py-faster-rcnn/output/faster_rcnn_end2end/voc_2007_trainval文件夹中。
vgg16_faster_rcnn_iter_*.caffemodel中,其中*为迭代次数
每迭代10000次,生成一个模型。迭代了70000次,共生成了7个模型。
五.测试模型
实际上,在./experiments/scripts/faster_rcnn_end2end.sh 中,训练完毕后会对模型进行测试。
那么,怎样单独执行测试呢?
切换目录:
cd $Text-Detection-with-FRCN/py-faster-rcnn/
运行指令:
tools/test_net.py --gpu 0
--def models/coco_text/VGG16/faster_rcnn_end2end/test.prototxt \
--netoutput/faster_rcnn_end2end/voc_2007_trainval/vgg16_faster_rcnn_iter_70000.caffemodel\
--imdb voc_2007_test\
--cfg experiments/cfgs/faster_rcnn_end2end.yml \
1.运行可能出现的错误:
File "/Text-Detection-with-FRCN/py-faster-rcnn/tools/../lib/datasets/voc_eval.py", line 23, in parse_rec
obj_struct['bbox'] = [int(bbox.find('xmin').text),
ValueError: invalid literal for int() with base 10: '391.0'
解决方案:改为:
obj_struct['bbox'] = [int(float(bbox.find('xmin').text)),
int(float(bbox.find('ymin').text)),
int(float(bbox.find('xmax').text)),
int(float(bbox.find('ymax').text))]
2.测试运行结果:
对于vgg16_faster_rcnn_iter_70000.caffemodel:
AP for text = 0.3422
Mean AP = 0.3422
~~~~~~~~
Results:
0.342
0.342
~~~~~~~~
对于github中已经训练好的vgg16_faster_rcnn_fine_tune_on_coco.caffemodel:
AP for text = 0.1013
Mean AP = 0.1013
~~~~~~~~
Results:
0.101
0.101
~~~~~~~~
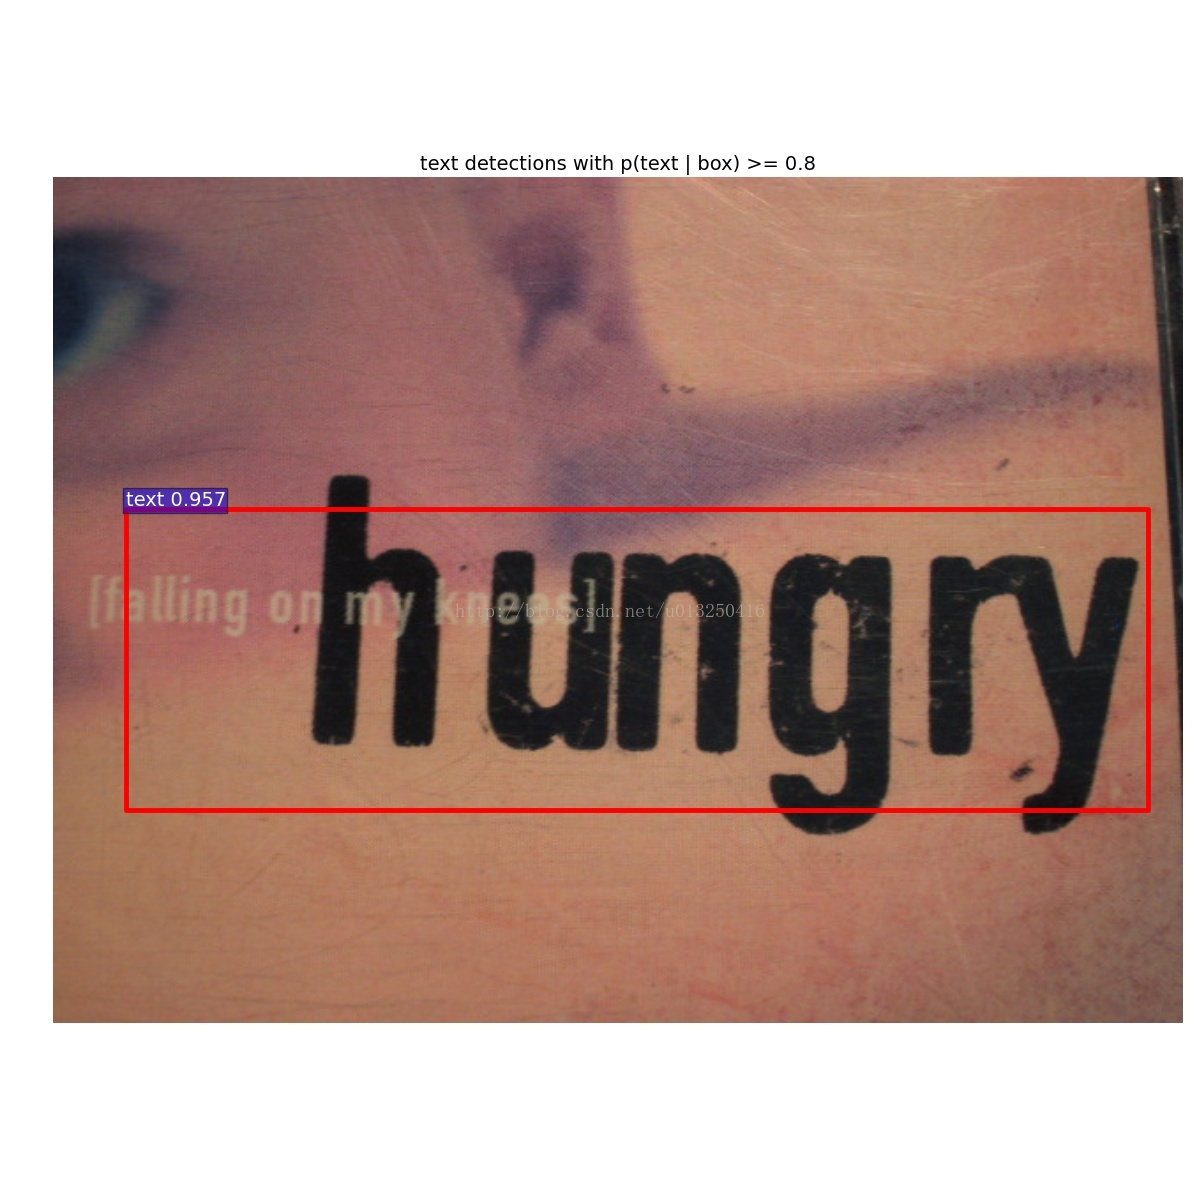
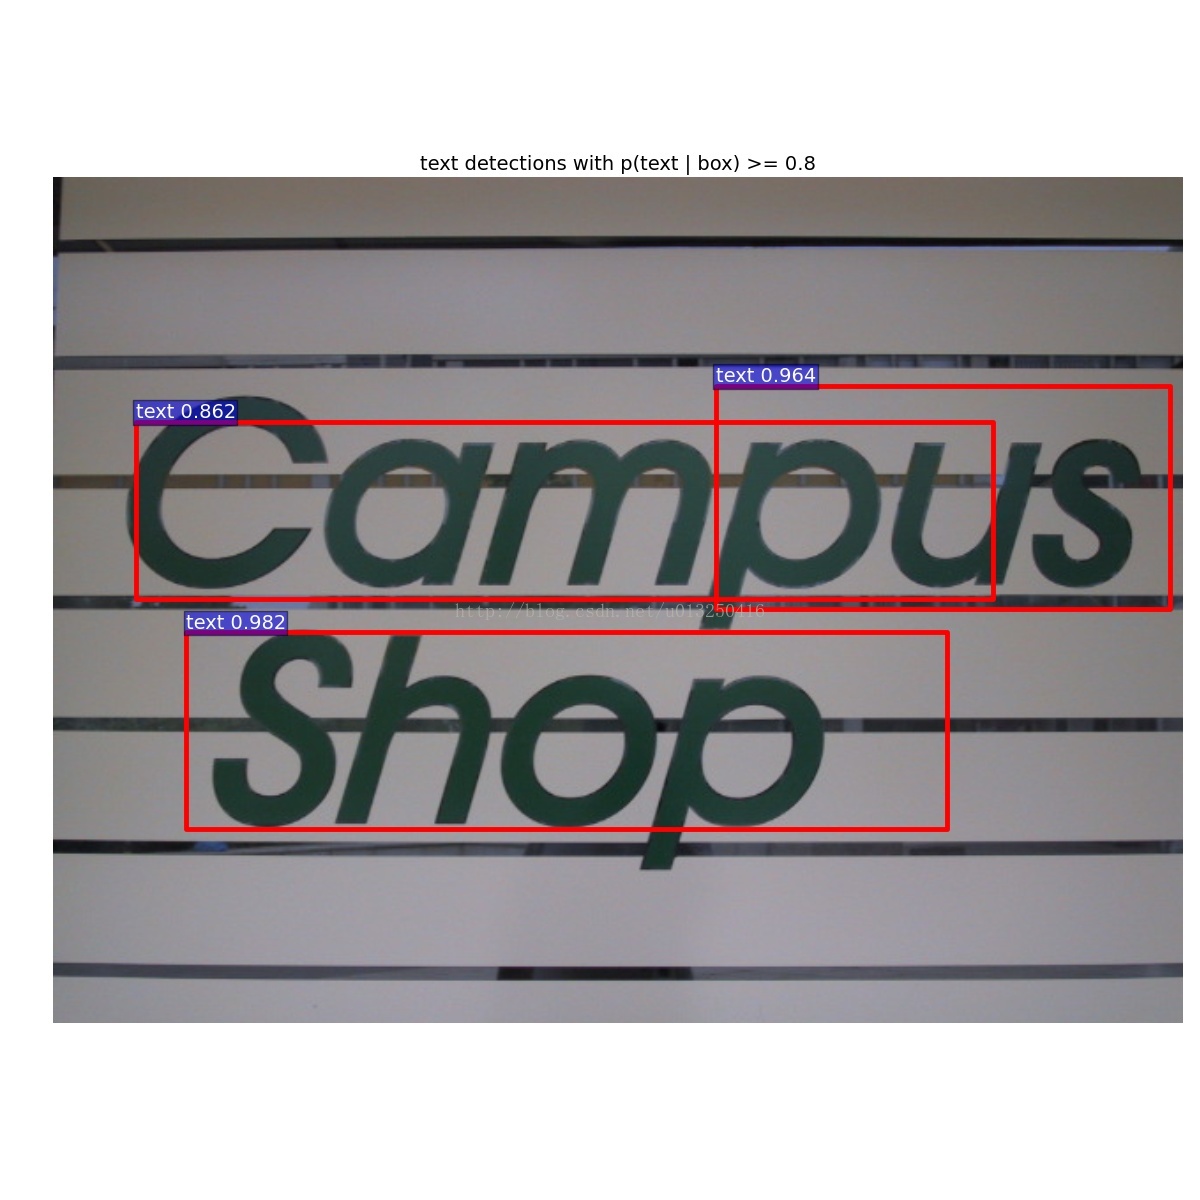
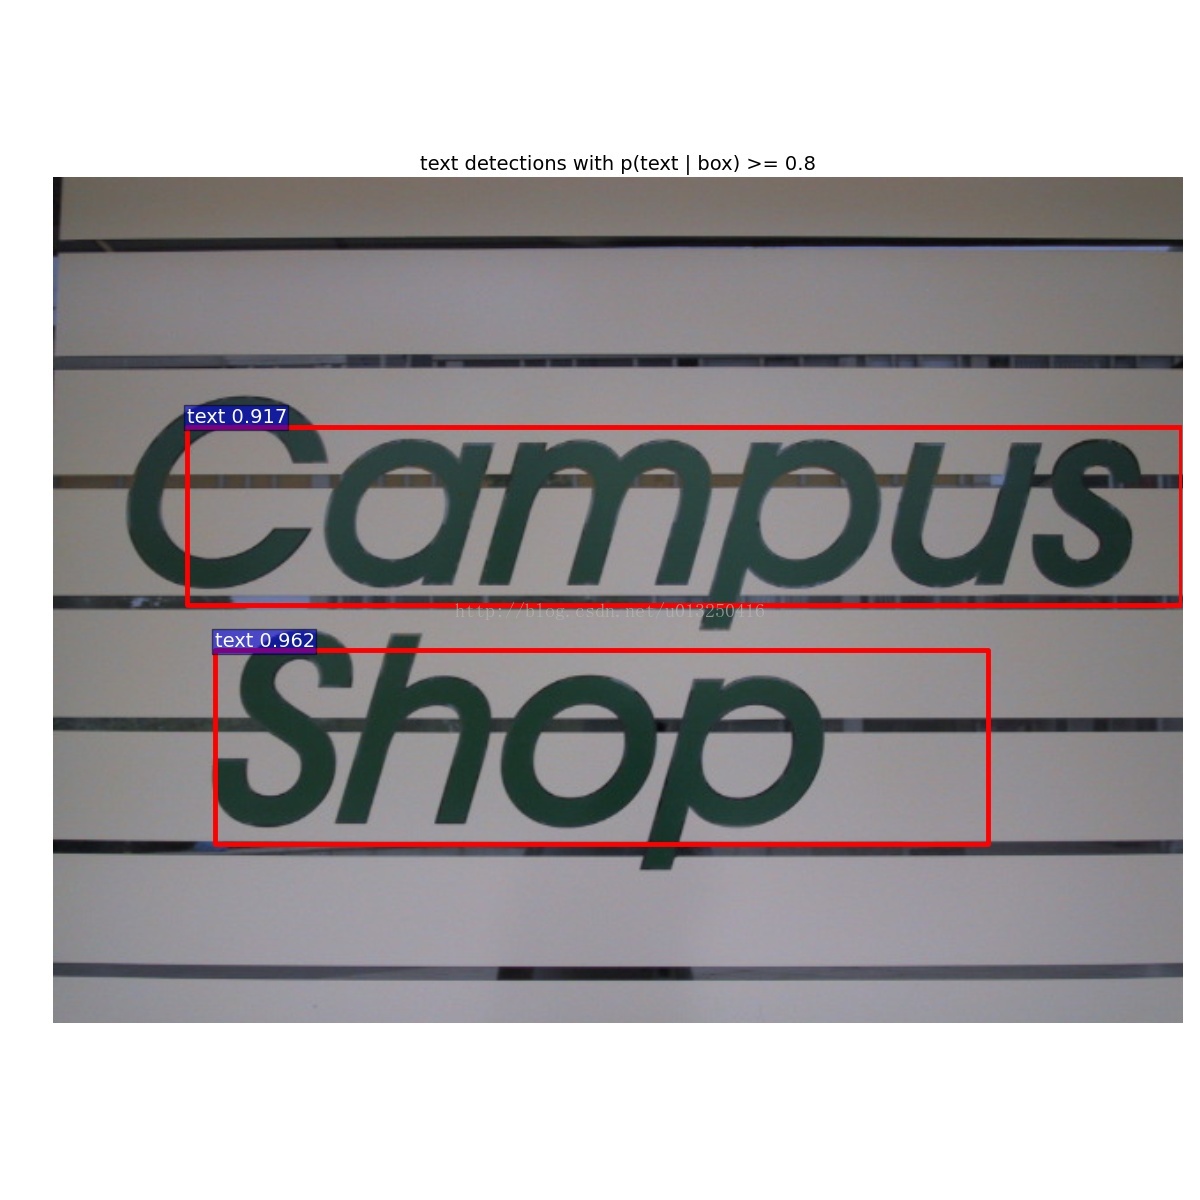
3.运行demo
在/Text-Detection-with-FRCN/script目录下,有text_detect_demo.sh文件:
./py-faster-rcnn/tools/text_detect_demo.py \
--gpu 0 \
--net models/deploy.prototxt \
--model models/vgg16_faster_rcnn_fine_tune_on_coco.caffemodel \
--dataset datasets/test
通过修改其中的model,来指定模型。
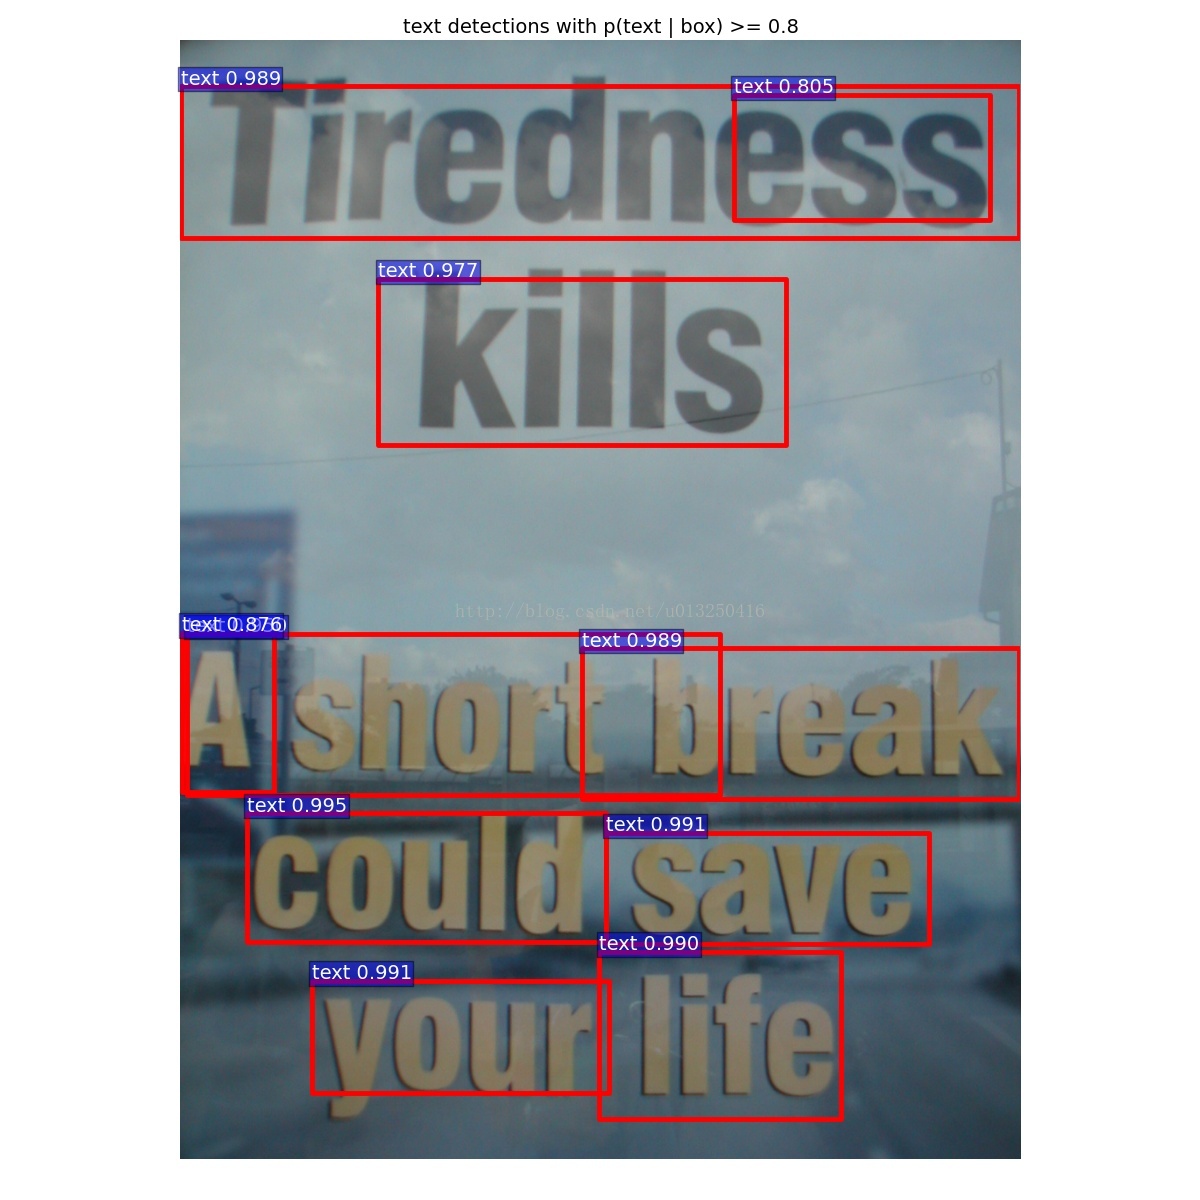
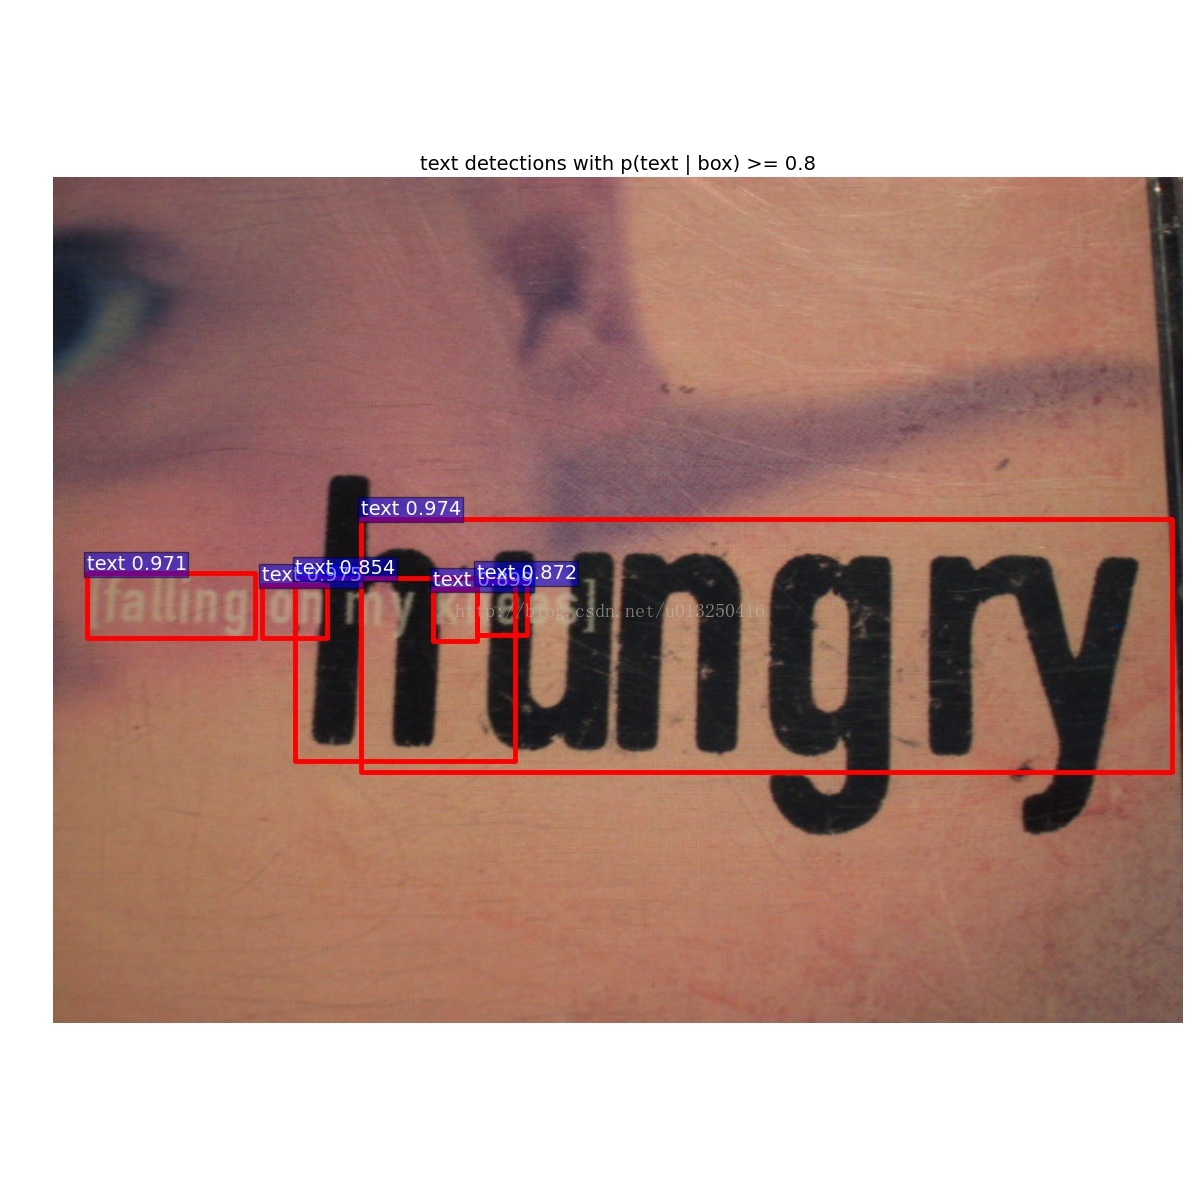
运行demo得到的结果:
左边:vgg16_faster_rcnn_iter_70000.caffemodel的测试结果,右边:github中已经训练好的vgg16_faster_rcnn_fine_tune_on_coco.caffemodel的测试结果。


 被折叠的 条评论
为什么被折叠?
被折叠的 条评论
为什么被折叠?
 到【灌水乐园】发言


