cocos2d-x小游戏——飞机大战

上周,我做了一个基于 cocos2d-x 的飞机大战的游戏,因为我刚学cocos2d-x没多久,所以这个飞机大战很多都是看着别人的教程,再加上自己的一些想法,来做的。

下面我想说一说我的思路。

飞机大战有三个场景:

  1. LayerGameStart(游戏开始)
  2. LayerGameMain(游戏进行中)
  3. LayerGameOver(游戏结束)

一、游戏开始场景(LayerGameStart)

其中,游戏开始和游戏结束是比较简单的,那我就先从简单的说起,
首先说下游戏开始场景。我们在这个场景里面只需要做一下工作:

  • 预加载一些资源(声音,图片缓存,这些资源都是全局的)
  • 注意要将同一类资源放在一起,便于管理
  • 检测游戏游戏的本地存数数据中是否有游戏最高分(UserDefault

在这个场景,我只想说下如果检测游戏的最高分
具体实现如下:

//判断分数是否已经被存储
bool LayerGameStart::isSaveFile()
{
    //用一个bool值作为标志,如果有则表示分数已经被存储
    if (!UserDefault::getInstance()->getBoolForKey("isSaveFileXml"))
    {
        //如果没有就设置标志并置为真
        UserDefault::getInstance()->setBoolForKey("isSaveFileXml",true);
        //设置最高分,默认值为0
        UserDefault::getInstance()->setIntegerForKey("HightestScore",0);
        flush的作用是将数据写入到xml文件中。flush()在windows下是空的。。。呵呵。。。
        UserDefault::getInstance()->flush();
        return false;
    }
    else
        return true;
}
void LayerGameStart::getHightestScore()
{
    if (isSaveFile())
    {
        //在这里设置历史最高得分
        LayerGameOver::_hightestScore = 
            UserDefault::getInstance()->getIntegerForKey("HightestScore",0);
    }
}

然后只需要将 getHightestScore( ) 函数放在 LayerGameStartinit( ) 函数中即可。


二、游戏结束场景(LayerGameOver)

游戏结束场景也很容易,主要实现下面的功能:

  • 显示本局游戏的得分
  • 显示历史最高分
  • 设置“返回游戏”按钮,和“退出”按钮

其中显示本局所得分数,也是比较好实现的,需要注意的是,如何将主场景(LayerGameMain)中的分数传递到游戏结束场景中去。做法如下:

    static LayerGameOver * create(int score);
    static cocos2d::Scene * scene(int score);
    bool init(int score);

在创建场景时将分数传入,即在 init( ) 函数中传入分数,因为 init 在 create 有被调用,而 create 函数又在 scene 函数中被调用,所以这三个函数都有参数了。在切换场景的时候直接将分数传递过来就行。

然后就是显示历史最高分,显示历史最高分需要在游戏结束场景的 class 中添加一个静态成员变量

    static int _hightestScore;//用于存到本地,记得要在class外进行初始化!
    cocos2d::Label * hightestScore;//用于显示

具体实现如下:

    //显示历史最高分
    Value strHightestScore(_hightestScore);
    hightestScore = Label::createWithBMFont("font/font.fnt",strHightestScore.asString());
    hightestScore->setColor(Color3B(30,50,240));
    hightestScore->setAnchorPoint(Point::ANCHOR_MIDDLE_LEFT);
    hightestScore->setPosition(Point(150,winSize.height-40));
    this->addChild(hightestScore);

返回和退出按钮就很简单了,就是设置两个图片作为按钮 (MenuItemSpritebackItemexitItem 然后将这两个精灵添加到 Menu 中去:Menu * menu = Menu::create(backItem, exitItem, nullptr); 这两个按钮点击的回调函数也很简单,返回就是切换到游戏开始场景,退出就是直接退出程序 exit(1);


三、游戏主场景

游戏主场景就是最重要也最难的,主要有一下功能:

  • 添加游戏背景并让游戏背景滚动起来

  • 添加玩家飞机
    1.飞机的动作行为(闪三次后播放自身帧动画,要方便控制,扩大其BoundingBox)
    2.飞机不能飞出屏幕
    3.由于其他层也需要飞机的位置,为了方便其他层获得飞机,将其设计为单例getInstance( )
    4.玩家飞机自身爆炸的动画(因为爆炸后要切换到游戏结束场景,所以要在这里将本局游戏得分传到结束场景)

  • 添加子弹
    1.首先得拿到玩家飞机的位置(因为子弹是从玩家飞机发出的)
    2.设置定时器来产生子弹
    3.让子弹飞~
    4.子弹的行为:与敌机碰撞或者什么也没碰撞到——飞出屏幕外
    5.将子弹放在一个容器里面,便于碰撞检测
    6.不只有单发子弹还有多发子弹(MultiBullets

  • 添加敌机
    1.首先有一个敌机类Enemy,用于产生所有敌机(小敌机,中敌机,打敌机)
    2.敌机产生的位置(屏幕上方,随机产生)
    3.敌机消失在屏幕下方
    4.与子弹和玩家飞机发生碰撞
    5.敌机爆炸动画,玩家得分。

  • 添加道具
    1.在玩游戏时,会用道具出现(从屏幕上方,随机出现)
    2.道具有两种:炸弹和双发子弹(bigBoom,multiBullets)
    3.道具行为:与玩家飞机碰撞或者什么也没碰到——掉到屏幕外
    4.炸弹可以让当前屏幕中所有敌机爆
    5.双发子弹增加玩家飞机的威力(第一次吃到会变成双发子弹,以后再吃到不会再加子弹而是直接给玩家加100分)

  • 添加控制层
    1.更新玩家得分
    2.实现游戏的暂停和继续的功能(添加屏蔽层)

怎么样,头晕了吗?要加这么多层,实现这么多功能。。。还有一些我没写(一时想不起来)
我也不准备,每个都详细说明了,我就说说实现这些功能需要注意的地方吧,也是我觉得比较难的地方。。。
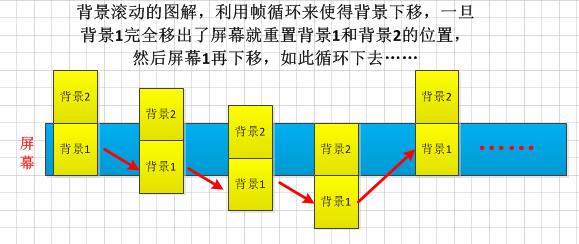
1. 如何实现屏幕滚动:

我在这里其实只用了一个背景图,但是把它加载了两次,然后让两个图片一起向下移动,具体过程请看下图

这里写图片描述

代码实现如下:

//添加背景
void LayerGameMain::addBackground()
{
    SimpleAudioEngine::getInstance()->playBackgroundMusic("sound/game_music.wav",true);

    auto bg1 = Sprite::createWithSpriteFrameName("background.png");
    bg1->setTag(BG1);
    bg1->setAnchorPoint(Point::ZERO);
    bg1->setPosition(Point(0,0));
    this->addChild(bg1);

    auto bg2 = Sprite::createWithSpriteFrameName("background.png");
    bg2->setTag(BG2);
    bg2->setAnchorPoint(Point::ZERO);
    bg2->setPosition(0,bg1->getContentSize().height - 5);//为了不留空隙
    this->addChild(bg2);

    //利用帧循环来实现背景滚动
    this->schedule(schedule_selector(LayerGameMain::movingBackgroundCallback),0.01f);
}

//使得背景滚动起来
void LayerGameMain::movingBackgroundCallback(float dt)
{
    Sprite * bg1 = (Sprite *)this->getChildByTag(BG1);
    Sprite * bg2 = (Sprite *)this->getChildByTag(BG2);

    bg1->setPositionY(bg1->getPositionY() - 2);//每个循环下移2个像素
    bg2->setPositionY(bg1->getPositionY() + bg2->getContentSize().height - 2);

    if (bg2->getPositionY() < 0)
    {
        bg1->setPositionY(0);//重置背景
    }
}

2. 如何将玩家飞机设计为单例?
cocos2d中很多类都有获得单例的函数getInstance( ),这里我也写了这么一个函数来得到飞机单例

class MyPlane : public cocos2d::Sprite
{
        /*省略部分代码*/
        //将飞机设计成全局的
    static MyPlane * getInstance();
    static MyPlane * _splane;
}

//初始化
MyPlane * MyPlane::_splane = nullptr;

MyPlane * MyPlane::getInstance()
{
    if (!_splane)
    {
        _splane = new MyPlane();
        if (_splane && _splane->init())
        {
            //不将其挂到渲染树上,让飞机的生命周期跟场景一样
            //_splane->autorelease();
        }
    }
    return _splane;//return 在if语句外面
}

还有就是玩家飞机爆炸的函数,需要传入飞机爆炸之前得到的分数。好让游戏结束场景能得到分数。

3. 子弹层的设计
因为玩家的飞机是不断移动的,然后子弹的动作都是 MoveTo ,其 create 函数只有时间变量,我们如何使得子弹的速度是一样的呢?很简单,根据 v = s / t;若想要速度一样则在距离不同的情况下,就必须改变子弹运行的时间,所以只要给不同位置发出的子弹不同的时间,就可以使得子弹的速度一样。具体实现如下:

    //得到子弹到屏幕上边沿的距离
    float distance = 
        winSize.height - plane->getPositionY() - plane->getBoundingBox().size.height/2;
    //确定子弹的速度 一秒跨越800个像素。
    float velocity = 800/1;
    //根据距离和速率求得时间
    float movedt = distance / velocity;
    //子弹在movedt的时间内移动到屏幕上边沿之外的地方(加上的 bullet->getContentSize().height 就是超出屏幕的距离)
    MoveTo * to = MoveTo::create(movedt,
        Point(birthPlace.x,winSize.height + bullet->getContentSize().height));

4. 敌机类的设计
这个不说了直接看代码,代码都有注释的
Enemy.h:

#ifndef __Enemy_H_
#define __Enemy_H_
#include "cocos2d.h"

class Enemy : public cocos2d::Node
{
public:
    //构造器
    Enemy();
    //析构器
    ~Enemy();
    //创建敌机
    static Enemy * create();
    //将敌机与其对应的Sprite(图片)和生命值绑定(有三类敌机)
    void bindEnemySprite(cocos2d::Sprite * spr,int life);
    //得到敌机
    cocos2d::Sprite * getSprite();
    //得到生命值
    int getLife();
    //失去生命值
    void loseLife();
    //得到敌机在世界坐标内的的位置和尺寸大小boundingbox
    cocos2d::Rect Get_BoundingBox();

private:
    cocos2d::Sprite * _sprite;
    int _life;
};

#endif

Enemy.cpp

#include "Enemy.h"
USING_NS_CC;

Enemy::Enemy()
{
    //在构造函数中初始化,其实也可以在init函数中初始化,但这里没有init函数
    _sprite = nullptr;
    _life = 0;
}
Enemy::~Enemy()
{

}
Enemy * Enemy::create()
{
    Enemy * pRect = new Enemy();
    if (pRect != nullptr)
    {
        pRect->autorelease();
        return pRect;
    }
    else
        return nullptr;
}
//绑定敌机,不同的敌机有不同的图片,不同的生命值
void Enemy::bindEnemySprite(cocos2d::Sprite * spr,int life)
{
    _sprite = spr;
    _life = life;
    //将_sprite加到 pRect 上!!pRect 实质就是一个Node
    this->addChild(_sprite);
}
Sprite * Enemy::getSprite()
{
    return _sprite;
}
int Enemy::getLife()
{
    return _life;
}
void Enemy::loseLife()
{
    _life--;
}
//自定义的getBoundingBox函数,便于主场景中的碰撞检测
Rect Enemy::Get_BoundingBox()
{
    Rect rect = _sprite->getBoundingBox();
    //本来敌机是加到pRect上的它的坐标是相对于pRect的
    //这里将敌机的坐标转换为世界坐标
    Point position = this->convertToWorldSpace(rect.origin);
    //这里只需要知道敌机的起始坐标,因为敌机的宽度和长度是不会改变的
    Rect enemyRect = Rect(position.x, position.y, rect.size.width, rect.size.height);
    return enemyRect;
}

5.有了敌机类,就要将敌机添加到主场景中去(LayerEnemy)
因为要加3类敌机,其实每一类敌机的添加方法都一样,只不过他们的图片,生命值,出场概率,被击毁后玩家所得的分数不相同罢了。在这里就将添加小敌机的方法说一下,中敌机和大敌机都一样。

    //小敌机更新函数(在定时器里面调用)
    void addSmallEnemyCallback(float dt);
    //小敌机移动完成后(没有碰撞)
    void smallEnemyMoveFinished(cocos2d::Node * node);
    //小敌机爆炸
    void smallEnemyBlowup(Enemy * smallEnemy);
    //移除小敌机
    void removeSmallEnemy(cocos2d::Node * target, void * data);
    //移除所有小敌机
    void removeAllSmallEnemy();

    //容器,用来存放所有小敌机,便于碰撞检测
    cocos2d::Vector<Enemy *> _smallVec;

实现函数:

//添加敌机的回调函数(在帧循环里面调用)
void LayerEnemy::addSmallEnemyCallback(float dt)
{
    Enemy * smallEnemy = Enemy::create();
    //绑定
    smallEnemy->bindEnemySprite(Sprite::createWithSpriteFrameName("enemy1.png"),SMALL_MAXLIFE);
    //加到smallVec中
    _smallVec.pushBack(smallEnemy);
    //确定敌机的坐标:横坐标x是一个随机值
    //smallEnemy->Get_BoundingBox().size.width/2 < x < winSize.width - smallEnemy->Get_BoundingBox().size.width/2
    //注意:这里要使用 Enemy 类里面的Get_BoundingBox() 函数!
    float x = CCRANDOM_0_1()*(winSize.width - 2*smallEnemy->Get_BoundingBox().size.width) + 
         smallEnemy->Get_BoundingBox().size.width/2;
    float y = winSize.height + smallEnemy->Get_BoundingBox().size.height/2;
    Point smallBirth = Point(x,y);
    //设置坐标
    smallEnemy->setPosition(smallBirth);
    this->addChild(smallEnemy);

    MoveTo * to = MoveTo::create(3,Point(smallBirth.x,smallBirth.y - 
        winSize.height - smallEnemy->Get_BoundingBox().size.height));
    CallFuncN * actionDone = CallFuncN::create(this,
            callfuncN_selector(LayerEnemy::smallEnemyMoveFinished));
    Sequence * sequence = Sequence::create(to,actionDone,NULL);
    smallEnemy->runAction(sequence);
}

//敌机爆炸的函数
void LayerEnemy::smallEnemyBlowup(Enemy * smallEnemy)
{
    SimpleAudioEngine::getInstance()->playEffect("sound/enemy1_down.wav");
    Animate * smallAnimate = 
        Animate::create(AnimationCache::getInstance()->animationByName("smallBlowup"));


    /*利用 CallFuncN 来完成 CallFuncND 的功能 !!
    注意这里(我花了很长时间才解决请看http://blog.csdn.net/crayondeng/article/details/18767407)*/

    auto actionDone = 
        CallFuncN::create(CC_CALLBACK_1(LayerEnemy::removeSmallEnemy,this,smallEnemy));
    Sequence * sequence = Sequence::create(smallAnimate,actionDone,NULL);
    smallEnemy->getSprite()->runAction(sequence);//这么写可以吗? smallEnemy->runAction(sequence)不行!
}

//这是没有碰撞的remove
void LayerEnemy::smallEnemyMoveFinished(cocos2d::Node * node)
{
    Enemy * smallEnemy = (Enemy *)node;
    this->removeChild(smallEnemy,true);
    _smallVec.eraseObject(smallEnemy);
    //node->removeAllChildrenWithCleanup(true);
}

//这是碰撞之后的remove
void LayerEnemy::removeSmallEnemy(cocos2d::Node * target,void * data)
{
    Enemy * smallEnemy = (Enemy *)data;
    if (smallEnemy)
    {
        _smallVec.eraseObject(smallEnemy);
        smallEnemy->removeFromParentAndCleanup(true);//和这句等效:this->removeChild(smallEnemy,true);
    }

}

//去掉所有小敌机
void LayerEnemy::removeAllSmallEnemy()
{
    for (auto node : _smallVec)
    {
        Enemy * enemy = (Enemy *)node;
        if (enemy->getLife() > 0)
        {
            this->smallEnemyBlowup(enemy);
        }
    }
}

6. 然后就添加道具层

道具有两种,一个是大炸弹,一个是双发子弹。它们产生的位置都是在屏幕上方,随机产生。
这里主要说一说炸弹,因为炸弹是可以点击的,一点击后,当前屏幕的所有敌机都会爆炸。炸弹的数量减一。所以炸弹需要在主场景的帧循环中不断检测,用一个容器来存放炸弹,玩家飞机一吃到炸弹道具,就更新炸弹数

void LayerGameMain::updateBigBoomCount(int bigBoomCount)
{
    String strBoomCount;//用来显示炸弹的数量
    Sprite * norBoom = Sprite::createWithSpriteFrameName("bomb.png");//正常的图片
    Sprite * selBoom = Sprite::createWithSpriteFrameName("bomb.png");//选择的图片
    if (bigBoomCount < 0)//如果小于0
    {
        return;//则什么也不做
    }
    else if (bigBoomCount == 0)//如果炸弹数等于0
    {
        if (this->getChildByTag(TAG_BIGBOOM))//在主场景里检查是否有炸弹图标
        {
            this->removeChildByTag(TAG_BIGBOOM,true);//如果有,就将其删除
        }
        if (this->getChildByTag(TAG_BIGBOOMCOUNT))//在主场景里面检查是否有炸弹数字标签
        {
            this->removeChildByTag(TAG_BIGBOOMCOUNT,true);//如果有,则删除
        }
    }
    else if (bigBoomCount == 1)//如果炸弹数等于1
    {
        if ( !(this->getChildByTag(TAG_BIGBOOM)) )//检查是否有炸弹图标
        {
            //如果没有,就添加一个炸弹图标(其实是一个菜单项)
            MenuItemSprite * boomItem = MenuItemSprite::create(norBoom,
                                                               selBoom,
                   CC_CALLBACK_1(LayerGameMain::boomMenuCallback,this));
            boomItem->setPosition(norBoom->getContentSize().width/2,
                                  norBoom->getContentSize().height/2);
            Menu * boomMenu = Menu::create(boomItem,nullptr);
            boomMenu->setPosition(Point::ZERO);
            this->addChild(boomMenu,0,TAG_BIGBOOM);
        }
        if ( !(this->getChildByTag(TAG_BIGBOOMCOUNT)) )//检查是否有炸弹数字标签
        {
            //如果没有,就添加一个炸弹数字标签
            strBoomCount.initWithFormat("X %d",bigBoomCount);
            LabelBMFont * labelBoomCount = 
                LabelBMFont::create(strBoomCount.getCString(),"font/font.fnt");
            labelBoomCount->setAnchorPoint(Point::ANCHOR_MIDDLE_LEFT);
            labelBoomCount->setPosition(Point(norBoom->getContentSize().width,
                                        norBoom->getContentSize().height - 30));
            this->addChild(labelBoomCount,0,TAG_BIGBOOMCOUNT);
        }
    }
    else if (bigBoomCount > 1 )//如果炸弹数大于1
    {
        //则只更新炸弹数目
        strBoomCount.initWithFormat("X %d",bigBoomCount);
        LabelBMFont * labelCount = 
            (LabelBMFont *)this->getChildByTag(TAG_BIGBOOMCOUNT);
        labelCount->setString(strBoomCount.getCString());//设置炸弹数目
    }
}

7. 最后来添加控制层
控制层主要是两个作用:1,暂停和继续游戏(添加屏蔽层)2,更新玩家得分
暂停和继续游戏需要两个按钮来控制。刚开始游戏时,游戏是进行着的,没有暂停。当玩家按了暂停按钮后,游戏暂停,按钮变成继续状态(三角形)这个还是比较简单的。下面来看实现代码:

LayerControl.h

#ifndef __LayerControl_H_
#define __LayerControl_H_
#include "cocos2d.h"
#include "LayerNoTouch.h"
class LayerControl : public cocos2d::Layer
{
public:
    CREATE_FUNC(LayerControl);
    bool init();

    void menuCallback(cocos2d::Ref * ref);
    void updateScore(int score);


private:
    cocos2d::MenuItemSprite * pauseMenuItem;
    cocos2d::LabelBMFont * scoreItem;
    LayerNoTouch * _noTouchLayer;
};

#endif

LayerControl.cpp

#include "LayerControl.h"
#include "AppMacros.h"
#include "SimpleAudioEngine.h"
using namespace CocosDenshion;
USING_NS_CC;

bool LayerControl::init()
{
    if (!Layer::init())
    {
        return false;
    }
    _noTouchLayer = nullptr;//初始化
    //暂停按钮不同状态下的两个图片
    Sprite * nor = Sprite::createWithSpriteFrameName("game_pause_nor.png");
    Sprite * press = Sprite::createWithSpriteFrameName("game_pause_pressed.png");
    pauseMenuItem = 
        MenuItemSprite::create(nor,press,CC_CALLBACK_1(LayerControl::menuCallback,this));
    Point menuBrith = Point(pauseMenuItem->getContentSize().width/2 + 10, 
                            winSize.height - pauseMenuItem->getContentSize().height);
    pauseMenuItem->setPosition(menuBrith);
    Menu * pauseMenu = Menu::create(pauseMenuItem,nullptr);
    pauseMenu->setPosition(Point::ZERO);
    this->addChild(pauseMenu,101);//将暂停/继续 按钮放在最前面

    scoreItem = LabelBMFont::create("0","font/font.fnt");
    scoreItem->setColor(Color3B(255,255,0));
    scoreItem->setAnchorPoint(Point(0,0.5));
    scoreItem->setPosition(Point(pauseMenuItem->getPositionX() + nor->getContentSize().width/2 + 5, 
                                 pauseMenuItem->getPositionY()));
    this->addChild(scoreItem);

    return true;
}

//按钮回调函数
void LayerControl::menuCallback(cocos2d::Ref * ref)
{
    if (!Director::getInstance()->isPaused())//如果点击按钮之前游戏没有暂停
    {
        if (SimpleAudioEngine::getInstance()->isBackgroundMusicPlaying())
        {
            //如果背景音乐还在播放,则暂停其播放
            SimpleAudioEngine::getInstance()->pauseBackgroundMusic();
        }
        //则将 暂停/继续 按钮设置为继续状态的按钮
        pauseMenuItem->setNormalImage(Sprite::createWithSpriteFrameName("game_resume_nor.png"));
    pauseMenuItem->setSelectedImage(Sprite::createWithSpriteFrameName("game_resume_pressed.png"));
        //并暂停游戏
        Director::getInstance()->pause();
        //添加屏蔽层,屏蔽层一定要加到其它所有层前面,暂停/继续 按钮的后面!!!
        _noTouchLayer = LayerNoTouch::create();
        this->addChild(_noTouchLayer);
    }
    else
    {
        SimpleAudioEngine::getInstance()->resumeBackgroundMusic();//恢复背景音乐
        pauseMenuItem->setNormalImage(Sprite::createWithSpriteFrameName("game_pause_nor.png"));
    pauseMenuItem->setSelectedImage(Sprite::createWithSpriteFrameName("game_pause_pressed.png"));
        Director::getInstance()->resume();
        this->removeChild(_noTouchLayer,true);
    }
}
//更新游戏得分,这个函数也可以放在主场景中
void LayerControl::updateScore(int score)
{
    /*2.0版本
    String * strScore = String::createWithFormat("%d",score);
    scoreItem->setString(strScore->getCString());*/

    //3.0版本
    Value strScore(score);
    scoreItem->setString(strScore.asString());//更新成绩转换为字符串
}

8. 最后,我们来看看主场景里面都做了什么

bool LayerGameMain::init()
{
    if (!Layer::init())
    {
        return false;
    }
    _bigBoomCount = 0;
    _score = 0;//不要将_score 设置为static ,否则在场景切换时,它不能清零

    this->addBackground();

    this->addMyPlane();

    this->addBulletLayer();//执行了startShoot()

    this->addMultiBulletsLayer();//没有执行startShoot()

    this->addEnemyLayer();

    this->addFoodLayer();

    this->addControlLayer();

    this->scheduleUpdate();//开启定时器便于碰撞检测

    auto listener = EventListenerTouchOneByOne::create();
    listener->setSwallowTouches(true);//触摸吞噬
    listener->onTouchBegan = CC_CALLBACK_2(LayerGameMain::onTouchBegan,this);
    listener->onTouchMoved = CC_CALLBACK_2(LayerGameMain::onTouchesMoved,this);
    this->_eventDispatcher->addEventListenerWithSceneGraphPriority(listener,this);

    return true;
}

这是主场景的初始化函数,大家都应该看到了,依次添加了背景、玩家飞机、子弹层、敌机层、食物层、控制层、最后开启帧循环定时器、设置触摸事件的监听。
怎么样,是不是很简单,很清晰? 哈哈,当做完之后再会过来看自己写的代码还真是挺好。。

最后的最后

来说一说主场景里面的 update 函数。这个函数里面做了整个游所有的碰撞检测。其原理都一样,这里我拿子弹与小敌机的碰撞检测为例说明一下:

//单发子弹与小敌机碰撞
    /*思路:
        两次遍历(即两个for循环),第一次遍历子弹容器(_bulletVector),取出其第一个子弹,
    第二次遍历小敌机容器(_smallVec)将这个取出的子弹与当前屏幕上所有的小敌机做碰撞检测,
    如果检测到碰撞,再判断当前碰撞到的小敌机的生命值_life 若等于1,则小敌机失去生命值
    再分别将当前的子弹和当前的小敌机加到容器 bulletToDel_Small 和 smallToDel 中去,
    当第一个子弹与屏幕上的敌机全部碰撞检测完以后,就把 bulletToDel_Small 和 smallToDel
    里面的对象全部删除,这样可以防止在遍历时发生错误!*/
    Vector<Sprite *> bulletToDel_Small;
    for (auto bt : _bulletLayer->_bulletVector)
    {
        Sprite * bullet = bt;
        Vector<Enemy *> smallToDel;
        for (auto et : _enemyLayer->_smallVec)
        {
            Enemy * enemy = et;
            if (bullet->getBoundingBox().intersectsRect(enemy->Get_BoundingBox()))
            {
                if (enemy->getLife() == 1)
                {
                    enemy->loseLife();
                    bulletToDel_Small.pushBack(bullet);
                    smallToDel.pushBack(enemy);
                    _score += SMALL_SCORE;//加上小敌机的分数
                    _controlLayer->updateScore(_score);
                }
            }

        }
        for(auto et : smallToDel)//注意for循环的位置,要与创建时的语句在同一层
        {
            Enemy * enemy = et;
            _enemyLayer->smallEnemyBlowup(enemy);//敌机爆炸(删除)
        }
    }
    for (auto bt : bulletToDel_Small)//注意for循环的位置,要与创建时的语句在同一层
    {
        Sprite * bullet = bt;
        _bulletLayer->removeBullet(bullet);//删除子弹
    }

好了,就写到这里了,写的很乱,不知道大家能不能看懂。
要是有什么写错了的地方,还望斧正。

最后附上本游戏的完整代码地址: PlaneFight

  • 4
    点赞
  • 24
    收藏
    觉得还不错? 一键收藏
  • 2
    评论
评论 2
添加红包

请填写红包祝福语或标题

红包个数最小为10个

红包金额最低5元

当前余额3.43前往充值 >
需支付:10.00
成就一亿技术人!
领取后你会自动成为博主和红包主的粉丝 规则
hope_wisdom
发出的红包
实付
使用余额支付
点击重新获取
扫码支付
钱包余额 0

抵扣说明:

1.余额是钱包充值的虚拟货币,按照1:1的比例进行支付金额的抵扣。
2.余额无法直接购买下载,可以购买VIP、付费专栏及课程。

余额充值