


如果我们想要进行基于以太坊的开发,那么使用私有链或者testnet都是个不错的选择,其中私有链因其安全性以及灵活性更是广受众多以太坊开发者的欢迎,本文讲述如何在 Windows 10 下构建一个以太坊私有链。
一、安装Geth
这里我们使用最流行的以太坊客户端-Geth。首先到Go Ethereum Downloads下载Windows客户端并安装。
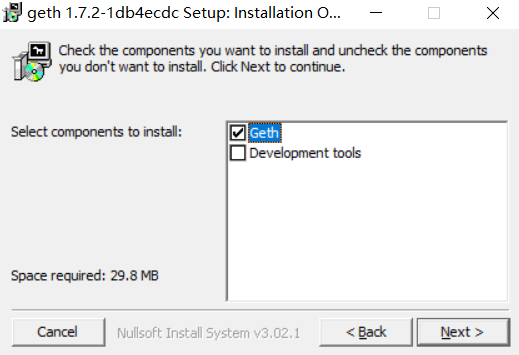
在安装过程中,需要注意的是要勾选'Development tools'.
安装完成后,打开Powershell, 输入geth version,安装成功的话应该出现和以下类似的信息:
PS C:\Users\liang> geth version
Geth
Version: 1.7.2-stable
Git Commit: 1db4ecdc0b9e828ff65777fb466fc7c1d04e0de9
Architecture: amd64
Protocol Versions: [63 62]
Network Id: 1
Go Version: go1.9
Operating System: windows
GOPATH=
GOROOT=c:\go
至此 Geth安装完成。
二、生成账户
这一步我们需要决定数据存放的位置以及生成新的以太坊账户。
PS C:\Users\liang> geth account new --datadir C:\Users\liang\Documents\ethereum
WARN [10-24|16:32:32] No etherbase set and no accounts found as default
Your new account is locked with a password. Please give a password. Do not forget this password.
Passphrase:
Repeat passphrase:
Address: {e0803904cbfce8e07745e1b404de43ce6f1e43bc}
在创建账户的过程中需要输入密码,最后返回一个生成的地址。将该地址记录下来,后面会使用。
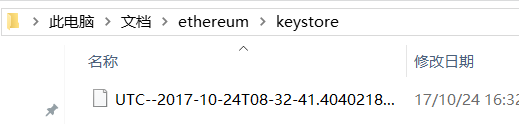
另外这里的数据目录选择了C:\Users\liang\Documents\ethereum, 在创建完账户以后该目录下会生成一个‘keystore’文件夹,用于保存加密后的私钥等信息。
三、配置创世区块文件
我们需要有一个初始化文件,用来生成一些基本的配置和创世区块
在目录C:\Users\liang\Documents\ethereum里创建genesis.json文件,写入以下内容
{
    "config": {
        "chainId": 15,
        "homesteadBlock": 0,
        "eip155Block": 0,
        "eip158Block": 0
    },
    "difficulty": "0x400",
    "gasLimit": "0x2100000",
    "alloc": {
        "e0803904cbfce8e07745e1b404de43ce6f1e43bc":
         { "balance": "0x1337000000000000000000" }
    }
}
在上面的文件中,我们配置了初始难度、网络id(15)、费用以及给上一步我们创建的账户分配了ETH。
执行以下命令,进行初始化
PS C:\Users\liang> geth -datadir C:\Users\liang\Documents\ethereum init C:\Users\liang\Documents\ethereum\genesis.json
INFO [10-24|16:39:15] Allocated cache and file handles         database=C:\\Users\\liang\\Documents\\ethereum\\geth\\cha
indata cache=16 handles=16
INFO [10-24|16:39:15] Writing custom genesis block
INFO [10-24|16:39:15] Successfully wrote genesis state         database=chaindata
       hash=a703b2…9ce84c
INFO [10-24|16:39:15] Allocated cache and file handles         database=C:\\Users\\liang\\Documents\\ethereum\\geth\\lig
htchaindata cache=16 handles=16
INFO [10-24|16:39:15] Writing custom genesis block
INFO [10-24|16:39:15] Successfully wrote genesis state         database=lightchaindata
            hash=a703b2…9ce84c
看到最后的'Successfully wrote genesis state'就说明初始化成功了。
四、启动私有链
我们可以根据自己的需求,对geth使用不同的参数进行启动。常见的参数如下:
--datadir
私有链数据存放目录,包括Ethereum使用的Leveldb数据
--nodiscover
既然是私有链,就要尽可能的避免和其他节点的自动交互。这里的设置为除非手工添加其他节点,否则不会自动发现。
--rpc
打开RPC接口
--rpcport
RPC监听端口,一般私有链是8545
--rpcapi
在RPC接口上打开哪些功能,私有链可以尽情开放,但是注意公链上这一部分的设置一定要小心。因为第三方可以通过调用你的这个RPC来实现你打开的所有功能。
--rpccorsdomain
设置哪些URL可以连接你的RPC接口。
--identity
给节点起名,标记节点
--networkid
和genesis.json里的chainId一致,这里是15
--nat
根据自己网络情况选择是否添加
--port
配置geth的端口
geth --datadir "C:\Users\liang\Documents\ethereum" --nodiscover --rpc --rpcport "8545" --rpccorsdomain "*" --rpcapi eth,web3,personal,net --ipcpath="C:\Users\liang\Documents\ethereum\geth.ipc" --identity 'MyFirstNode' --networkid 15 --nat "any" --port "30303"
为了方便以后使用,我们可以把上面的命令写入到startnode.bat这样一个批处理文件。
启动过程如下:
PS C:\Users\liang> geth --datadir "C:\Users\liang\Documents\ethereum" --nodiscover --rpc --rpcport "8545" --rpccorsdomain "*"  --rpcapi eth,web3,personal,net --identity 'MyFirstNode' --networkid 15 --nat "any" --port "30303"
INFO [10-24|16:47:39] Starting peer-to-peer node               instance=Geth/MyFirstNode/v1.7.2-stable-1db4ecdc/windows-amd64/go1.9
INFO [10-24|16:47:39] Allocated cache and file handles         database=C:\\Users\\liang\\Documents\\ethereum\\geth\\chaindata cache=128 handles=1024
WARN [10-24|16:47:39] Upgrading database to use lookup entries
INFO [10-24|16:47:39] Database deduplication successful        deduped=0
INFO [10-24|16:47:39] Initialised chain configuration          config="{ChainID: 15 Homestead: 0 DAO: <nil> DAOSupport: false EIP150: <nil> EIP155: 0 EIP158: 0 Byzantium: <nil> Engine: unknown}"
INFO [10-24|16:47:39] Disk storage enabled for ethash caches   dir=C:\\Users\\liang\\Documents\\ethereum\\geth\\ethash count=3
INFO [10-24|16:47:39] Disk storage enabled for ethash DAGs     dir=C:\\Users\\liang\\AppData\\Ethash                   count=2
INFO [10-24|16:47:39] Initialising Ethereum protocol           versions="[63 62]" network=15
INFO [10-24|16:47:39] Loaded most recent local header          number=0 hash=a703b2…9ce84c td=1024
INFO [10-24|16:47:39] Loaded most recent local full block      number=0 hash=a703b2…9ce84c td=1024
INFO [10-24|16:47:39] Loaded most recent local fast block      number=0 hash=a703b2…9ce84c td=1024
INFO [10-24|16:47:39] Regenerated local transaction journal    transactions=0 accounts=0
INFO [10-24|16:47:39] Starting P2P networking
INFO [10-24|16:47:39] RLPx listener up                         self="enode://24ddd369b1581a21775a9567da330fa5312fe8d523e7d470b3809358266e3c5c2bc8cd1388d71296135585ea0c727bdfd3b1c2f07644a3d6e22fcc7d4983e122@[::]:30303?discport=0"
INFO [10-24|16:47:39] HTTP endpoint opened: http://127.0.0.1:8545
INFO [10-24|16:47:39] IPC endpoint opened: \\.\pipe\geth.ipc
五、连接到私有链
这一步需要打开一个新的Powershell窗口。我们可以通过ipc或者rpc两种方式连接到私有链。
1. RPC方式
PS C:\Users\liang> geth attach 'http://localhost:8545'
Welcome to the Geth JavaScript console!

instance: Geth/MyFirstNode/v1.7.2-stable-1db4ecdc/windows-amd64/go1.9
coinbase: 0xe0803904cbfce8e07745e1b404de43ce6f1e43bc
at block: 0 (Thu, 01 Jan 1970 08:00:00 CST)
 modules: eth:1.0 net:1.0 personal:1.0 rpc:1.0 web3:1.0

>
2. IPC方式
PS C:\Users\liang> geth attach
Welcome to the Geth JavaScript console!

instance: Geth/MyFirstNode/v1.7.2-stable-1db4ecdc/windows-amd64/go1.9
coinbase: 0xe0803904cbfce8e07745e1b404de43ce6f1e43bc
at block: 0 (Thu, 01 Jan 1970 08:00:00 CST)
 datadir: C:\Users\liang\Documents\ethereum
 modules: admin:1.0 debug:1.0 eth:1.0 miner:1.0 net:1.0 personal:1.0 rpc:1.0 txpool:1.0 web3:1.0

>
六、基本操作
连接到私有链以后,我们可以进行一些基本的操作。比如查询余额,转账等。
> miner.start(2) // 使用2个线程进行挖矿
null
> eth.accounts  // 列出当前账户
["0xe0803904cbfce8e07745e1b404de43ce6f1e43bc"]
> eth.getBalance(eth.accounts[0]) // 查询当前账户余额,单位是wei
2.3229435729235784806170624e+25
> personal.newAccount('password')  // 创建新账户
"0x1219058b07201110d7c9a16dd22d8eca4d099d33"
> web3.fromWei(eth.getBalance(eth.coinbase), 'ether') // 查询账户余额,单位是ETH
23229620.729235784806170624
> net.version // 查询网络id
"15"
> personal.unlockAccount(eth.accounts[0], 'password', 300) // 解锁账户
true
> web3.fromWei(eth.getBalance(eth.accounts[1]), 'ether') // 查询账户余额
0
> eth.sendTransaction({from: eth.coinbase, to: eth.accounts[1], value: web3.toWei(100, "ether")}) // 发起一笔转账
"0xd62ad2aa1a1b6b471e713ddd0bf35e070738da43e373b3ce17b3857a0dec3e87"
> web3.fromWei(eth.getBalance(eth.accounts[1]), 'ether') // 查看转账后的余额
100
另外挖矿启动后,日志应该显示如下:
INFO [10-24|17:09:37] Mining too far in the future             wait=2s
INFO [10-24|17:09:39] Commit new mining work                   number=147 txs=0 uncles=0 elapsed=2
INFO [10-24|17:09:41] Successfully sealed new block            number=147 hash=b78dcf…0d5a90
INFO [10-24|17:09:41] 


 9279
9279


 被折叠的 条评论
为什么被折叠?
被折叠的 条评论
为什么被折叠?
 到【灌水乐园】发言


