


新特性界面
当我们在应用商店下载一个应用或者更新一款应用时,进入应用首先看到的是界面展示,一个炫酷的界面展示肯定会吸引众多目光,但如何做一个比较有意思的界面呢?
1>首先创建一个控制器,继承自UIViewController
@interface WTNewFeatureController ()<UICollectionViewDataSource,UICollectionViewDelegate,WTNewFeatureCellDelegate>
@property (weak,nonatomic) UICollectionView * collectionView;
@property (strong,nonatomic) NSMutableArray * data;
/** 大图片 */
@property (weak,nonatomic) UIImageView * guideImg;
/** 大文字图片 */
@property (weak,nonatomic) UIImageView * textImg;
/** 小文字图片 */
@property (weak,nonatomic) UIImageView * smallTextImg;

@end

@implementation WTNewFeatureController

static NSString * ID = @"Cell";


- (NSMutableArray *)data{

    if (_data == nil) {

        _data = [NSMutableArray array];

        for (int i = 0; i < 4; i ++) {

            UIImage * img = [UIImage imageNamed:[NSString stringWithFormat:@"guide%dBackground@2x",i + 1]];

            [self.data addObject:img];
        }
    }

    return _data;
}
- (void)viewDidLoad {
    [super viewDidLoad];

    // 布局样式
    UICollectionViewFlowLayout * layout = [[UICollectionViewFlowLayout alloc] init];

    layout.itemSize = self.view.frame.size;

    layout.scrollDirection = UICollectionViewScrollDirectionHorizontal;

    layout.minimumLineSpacing = 0;

    // collectionView对象
    UICollectionView * collectionView = [[UICollectionView alloc] initWithFrame:self.view.bounds collectionViewLayout:layout];

    // 自动分页
    collectionView.pagingEnabled = YES;
    // 去除弹簧效果
    collectionView.bounces = NO;

    collectionView.backgroundColor = [UIColor whiteColor];
    // 数据源代理
    collectionView.dataSource = self;
    collectionView.delegate = self;

    self.collectionView = collectionView;

    [self.view addSubview:collectionView];

    [collectionView registerClass:[WTNewFeatureCell class] forCellWithReuseIdentifier:ID];

    [self setUpUI];
}

- (void)setUpUI{

    UIImageView * guideLine = [[UIImageView alloc] initWithImage:[UIImage imageNamed:@"guideLine"]];

    [self.collectionView addSubview:guideLine];
//    [guideLine mas_makeConstraints:^(MASConstraintMaker *make) {
//        make.left.equalTo(self.collectionView).offset(-200);
//    }];
    guideLine.x = -200;

    UIImageView * guideImg = [[UIImageView alloc] initWithImage:[UIImage imageNamed:@"guide1"]];
    self.guideImg = guideImg;
    [self.collectionView addSubview:guideImg];

    UIImageView * textImg = [[UIImageView alloc] initWithImage:[UIImage imageNamed:@"guideLargeText1"]];
    self.textImg = textImg;
    [self.collectionView addSubview:textImg];
//    [textImg mas_makeConstraints:^(MASConstraintMaker *make) {
//        make.top.offset(self.view.frame.size.height * 0.7);
//    }];
    textImg.y = self.view.frame.size.height * 0.7;


    UIImageView * smallTextImg = [[UIImageView alloc] initWithImage:[UIImage imageNamed:@"guideSmallText1"]];
    self.smallTextImg = smallTextImg;
    [self.collectionView addSubview:smallTextImg];
//    [smallTextImg mas_makeConstraints:^(MASConstraintMaker *make) {
//        make.top.offset(self.view.frame.size.height * 0.8);
//    }];

     smallTextImg.y = self.view.frame.size.height * 0.8;

}
UICollectionViewDataSource方法
#pragma mark <UICollectionViewDataSource>

- (NSInteger)numberOfSectionsInCollectionView:(UICollectionView *)collectionView {
    return 1;
}


- (NSInteger)collectionView:(UICollectionView *)collectionView numberOfItemsInSection:(NSInteger)section {

    return self.data.count;
}

- (UICollectionViewCell *)collectionView:(UICollectionView *)collectionView cellForItemAtIndexPath:(NSIndexPath *)indexPath {

    WTNewFeatureCell *cell = [collectionView dequeueReusableCellWithReuseIdentifier:ID forIndexPath:indexPath];

    // 设置代理
    cell.delegate = self;
    cell.image = self.data[indexPath.item];

    // 判断是否是最后一页
    if (indexPath.item == self.data.count - 1) {
        // 显示体验按钮
        cell.expersionBtn.hidden = NO;
    }else{

        cell.expersionBtn.hidden = YES;
    }
    return cell;
}
代理方法的实现
#pragma mark - UIScrollViewDelegate

- (void)scrollViewDidEndDecelerating:(UIScrollView *)scrollView{

    // 偏移量
    CGFloat offsetX = scrollView.contentOffset.x;

    int startX = 0;

    if (self.guideImg.frame.origin.x < offsetX) { // 向左移动

        startX = self.guideImg.frame.origin.x + scrollView.frame.size.width;

    }else{ // 向右移动

        startX = self.guideImg.frame.origin.x - scrollView.frame.size.width;
    }

    // 计算页码
    int page = offsetX / scrollView.width;

    // 拼接图片名称
    NSString *secondName = [NSString stringWithFormat:@"guide%@", @(page + 1)];
    NSString *largeName = [NSString stringWithFormat:@"guideLargeText%@", @(page + 1)];
    NSString *smallName = [NSString stringWithFormat:@"guideSmallText%@", @(page + 1)];

    // 修改图片
    self.guideImg.image = [UIImage imageNamed:secondName];
    self.textImg.image = [UIImage imageNamed:largeName];
    self.smallTextImg.image = [UIImage imageNamed:smallName];

        [UIView animateWithDuration:0.25 animations:^{

            self.guideImg.x = startX;
            self.textImg.x = startX;
            self.smallTextImg.x = startX;

        }];


}
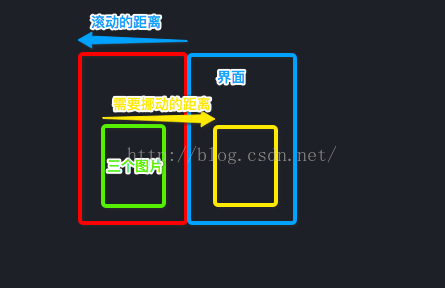
##在滚动界面的时候需要调整三个图片的位置,此时就需要判断,向左滚动如图所示,向右则相反。
自定义cell的实现
.h文件
@class WTNewFeatureCell;
@protocol WTNewFeatureCellDelegate <NSObject>
@optional
- (void)newFeatureCell:(WTNewFeatureCell *)featureCell didClickWithBtn:(UIButton *)btn;

@end
@interface WTNewFeatureCell : UICollectionViewCell
@property (weak,nonatomic) UIImage * image;
/** 立即体验按钮 */
@property (weak,nonatomic) UIButton * expersionBtn;

@property (weak,nonatomic) id<WTNewFeatureCellDelegate> delegate;
.m文件
@interface WTNewFeatureCell ()
@property (weak,nonatomic) UIImageView * imgView;

@end
@implementation WTNewFeatureCell

- (instancetype)initWithFrame:(CGRect)frame{

    if (self = [super initWithFrame:frame]) {

       // imageView
        UIImageView * imgView = [[UIImageView alloc] init];
        self.imgView = imgView;
        [self.contentView addSubview:imgView];

      // 立即体验按钮
        UIButton * btn = [UIButton buttonWithType:UIButtonTypeCustom];

        [btn setImage:[UIImage imageNamed:@"guideStart"] forState:UIControlStateNormal];
        [btn sizeToFit];
        self.expersionBtn = btn;

        btn.hidden = YES;
        [btn addTarget:self action:@selector(btnClick:) forControlEvents:UIControlEventTouchUpInside];
        [self.contentView addSubview:btn];

    }

    return self;
}

- (void)btnClick:(UIButton *)btn{

    if ([self.delegate respondsToSelector:@selector(newFeatureCell:didClickWithBtn:)]) {

        [self.delegate newFeatureCell:self didClickWithBtn:btn];
    }

}
- (void)setImage:(UIImage *)image{

    _image = image;

    self.imgView.image = image;
}

- (void)layoutSubviews{

    self.imgView.frame = self.bounds;
    self.expersionBtn.x = (self.width - self.expersionBtn.width) * 0.5;
    self.expersionBtn.y = self.height * 0.85;
}
@end


 7432
7432

 被折叠的 条评论
为什么被折叠?
被折叠的 条评论
为什么被折叠?
 到【灌水乐园】发言


