


搭建SSH项目,源码示例
在项目中有spring配置Oracle示例,同样也有MySQL的
有关于struts2的拦截器栈配置、全局result配置以及Action的404错误处理等
ps:一个简单的SSH小模版
好了下面是源码示例:
首先,新建一个新的Web Project,接着导入项目所需的所有架包
架包如下(源码在最后,包含架包):
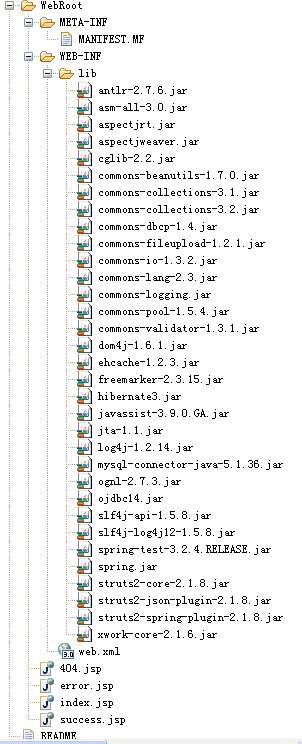
然后项目的src目录下
项目包com.ssh.bean下建立实体如下:
package com.ssh.bean;

/**
 * Test entity. @author MyEclipse Persistence Tools
 */

public class Test implements java.io.Serializable {

    // Fields

    private static final long serialVersionUID = 1L;
    private Integer id;
    private String content;

    // Constructors

    /** default constructor */
    public Test() {
    }

    /** full constructor */
    public Test(String content) {
        this.content = content;
    }

    // Property accessors

    public Integer getId() {
        return this.id;
    }

    public void setId(Integer id) {
        this.id = id;
    }

    public String getContent() {
        return this.content;
    }

    public void setContent(String content) {
        this.content = content;
    }

}
Test类的映射文件:
<?xml version="1.0" encoding="utf-8"?>
<!DOCTYPE hibernate-mapping PUBLIC "-//Hibernate/Hibernate Mapping DTD 3.0//EN" "http://hibernate.sourceforge.net/hibernate-mapping-3.0.dtd">
<hibernate-mapping>
    <!-- schema是Oracle数据库的用户名 -->
    <class name="com.ssh.bean.Test" table="TEST" schema="EJOB">
        <id name="id" type="java.lang.Integer">
            <column name="ID" precision="5" scale="0" />
            <!-- 自增主键 -->
            <generator class="sequence" />
        </id>
        <property name="content" type="java.lang.String">
            <column name="CONTENT" length="10" />
        </property>
    </class>
</hibernate-mapping>
接着是拦截器示例,需要在struts.xml文件中配置,看后面struts.xml:
package com.ssh.interceptor;
import com.opensymphony.xwork2.ActionInvocation;
import com.opensymphony.xwork2.interceptor.AbstractInterceptor;
public class MyInterceptor extends AbstractInterceptor {
private static final long serialVersionUID = 1L;
@Override
public String intercept(ActionInvocation invocation) throws Exception {
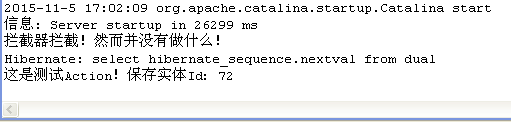
System.out.println("拦截器拦截!然而并没有做什么!");
return invocation.invoke();
}
}
然后是TestAction,如下:
package com.ssh.action;

import org.hibernate.SessionFactory;

import com.opensymphony.xwork2.ActionSupport;
import com.ssh.bean.Test;

public class TestAction extends ActionSupport{

    private static final long serialVersionUID = 1L;
    private SessionFactory sessionFactory;

    public SessionFactory getSessionFactory() {
        return sessionFactory;
    }

    public void setSessionFactory(SessionFactory sessionFactory) {
        this.sessionFactory = sessionFactory;
    }

    public String execute(){

        Test test = new Test("测试");
        Integer id = (Integer) sessionFactory.openSession().save(test);

        System.out.println("这是测试Action!保存实体Id:" + id);
        return ActionSupport.SUCCESS;
    }

}
ps:这里省略了service以及Dao接口
在src目录下新建struts.xml如下:
<?xml version="1.0" encoding="UTF-8" ?>
<!DOCTYPE struts PUBLIC
    "-//Apache Software Foundation//DTD Struts Configuration 2.0//EN"
    "http://struts.apache.org/dtds/struts-2.0.dtd">
<struts>

    <!-- 指定由spring负责action对象的创建 -->
    <constant name="struts.objectFactory" value="spring" />
    <!-- 所有匹配*.action的请求都由struts2处理 -->
    <!-- <constant name="struts.action.extension" value="action" /> -->
    <!-- 是否启用开发模式(开发时设置为true,发布到生产环境后设置为false) -->
    <constant name="struts.devMode" value="true" />
    <!-- 请求参数的编码方式 -->
    <constant name="struts.i18n.encoding" value="GBK" />
    <!-- 文件上传最大值 -->
    <constant name="struts.multipart.maxSize" value="104857600" />

    <package name="ssh" namespace="/ssh" extends="struts-default">

        <interceptors>
            <!-- 拦截器 -->
            <interceptor class="com.ssh.interceptor.MyInterceptor"
                name="MyInterceptor" />
            <!--定义一个拦截器栈 -->
            <interceptor-stack name="mydefault">
                <!--配置默认拦截器 -->
                <interceptor-ref name="defaultStack" />
                <interceptor-ref name="MyInterceptor" />
            </interceptor-stack>
        </interceptors>

        <!-- 使用配置的默认拦截器 -->
        <default-interceptor-ref name="mydefault" />

        <!--定义全局Result -->
        <global-results>
            <result name="login">/index.jsp</result>
            <result name="error">/error.jsp</result>
        </global-results>

        <action name="Test" class="TestAction">
            <result name="success">/success.jsp</result>
        </action>

    </package>

    <!--action的404处理 -->
    <package name="error" extends="struts-default">
        <default-action-ref name="notFound" />
        <action name="notFound">
            <result>/404.jsp</result>
        </action>
    </package>

</struts>
新建spring.xml文件如下:
<?xml version="1.0" encoding="UTF-8"?>
<beans xmlns="http://www.springframework.org/schema/beans"
    xmlns:context="http://www.springframework.org/schema/context"
    xmlns:xsi="http://www.w3.org/2001/XMLSchema-instance" xmlns:aop="http://www.springframework.org/schema/aop"
    xmlns:tx="http://www.springframework.org/schema/tx" xmlns:p="http://www.springframework.org/schema/p"
    xmlns:util="http://www.springframework.org/schema/util" xmlns:jdbc="http://www.springframework.org/schema/jdbc"
    xmlns:cache="http://www.springframework.org/schema/cache"
    xsi:schemaLocation="
    http://www.springframework.org/schema/context
    http://www.springframework.org/schema/context/spring-context.xsd
    http://www.springframework.org/schema/beans
    http://www.springframework.org/schema/beans/spring-beans.xsd
    http://www.springframework.org/schema/tx
    http://www.springframework.org/schema/tx/spring-tx.xsd
    http://www.springframework.org/schema/jdbc
    http://www.springframework.org/schema/jdbc/spring-jdbc-3.1.xsd
    http://www.springframework.org/schema/cache
    http://www.springframework.org/schema/cache/spring-cache-3.1.xsd
    http://www.springframework.org/schema/aop
    http://www.springframework.org/schema/aop/spring-aop.xsd
    http://www.springframework.org/schema/util
    http://www.springframework.org/schema/util/spring-util.xsd">

    <!-- 可以把普通Bean类配置移到spring_bean.xml中,在这里引入文件 -->
    <!-- <import resource="spring_bean.xml" /> -->

    <!-- 配置mysql数据库连接 -->
    <!-- <bean id="dataSource" class="org.apache.commons.dbcp.BasicDataSource">
        <property name="driverClassName" value="com.mysql.jdbc.Driver"> </property>
        <property name="url" value="jdbc:mysql://localhost:3306/test"> </property>
        <property name="username" value="root"></property>
        <property name="password" value="123"></property>
        </bean> -->

    <!-- 配置oracle数据库连接 -->
    <bean id="dataSource" class="org.apache.commons.dbcp.BasicDataSource">
        <property name="driverClassName" value="oracle.jdbc.driver.OracleDriver">
        </property>
        <!-- jdbc:oracle:thin:@你的IP:端口:数据库 -->
        <property name="url" value="jdbc:oracle:thin:@localhost:1521:test">
        </property>
        <property name="username" value="root"></property>
        <property name="password" value="123"></property>
    </bean>

    <!-- 配置sessionFactory -->
    <bean id="sessionFactory"
        class="org.springframework.orm.hibernate3.LocalSessionFactoryBean">
        <property name="dataSource">
            <ref bean="dataSource" />
        </property>
        <property name="hibernateProperties">
            <props>
                <prop key="hibernate.current_session_context_class">org.springframework.orm.hibernate3.SpringSessionContext
                </prop>
                <!-- <prop key="hibernate.dialect">org.hibernate.dialect.MySQL5Dialect</prop> -->
                <prop key="hibernate.dialect">org.hibernate.dialect.Oracle10gDialect</prop>
                <prop key="hibernate.show_sql">true</prop>
                <prop key="hibernate.hbm2ddl.auto">update</prop>
            </props>
        </property>
        <!-- 配置数据库实体类映射文件,自动扫描整个包 -->
        <property name="mappingDirectoryLocations">
            <list>
                <value>classpath:com/ssh/bean</value>
            </list>
        </property>
    </bean>

    <!-- 配置Action -->
    <bean id="TestAction" class="com.ssh.action.TestAction">
        <property name="sessionFactory" ref="sessionFactory" />
    </bean>
</beans>
在web.xml里配置struts2过滤器,配置spring监听器:
<?xml version="1.0" encoding="UTF-8"?>
<web-app version="3.0" xmlns="http://java.sun.com/xml/ns/javaee"
    xmlns:xsi="http://www.w3.org/2001/XMLSchema-instance"
    xsi:schemaLocation="http://java.sun.com/xml/ns/javaee
    http://java.sun.com/xml/ns/javaee/web-app_3_0.xsd">
    <display-name></display-name>
    <welcome-file-list>
        <welcome-file>index.jsp</welcome-file>
    </welcome-file-list>

    <!-- 配置struts过滤器 -->
    <filter>
        <filter-name>struts2</filter-name>
        <filter-class>org.apache.struts2.dispatcher.ng.filter.StrutsPrepareAndExecuteFilter</filter-class>
    </filter>

    <filter-mapping>
        <filter-name>struts2</filter-name>
        <url-pattern>/*</url-pattern>
    </filter-mapping>

    <!-- 配置spring -->
    <context-param>
        <param-name>contextConfigLocation</param-name>
        <param-value>classpath:spring.xml</param-value>
    </context-param>

    <listener>
        <listener-class>org.springframework.web.context.ContextLoaderListener</listener-class>
    </listener>

</web-app>
最后新建几个简单的jsp页面,发布然后运行,访问
http://localhost:8080/ssh_template/ssh/Test.action
会看到如下结果:

控制台输出如下:
ps:项目的编码是GBK,注意你的workspace的默认编码


 3442
3442

 被折叠的 条评论
为什么被折叠?
被折叠的 条评论
为什么被折叠?
 到【灌水乐园】发言


