


 本文详述了如何从源代码编译JCEF,包括准备环境、构建过程及测试方法,适用于Windows、Linux和MacOSX平台。
JCEF
我想,你既然搜索到了JCEF,那么你一定知道CEF、JCEF是个啥玩意。不知道就先去了解一下吧。
觉得本文过于啰嗦的,请参考比较简单的获取 JCEF 相关 jar 包的教程
一、前言
- 本篇文章主要介绍怎么得到 jcef 相关的 jar 包。
- 本文凡涉及32位和64位,如不特殊说明,全指的是64位。
- 本文凡涉及操作系统,如不特殊说明,全指的是 Windows 操作系统(平台)。
我曾思考过,网上为什么没有那种做好的,能直接拿来用的 jar 包,时间长了我发现,这个 jar 包弄起来太费劲,而且 chromium 总更新,CEF总更新,JCEF总更新,所以还是自己通过教程自己搞 jar 包吧。
二、相关链接
- CEF 开源项目: https://code.google.com/archive/p/chromiumembedded/;
- CEF 开源项目 git 网址: https://bitbucket.org/chromiumembedded/cef/src/master/;
- CEF 各版本下载地址: https://cef-builds.spotifycdn.com/index.html;
- JCEF 开源项目 git 网址: https://bitbucket.org/chromiumembedded/java-cef/src/master/;
- JCEF 开源项目 README: https://bitbucket.org/chromiumembedded/java-cef/src/master/README.md;
- Building JCEF: https://bitbucket.org/chromiumembedded/java-cef/wiki/BranchesAndBuilding;
- CEF 中文介绍:https://github.com/zhaojunmeng/myblog/blob/master/posts/cef/hello-cef.md;
- CEF General Usage 中文翻译文档:https://github.com/fanfeilong/cefutil/blob/master/doc/CEF%20General%20Usage-zh-cn.md。
三、准备工作
1. Building from Source(从源代码处构建)
以下英文部分内容于 2022.08.06 copy 自 Chromium Embedded Framework / cef / java-cef / BranchesAndBuilding
Building JCEF from source code is currently supported on Windows, Linux and Mac OS X for 64-bit Oracle Java targets. 32-bit builds are also possible on Windows and Linux but they are untested.
(现在支持在 Windows, Linux 和 Mac OS 上,从源代码处构建 JCEF,构建成 64 位的 Oracle Java 目标。在 Windows 和 Linux 系统上构建 32位的也行,不过没有测试过他们好不好用)
To build JCEF from source code you should begin by installing the build prerequisites for your operating system and development environment.
(要从源代码处构建 JCEF,首先应该为操作系统和开发环境安装构建先决条件。)
I. For all platforms this includes:(以下信息适用于所有平台,包括:)
CMake version 3.19 or newer.(CMake 3.19 或更高版本)Git.Java version 7 to 14.(jdk 7 到 14)Python version 2.6+ or 3+.(Python 2.6 以上版本或 3 以上版本)
II. For Linux platforms:(对于 Linux 平台:)
Currently supported distributions include Debian 10 (Buster), Ubuntu 18 (Bionic Beaver), and related. Ubuntu 18.04 64-bit with GCC 7.5.0+ is recommended. Newer versions will likely also work but may not have been tested. Required packages include: build-essential, libgtk2.0-dev.
(目前支持的发行版包括 Debian 10 (Buster)、Ubuntu 18 (Bionic Beaver) 以及相关版本。推荐使用 Ubuntu 18.04 64位配合 GCC 7.5.0 以上版本。较新的版本可能也会工作,但可能尚未测试。build essential,libgtk3-dev 是必需的。)
III. For Mac OS X platforms:(对于 Mac OS X 平台:)
- Apache Ant is required to build the Java app bundle.
- Java version newer than 8u121 is required.
- Xcode 12.2 to 13.0 building on MacOS 10.15.4 (Catalina) or newer. The Xcode command-line tools must also be installed. Only 64-bit builds are supported on macOS.
IV. For Windows platforms:(对于 Windos 平台:)
Visual Studio 2019 or newer building on Windows 7 or newer. Windows 10 64-bit are recommended.
(Windows 7 以上操作系统、Visual Studio 2019 及以上版本。推荐使用 Windows 10 64 位操作系统。)
2. 下载 CMake
CMake 官方下载网址:https://cmake.org/download/
下载最新版即可。建议使用安装版,允许自动配置环境变量。
3. 下载 Git
官方网址:https://git-scm.com/downloads
git for windows:https://gitforwindows.org/
4. 下载 jdk
jdk 官方下载网址:https://www.oracle.com/java/technologies/downloads/
jdk 8 最新版下载网址:https://www.oracle.com/java/technologies/downloads/#java8
jdk 11 最新版下载网址:https://www.oracle.com/java/technologies/downloads/#java11
jdk 各版本下载网址:https://www.oracle.com/java/technologies/downloads/archive/
jdk 1.8 最后一个免费商用版及其早期版本:https://www.oracle.com/java/technologies/javase/javase8-archive-downloads.html
5. 下载 Python
官方下载网址:https://www.python.org/downloads/
6. 下载 Visual Studio
官方下载网址:https://visualstudio.microsoft.com/zh-hans/vs/
三、正式搞起
以下内容英文部分于 2022.08.06 copy 自 Chromium Embedded Framework / cef / java-cef / BranchesAndBuilding
I. Download JCEF source code using Git.(使用 Git 下载 JCEF 源代码)
# The JCEF source code will exist at `/path/to/java-cef/src`
# JCEF 源代码将存在于 `/path/to/java-cef/src` 路径下,其中 `/path/to/` 是你指定的路径
cd /path/to/java-cef
git clone https://bitbucket.org/chromiumembedded/java-cef.git src
我是这样操作的:
- 新建个文件夹:D:\project\java-cef。
- 打开 git bash,cd D:\project\java-cef。
- 输入命令
git clone https://bitbucket.org/chromiumembedded/java-cef.git src并执行,等待完成。
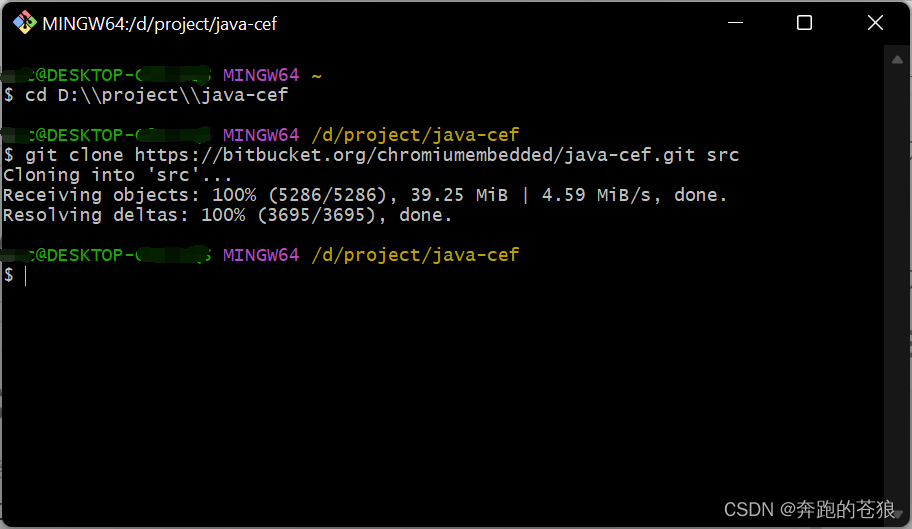
ps: 建议使用 git 而非从网站上直接下载,至于原因请查看本文参考文章。
II. Building(构建)
1. Run CMake(运行 CMake)
Run CMake to generate platform-specific project files and then build the resulting native targets. See CMake output for any additional steps that may be necessary. For example, to generate a Release build of the jcef and jcef_helper targets:
(运行 CMake 生成特定于平台的项目文件,然后生成生成的本地目标。请参阅 CMake 输出以了解可能需要的任何其他步骤。例如,要生成jcef和jcef_helper目标的发布版本:)
# Enter the JCEF source code directory.
cd /path/to/java-cef/src

# Create and enter the `jcef_build` directory.
# The `jcef_build` directory name is required by other JCEF tooling
# and should not be changed.
mkdir jcef_build && cd jcef_build

# Linux: Generate 64-bit Unix Makefiles.
cmake -G "Unix Makefiles" -DCMAKE_BUILD_TYPE=Release ..
# Build using Make.
make -j4

# Mac OS X: Generate 64-bit Xcode project files.
cmake -G "Xcode" -DPROJECT_ARCH="x86_64" ..
# Open jcef.xcodeproj in Xcode
# - Select Scheme > Edit Scheme and change the "Build Configuration" to "Release"
# - Select Product > Build.

# Windows: Generate 64-bit VS2019 project files.
cmake -G "Visual Studio 16" -A x64 ..
# Open jcef.sln in Visual Studio
# - Select Build > Configuration Manager and change the "Active solution configuration" to "Release"
# - Select Build > Build Solution.
以上内容出自Building JCEF,个人认为其命令有些不合适,建议按照我如下步骤操作。
- 首先编辑 D:\project\java-cef\src\CMakeLists.txt 文件,目的是构建过程会
Downloading clang-format from Google Storage...,然后 Google 访问不了的话,就会一直卡在这里。
打开 CMakeLists.txt 文件后,搜索字符串:“Downloading clang-format from Google Storage…”
给这一大段话,每一行前面加上 #,将其注释掉。或者直接将它们都删了。
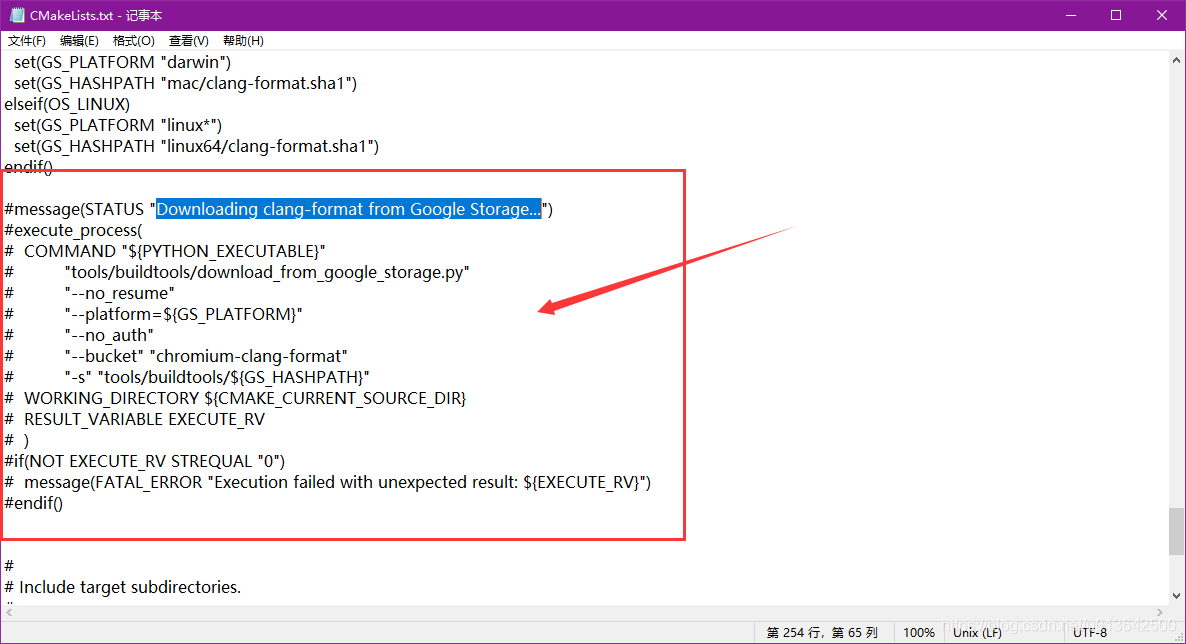
- 在 CMakeLists.txt 文件中,搜索字符串:“Specify the CEF distribution version.”,找到 CEF 版本号,然后在CEF各版本下载地址 中下载对应版本的 CEF Standard Distribution。
第 2、3 两步的目的是避免在 CMake 构建过程中下载这个东西,然后下载失败,又乱七八糟的其他问题。

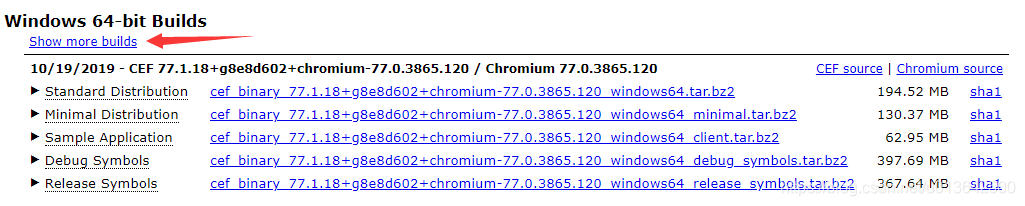

- 将上一步下载的 CEF 压缩包复制到 D:\project\java-cef\src\third_party\cef 中,然后“解压到当前文件夹”。
图片是旧图,路径请忽略

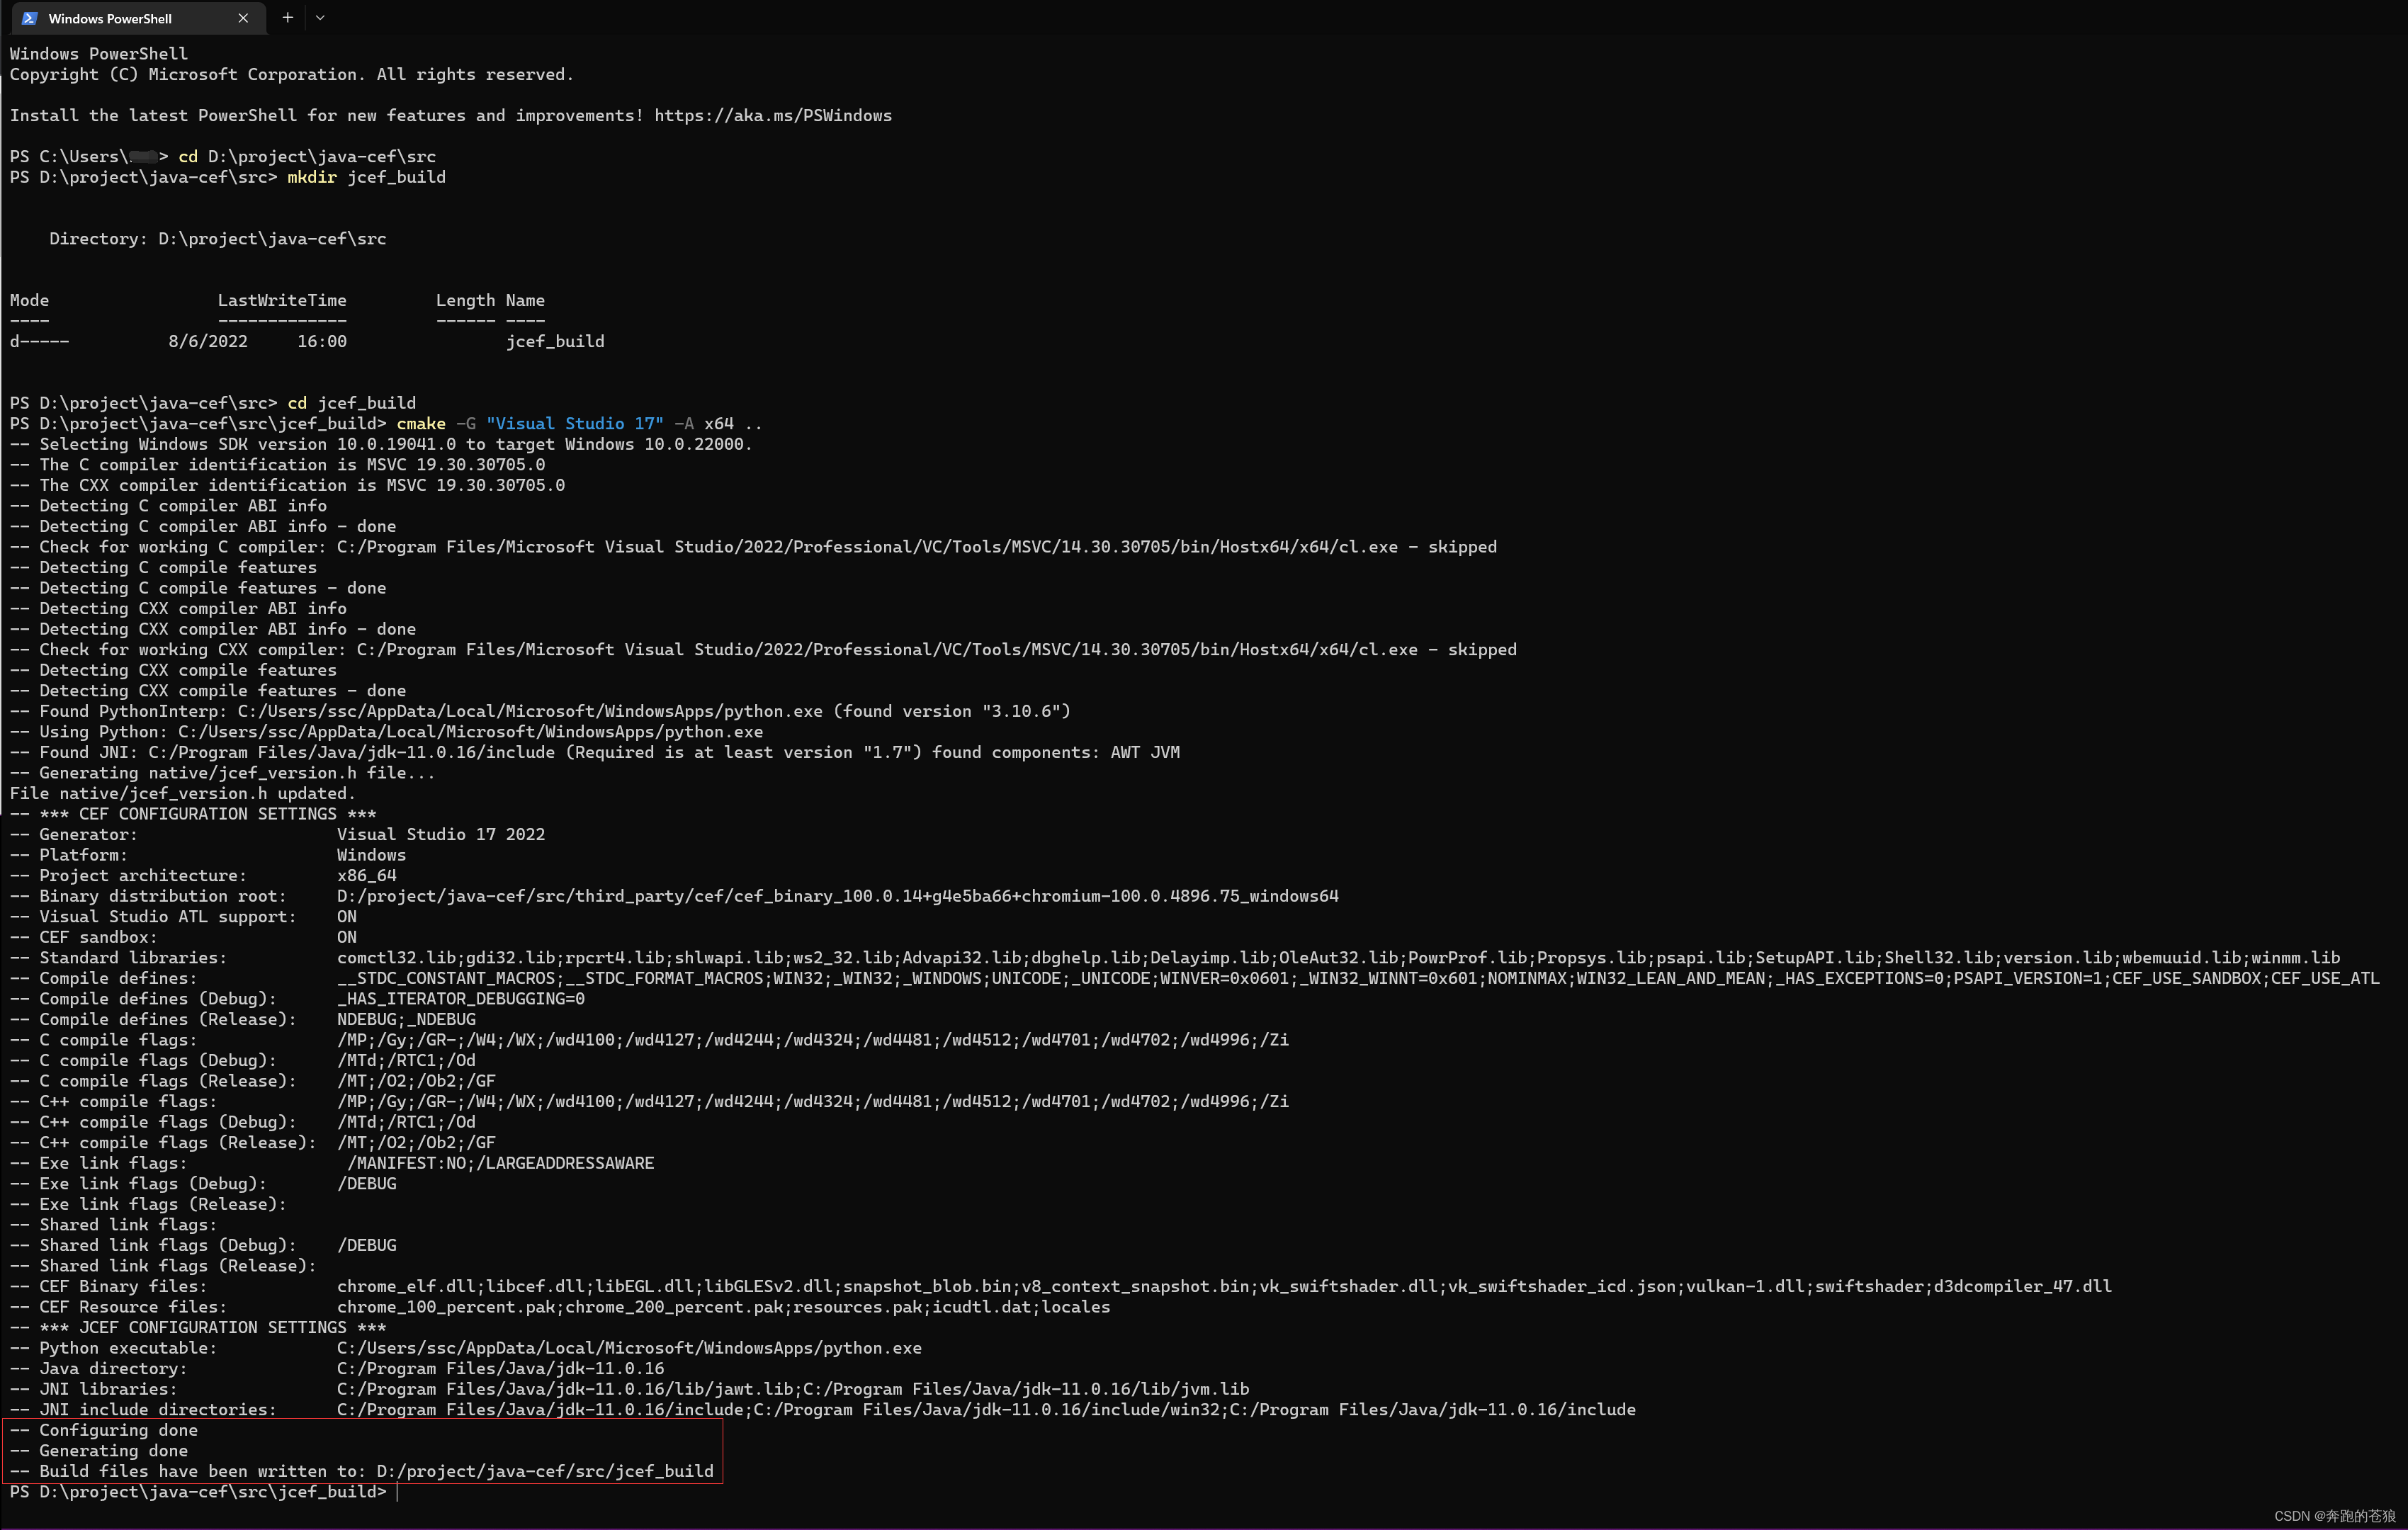
- 打开 cmd 或 PowerShell(不需要“以管理员身份运行”),输入命令:
cd D:\project\java-cef\src
mkdir jcef_build
cd jcef_build


# VS2019
cmake -G "Visual Studio 16" -A x64 ..
# VS2022
cmake -G "Visual Studio 17" -A x64 ..
2. 用 VS 2022 生成解决方案
- 用 Visual Studio 2022 打开 D:\project\java-cef\src\jcef_build\jcef.sln。
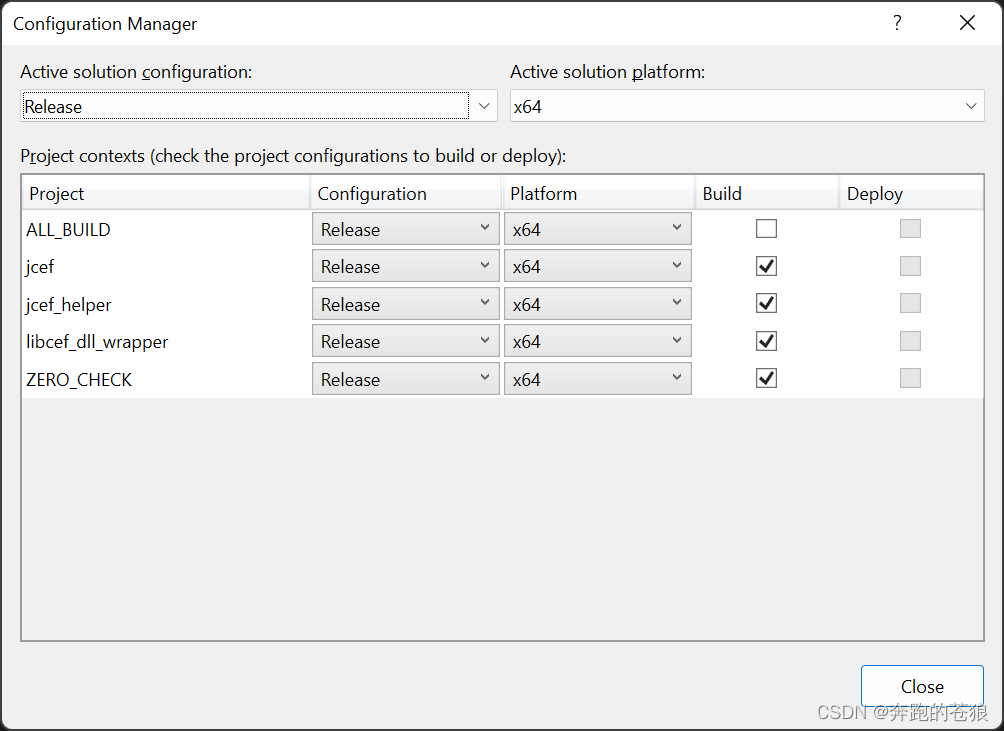
- 点击菜单栏“生成”中的“配置管理器”。
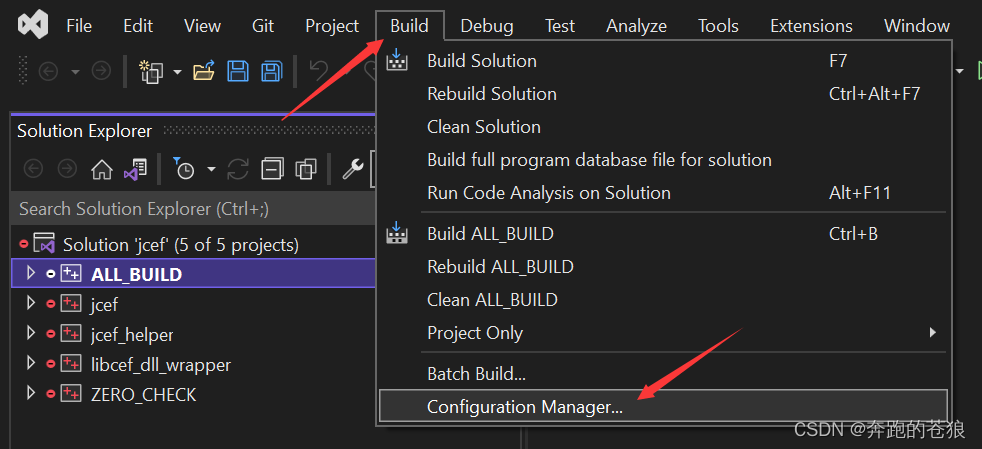
- 活动解决方案配置改为“Release”,活动解决方案平台为“x64”。
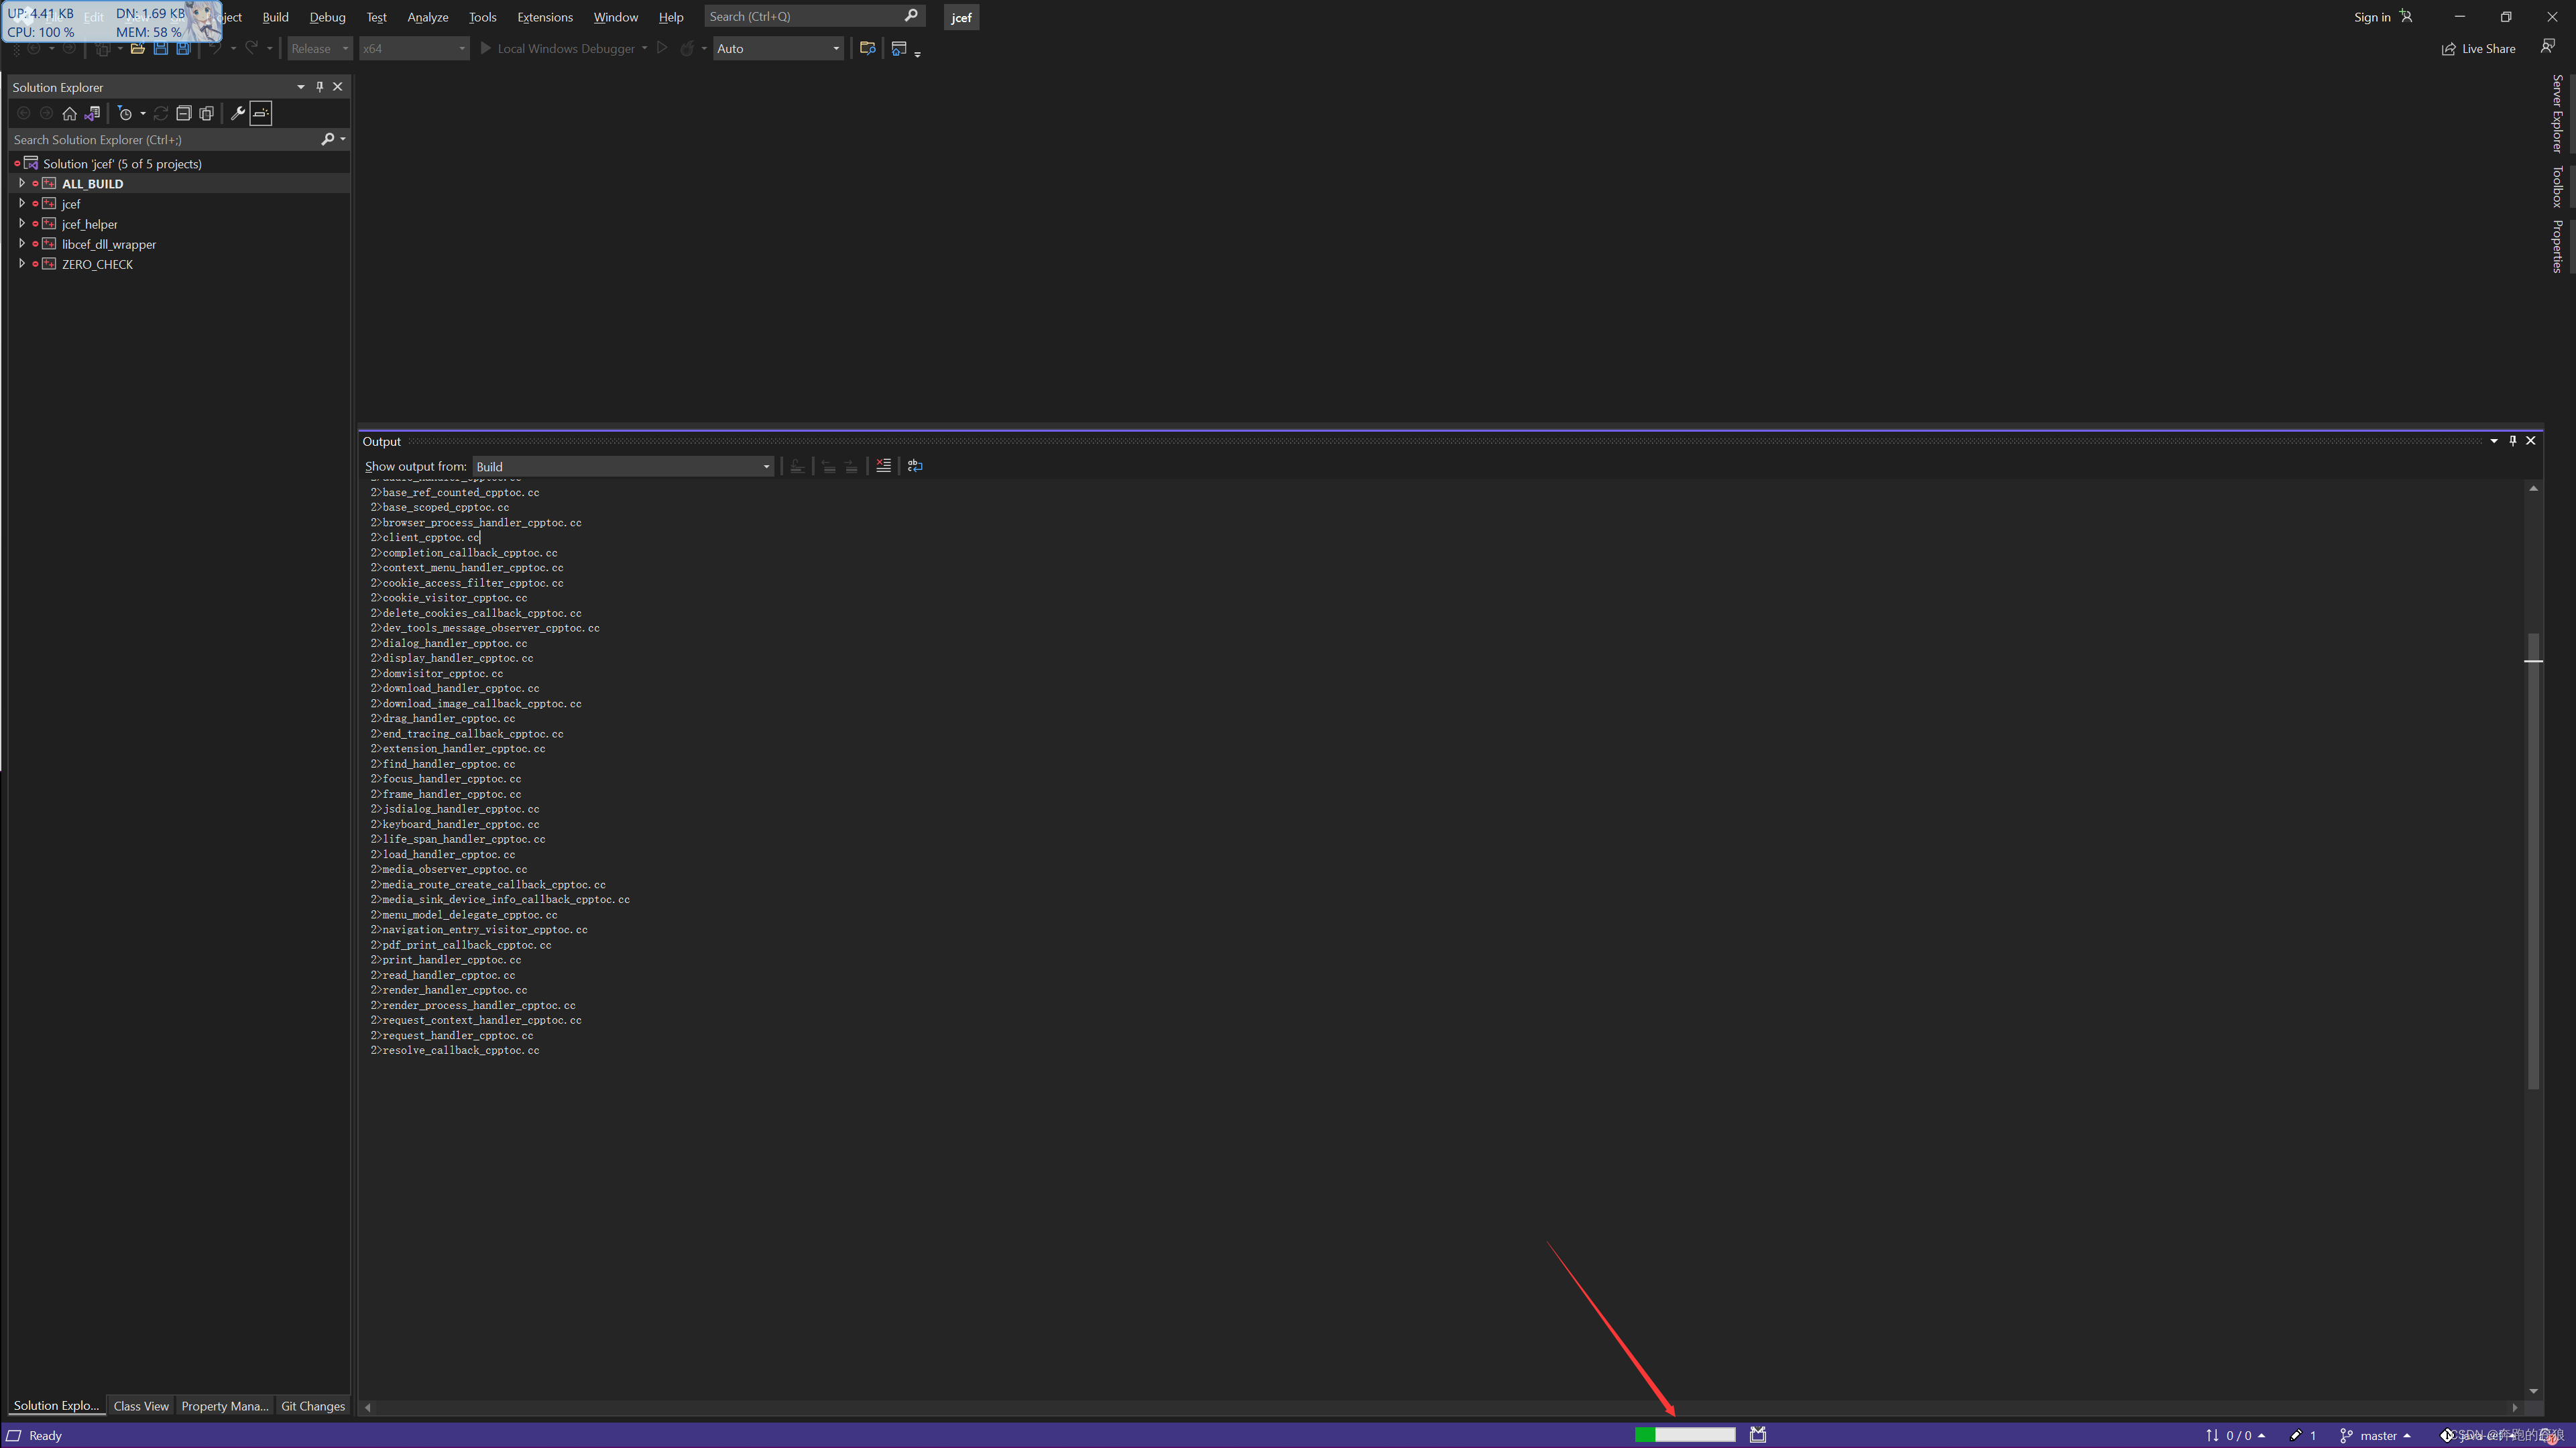
- 点击菜单栏“生成”中的“生成解决方案”。
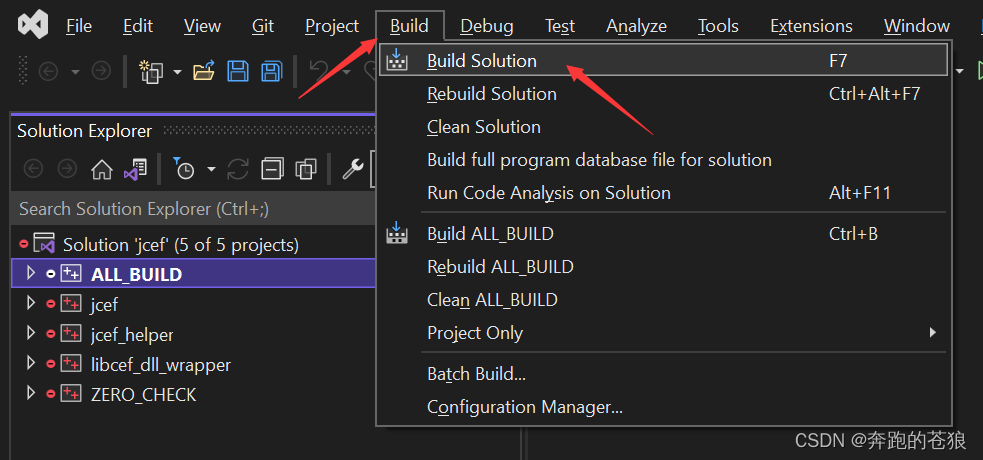
- 等待完成。

3. build the JCEF Java classes(构建 JCEF 的 Java 的 class 文件)
On Windows and Linux build the JCEF Java classes using the compile.[bat|sh] tool.
(在 Windows 上使用 compile.bat,或在 Linux 上使用 compile.sh 工具构建 JCEF 的 Java 的 class 文件。)
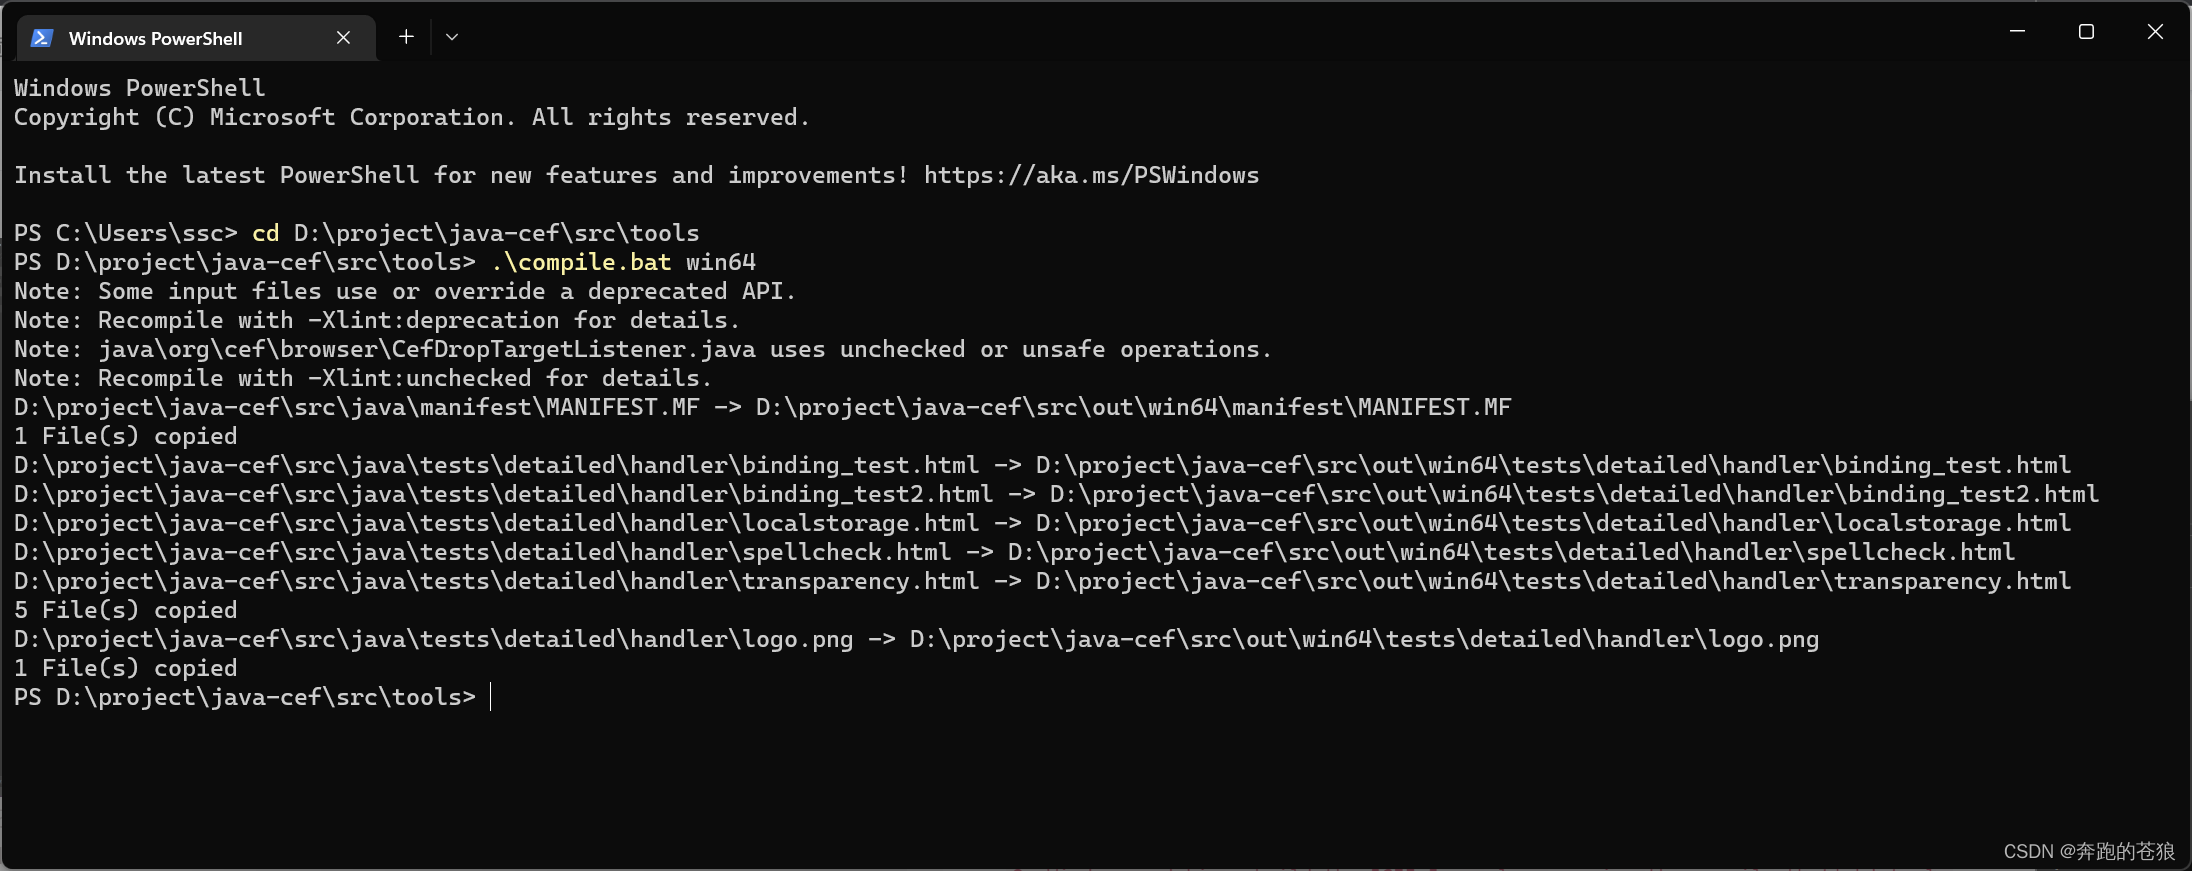
cd /path/to/java-cef/src/tools
.\compile.bat win64
On Mac OS X the JCEF Java classes are already built by the CMake project.
(在Mac OS X上,JCEF Java 的 class 文件已经由 CMake 项目构建。)
4. test that the resulting build works(测试生成的构建是否有效)
此步为运行可跳过,仅为测试 CMake 是否成功。
On Windows and Linux test that the resulting build works using the run.[bat|sh] tool. You can either run the simple example (see java/simple/MainFrame.java) or the detailed one (see java/detailed/MainFrame.java) by appending "detailed" or "simple" to the run.[bat|sh] tool. This example assumes that the "Release" configuration was built in step 1 and that you want to use the detailed example.
(在 Windows 上使用 run.bat,或在 Linux 上使用 run.sh 工具测试生成的构建是否有效。您可以运行那个 simple 的示例(请参阅 java/simple/mainframe.java)或 detailed 的示例(请参阅 java/detailed/mainframe.java),方法是在 run.bat 或 run.sh 命令后面附加“detailed”或“simple”。本例假设“release”配置是在步骤1中构建的,并且您希望使用 detailed 的示例。)
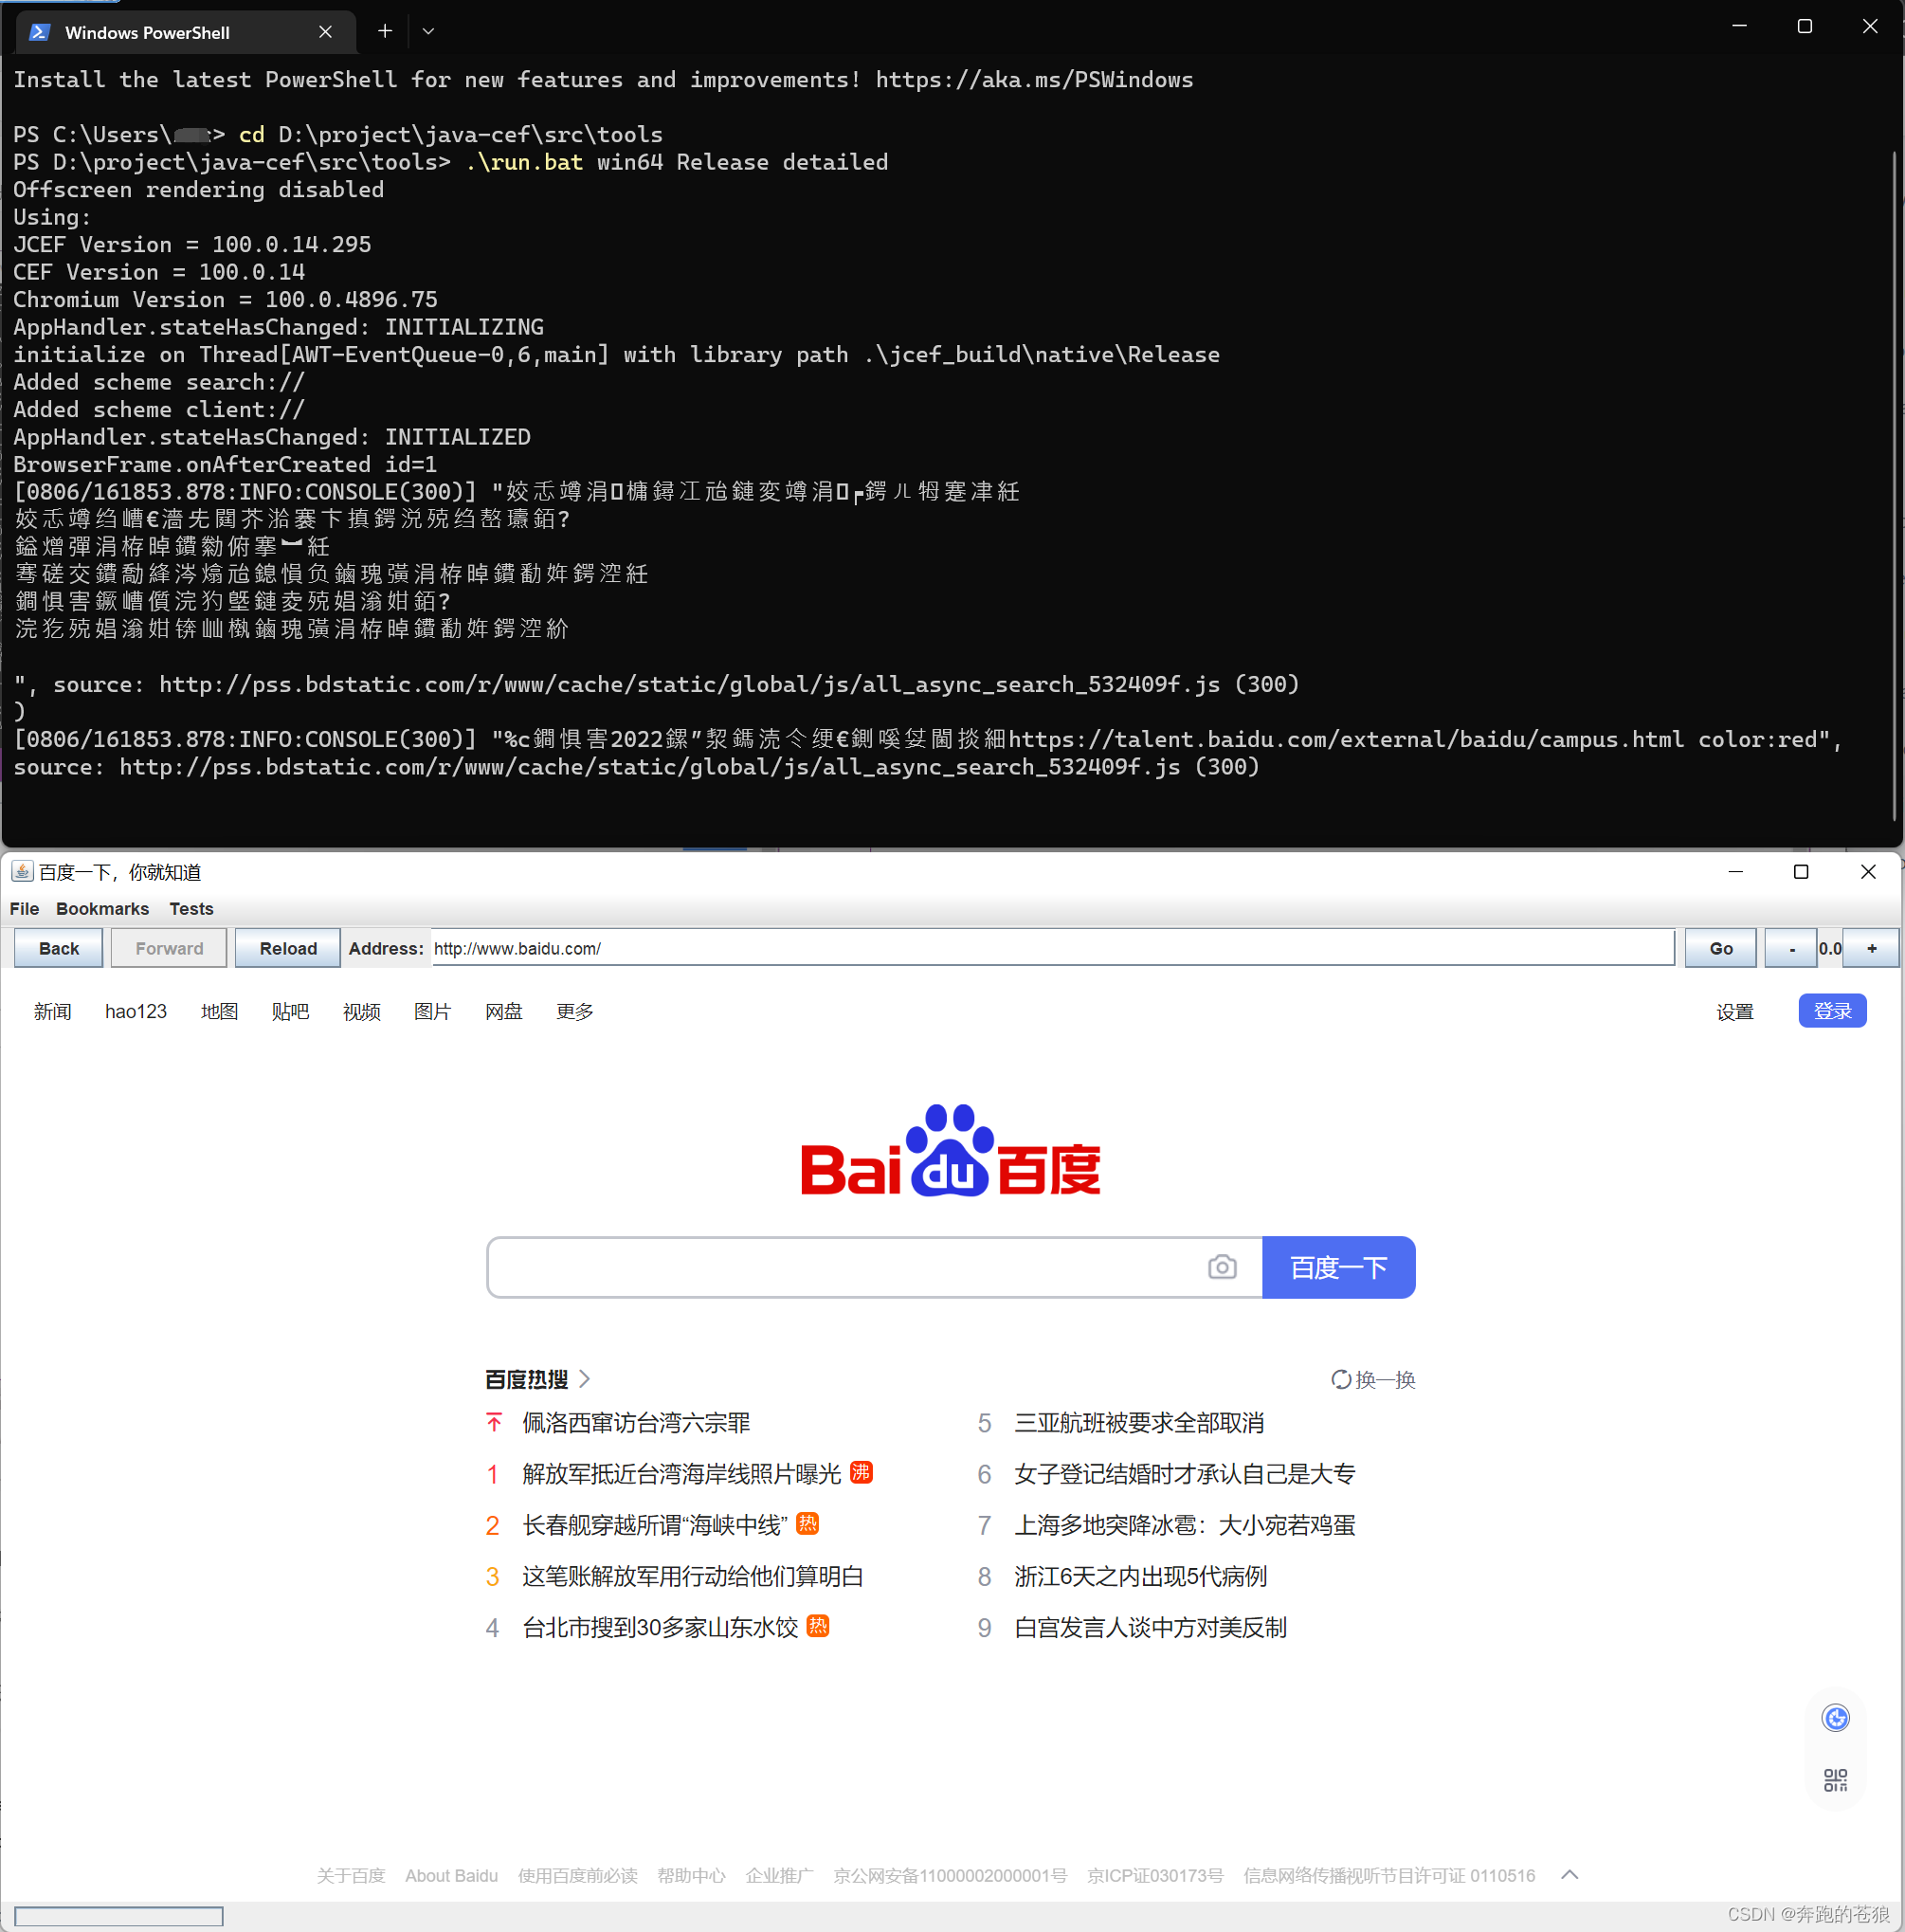
cd /path/to/java-cef/src/tools
.\run.bat win64 Release detailed
.\run.bat win64 Release simple
On Mac OS X run jcef_app for the detailed example. Either use the command-line or double-click on jcef_app in Finder.
(在 Mac OS X 上运行 jcef_app 获取 detailed 的示例。使用命令行或双击 Finder 中的 jcef_app 也行。)
cd /path/to/java-cef/src/jcef_build/native/Release
open jcef_app.app
III. Packaging(打包)
After building the Release configurations you can use the make_distrib.[bat|sh] script to create a binary distribution.
(在 VS 生成解决方案之后,您可以使用 make_distrib.bat 或 make_distrib.sh 脚本创建一个 binary distribution。)
cd /path/to/java-cef/src/tools
.\make_distrib.bat win64
If the process succeeds a binary distribution package will be created in the /path/to/java-cef/src/binary_distrib directory. See the README.txt file in that directory for usage instructions.
(如果进程成功,将在/path/to/java-cef/src/binary_distrib目录中创建 binary distribution 包。有关用法说明,请参阅该目录中的 readme.txt 文件。)
四、终于搞完了
我们打开这个文件夹:D:\project\java-cef\src\binary_distrib\win64
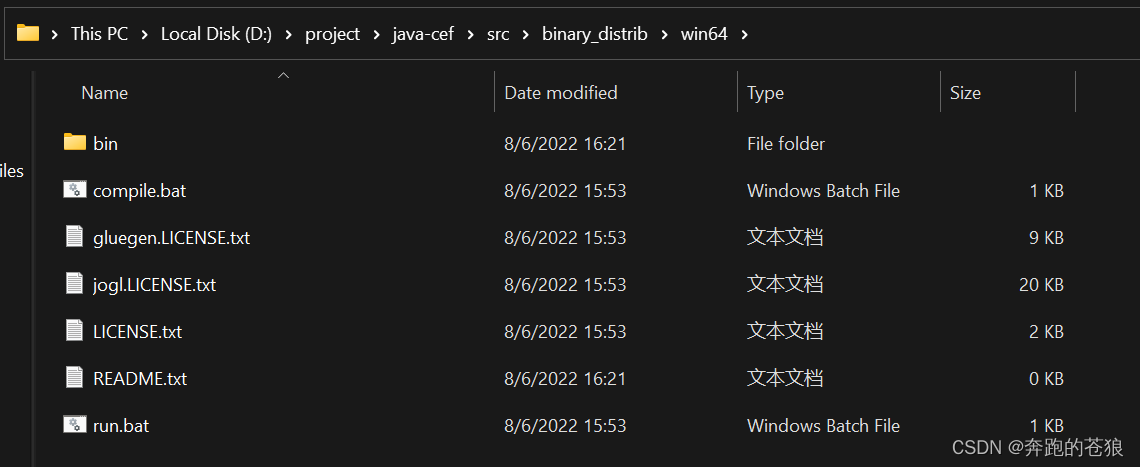
其中 bin 文件夹为 jar 相关文件,整个文件夹都是。
主要需要这些文件引入到使用 JCEF 的项目中。

本人打包的各版本(不一定有哪些版本,也不一定是最新版版,看心情更新)
可以在这里下载:百度网盘 提取码: 1n7x(链接可能会失效,请评论让我更正)
五、参考文章(非“相关链接”中的网站)
在此,对以下文章表示感谢。


 2307
2307

 被折叠的 条评论
为什么被折叠?
被折叠的 条评论
为什么被折叠?
 到【灌水乐园】发言


