


文章目录
Bitmap介绍
Bitmap 是一种图像表示,用于存储图像数据的像素矩阵。它使用一个矩阵保存图像的像素信息。每个像素都有颜色信息,通常以 RGB(红色、绿色、蓝色)三通道表示。Android 还支持透明度通道,即 ARGB 模式,常见的有:
- ARGB_8888:表示每个像素包含 32 位(8 位 Alpha,8 位 Red,8 位 Green,8 位 Blue),是最常用的配置,图像质量高。
- RGB_565:每个像素包含 16 位(5 位 Red,6 位 Green,5 位 Blue),图像质量稍低,但占用的内存较少。
- ALPHA_8:每个像素只包含 8 位透明度,常用于遮罩。
更详细的参见下面要介绍的 BitmapFactory.Config。
创建 Bitmap
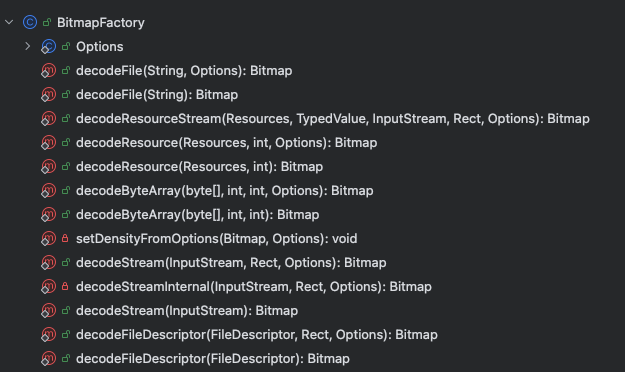
创建 Bitmap 的方法有多种,具体方式取决于使用场景。比如可以通过 BitmapFactory 从资源、文件、字节数组等创建:
列举其中的几种创建方式:
//1、从资源文件创建 Bitmap
val bitmapFromResource = BitmapFactory.decodeResource(resources, R.drawable.example_image)

//2、从文件创建 Bitmap
val bitmapFromFile = BitmapFactory.decodeFile("/path/to/image.jpg")

//3、从字节数组创建 Bitmap
val byteArray: ByteArray = ...
val bitmapFromByteArray = BitmapFactory.decodeByteArray(byteArray, 0, byteArray.size)

//4、从从输入流解码成 Bitmap
lifecycleScope.launch {
      flow<Bitmap> {
         runCatching {
            val inputStream = URL("https://img0.baidu.com/it/u=264197520,340791108&fm=253&fmt=auto&app=120&f=JPEG?w=570&h=380").openStream()
            val bitmap = BitmapFactory.decodeStream(inputStream)
            emit(bitmap)
          }
      }
      .flowOn(Dispatchers.IO)
      .collectLatest { bm ->
          log("在线图片大小 -> width:${bm.width}, height:${bm.height}, " +
                            "allocationByteCount:${bm.allocationByteCount}=${bm.allocationByteCount / 1024} KB")
    }
}
//执行结果:在线图片大小 -> width:570, height:380, allocationByteCount:866400=846 KB

//5、创建一个宽度 200px,高度 200px 的 ARGB_8888 格式的空白 Bitmap
val emptyBitmap = Bitmap.createBitmap(200, 200, Bitmap.Config.ARGB_8888)
emptyBitmap.eraseColor(Color.RED) // 直接用颜色填充空白 Bitmap
BitmapFactory.Options
用于控制解码位图的设置类,它提供了一系列选项来配置图片的加载和处理。使用 BitmapFactory.Options 可以更有效地处理图片资源,尤其在内存优化、缩放加载、复用位图等方面。下面列举一些常用字段:
- inJustDecodeBounds:只获取图片的宽高等信息,不实际加载图片数据。当只想知道图片的尺寸而不想占用内存时,可以设置该值为 true。
- outWidth 和 outHeight:用于获取图片的宽度和高度信息。当inJustDecodeBounds设置为true时,options.outWidth 和 options.outHeight 可以分别获取到图片的宽度和高度,而不会实际加载整个图片到内存中。示例:
val options = BitmapFactory.Options().apply {
    inJustDecodeBounds = true
}
BitmapFactory.decodeResource(resources, R.drawable.sample_image, options)
val imageWidth = options.outWidth
val imageHeight = options.outHeight
- inSampleSize:用于缩小图片的大小加载。比如当 inSampleSize = 2 时,图片宽高都会被缩小为原来的一半(1/4的像素),从而减少内存开销。
val options = BitmapFactory.Options().apply {
    inSampleSize = 2
}
val bitmap = BitmapFactory.decodeResource(resources, R.drawable.sample_image, options)
- inPreferredConfig:设置解码时的位图配置(
BitmapFactory.Config类型,默认是Bitmap.Config.ARGB_8888),它决定了位图像素的存储格式和颜色深度,直接影响内存占用。
val options = BitmapFactory.Options().apply {
    inPreferredConfig = Bitmap.Config.RGB_565
}
val bitmap = BitmapFactory.decodeResource(resources, R.drawable.sample_image, options)
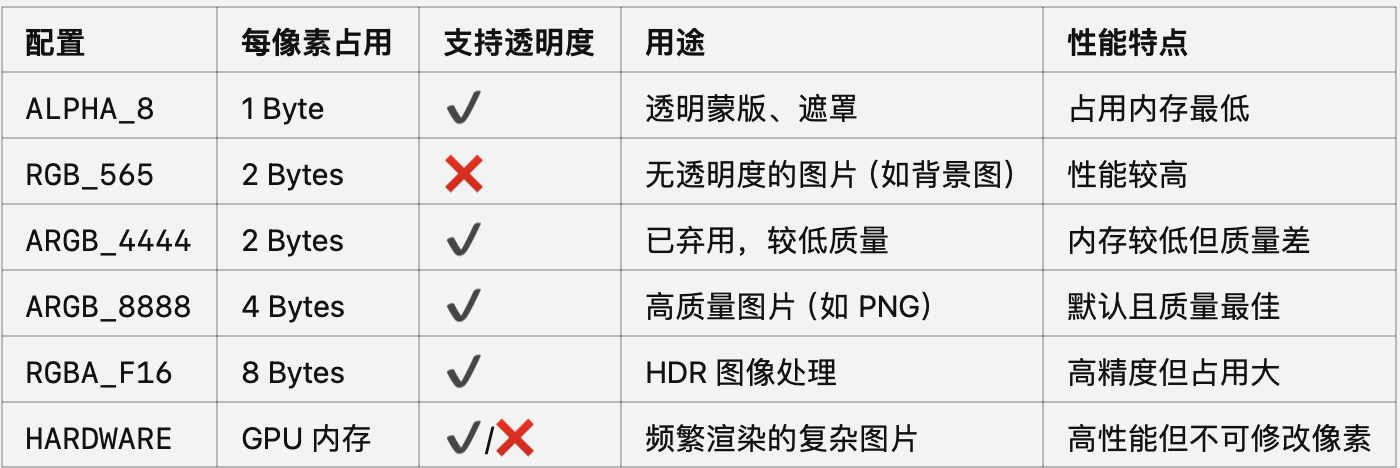
BitmapFactory.Config 定义了像素存储格式的枚举类型,它决定了每个像素使用多少位以及如何存储颜色值,详细配置如下:
- inMutable:是否生成可变的位图。当设置为 true 时,生成的 Bitmap 可以被修改。
val options = BitmapFactory.Options().apply {
    inMutable = true
}
val bitmap = BitmapFactory.decodeResource(resources, R.drawable.sample_image, options)
bitmap?.setPixel(0, 0, Color.RED)  // 修改像素
- inBitmap:复用已存在的位图内存,减少内存分配和回收的开销。
val options = BitmapFactory.Options()
options.inMutable = true //设置为可变位图
//创建第一个位图
val reusableBitmap = BitmapFactory.decodeResource(resources, R.drawable.icon_cat_w, options)
reusableBitmap.run {
     log("1、reusableBitmap -> height:$height, width:$width, byteCount:$byteCount, allocationByteCount:$allocationByteCount")
}
//准备复用第一个已存在的位图
options.inBitmap = reusableBitmap
//复用第一个位图
val targetBitmap = BitmapFactory.decodeResource(resources, R.drawable.icon_compose, options)
targetBitmap.run {
      log("2、targetBitmap -> height:$height, width:$width, byteCount:$byteCount, allocationByteCount:$allocationByteCount")
}
log("3、reusableBitmap: ${reusableBitmap.hashCode()}, targetBitmap: ${targetBitmap.hashCode()}")
执行结果:
1、reusableBitmap -> height:786, width:1100, byteCount:3458400, allocationByteCount:3458400
2、targetBitmap -> height:458, width:424, byteCount:776768, allocationByteCount:3458400
3、reusableBitmap: 98561878, targetBitmap: 98561878
可以看到3处hashCode的值是一样的,说明Bitmap确实复用了 需要注意宽高只能从大往小复用,反之复用会报错。
- inDensity 和 inTargetDensity:inDensity 是指图片资源的像素密度。inTargetDensity 是指当前设备的目标像素密度。如果两者不同,系统会根据这些密度信息缩放图片以适应屏幕分辨率。
- outMimeType:表示解码后的图像格式(MIME类型),如 image/png、image/jpeg 等。此字段不会影响解码过程,但会在解码后保存图像的类型信息。
- inScaled:是否根据 inDensity 和 inTargetDensity 缩放图像。如果设置为 true,图像将根据这两个值进行缩放。
Bitmap常用方法
- getWidth()、getHeight():返回 Bitmap 的宽度和高度。
- getByteCount() / getAllocationByteCount():getByteCount()返回位图实际像素数据所占用的内存大小,与实际图像大小有关,且不受回收重用机制的影响; 而getAllocationByteCount() 返回 Bitmap 所占的内存分配的大小,这个大小不仅包括实际像素数据,还可能包括为了复用内存而预分配的额外空间。比如在使用 inBitmap(在 BitmapFactory.Options 中启用复用机制)时有意义,因为这个方法会返回实际分配的内存大小,可能比 getByteCount() 大。即:
getAllocationByteCount() >= getByteCount() - getConfig(): BitmapFactory.Config类型,具体值上面已经介绍过了。
- recycle():手动释放 Bitmap 所占用的内存资源,当 Bitmap 不再需要时调用它来避免内存泄漏。
- isRecycled():isRecycled() 用来判断 Bitmap 是否已经被回收。调用 recycle() 方法后,Bitmap 被标记为回收状态,内存被释放,此时该对象不再可用,访问它会导致异常。
val bitmap = BitmapFactory.decodeResource(resources, R.drawable.sample_image)
// 回收 bitmap
bitmap.recycle()
// 检查是否已经回收
if (bitmap.isRecycled) {
    println("Bitmap 已经被回收")
}
- isMutable():isMutable() 用来检查 Bitmap 是否可以被修改。默认情况下,解码后的位图是不可变的(immutable),如果 Bitmap 是可变的(mutable),你可以对它进行像素操作。
- setPixel / getPixel:获取或设置 Bitmap 指定位置的像素颜色值。
- copy(Config config, boolean isMutable):复制一个位图,且互相不影响。示例:
val originalBitmap = BitmapFactory.decodeResource(resources, R.drawable.sample_image)

// 复制一个新的Bitmap,使用相同的颜色配置,并使其可变
val copiedBitmap = originalBitmap.copy(Bitmap.Config.ARGB_8888, true)

// 修改新Bitmap的一个像素
copiedBitmap.setPixel(10, 10, Color.RED)

// 打印两者的宽高,验证是两个不同的位图对象
println("Original bitmap width: ${originalBitmap.width}, height: ${originalBitmap.height}")
println("Copied bitmap width: ${copiedBitmap.width}, height: ${copiedBitmap.height}")
println("hashCode: ${originalBitmap.hashCode()}, ${copiedBitmap.hashCode()}")
执行结果:
17:28:14.286  E  Original bitmap width: 132, height: 132
17:28:14.286  E  Copied bitmap width: 132, height: 132
17:28:14.286  E  hashCode: 6852914, 124731011
可以看到宽高都是一样的,且两个Bitmap的hashCode并不一样,可以理解copy是一次深拷贝。
- eraseColor(@ColorInt int c):将位图的所有像素填充为指定的颜色。如:
bitmap.eraseColor(Color.BLUE) - compress(CompressFormat format, int quality, OutputStream stream):将位图压缩为指定格式(如 PNG、JPEG)并输出到一个流中。通常用于保存或传输位图。示例:
val outputStream = FileOutputStream(File("/path/to/output.jpg"))
bitmap.compress(Bitmap.CompressFormat.JPEG, 90, outputStream)
outputStream.close()
Bitmap 常见优化手段
由于 Bitmap 对象占用大量内存,在使用和处理大量图像时,需要对内存进行有效管理。以下是常见的优化手段:
使用 inSampleSize 对大图片进行缩放
为了避免加载大图片时内存溢出,可以通过 BitmapFactory.Options 中的 inSampleSize 对图像进行缩放加载。
val options = BitmapFactory.Options()
options.inJustDecodeBounds = true // 只加载图片的尺寸,不加载图片内容
BitmapFactory.decodeResource(resources, R.drawable.large_image, options)

val imageHeight = options.outHeight
val imageWidth = options.outWidth

// 计算合适的 inSampleSize
options.inSampleSize = calculateInSampleSize(options, reqWidth = 100, reqHeight = 100)

// 重新加载缩小后的图片
options.inJustDecodeBounds = false
val scaledBitmap = BitmapFactory.decodeResource(resources, R.drawable.large_image, options)

// 计算缩放比例的方法
fun calculateInSampleSize(options: BitmapFactory.Options, reqWidth: Int, reqHeight: Int): Int {
    val height = options.outHeight
    val width = options.outWidth
    var inSampleSize = 1
    if (height > reqHeight || width > reqWidth) {
        val halfHeight = height / 2
        val halfWidth = width / 2
        while ((halfHeight / inSampleSize) >= reqHeight && (halfWidth / inSampleSize) >= reqWidth) {
            inSampleSize *= 2
        }
    }
    return inSampleSize
}
回收 Bitmap
当 Bitmap 不再需要时,应当调用 recycle() 方法来释放内存。
bitmapFromResource.recycle()
注意:在调用 recycle() 之后不能再访问这个 Bitmap,否则会抛出异常。
Bitmap 与 Drawable 互转
- 从 Bitmap 转换为 Drawable
val drawable = BitmapDrawable(resources, bitmap)
- 从 Drawable 转换为 Bitmap
fun drawableToBitmap(drawable: Drawable): Bitmap {
    if (drawable is BitmapDrawable) {
        return drawable.bitmap
    }

    val bitmap = Bitmap.createBitmap(drawable.intrinsicWidth, drawable.intrinsicHeight, Bitmap.Config.ARGB_8888)
    val canvas = Canvas(bitmap)
    drawable.setBounds(0, 0, canvas.width, canvas.height)
    drawable.draw(canvas)
    return bitmap
}
Bitmap 的内存管理变化
Android 2.x 及之前版本:
在 Android 2.x(API Level 10 及以下)中,Bitmap 对象的像素数据存储在 Native 层的堆内存中,而 Bitmap 对象本身存储在 Dalvik 堆 中(Java 层)。因此,当处理 Bitmap 时,虽然使用的是 Java 对象,但其实际像素数据存储在 Native 层。Java 垃圾回收器(GC)无法直接管理这些 Native 堆中的资源,所以必须调用 Bitmap.recycle() 方法来手动释放像素内存。Android 3.0(API Level 11):
从 Android 3.0 开始,Bitmap 的像素数据的内存管理发生了变化。为了简化内存管理,Android 将 Bitmap 对象的 像素数据存储从 Native 层移到了 Dalvik 层的堆内存。这样,Java 层和像素数据都位于 Dalvik 堆中,简化了内存管理,因为 Java 垃圾回收器能够一并管理和回收这些对象。优点是方便了管理,且Java 的垃圾回收机制能管理整个 Bitmap 对象的内存;缺点也很明显,Dalvik 虚拟机的堆内存相对有限,大量或大尺寸的 Bitmap 操作容易导致内存不足的问题(OOM)。Android 8.0(API Level 26)及之后的版本:
从 Android 8.0 开始,Bitmap 像素数据的存储再次发生变化。Bitmap 的像素数据又回到了 Native 堆,而 Bitmap 对象本身依旧存放在 Java 堆中。Android 8.0 引入了更加先进的内存管理机制,同时减少了 Dalvik/ART 堆内存的压力,不会轻易遇到内存不足问题。


 118
118

 被折叠的 条评论
为什么被折叠?
被折叠的 条评论
为什么被折叠?
 到【灌水乐园】发言


