


1 n2n简介
为了满足两个不同局域网的机器进行通信,让不同网段的机器能够进行P2P( 点对点 peer-to-peer ) 通信。
2 n2n源码
https://github.com/ntop/n2n.git
3 n2n名词
3.1 SuperNode 超级节点
SuperNode 相当与注册中心, 它会记录边缘节点的连接信息,告诉各个边缘节点如何去找到其它的边缘节点。如果超级节点发生故障,那么边缘节点之间将不能正常的进行通信。在整个N2N网络中必须至少拥有一个SuperNode。
3.2 Edge 边缘节点
边缘节点是指所有通过 SuperNode 组网而成的节点,无论你处于哪个位置哪种网络环境下,edge节点之间都能进行通信。一台计算机可以拥有多个edge, 局域网根据子网掩码来决定两台机器是否处于同一个网段,而edge需要添加一组账号密码,在N2N 里面称作 GroupName 和 password ,Group0 和 Group 1 里面的 10.0.0.1 是不一样的。
4 n2n配置
版本:
Welcome to n2n v.2.8.0 for Debian
4.1 下载n2n
#创建一个 n2n 的目录,用于存放各版本源码
mkdir n2n

#进入n2n 目录
cd n2n
#下载 n2n 包
git clone https://github.com/ntop/n2n.git
#进入n2n-3.1.1目录
cd n2n
4.2 安装依赖
# 安装 openssl
yum install -y openssl-devel  cmake  net-tools  gcc gcc-c++
4.3 进行编译
4.3.1 第一步
# 新建 build 目录
cmake -E make_directory build
# 进入 build 目录
cd build
# 在当前目录生成 makefile
cmake ..
# cmake 的执行结果:
-- The C compiler identification is GNU 4.8.5
-- The CXX compiler identification is GNU 4.8.5
-- Check for working C compiler: /usr/bin/cc
-- Check for working C compiler: /usr/bin/cc -- works
-- Detecting C compiler ABI info
-- Detecting C compiler ABI info - done
-- Check for working CXX compiler: /usr/bin/c++
-- Check for working CXX compiler: /usr/bin/c++ -- works
-- Detecting CXX compiler ABI info
-- Detecting CXX compiler ABI info - done
-- Build for version: 3.1.1-76-g709590d
-- Configuring done
-- Generating done
-- Build files have been written to: /home/n2n/n2n/build
4.3.2 第二步
# 编译过程中会有一些告警提示,可以忽略
cmake --build . --config Release
#编译过程
/usr/bin/cmake -H/home/n2n/n2n -B/home/n2n/n2n/build --check-build-system CMakeFiles/Makefile.cmake 0
/usr/bin/cmake -E cmake_progress_start /home/n2n/n2n/build/CMakeFiles /home/n2n/n2n/build/CMakeFiles/progress.marks
/usr/bin/gmake -f CMakeFiles/Makefile2 all
gmake[1]: Entering directory `/home/n2n/n2n/build'
/usr/bin/gmake -f CMakeFiles/doc.dir/build.make CMakeFiles/doc.dir/depend
gmake[2]: Entering directory `/home/n2n/n2n/build'
....................
gmake[2]: Leaving directory `/home/n2n/n2n/build'
/usr/bin/cmake -E cmake_progress_report /home/n2n/n2n/build/CMakeFiles  52
[100%] Built target tests-wire
gmake[1]: Leaving directory `/home/n2n/n2n/build'
/usr/bin/cmake -E cmake_progress_start /home/n2n/n2n/build/CMakeFiles 0
4.3.3 第三步
# 将编译后的执行文件安装到 sbin 或 bin 目录下
make install
# 编译安装目标目录示例
[100%] Built target tests-wire
make[1]: Leaving directory `/home/n2n/n2n/build'
/usr/bin/cmake -E cmake_progress_start /home/n2n/n2n/build/CMakeFiles 0
make -f CMakeFiles/Makefile2 preinstall
make[1]: Entering directory `/home/n2n/n2n/build'
make[1]: Nothing to be done for `preinstall'.
make[1]: Leaving directory `/home/n2n/n2n/build'
Install the project...
/usr/bin/cmake -P cmake_install.cmake
-- Install configuration: ""
-- Installing: /usr/local/sbin/edge
-- Installing: /usr/local/sbin/supernode
-- Installing: /usr/local/bin/n2n-benchmark
-- Installing: /usr/share/man/man8/edge.8.gz
-- Installing: /usr/share/man/man1/supernode.1.gz
-- Installing: /usr/share/man/man7/n2n.7.gz
4.4 设置开机自启及火墙配置
4.4.1 设置开机自启
# 先查询一下这个端口是否被占用
netstat -anp|grep 8864
# 编辑开机自启文件
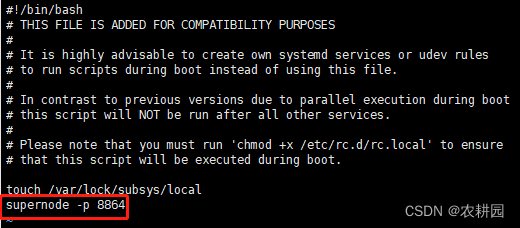
vi /etc/rc.local
4.4.2 防火墙配置
# 查看防⽕墙的状态
iptables -L -n -v --line-numbers
# 如果有需要可以给端口创建两个入站规则,这个视不同的公有云服务器的安全配置而定
iptables -I INPUT -p tcp  --dport 8864 -j ACCEPT
iptables -I INPUT -p udp  --dport 8864 -j ACCEPT
4.4.3 重启
reboot
4.5 验证
查看进程是否进行
# 检查 supernode 进程是否已运行
netstat -anp|grep `ps -ef|grep supernode|grep -v grep|awk {'print $2'}`

5 Linux 环境 edge 的编译、配置与启动
5.1 配置n2n启动脚本
vi /etc/init.d/n2n
#!/bin/sh
### BEGIN INIT INFO
# Provides:          n2n
# Required-Start:    $network $remote_fs $local_fs
# Required-Stop:     $remote_fs $local_fs
# Default-Start:     2 3 4 5
# Default-Stop:      0 1 6
# Short-Description: Start or stop the n2n VPN
# Description:       This script controls the n2n VPN service.
#                    It is called from the boot, halt and reboot scripts.
#                    So far, only 1 PVN is supported by this script.
#                    More can be started via the command line.
### END INIT INFO

set -e

# PATH should only include /usr/* if it runs after the mountnfs.sh script
PATH=/sbin:/usr/sbin:/bin:/usr/bin
DESC='n2n P2P VPN'
NAME=n2n
#DAEMON=/usr/sbin/edge
DAEMON=/usr/local/sbin/edge
DAEMON_ARGS=""
# Arguments to run the daemon with
#PIDFILE=/var/run/$NAME-edge.pid
SCRIPTNAME=/etc/init.d/$NAME
# Exit if the package is not installed
[ -x "$DAEMON" ] || exit 0

# Check config
if [ ! -f "/etc/default/edge.conf" ]
then
	echo "Warning: n2n VPN client is not configured, edit config file in /etc/default/edge.conf." 1>&2
	exit 0
fi

# Load the VERBOSE setting and other rcS variables
. /lib/init/vars.sh
. /lib/lsb/init-functions

## Make sure /var/run/n2n exists.
#if [ ! -e /var/run/$NAME ] ; then
#	mkdir -p /var/run/$NAME
#	chown proxy:proxy /var/run/$NAME
#	chmod 755 /var/run/$NAME
#fi

# Function that starts the daemon/service
#
do_start()
{
	if [ -r /sys/class/net/edge0 ]; then
	 echo edge node is already running.
	 exit 0
	fi

	# Return
	#   0 if daemon has been started
	#   1 if daemon was already running
	#   2 if daemon could not be started
	start-stop-daemon --start --quiet --user nobody --exec $DAEMON --test > /dev/null \
		|| return 1
	start-stop-daemon --start --quiet --user nobody --exec $DAEMON -- \
		/etc/default/edge.conf \
		|| return 2
}

#
# Function that stops the daemon/service
#
do_stop()
{
	# Return
	#   0 if daemon has been stopped
	#   1 if daemon was already stopped
	#   2 if daemon could not be stopped
	#   other if a failure occurred
	start-stop-daemon --stop --quiet --retry=TERM/30/KILL/5 --user nobody --exec $DAEMON
	RETVAL="$?"
	[ "$RETVAL" = 2 ] && return 2
	# Wait for children to finish too if this is a daemon that forks
	# and if the daemon is only ever run from this initscript.
	# If the above conditions are not satisfied then add some other code
	# that waits for the process to drop all resources that could be
	# needed by services started subsequently.  A last resort is to
	# sleep for some time.
	start-stop-daemon --stop --quiet --oknodo --retry=0/30/KILL/5 --exec $DAEMON
	[ "$?" = 2 ] && return 2
	# Many daemons don't delete their pidfiles when they exit.
	rm -f $PIDFILE
	return "$RETVAL"
}

#
# Function that sends a SIGHUP to the daemon/service
#
do_reload() {
	#
	# If the daemon can reload its configuration without
	# restarting (for example, when it is sent a SIGHUP),
	# then implement that here.
	#
	start-stop-daemon --stop --signal 1 --quiet --name $NAME
	return 0
}

case "$1" in
  start)
	[ "$VERBOSE" != no ] && log_daemon_msg "Starting $DESC " "$NAME"
	do_start
	case "$?" in
		0|1) [ "$VERBOSE" != no ] && log_end_msg 0 ;;
		2) [ "$VERBOSE" != no ] && log_end_msg 1 ;;
	esac
	# 修改虚拟网卡速度,n2n默认是10M/S,修改为1000M/S
	ethtool -s edge0 speed 1000 duplex full autoneg off
	;;
  stop)
	[ "$VERBOSE" != no ] && log_daemon_msg "Stopping $DESC" "$NAME"
	do_stop
	case "$?" in
		0|1) [ "$VERBOSE" != no ] && log_end_msg 0 ;;
		2) [ "$VERBOSE" != no ] && log_end_msg 1 ;;
	esac
	;;
  status)
	status_of_proc "$DAEMON" "$NAME" && exit 0 || exit $?
	;;
  #reload|force-reload)
	#
	# If do_reload() is not implemented then leave this commented out
	# and leave 'force-reload' as an alias for 'restart'.
	#
	#log_daemon_msg "Reloading $DESC" "$NAME"
	#do_reload
	#log_end_msg $?
	#;;
  restart|force-reload)
	#
	# If the "reload" option is implemented then remove the
	# 'force-reload' alias
	#
	log_daemon_msg "Restarting $DESC" "$NAME"
	do_stop
	case "$?" in
	  0|1)
		do_start
		case "$?" in
			0) log_end_msg 0 ;;
			1) log_end_msg 1 ;; # Old process is still running
			*) log_end_msg 1 ;; # Failed to start
		esac
		;;
	  *)
		# Failed to stop
		log_end_msg 1
		;;
	esac
	;;
  *)
	N=/etc/init.d/$NAME
	#echo "Usage: $SCRIPTNAME {start|stop|restart|reload|force-reload}" >&2
	echo "Usage: $SCRIPTNAME {start|stop|status|restart|force-reload}" >&2
	exit 3
	;;
esac

exit 0
5.2 配置edge.conf脚本
在/etc/default/目录下创建edge.conf配置文件:
#
#         The configuration file is similar to the command line, with one option per line. An equal
#        sign '=' should be used between key and value. Example: -c=mynetwork or --community=mynetwork
#        This file contains a basic configuration example, please refer to the help (-h) for the full
#        list of available options.
#
#       -d|--tun-device
#        Specifies the name of the TUN interface.
#
#-d=tap0
#
#       -c|--community
#        Specifies the n2n community name the edge belongs to.
#
-c=
#
#       -k
#        Sets the encryption key (ASCII). The environment variable N2N_KEY=<key> can also be used.
#
-k=
#
#       -m
#        Specified the MAC address for the TAP interface (random otherwise).
#
# -m=5E:57:77:58:7F:77
#
#       -a
#        Sets the interface address. For DHCP use '-r -a dhcp:0.0.0.0'.
#
-a=16.16.16.25
#
#       -p
#        Sets the local UDP port to a fixed port.
#
-p=60000
#
#       -l|--supernode-list
#        Specifies the supernode IP and port.
#
-l=168.324.678.8:8864
#
#       -z1 ... -z2| compress outgoing data packets,
#        -z1 = lzo1x,
#        disabled by default
#
-z1
#
#
-bHEerejer
5.3 n2n服务启动
#n2n 服务启动
systemctl daemon-reload
#n2n 服务启动
systemctl start n2n

#n2n 服务状态查询
systemctl status n2n

#n2n 服务停止
systemctl stop n2n
6 windows环境部署
7 常见问题
问题1:开机启动后/etc/rc.local supdernode没有生效
排查方法:
是rc.local没有执行权限导致
解决方法:
第一种方法:直接加权限
[root@master ~]# ls -l   /etc/rc.local
lrwxrwxrwx. 1 root root 13 Sep 17 19:58 /etc/rc.local -> rc.d/rc.local
[root@master ~]#
[root@master ~]#
[root@master ~]# chmod +x /etc/rc.local
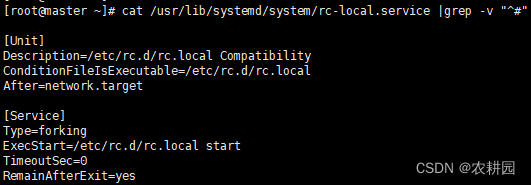
第二种方法:
rc-local服务配置路径为/usr/lib/systemd/system/rc-local.service。在[Unit]模块中添加或修改Requires和After项值为network-online.target。
cat /usr/lib/systemd/system/rc-local.service |grep -v “^#” #过滤掉注释


 3310
3310


 被折叠的 条评论
为什么被折叠?
被折叠的 条评论
为什么被折叠?
 到【灌水乐园】发言


