


记录学习PART 7: BACKGROUND SESSIONS内容
Networking with URLSession: Background Session
background session
background transfers在app在后台或者任何原因导致的app崩溃时,都会继续下载。在上一节下载音乐的例子中可能用处不大,但是在下载比较大的文件时,却是非常有用的。
参考URLSession Tutorial: Getting Started
But if your app isn’t running, how can this work? The OS runs a separate daemon outside the app to manage background transfer tasks, and it sends the appropriate delegate messages to the app as the download tasks run. In the event the app terminates during an active transfer, the tasks will continue to run unaffected in the background.
app未运行,OS在app外运行一个单独的守护线程来管理background transfer task,并在下载task运行时将适当的委托消息发送到app。在传输期间终止app,task将在后台继续运行不受影响
具体过程,参考Using NSURLSession中的Background Transfer Considerations一节
通过一个background session配置对象,创建background session。这个配置对象还需指定一个identifier,配置对象默认的networkServiceType是default
let configuration = URLSessionConfiguration.background(withIdentifier: “com.raywenderlich.prefetch”)
// task主要运行在background
configuration.networkServiceType = .background
background session必须有一个自定义的delegate,所以可使用如下的初始化方法
init(configuration: URLSessionConfiguration,delegate: URLSessionDelegate?, delegateQueue: OperationQueue?)delegate对象通常是一个view controller,- 把
delegateQueue设置为nil,意味着session会创建一个默认的delegateQueue
如下的初始化方式:
let session = URLSession(configuration: configuration,delegate: self, delegateQueue: nil)默认创建的delegateQueue是一个默认的serial queue,在这个queue中执行代理方法和completion handler。如下,可修改这个queue的一些属性:
let session = URLSession(configuration: configuration, delegate: self,delegateQueue: nil)
session.delegateQueue.name = "com.raywenderlich.delegateQueue"
session.delegateQueue.qualityOfService = .userInitiated同样可以自己创建concurrent queue
let delegateQueue = OperationQueue()
delegateQueue.underlyingQueue = DispatchQueue.global(qos: .userInitiated)
delegateQueue.maxConcurrentOperationCount = 2
let session = URLSession(configuration: configuration, delegate: self, delegateQueue: delegateQueue)
如果app不再需要一个session,可使用调用如下的方法,使其无效:
func invalidateAndCancel()
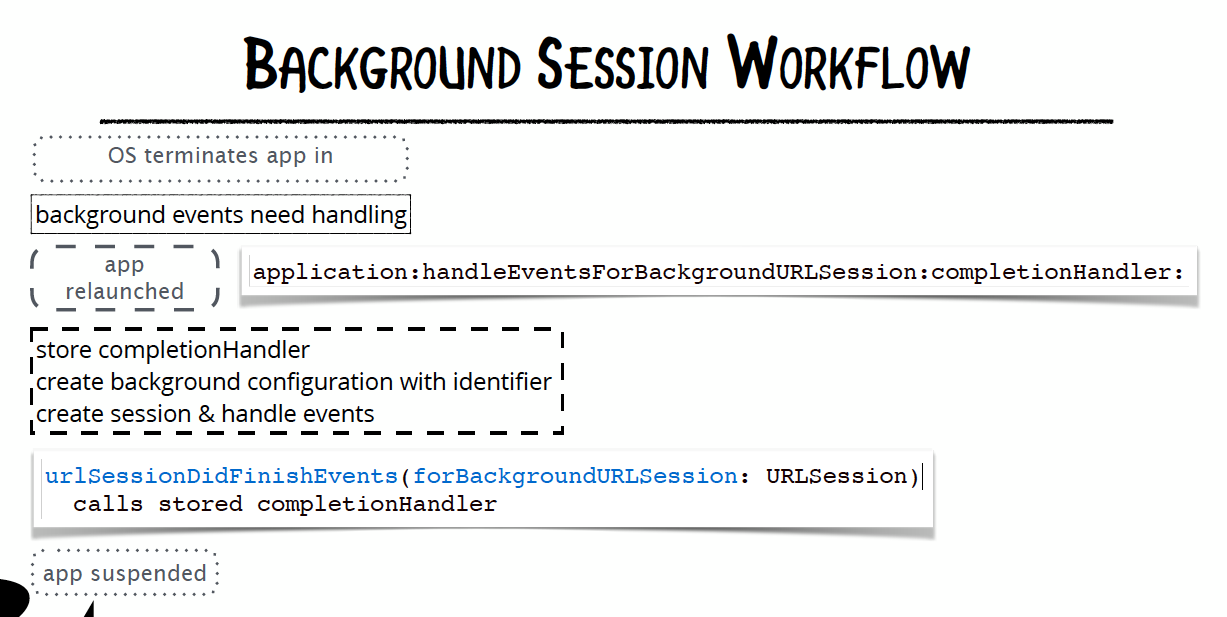
func finishTasksAndInvalidate()background session的工作流程
1.如果background session task在运行的时候app被终止了,task会在系统的后台继续进行,过了一段时间之后,task完成或者需要authentication,iOS会在后台relaunche你的app,然后调用UI Application的代理方法application:handleEventsForBackgroundURLSession:completionHandler:,这个方法会传递session的identifier和completionHandler,你的app应该保存这个completionHandler,并使用同样的identifier创建一个background configuration对象,然后使用这个配置对象创建一个session。这个新创建的session和后台的活动重新联系在一起,处理事件。过后,当session完成最后一个后台下载task,session调用session代理对象的urlSessionDidFinishEvents(forBackgroundURLSession: URLSession)方法,在这个方法里,要在主线程里调用上面保存completionHandler。这样就会告诉操作系统,现在可以安全的重新suspend你的app了
2.如果task完成,而app是在suspended状态,代理的URLSession:downloadTask:didFinishDownloadingToURL:方法会被调用
3.background session中的upload和download任务,在网络出错后,会自动的尝试重新连接,所以不需要reachability API。
background session注意事项
1.The number of system-wide concurrent background transfers is limited.
2.A background task may be cancelled if it fails to meet a system-specified throughput limit.
3.If the background transfer is initiated while the app is in the background, the task is treated as discretionary(任意的).
4.Redirects are always followed
5.Upload tasks must be from a file
SERVER-SIDE NEGOTIATIONS
Set up your back-end server with endpoints that:
- send or receive zip or tar archives
- send or receive incremental diffs for replication between the client and server
- return an upload identifier, which your app can use to track and resume the upload of data
代理
需要自定义代理对象的理由如下:
1.一个background session必须使用一个自定义的delegate,在background session中不能创建task的completion handler。
2.执行自定义的authentication或者SSL证书认证
3.检查response header,来决定whether a transfer should be downloaded to disk or displayed based on the MIME type or other response info
4.Limits caching or HTTP redirects programmatically
代理方法的分类
大致可分为4组:
1.共用的URLSessionDelegate
处理session-level层级的事件
//告知session会话已无效
func urlSession(URLSession, didBecomeInvalidWithError: Error?)
func urlSessionDidFinishEvents(forBackgroundURLSession: URLSession)如果你使用的是下载task,也要实现URLSessionDownloadDelegate协议
如果你使用的是data或者upload类型的task,也要实现URLSessionDataDelegate协议
//监测进度
func urlSession(URLSession, task: URLSessionTask,didSendBodyData: Int64, totalBytesSent: Int64,totalBytesExpectedToSend: Int64)
//完成时
func urlSession(URLSession,task:URLSessionTask,didCompleteWithError: Error?)
//重定向
func urlSession(URLSession, task: URLSessionTask, willPerformHTTPRedirection: HTTPURLResponse, newRequest: URLRequest, completionHandler: @escaping (URLRequest?) -> Void))
3.DataTask & UploadTask Events
func urlSession(URLSession, dataTask: URLSessionDataTask, didReceive: URLResponse,
completionHandler: @escaping (URLSession.ResponseDisposition) -> Void)
// ResponseDisposition: cancel, allow, becomeDownload
func urlSession(URLSession, dataTask: URLSessionDataTask,
didBecome: URLSessionDownloadTask)
func urlSession(URLSession, dataTask: URLSessionDataTask, didReceive: Data)
//处理缓存
func urlSession(URLSession, dataTask: URLSessionDataTask,
willCacheResponse: CachedURLResponse,
completionHandler: @escaping (CachedURLResponse?) -> Void)
4.Download Task Events
//下载的进度
func urlSession(URLSession, downloadTask: URLSessionDownloadTask,
didWriteData: Int64, totalBytesWritten: Int64,
totalBytesExpectedToWrite: Int64)
//下载完成
func urlSession(URLSession, downloadTask: URLSessionDownloadTask,
didFinishDownloadingTo: URL)
例子
下载
创建下载的session,并指定delegate对象
  //创建URLSession,并设置delegate
  lazy var downloadsSession: URLSession = {
    let configuration = URLSessionConfiguration.background(withIdentifier: "bgSessionConfiguration")
    return URLSession(configuration: configuration, delegate: self, delegateQueue: nil)
  }()
实现下载的代理方法:
1.完成下载
2.监听下载进度
  //完成下载
  func urlSession(_ session: URLSession, downloadTask: URLSessionDownloadTask, didFinishDownloadingTo location: URL) {
    guard let sourceURL = downloadTask.originalRequest?.url else { return }

    apiManager.activeDownloads[sourceURL] = nil

    let destinationURL = apiManager.localFilePath(for: sourceURL)

    let fileManager = FileManager.default
    try? fileManager.removeItem(at: destinationURL)
    do {
      try fileManager.copyItem(at: location, to: destinationURL)
    } catch let error {
      print("Could not copy file to disk: \(error.localizedDescription)")
    }

    if let index = trackIndex(for: downloadTask) {
      DispatchQueue.main.async {
        self.tableView.reloadRows(at: [IndexPath(row: index, section: 0)], with: .none)
      }
    }

  }

  //下载进度
  func urlSession(_ session: URLSession, downloadTask: URLSessionDownloadTask, didWriteData bytesWritten: Int64, totalBytesWritten: Int64, totalBytesExpectedToWrite: Int64) {

    if let url = downloadTask.originalRequest?.url,
      let download = apiManager.activeDownloads[url] {

      download.progress = Float(totalBytesWritten) / Float(totalBytesExpectedToWrite)
      //可以将字节转化为我们需要的Kb或者m
      let totalSize = ByteCountFormatter.string(fromByteCount: totalBytesExpectedToWrite, countStyle: .file)
      //更新UI
      if let trackIndex = trackIndex(for: downloadTask) {
                if let trackCell = tableView.cellForRow(at: IndexPath(row: trackIndex, section: 0)) as? ProgressUpdateDelegate {
                    DispatchQueue.main.async {
                        trackCell.updateDisplay(progress: download.progress, totalSize: totalSize)
                    }
                }
      }
    }

  }
ByteCountFormatter.string可参考NSByteCountFormatter
background session
1.在AppDelegate中定义一个block变量
var backgroundSessionCompletionHandler: (() -> Void)?
实现 func application(_ application: UIApplication, handleEventsForBackgroundURLSession identifier: String, completionHandler: @escaping () -> Void)方法:
  func application(_ application: UIApplication, handleEventsForBackgroundURLSession identifier: String, completionHandler: @escaping () -> Void) {
    backgroundSessionCompletionHandler = completionHandler
    //创建download session
    let configuration = URLSessionConfiguration.background(withIdentifier: identifier)
    let downloadssession = URLSession(configuration: configuration, delegate: SearchViewController(), delegateQueue: nil)
    let apiManager = APIManager()
    //指定download session
    apiManager.downloadsSession = downloadssession
  }
2.实现URLSessionDelegate的func urlSessionDidFinishEvents(forBackgroundURLSession session: URLSession)
  func urlSessionDidFinishEvents(forBackgroundURLSession session: URLSession) {
    if let appDelegate = UIApplication.shared.delegate as? AppDelegate,
      let completionHandler = appDelegate.backgroundSessionCompletionHandler {
      appDelegate.backgroundSessionCompletionHandler = nil
      //主线程调用
      DispatchQueue.main.async {
        completionHandler()
      }
    }
  }
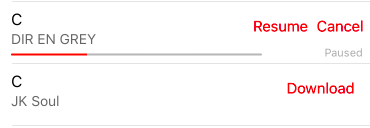
下载的效果如下:
data task使用代理
创建data task
let taskDelegate = TaskDelegate()
let delegateSession = URLSession(configuration: .ephemeral, delegate: taskDelegate, delegateQueue: nil)
delegateSession.dataTask(with: URL(string: "http://localhost:3000/posts/")!).resume()
实现URLSessionDataDelegate代理中方法,主要有三个:
1. 收到响应func urlSession(_ session: URLSession, dataTask: URLSessionDataTask, didReceive response: URLResponse, completionHandler: @escaping (URLSession.ResponseDisposition) -> Void
2.收到数据func urlSession(_ session: URLSession, dataTask: URLSessionDataTask, didReceive data: Data)
3.请求完成func urlSession(_ session: URLSession, task: URLSessionTask, didCompleteWithError error: Error?)
可参考的例子:
OperationQueue
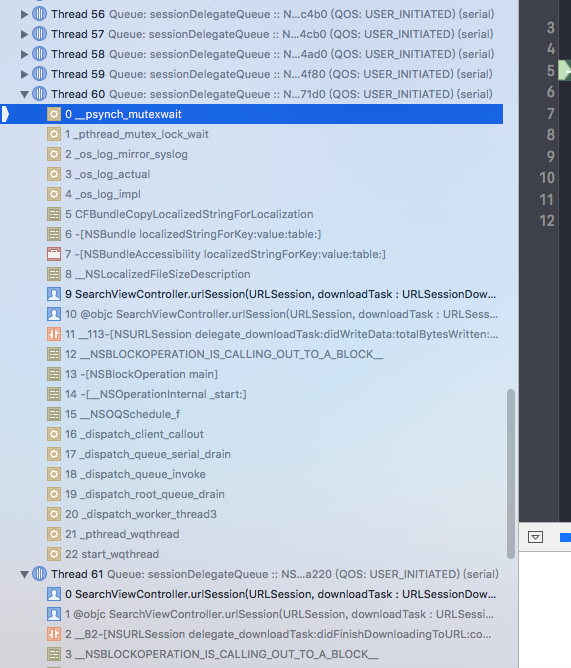
如果用如下的代码创建队列:
let delegateQueue = OperationQueue()
delegateQueue.name = "sessionDelegateQueue"
delegateQueue.qualityOfService = .userInitiated
apiManager.downloadsSession = URLSession(configuration: configuration,
delegate: self, delegateQueue: delegateQueue)
打断点,看执行的结果,会发现有许多sessionDelegateQueue线程出现,而且是serial的,只有一个是实际在执行的,其它都在waiting on a mutual exclusion (mutex) lock
如果要是想要concurrent queue,可以指定队列的underlyingQueue为一个concurrent dispatch queue
delegateQueue.underlyingQueue = DispatchQueue.global(qos: .userInitiated)
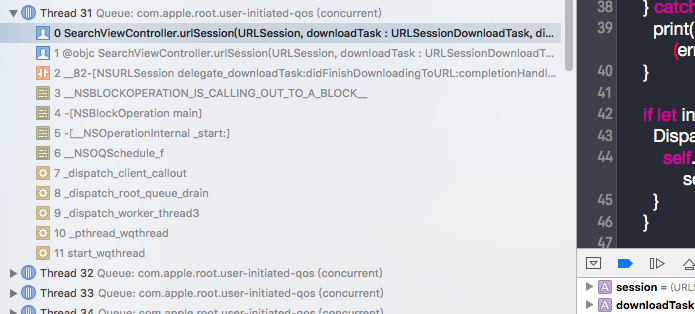
同样的打断点,继续执行,会发现更多的带有user-initiated-qos线程出现,但是还是只有一个正在执行,其它还是在等待……,这样一看,指定一个并行的underlyingQueue好像并没有什么好处,不过可以添加如下的语句后,再看:
delegateQueue.maxConcurrentOperationCount = 3
重新运行,会发现现在有2个thread正在执行。
也可以自定义队列, 如下:
// Serial private dispatch queue
let mySerialDelegateQueue = DispatchQueue(label: "serialDelegateQueue")
// Concurrent private dispatch queue
let myConcurrentDelegateQueue = DispatchQueue(label:
"concurrentDelegateQueue", attributes: .concurrent)
mySerialDelegateQueue.qos = .userInitiated


 895
895


 被折叠的 条评论
为什么被折叠?
被折叠的 条评论
为什么被折叠?
 到【灌水乐园】发言


