


iOS音频—AVAudioEngine
AVAudioEngine的说明:
A group of connected audio node objects used to generate and process audio signals and perform audio input and output.
一组相连接的audio节点,来生成和处理音频信号,执行audio的输入和输出
分别创建audio node,然后把它附加到audio engine。在运行时,可以在audio node上执行所有的操作,如connecting、disconnecting和removing,仅有如下的一些限制:
- Reconnect audio nodes only when they’re upstream of a mixer.
- If you remove an audio node that has differing input and output channel counts, or that is a mixer, the result is likely to be a broken graph.
原理说明:
- Building Modern Audio Apps with AVAudioEngine - 一些说明,可细看
- iOS AVAudioEngine
- AVAudioEngine Tutorial for iOS: Getting Started
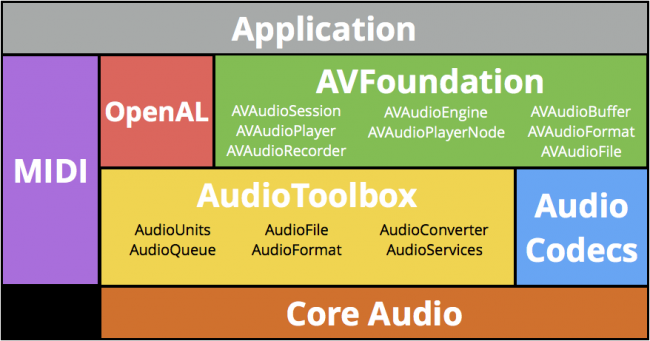
AVAudioEngine是AVFoundation的一部分
AVAudioEngine的作用:
- Manages graphs of audio nodes - 管理audio节点
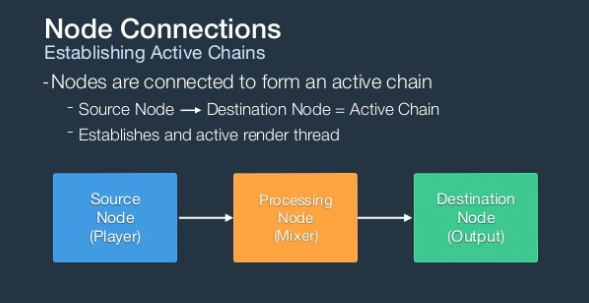
- Connects audio node into active chains - 链接audio节点
- Dynamically attach and reconfigure graph
- Start and stop the engine
AVAudioNode说明:
-
Nodes are audio blocks 节点是音频块
- Source Nodes:Player, Microphone
- Processing Nodes: Mixer, Audio Unit Effect
- Destination: Speaker, Headphones Nodes
-
AVAudioEngine提供了3个隐式的node:AVAudioInputNode- 系统输入,不能被创建AVAudioOutputNode- 系统输出,不能被创建AVAudioMixerNode- 混淆多个输入到一个输出
-
node通过它们的输入和输出总线(bus)连接
- 大多数的node只有一个输入和一个输出
AVAudioMixerNode有多个输入和一个输出
- bus有一个关联的audio format
- 大多数的node只有一个输入和一个输出
Node连接
基本使用
大致的流程:
- Create the engine
- Create the nodes
- Attach the nodes to the engine
- Connect the nodes together
- Start the engine
设置engine
    // 1. Create engine (example only, needs to be strong reference)
    AVAudioEngine *engine = [[AVAudioEngine alloc] init];
    // 2. Create a player node
    AVAudioPlayerNode *player = [[AVAudioPlayerNode alloc] init];
    // 3. Attach node to the engine
    [engine attachNode:player];
    // 4. Connect player node to engine's main mixer
    AVAudioMixerNode *mixer = engine.mainMixerNode;
    [engine connect:player to:mixer format:[mixer outputFormatForBus:0]];
    // 5. Start engine
    NSError *error;
    if (![engine startAndReturnError:&error]) {
        // handle error
    }
播放audio
Audio Files音频文件
AVAudioFile表示的是可被读写的音频文件
Regardless of the file’s actual format, you read and write it using AVAudioPCMBuffer objects that contain samples using AVAudioCommonFormat. This format is referred to as the file’s processing format. Conversions are performed to and from the file’s actual format.
不论文件的实际格式,可以使用包含AVAudioCommonFormat样本AVAudioPCMBuffer对象来读写
Reads and writes are always sequential, but random access is possible by setting theframePositionproperty.
- Reads and writes files in all Core Audio supported formats
- Automatically decodes when reading, encodes when writing 读的时候自动解码,写的时候自动编码
- Does not support sample rate conversion 不支持采样率转换
- File has both a file format and a processing format 文件有文件格式和处理根式
- fileFormat: on-disk format 磁盘上的格式
- processingFormat: uncompressed, in-memory format 未压缩的,内存中的格式
- Both are instances of
AVAudioFormat都是AVAudioFormat实例
Audio Formats音频格式
AVAudioFormat表示的是:
A class that represents a buffer of audio data with a format.
Instances of this class are immutable.This class wraps a Core Audio
AudioStreamBasicDescriptionstructure, with convenience initializers and accessors for common formats, including Core Audio’s standard deinterleaved, 32-bit floating-point format.
表示的是audio数据buffer的格式
这个类的实例不可变
这个类包裹的是Core Audio的AudioStreamBasicDescription结构体
- Provides a format descriptor for the digital audio samples
- Provides access to sample rate, channel count, interleaving, etc.
- Wrapper over Core Audio
AudioStreamBasicDescription
- Core Audio uses a “Standard” format for both platforms
- Noninterleaved linear PCM, 32-bit floating point samples
- Canonical formats are deprecated!
- Additionally supports “Common” formats
AVAudioCommonFormat: 16/32-bit integer, 32/64-but floating point
Audio Buffers
- Memory buffer for audio data in any Linear PCM format
- Format and buffer capacity defined upon creation
- Provides a wrapper over a Core Audio
AudioBufferListaudioBufferListandmutableAudioBufferListproperties
- Sample data accessed using:
     @property (nonatomic, readonly) float * const *floatChannelData;
     @property (nonatomic, readonly) int16_t * const *int16ChannelData;
     @property (nonatomic, readonly) int32_t * const *int32ChannelData;
Player Nodes播放节点
- Pushes audio data onto the active render thread
- Schedule audio data from files and buffers 从文件和缓冲区安排音频数据
- Scheduled to play immediately or at future time Future times 立即播放or在未来的某个时刻播放
- Future times specified with
AVAudioTime使用AVAudioTime指定将来的时间
- Future times specified with
- Files
- Schedule file or file segment with completion callback
- Buffers
- Schedule multiple buffers with individual completion callbacks
- Schedule looping buffer
- Scheduled to play immediately or at future time Future times 立即播放or在未来的某个时刻播放
Scheduling Files and Buffers
Immediate File Playback 立即文件播放
[playerNode scheduleFile:audioFile atTime:nil completionHandler:nil];
[playerNode play];
Immediate Buffer Playback 立即缓冲区播放
[playerNode scheduleBuffer:audioBuffer completionHandler:nil];
[playerNode play];
Future Buffer Playback
// Play audio file 5 seconds from now
double sampleRate = buffer.format.sampleRate;
double sampleTime = sampleRate * 5.0;
AVAudioTime *futureTime = [AVAudioTime timeWithSampleTime:sampleTime
                                                   atRate:sampleRate];
[playerNode scheduleBuffer:audioBuffer atTime:futureTime options:0 completionHandler:nil];
[playerNode play];
Creating Files and Buffers
    NSURL *url = [[NSBundle mainBundle] URLForResource:@"groove" withExtension:@"m4a"];
    // Create AVAudioFile
    AVAudioFile *file = [[AVAudioFile alloc] initForReading:url error:nil];
    // 创建AVAudioPCMBuffer
    AVAudioFormat *format = file.processingFormat;
    AVAudioFrameCount capacity = (AVAudioFrameCount)file.length;
    AVAudioPCMBuffer *buffer = [[AVAudioPCMBuffer alloc] initWithPCMFormat:format frameCapacity:capacity];
    // Read AVAudioFile -> AVAudioPCMBuffer
    [file readIntoBuffer:buffer error:nil];
一些说明
1.AVAudioNode
AVAudioNode,一个抽象类,用于音频生成,处理或I/O块。AVAudioEngine对象包含各种AVAudioNode子类的实例。
Node有input和output总线(bus),可将其视为连接点。 例如,effect通常具有一个输入总线和一个输出总线。 mixer通常具有多个输入总线和一个输出总线。
总线具有格式,以采样率(sample rate)和通道数(channel count)表示。在节点之间建立连接时,格式通常必须完全匹配。 但是,有一些例外,例如AVAudioMixerNode和AVAudioOutputNode类。
一个audio node只有连接到audio engine才有用
子类有:
- AVAudioMixerNode - A node with an output volume; it mixes its inputs down to a single output. The
AVAudioEngine’s built-in mixerNode is anAVAudioMixerNode.
AVAudioEngine内置的mixerNode是AVAudioMixerNode - AVAudioIONode - A node that patches through to the system’s (device’s) own input (
AVAudioInputNode) or output (AVAudioOutputNode). TheAVAudioEngine’sbuilt-in inputNode and outputNode areAVAudioIONodes. - AVAudioPlayerNode - 可以从file或者buffer播放
- AVAudioEnvironmentNode
- AVAudioUnit - A node that processes its input with special effects before passing it to the output. Built-in subclasses include:
2.什么是Audio Mixing
混音(英语:Audio Mixing)是音乐制作中的一个步骤,是把多种来源的声音,整合至一个立体音轨(Stereo)或单音音轨(Mono)中。这些原始声音信号,来源可能分别来自不同的乐器、人声或管弦乐,收录自现场演奏(live)或录音室内。在混音的过程中,混音师会将每一个别原始信号的频率、动态、音质、定位、残响和声场单独进行调整,让各音轨最佳化,之后再叠加于最终成品上。这种处理方式,能制作出一般听众在现场录音时不能听到之层次分明的完美效果。
全景(Panorama)
Panorama通常缩写为Pan,在Stereo的状态下,让声音在左、右声道中调整位置,以达到把音轨错开、增加清晰度、避免乐器互相干扰等目的。正确使用Pan的功能,可以让声音更宽大、音场更深;当然,就像混音中其他元素一样,Pan的调整方式并没有绝对的对错,要视实际情况来判断— 混音
Demo
例子来源自Programming iOS 12 和 网络
1.播放本地的一个音频文件
    AVAudioPlayerNode *player = [[AVAudioPlayerNode alloc] init];
    NSURL *url = [[NSBundle mainBundle] URLForResource:@"aboutTiagol" withExtension:@"m4a"];
    NSError *error;
    AVAudioFile *file = [[AVAudioFile alloc] initForReading:url error:&error];
    if (error) {
        NSLog(@"%@", [error localizedDescription]);
        return;
    }
    [self.audioEngine attachNode:player];
    [self.audioEngine connect:player to:self.audioEngine.mainMixerNode format:file.processingFormat];
    [player scheduleFile:file atTime:nil completionHandler:^{

        dispatch_after(dispatch_time(DISPATCH_TIME_NOW, (int64_t)(0.1 * NSEC_PER_SEC)), dispatch_get_main_queue(), ^{
            if (self.audioEngine.isRunning) {
                [self.audioEngine stop];
            }
        });

    }];

    [self.audioEngine prepare];
    [self.audioEngine startAndReturnError:&error];
    if (error) {
        NSLog(@"%@", [error localizedDescription]);
    }

    [player play];
2.buffer播放的例子
    NSURL *url = [[NSBundle mainBundle] URLForResource:@"Hooded" withExtension:@"mp3"];
    NSError *error;
    AVAudioFile *file = [[AVAudioFile alloc] initForReading:url error:&error];
    if (error) {
        NSLog(@"%@", [error localizedDescription]);
        return;
    }

    AVAudioPCMBuffer *buffer = [[AVAudioPCMBuffer alloc] initWithPCMFormat:file.processingFormat
                                                             frameCapacity:(AVAudioFrameCount)(file.length)];
    [file readIntoBuffer:buffer error:&error];
    if (error) {
        NSLog(@"%@", [error localizedDescription]);
        return;
    }

    AVAudioPlayerNode *player = [[AVAudioPlayerNode alloc] init];
    [self.audioEngine attachNode:player];
    [self.audioEngine connect:player to:self.audioEngine.mainMixerNode format:file.processingFormat];
    [player scheduleFile:file atTime:nil completionHandler:^{

        dispatch_after(dispatch_time(DISPATCH_TIME_NOW, (int64_t)(0.1 * NSEC_PER_SEC)), dispatch_get_main_queue(), ^{
            if (self.audioEngine.isRunning) {
                [self.audioEngine stop];
            }
        });

    }];

    [self.audioEngine prepare];
    [self.audioEngine startAndReturnError:&error];
    if (error) {
        NSLog(@"%@", [error localizedDescription]);
    }

    [player play];
3.添加更多的node,这个例子同时播放2个声音,第一个声音通过file,第二个声音通过buffer(循环播放这个声音)。
第一个声音传递给time-pitch effect node,然后再通过reverb effect node(混响效果节点)
Time Pitch 变速变调效果器,调整声音音高 eg:会说话的Tom猫
    AVAudioPlayerNode *player = [[AVAudioPlayerNode alloc] init];
    NSURL *url = [[NSBundle mainBundle] URLForResource:@"aboutTiagol" withExtension:@"m4a"];
    NSError *error;
    AVAudioFile *file = [[AVAudioFile alloc] initForReading:url error:&error];
    if (error) {
        NSLog(@"%@", [error localizedDescription]);
        return;
    }
    [self.audioEngine attachNode:player];

    //effect node
    AVAudioUnitTimePitch *effect = [[AVAudioUnitTimePitch alloc] init];
    effect.rate = 0.9;
    effect.pitch = -300;
    [self.audioEngine attachNode:effect];
    [self.audioEngine connect:player to:effect format:file.processingFormat];

    //effect node
    AVAudioUnitReverb *effect2 = [[AVAudioUnitReverb alloc] init];
    [effect2 loadFactoryPreset:AVAudioUnitReverbPresetCathedral];
    effect2.wetDryMix = 40;
    [self.audioEngine attachNode:effect2];
    [self.audioEngine connect:effect to:effect2 format:file.processingFormat];

    //patch last node into engine mixer and start playing first sound
    //添加mixer,开始播放第一个声音
    AVAudioMixerNode *mixer = self.audioEngine.mainMixerNode;
    [self.audioEngine connect:effect2 to:mixer format:file.processingFormat];
    [player scheduleFile:file atTime:nil completionHandler:^{

        dispatch_after(dispatch_time(DISPATCH_TIME_NOW, (int64_t)(0.1 * NSEC_PER_SEC)), dispatch_get_main_queue(), ^{
            if (self.audioEngine.isRunning) {
                [self.audioEngine stop];
            }
        });

    }];

    [self.audioEngine prepare];
    [self.audioEngine startAndReturnError:&error];
    if (error) {
        NSLog(@"%@", [error localizedDescription]);
    }
    [player play];

    //第二个声音 循环播放
    NSURL *url2 = [[NSBundle mainBundle] URLForResource:@"Hooded" withExtension:@"mp3"];
    AVAudioFile *file2 = [[AVAudioFile alloc] initForReading:url2 error:&error];
    if (error) {
        NSLog(@"%@", [error localizedDescription]);
        return;
    }
    AVAudioPCMBuffer *buffer = [[AVAudioPCMBuffer alloc] initWithPCMFormat:file2.processingFormat
                                                             frameCapacity:(AVAudioFrameCount)file2.length];
    [file2 readIntoBuffer:buffer error:&error];
    if (error) {
        NSLog(@"%@", [error localizedDescription]);
        return;
    }
    AVAudioPlayerNode *player2 = [[AVAudioPlayerNode alloc] init];
    [self.audioEngine attachNode:player2];
    [self.audioEngine connect:player2 to:mixer format:file2.processingFormat];
    [player2 scheduleBuffer:buffer atTime:nil options:AVAudioPlayerNodeBufferLoops completionHandler:nil];

    // mix down a little, start playing second sound开始播放第二个声音
    player.pan = -0.5;
    player2.volume = 0.5;
    player2.pan = 0.5;
    [player2 play];
4.将声音文件传递给reverb effect(混响器),将输出保存为一个新的文件
    NSURL *url = [[NSBundle mainBundle] URLForResource:@"Hooded" withExtension:@"mp3"];
    NSError *error;
    AVAudioFile *file = [[AVAudioFile alloc] initForReading:url error:&error];
    if (error) {
        NSLog(@"AVAudioFile error: %@", [error localizedDescription]);
        return;
    }
    AVAudioPlayerNode *player = [[AVAudioPlayerNode alloc] init];
    [self.audioEngine attachNode:player];
    // patch the player into the effect
    AVAudioUnitReverb *effect = [[AVAudioUnitReverb alloc] init];
    [effect loadFactoryPreset:AVAudioUnitReverbPresetCathedral];
    effect.wetDryMix = 40;
    [self.audioEngine attachNode:effect];
    [self.audioEngine connect:player to:effect format:file.processingFormat];

    AVAudioMixerNode *mixer = self.audioEngine.mainMixerNode;
    [self.audioEngine connect:effect to:mixer format:file.processingFormat];

    //创建输出文件
    NSFileManager *fm = [NSFileManager defaultManager];
    NSURL *doc = [fm URLForDirectory:NSDocumentDirectory inDomain:NSUserDomainMask appropriateForURL:nil create:YES error:nil];
    NSURL *outurl = [doc URLByAppendingPathComponent:@"myfile.aac" isDirectory:NO];
    [fm removeItemAtURL:outurl error:nil];
    AVAudioFile *outfile = [[AVAudioFile alloc] initForWriting:outurl
                                                      settings:@{
                                                                 AVFormatIDKey : [NSNumber numberWithInt:kAudioFormatMPEG4AAC],
                                                                 AVNumberOfChannelsKey : [NSNumber numberWithInt: 1],
                                                                 AVSampleRateKey : [NSNumber numberWithFloat: 22050]
                                                                 }
                                                         error:nil];

    NSLog(@"outurl %@", outurl);

    BOOL done = false;
    [player scheduleFile:file atTime:nil completionHandler:nil];
    uint32_t sz = 4096;
    [self.audioEngine enableManualRenderingMode:AVAudioEngineManualRenderingModeOffline
                                         format:file.processingFormat
                              maximumFrameCount:(AVAudioFrameCount)sz
                                          error:nil];

    [self.audioEngine prepare];
    [self.audioEngine startAndReturnError:&error];
    [player play];

    AVAudioPCMBuffer *outbuf = [[AVAudioPCMBuffer alloc] initWithPCMFormat:file.processingFormat
                                                             frameCapacity:(AVAudioFrameCount)sz];
    AVAudioFramePosition rest = file.length - self.audioEngine.manualRenderingSampleTime;
    while (rest > 0) {
        AVAudioFrameCount ct = MIN(outbuf.frameCapacity, (AVAudioFrameCount)rest);
        AVAudioEngineManualRenderingStatus stat = [self.audioEngine renderOffline:ct toBuffer:outbuf error:nil];
        if (stat == AVAudioEngineManualRenderingStatusSuccess) {
            [outfile writeFromBuffer:outbuf error:nil];
            rest = file.length - self.audioEngine.manualRenderingSampleTime;
        }
    }

    [player stop];
    [self.audioEngine stop];


    [self play:outurl];
5.录音并写入到本地文件
参考:
录音的同时,在耳麦中播放,类似耳返,并写入到本地的文件
参考上面的教程,demo如下:
//录音
- (IBAction)button5_action:(id)sender {

    NSFileManager *fm = [NSFileManager defaultManager];
    NSURL *doc = [fm URLForDirectory:NSDocumentDirectory inDomain:NSUserDomainMask appropriateForURL:nil create:YES error:nil];
    NSURL *outurl = [doc URLByAppendingPathComponent:@"record.caf" isDirectory:NO];
    [fm removeItemAtURL:outurl error:nil];

    AVAudioFile *file = [[AVAudioFile alloc] initForWriting:outurl
                                                   settings:[self.audioEngine.mainMixerNode outputFormatForBus:0].settings
                                                      error:nil];
    AVAudioInputNode *inputNode = self.audioEngine.inputNode;

    [self.audioEngine connect:inputNode
                           to:self.audioEngine.mainMixerNode
                       format:[self.audioEngine.inputNode inputFormatForBus:0]];


    [self.audioEngine.mainMixerNode installTapOnBus:0 bufferSize:1024 format:[self.audioEngine.mainMixerNode outputFormatForBus:0] block:^(AVAudioPCMBuffer * _Nonnull buffer, AVAudioTime * _Nonnull when) {

        [file writeFromBuffer:buffer error:nil];

    }];

    [self.audioEngine prepare];
    [self.audioEngine startAndReturnError:nil];


}
//停止录音
- (IBAction)stopAction:(id)sender {

    [self.audioEngine.mainMixerNode removeTapOnBus:0];
    [self.audioEngine stop];

    NSFileManager *fm = [NSFileManager defaultManager];
    NSURL *doc = [fm URLForDirectory:NSDocumentDirectory inDomain:NSUserDomainMask appropriateForURL:nil create:YES error:nil];
    NSURL *outurl = [doc URLByAppendingPathComponent:@"record.caf" isDirectory:NO];
    NSLog(@"outurl %@", outurl);

    [self play:outurl];

}
本身初始化時
AVAudioEngine已經將mainMixerNode與輸出端連接,所以我們要將輸入節點與它連接後就能完成即時錄音與播放功能,接續之前的程式後增加輸入節點與mainMixerNode的連接,


 679
679

 被折叠的 条评论
为什么被折叠?
被折叠的 条评论
为什么被折叠?
 到【灌水乐园】发言


