1.背景
最近实施部门,有个需求就是研发人员通过vue 写完代码,yarn build 编译完成代码后,移交实施,通过修改public 文件夹下的 config 文件来实现修改,请求后台的 requestUrl 和 titile 的功能。由于在代码里配置后,yarn build 后会压缩js 导致,修改配置不方便。故经过我长期的研究总结出了一套可以完美从开发环境迁移到nginx 部署的方案。在此分享给有需要的小伙伴,一起共勉!!!
2.配置步骤
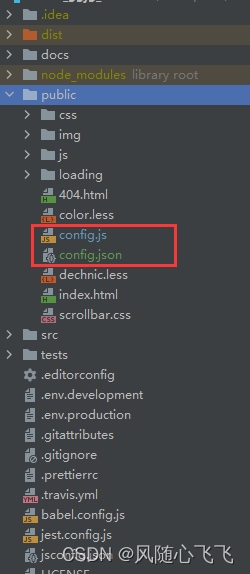
- public 文件夹下新增两个配置文件:config.js 和config.json

config.js
export const globalConfig = {
  // 请求后台路径
  requestUrl: '/api'
}
config.json
{
  "logoTitle": "标题",
  "energyWarningShowFlag": false
}
index.html 页面里引入 这两个配置文件
<script  src="<%= BASE_URL %>config.js"></script>
<script  src="<%= BASE_URL %>config.json"></script>
完整的 html 页面:
<!DOCTYPE html>
<html lang="zh-cmn-Hans">
  <head>
    <meta charset="utf-8">
    <meta http-equiv="X-UA-Compatible" content="IE=edge">
    <meta name="viewport" content="width=device-width,initial-scale=1.0">
    <!--常见的头缺失或不安全问题:
    1、“Content-Security-Policy”头缺失或不安全
    2、“X-Content-Type-Options”头缺失或不安全
    3、“X-XSS-Protection”头缺失或不安全
    4、设置HTTP请求头(X-Frame-Options)-->
   <!-- <meta http-equiv="Content-Security-Policy" content="default-src 'self'"/>
    <meta http-equiv="X-Content-Type-Options" content="nosniff" />
    <meta http-equiv="X-XSS-Protection" content="1; mode=block" />
    <meta http-equiv="X-Frame-Options" content="SAMEORIGIN">-->

    <link rel="icon" href="<%= BASE_URL %>img/logo.png">
    <title></title>
<!--    <title><%=htmlWebpackPlugin.options.title %></title>-->
    <!--<style>#preloadingAnimation{position:fixed;left:0;top:0;height:100%;width:100%;background:#ffffff;user-select:none;z-index: 9999;overflow: hidden}.lds-roller{display:inline-block;position:relative;left:50%;top:50%;transform:translate(-50%,-50%);width:64px;height:64px;}.lds-roller div{animation:lds-roller 1.2s cubic-bezier(0.5,0,0.5,1) infinite;transform-origin:32px 32px;}.lds-roller div:after{content:" ";display:block;position:absolute;width:6px;height:6px;border-radius:50%;background:#13c2c2;margin:-3px 0 0 -3px;}.lds-roller div:nth-child(1){animation-delay:-0.036s;}.lds-roller div:nth-child(1):after{top:50px;left:50px;}.lds-roller div:nth-child(2){animation-delay:-0.072s;}.lds-roller div:nth-child(2):after{top:54px;left:45px;}.lds-roller div:nth-child(3){animation-delay:-0.108s;}.lds-roller div:nth-child(3):after{top:57px;left:39px;}.lds-roller div:nth-child(4){animation-delay:-0.144s;}.lds-roller div:nth-child(4):after{top:58px;left:32px;}.lds-roller div:nth-child(5){animation-delay:-0.18s;}.lds-roller div:nth-child(5):after{top:57px;left:25px;}.lds-roller div:nth-child(6){animation-delay:-0.216s;}.lds-roller div:nth-child(6):after{top:54px;left:19px;}.lds-roller div:nth-child(7){animation-delay:-0.252s;}.lds-roller div:nth-child(7):after{top:50px;left:14px;}.lds-roller div:nth-child(8){animation-delay:-0.288s;}.lds-roller div:nth-child(8):after{top:45px;left:10px;}#preloadingAnimation .load-tips{color: #13c2c2;font-size:2rem;position:absolute;left:50%;top:50%;transform:translate(-50%,-50%);margin-top:80px;text-align:center;width:400px;height:64px;}  @keyframes lds-roller{0%{transform:rotate(0deg);} 100%{transform:rotate(360deg);}}</style>-->
    <script src="<%= BASE_URL %>js/moment.min.js"></script>
    <script src="<%= BASE_URL %>js/vue.js"></script>

    <script src="<%= BASE_URL %>js/antd.min.js"></script>

    <link rel="stylesheet" href="<%= BASE_URL %>css/antd.min.css">
    <!--<style>-->
      <!--.ant-menu-dark .ant-menu-inline.ant-menu-sub{background:#123092;-webkit-box-shadow:0 2px 8px rgba(0,0,0,.45) inset;box-shadow:inset 0 2px 8px rgba(0,0,0,.45)}-->
      <!--.ant-menu-submenu-popup.ant-menu-dark .ant-menu-item-selected,.ant-menu.ant-menu-dark .ant-menu-item-selected{background-color:#081a59}-->
      <!--.ant-menu-dark,.ant-menu-dark .ant-menu-sub{color:hsla(0,0%,100%,.65);background:#123092}-->
    <!--</style>-->
  </head>
  <body>
    <noscript>
      <strong>因为未启用 JavaScript,所以本项目无法正常工作。请启用 JavaScript!</strong>
    </noscript>
    <div id="app">
      <div id="preloadingAnimation"><div class=lds-roller><div></div><div></div><div></div><div></div><div></div><div></div><div></div><div></div></div><div class=load-tips>Loading</div></div>
    </div>
    <!-- built files will be auto injected -->
    <script  src="<%= BASE_URL %>config.js"></script>
    <script  src="<%= BASE_URL %>config.json"></script>

  </body>
</html>
- main.js 里新增 getServerConfig 方法
import axios from 'axios'

function getServerConfig () {
  return new Promise ((resolve, reject) => {
    axios.get('../config.json').then(response => {
      console.log("读取外部化配置文件>>>>>>>>")
      let data = response.data
      console.log(data)  // 是否成功读取需要的配置项
      for (let key in data) {
        Vue.prototype["$"+key] = data[key];
        console.log("设置 $"+key +"  "+data[key])
      }
      console.log(Vue.prototype.$logoTitle)  // 验证是否已经把属性挂载在了Vue的原型上
      resolve();
    }).catch(error => {
      console.log(error);
      reject()
    })
  })
}
async function init(){
  await getServerConfig();
}

new Vue({
  router,
  store,
  created () {
    bootstrap();
    init();
  },
  render: h => h(App)
}).$mount('#app')
PS: Vue.prototype 表示将变量挂载到Vue 实例上,可以从页面调用。 config.js 里面的 变量可以从js 代码里调用;config.json 里可以从Vue 页面通过this.$var 的方式调用。
- 在Vue 页面里调用
<div class="header">
  <a href="/">
      <span class="title">{{ this.$logoTitle }}</span>
 </a>
</div>
- js 里面调用
import { globalConfig } from '../../public/config'
const baseUrl = process.env.NODE_ENV === 'production' ? globalConfig.requestUrl : process.env.VUE_APP_BASE_API
- 修改html 页面里的title
router.beforeEache 里面 添加 document.title = Vue.prototype.$logoTitle 更改title 标题
router.beforeEach((to, from, next) => {
  document.title = Vue.prototype.$logoTitle
  NProgress.start() // start progress bar
  if (Vue.ls.get(ACCESS_TOKEN)) {
    /* has token */
    if (to.path === '/user/login') {
      next({ path: '/sys/menu' })
      NProgress.done()
    } else {
      if (!store.getters.nickname) {
        store
          .dispatch('GetInfo')
          .then(res => {
            // 新增服务器返回的菜单路由
            addRoutes(res.menus)
            const redirect = decodeURIComponent(from.query.redirect || to.path)
            if (to.path === redirect) {
              // hack方法 确保addRoutes已完成 ,set the replace: true so the navigation will not leave a history record
              next({ ...to, replace: true })
            } else {
              // 跳转到目的路由
              next({ path: redirect })
            }

          })
          .catch((e) => {
            // Vue.prototype.$notification.error({
            //   message: '错误',
            //   description: '请求用户信息失败,请重试'
            // })
            store.dispatch('Logout').then(() => {
              next({ path: '/user/login', query: { redirect: to.fullPath } })
            })
          })
      } else {
        next()
      }
    }
  } else {
    if (whiteList.includes(to.name)) {
      // 在免登录白名单,直接进入
      next()
    } else {
      next({ path: '/user/login', query: { redirect: to.fullPath } })
      NProgress.done() // if current page is login will not trigger afterEach hook, so manually handle it
    }
  }
})
3.小结
- Vue.prototype 表示将变量挂载到Vue 实例上,可以从页面调用。
- config.js 里面的 变量可以从js 代码里调用;config.json 里可以从Vue 页面通过this.$var 的方式调用。
- 在router 里面 新增document.title = Vue.prototype.$logoTitle 更改title 标题


 2万+
2万+


 被折叠的 条评论
为什么被折叠?


