


init入口函数分析
init的入口函数为main,位于system/core/init/init.cpp
int main(int argc, char** argv) {
if (!strcmp(basename(argv[0]), "ueventd")) {return ueventd_main(argc, argv);
}
if (!strcmp(basename(argv[0]), "watchdogd")) {
return watchdogd_main(argc, argv);
}
// Clear the umask.
umask(0);
add_environment("PATH", _PATH_DEFPATH);
//判断是否是第一次开机
bool is_first_stage = (argc == 1) || (strcmp(argv[1], "--second-stage") != 0);
// Get the basic filesystem setup we need put together in the initramdisk
// on / and then we'll let the rc file figure out the rest.
if (is_first_stage) {
/挂载文件系统
mount("tmpfs", "/dev", "tmpfs", MS_NOSUID, "mode=0755");mkdir("/dev/pts", 0755);
mkdir("/dev/socket", 0755);
mount("devpts", "/dev/pts", "devpts", 0, NULL);
#define MAKE_STR(x) __STRING(x)
mount("proc", "/proc", "proc", 0, "hidepid=2,gid=" MAKE_STR(AID_READPROC));
mount("sysfs", "/sys", "sysfs", 0, NULL);
}
// We must have some place other than / to create the device nodes for
// kmsg and null, otherwise we won't be able to remount / read-only
// later on. Now that tmpfs is mounted on /dev, we can actually talk
// to the outside world.
//调用dup函数把标准输入,输出,错误输出都重定位到/dev/__null__
open_devnull_stdio();
//创建/dev/__kmsg__并打开/dev/__kmsg__设备节点,用于后面的log信息处理,如写日志等就往这个节点里面写.
klog_init();
//设置实时将LOG打印到节点
klog_set_level(KLOG_NOTICE_LEVEL);NOTICE("init %s started!\n", is_first_stage ? "first stage" : "second stage");
if (!is_first_stage) {
////关闭/dev/.booting文件的相关权限
// Indicate that booting is in progress to background fw loaders, etc.close(open("/dev/.booting", O_WRONLY | O_CREAT | O_CLOEXEC, 0000));
//主要工作是申请32k共享内存,其中前1k是属性区的头,后面31k可以存247个属性(受前1k头的限制)。property_init初始化完property以后,加载/default.prop的属性定义。
property_init();
//先初始化DT,因为DT的属性集的优先级高于comand line
process_kernel_dt();
// properties set in DT always have priority over the command-line ones.
process_kernel_cmdline();// //导出内核变量
export_kernel_boot_props();
}
selinux_initialize(is_first_stage);
// 恢复下面目录的安全上下文为系统原始设置
NOTICE("Running restorecon...\n");
restorecon("/dev");
restorecon("/dev/socket");
restorecon("/dev/__properties__");
restorecon("/property_contexts");
restorecon_recursive("/sys");
epoll_fd = epoll_create1(EPOLL_CLOEXEC);
if (epoll_fd == -1) {
ERROR("epoll_create1 failed: %s\n", strerror(errno));
exit(1);
}
//初始化SIGCHLD信号处理的
signal_handler_init();
property_load_boot_defaults();
export_oem_lock_status();//启动属性服务
start_property_service();
#ifdef BOOT_TRACE
if (boot_trace) {
ERROR("enable boot systrace...");
property_set("debug.atrace.tags.enableflags", "0x3ffffe");
}
#endif
const BuiltinFunctionMap function_map;
Action::set_function_map(&function_map);
Parser& parser = Parser::GetInstance();
parser.AddSectionParser("service",std::make_unique<ServiceParser>());
parser.AddSectionParser("on", std::make_unique<ActionParser>());
parser.AddSectionParser("import", std::make_unique<ImportParser>());
//解析init.rc配置文件
parser.ParseConfig("/init.rc");ActionManager& am = ActionManager::GetInstance();
am.QueueEventTrigger("early-init");
// Queue an action that waits for coldboot done so we know ueventd has set up all of /dev...
am.QueueBuiltinAction(wait_for_coldboot_done_action, "wait_for_coldboot_done");
// ... so that we can start queuing up actions that require stuff from /dev.
am.QueueBuiltinAction(mix_hwrng_into_linux_rng_action, "mix_hwrng_into_linux_rng");
am.QueueBuiltinAction(set_mmap_rnd_bits_action, "set_mmap_rnd_bits");
am.QueueBuiltinAction(keychord_init_action, "keychord_init");
am.QueueBuiltinAction(console_init_action, "console_init");
// Trigger all the boot actions to get us started.
am.QueueEventTrigger("init");
// Repeat mix_hwrng_into_linux_rng in case /dev/hw_random or /dev/random
// wasn't ready immediately after wait_for_coldboot_done
am.QueueBuiltinAction(mix_hwrng_into_linux_rng_action, "mix_hwrng_into_linux_rng");
// Don't mount filesystems or start core system services in charger mode.
std::string bootmode = property_get("ro.bootmode");
if (bootmode == "charger") {
am.QueueEventTrigger("charger");
} else {
am.QueueEventTrigger("late-init");
}
// Run all property triggers based on current state of the properties.
am.QueueBuiltinAction(queue_property_triggers_action, "queue_property_triggers");
while (true) {
if (!waiting_for_exec) {
am.ExecuteOneCommand();
restart_processes();
}
int timeout = -1;
if (process_needs_restart) {
timeout = (process_needs_restart - gettime()) * 1000;
if (timeout < 0)
timeout = 0;
}
if (am.HasMoreCommands()) {
timeout = 0;
}
bootchart_sample(&timeout);
epoll_event ev;
int nr = TEMP_FAILURE_RETRY(epoll_wait(epoll_fd, &ev, 1, timeout));
if (nr == -1) {
ERROR("epoll_wait failed: %s\n", strerror(errno));
} else if (nr == 1) {
((void (*)()) ev.data.ptr)();
}
}
return 0;
}
从上面代码中可以精简归纳init的main方法做的事情:
1.创建文件系统目录并挂载相关的文件系统
2.屏蔽标准的输入输出
3.初始化内核log系统
4.调用property_init初始化属性相关的资源
5.完成SELinux相关工作
6.重新设置属性
7.创建epoll句柄
8.装载子进程信号处理器
9.通过property_start_service启动属性服务
10.通过parser.ParseConfig(“/init.rc”)来解析init.rc
接下来对上述部分步骤,进行详细解析。
1.创建文件系统目录并挂载相关的文件系统
//清除屏蔽字(file mode creation mask),保证新建的目录的访问权限不受屏蔽字影响。
该部分主要用于创建和挂载启动所需的文件目录。
需要注意的是,在编译Android系统源码时,在生成的根文件系统中,并不存在这些目录,它们是系统运行时的目录,即当系统终止时,就会消失。
在init初始化过程中,Android分别挂载了tmpfs,devpts,proc,sysfs这4类文件系统。
2.屏蔽标准的输入输出
前文生成/dev目录后,init进程将调用open_devnull_stdio函数,屏蔽标准的输入输出。
open_devnull_stdio函数会在/dev目录下生成null设备节点文件,并将标准输入、标准输出、标准错误输出全部重定向到null设备中。
open_devnull_stdio函数定义于system/core/init/util.cpp中。
这里需要说明的是,dup2函数的作用是用来复制一个文件的描述符,通常用来重定向进程的stdin、stdout和stderr。它的函数原形是:
int dup2(int oldfd, int targetfd)
该函数执行后,targetfd将变成oldfd的复制品。
因此上述过程其实就是:创建出null设备后,将0、1、2绑定到null设备上。因此init进程调用open_devnull_stdio函数后,通过标准的输入输出无法输出信息。
4.初始化属性域
调用property_init初始化属性域。在Android平台中,为了让运行中的所有进程共享系统运行时所需要的各种设置值,系统开辟了属性存储区域,并提供了访问该区域的API。
需要强调的是,在init进程中有部分代码块以is_first_stage标志进行区分,决定是否需要进行初始化,而is_first_stage的值,由init进程main函数的入口参数决定。 其原因在于,在引入selinux机制后,有些操作必须要在内核态才能完成;
但init进程作为android的第一个进程,又是运行在用户态的。
于是,最终设计为用is_first_stage进行区分init进程的运行状态。init进程在运行的过程中,会完成从内核态到用户态的切换。
void property_init() {
if (__system_property_area_init())
{
ERROR("Failed to initialize property area\n"); exit(1);
}
}
property_init函数定义于system/core/init/property_service.cpp中,如上面代码所示,最终调用_system_property_area_init函数初始化属性域。
5.完成SELinux相关工作
init进程进程调用selinux_initialize启动SELinux。从注释来看,init进程的运行确实是区分用户态和内核态的。
static void selinux_initialize(bool in_kernel_domain)
{
Timer t;
selinux_callback cb; //用于打印log的回调函数
cb.func_log = selinux_klog_callback;
selinux_set_callback(SELINUX_CB_LOG, cb); //用于检查权限的回调函数
cb.func_audit = audit_callback;
selinux_set_callback(SELINUX_CB_AUDIT, cb);
if (in_kernel_domain)
{
//内核态处理流程
INFO("Loading SELinux policy...\n");
//用于加载sepolicy文件。该函数最终将sepolicy文件传递给kernel,这样kernel就有了安全策略配置文件,后续的MAC才能开展起来。
if (selinux_android_load_policy() < 0) {
ERROR("failed to load policy: %s\n",
strerror(errno));
security_failure();
}
//内核中读取的信息
bool kernel_enforcing = (security_getenforce() == 1);
//命令行中得到的数据
bool is_enforcing = selinux_is_enforcing();
if (kernel_enforcing != is_enforcing) { //用于设置selinux的工作模式。selinux有两种工作模式: //1、”permissive”,所有的操作都被允许(即没有MAC),但是如果违反权限的话,会记录日志 //2、”enforcing”,所有操作都会进行权限检查。在一般的终端中,应该工作于enforing模式 if(security_setenforce(is_enforcing)) {
........ //将重启进入recovery mode security_failure();
}
} if (write_file("/sys/fs/selinux/checkreqprot", "0") == -1) { security_failure(); } NOTICE("(Initializing SELinux %s took %.2fs.)\n", is_enforcing ? "enforcing" : "non-enforcing", t.duration()); } else { selinux_init_all_handles(); }}
6.重新设置属性
上述文件节点在加载Sepolicy之前已经被创建了,因此在加载完Sepolicy后,需要重新设置相关的属性。
9.启动配置属性的服务端
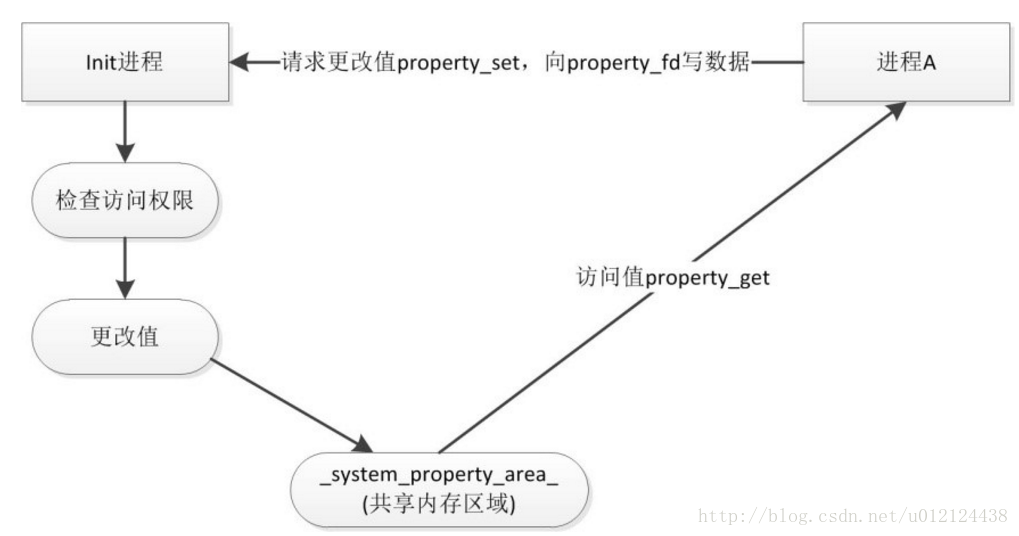
init进程在共享内存区域中,创建并初始化属性域。其它进程可以访问属性域中的值,但更改属性值仅能在init进程中进行。这就是init进程调用start_property_service的原因。其它进程修改属性值时,要预先向init进程提交值变更申请,然后init进程处理该申请,并修改属性值。在访问和修改属性时,init进程都可以进行权限控制。
我们知道,在create_socket函数返回套接字property_set_fd时,property_set_fd是一个主动连接的套接字。此时,系统假设用户会对这个套接字调用connect函数,期待它主动与其它进程连接。
由于在服务器编程中,用户希望这个套接字可以接受外来的连接请求,也就是被动等待用户来连接,于是需要调用listen函数使用主动连接套接字变为被连接套接字,使得一个进程可以接受其它进程的请求,从而成为一个服务器进程。
因此,调用listen后,init进程成为一个服务进程,其它进程可以通过property_set_fd连接init进程,提交设置系统属性的申请。
listen函数的第二个参数,涉及到一些网络的细节。
在进程处理一个连接请求的时候,可能还存在其它的连接请求。因为TCP连接是一个过程,所以可能存在一种半连接的状态。有时由于同时尝试连接的用户过多,使得服务器进程无法快速地完成连接请求。
因此,内核会在自己的进程空间里维护一个队列,以跟踪那些已完成连接但服务器进程还没有接手处理的用户,或正在进行的连接的用户。这样的一个队列不可能任意大,所以必须有一个上限。listen的第二个参数就是告诉内核使用这个数值作为上限。因此,init进程作为系统属性设置的服务器,最多可以同时为8个试图设置属性的用户提供服务。
在启动配置属性服务的最后,调用函数register_epoll_handler。该函数将利用之前创建出的epoll句柄监听property_set_fd。当property_set_fd中有数据到来时,init进程将利用handle_property_set_fd函数进行处理。
- 1
handle_propery_set_fd函数实际上是调用accept函数监听连接请求,接收property_set_fd中到来的数据,然后利用recv函数接受到来的数据,最后根据到来数据的类型,进行设置系统属性等相关操作,在此不做深入分析。
介绍一下系统属性改变的一些用途。
在init.rc中定义了一些与属性相关的触发器。当某个条件相关的属性被改变时,与该条件相关的触发器就会被触发。举例来说,如下面代码所示,debuggable属性变为1时,将执行启动console进程等操作。
总结一下,其它进程修改系统属性时,大致的流程如下图所示:其它的进程像init进程发送请求后,由init进程检查权限后,修改共享内存区。


 1896
1896

 被折叠的 条评论
为什么被折叠?
被折叠的 条评论
为什么被折叠?
 到【灌水乐园】发言


