


第一步:使用composer 下载安装thinkphp5.0框架
composer create-project topthink/think=5.0.* think-swoole-5.0 --prefer-dist
第二步:在tp5的框架目录中新建一个server 目录,用于存放http_server文件

在server 目录下面新建一个Http.php文件
<?php


/**
 * Class Http  http服务器
 * 利用swoole提供的http服务器与thinkphp5.1框架
 * 进行融合使用
 */

class Http
{


    private  $host; //主机ip地址


    private  $port; //端口


    private  $http_server; //http服务器

    /**
     * 构造方法
     * Http constructor.
     * @param string $host
     * @param int $port
     */
    public function  __construct($host="0.0.0.0",$port=80)
    {
        $this->host = $host; //设置服务器的ip地址

        $this->port = $port  ;// 设置服务器运行的端口

        //创建http服务器

        $this->http_server = new Swoole\Http\Server($this->host,$this->port);

        //配置http服务器
        $this->http_server->set(
            [
                "worker_num" => 4 , //设置启动的 Worker 进程数

                "daemonize " => 0 ,  //1 守护线程运行| 0 非守护线程运行

                "enable_static_handler" => true,

                "document_root" => __DIR__."/../public", //设置运行静态目录的根目录

                'upload_tmp_dir' => __DIR__.'/../public/upload', //设置上传文件的目录
             ]
        );

        //注册http服务器监听事件

        $this->http_server->on("request",[$this,"onRequest"]);

         //此事件在 Worker 进程 / Task 进程启动时发生,这里创建的对象可以在进程生命周期内使用
        $this->http_server->on("WorkerStart",[$this,"onWorkerStart"]);
        //启动http服务器
        $this->http_server->start();

    }

    /**
     * 此事件在 Worker 进程 / Task 进程启动时发生,这里创建的对象可以在进程生命周期内使用。
     * @param \Swoole\Server $server  服务器对象
     * @param $workerId 进程 id(非进程的 PID)
     */
     public  function  onWorkerStart(Swoole\Server $server,  $workerId)
     {
         define('APP_PATH', __DIR__ . '/../application/');
        // 加载thinkphp5.0 框架的基础文件
         // ThinkPHP 引导文件
         // 1. 加载基础文件
         require __DIR__ . '/../thinkphp/base.php';
     }

    /**
     * 监听请求事件
     * @param $request 请求对象
     * @param $response 响应对象
     */
    public function  onRequest($request,$response)
    {
        $response->header("Content-Type","application/json;charset=utf8");
        $_GET=[];
        if (isset($request->get)) {
            $_GET = $request->get;
            foreach ($request->get as $k => $v) {
                $_GET[$k] = $v;
            }
        }

        $_POST = [];
        if (isset($request->post)) {

            foreach ($request->post as $k => $v) {
                $_POST[$k] = $v;
            }

        }
        $_SERVER = [];
        if (isset($request->header)) {
              foreach ($request->header as $k=> $v) {
                  $_SERVER[$k] = $v;
              }
        }
        $_COOKIE = [];
        if (isset($request->cookie)) {
            foreach ($request->cookie as $k => $v ) {
                $_COOKIE[$k] = $v;
            }
        }
        ob_start();
        ob_clean();
        // 执行应用并响应
        try {
            // 2. 执行应用
            \think\App::run()->send();

        } catch (Exception $e) {
           $json = [
               "code" => $e->getCode()?$e->getCode():500,
               "msg" => $e->getMessage()
           ];
           echo json_encode($json,JSON_UNESCAPED_UNICODE);
        }

        $res = ob_get_contents();
      //  ob_end_clean();

        $response->end($res);


    }

}

//创建http服务器
$http = new Http();
第三步:修改thinkphp5.0 Reuquest 文件源码
讲Request.php 文件的第435行和448行注释掉
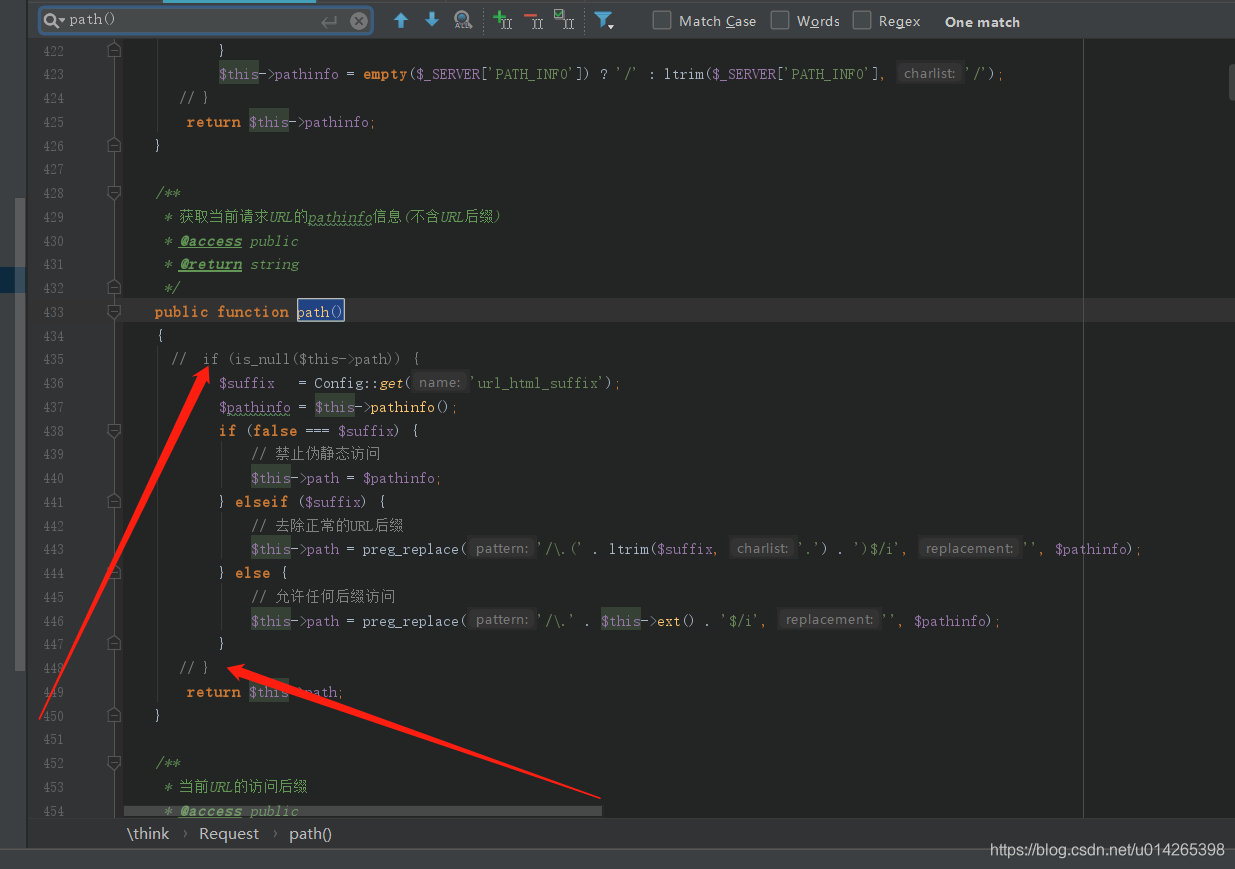
注释掉403行和424行

第四步:修改thinkphp类库中的Query.php

PHP7.4不再支持使用大括号访问数组以及字符串的偏移_PHP代码
php7.4不支持数组{}写法,统一为数组[]
将{0} 改为[0] 即可
第五步:在common.php中添加如下方法
function apiJson($code=200,$msg="操作成功",$data=null)
{

    $json = array(
        "code" => $code,
        "msg" => $msg,
        "data" => $data
    );
    $header= [];
    $header["Access-Control-Allow-Origin"] = "*";
    $header["Access-Control-Allow-Headers"] = "*";
    $header["Content-Type"] = "application/json;charset=utf-8";
    return json($json,200,$header);

}
第六步:配置数据库,并在controller index.php添加如下测试代码进行测试
  public function  tp_test()
    {
        $start_time = time();

        $data = Db::name("user")->limit(0,1000)->select();
        $end_time = time();
       return apiJson(200,($end_time-$start_time),$data);
    }
第七步:在命令行模式启动http_server
php Http.php
第八步在浏览器访问接口
http://ip:port/?s=/index/index/tp_test
大功告成


 636
636


 被折叠的 条评论
为什么被折叠?
被折叠的 条评论
为什么被折叠?
 到【灌水乐园】发言


