


前言
WebSocket是一种在客户端和服务器之间建立持久性连接的通信协议,使得双向通信成为可能。在Java中,有多种方式可以实现WebSocket,这次,主要介绍javax.websocket、spring-boot-starter-websocket和Netty三种方式进行实现,这是最后一篇通过netty实现
一、javax.websocket
javax.websocket![]() https://blog.csdn.net/u014374743/article/details/135905010
https://blog.csdn.net/u014374743/article/details/135905010
二、spring-boot-starter-websocket(推荐)
spring-boot-starter-websocket![]() https://blog.csdn.net/u014374743/article/details/135920941
https://blog.csdn.net/u014374743/article/details/135920941
三、Netty
优点:
-
高性能:Netty是一个高性能的网络通信框架,适用于处理大量的并发连接。
-
灵活性:提供了底层的网络API,可以进行更细致的定制和优化。
劣势:
-
学习曲线:相对于前两者,Netty的学习曲线可能更陡峭,需要更深入的理解网络编程和框架的使用。
-
开发成本:需要更多的自定义开发,可能会增加开发成本和时间。
实现方式:
1.引入netty依赖
<dependency>
    <groupId>io.netty</groupId>
    <artifactId>netty-all</artifactId>
</dependency>
2.创建Websocket处理器类
用于处理建立连接的时间,获取消息的事件,连接断开事件,异常处理事件
import io.netty.channel.Channel;
import io.netty.channel.ChannelHandlerContext;
import io.netty.channel.SimpleChannelInboundHandler;
import io.netty.handler.codec.http.websocketx.TextWebSocketFrame;
import org.springframework.stereotype.Component;
import java.util.concurrent.CopyOnWriteArrayList;


// WebSocket处理器类
@Component
public class WebSocketHandler extends SimpleChannelInboundHandler<TextWebSocketFrame> {
    //存储建立连接的通道
    public static CopyOnWriteArrayList<Channel> channels = new CopyOnWriteArrayList<>();
    // 处理接收到的文本消息
    @Override
    protected void channelRead0(ChannelHandlerContext ctx, TextWebSocketFrame msg) throws Exception {
        // 获取接收到的消息
        String receivedMessage = msg.text();
        // 在这里处理接收到的消息,例如记录日志、处理业务逻辑等
        // 这里只简单打印出接收到的消息
        System.out.println("Received message: " + receivedMessage);

        // 假设有一个服务类(Service)来处理这个消息,比如将消息存储到数据库或者其他操作
        // service.handleMessage(receivedMessage);

        // 回复客户端收到消息的确认
        ctx.writeAndFlush(new TextWebSocketFrame("Received: " + receivedMessage));
    }

    // 处理WebSocket连接建立事件
    @Override
    public void handlerAdded(ChannelHandlerContext ctx) throws Exception {
        // 在这里可以做一些连接建立的处理
        channels.add(ctx.channel());
        System.out.println("WebSocket Client connected success " + ctx.channel());
    }

    // 处理WebSocket连接断开事件
    @Override
    public void handlerRemoved(ChannelHandlerContext ctx) throws Exception {
        // 在这里可以做一些连接断开的处理
        channels.remove(ctx.channel());
        System.out.println("WebSocket Client disconnected: " + ctx.channel());
    }

    // 异常处理
    @Override
    public void exceptionCaught(ChannelHandlerContext ctx, Throwable cause) throws Exception {
        // 发生异常时进行处理
        cause.printStackTrace();
        ctx.close();
    }
}
3.创建websocket启动配置类
import io.netty.bootstrap.ServerBootstrap;
import io.netty.channel.ChannelFutureListener;
import io.netty.channel.ChannelInitializer;
import io.netty.channel.ChannelPipeline;
import io.netty.channel.EventLoopGroup;
import io.netty.channel.nio.NioEventLoopGroup;
import io.netty.channel.socket.SocketChannel;
import io.netty.channel.socket.nio.NioServerSocketChannel;
import io.netty.handler.codec.http.HttpObjectAggregator;
import io.netty.handler.codec.http.HttpServerCodec;
import io.netty.handler.codec.http.websocketx.WebSocketServerProtocolHandler;
import io.netty.handler.stream.ChunkedWriteHandler;
import org.springframework.context.annotation.Configuration;
import javax.annotation.PostConstruct;


@Configuration
public class WebSocketConfig {

    // 在应用启动时启动Netty服务器
    @PostConstruct
    public void startNettyServer() {
        //负责接收客户端的连接请求
        EventLoopGroup bossGroup = new NioEventLoopGroup();
        //负责处理已经建立连接的客户端的读写请求
        EventLoopGroup workerGroup = new NioEventLoopGroup();
        //创建服务驱动
        ServerBootstrap serverBootstrap = new ServerBootstrap();
        serverBootstrap.group(bossGroup, workerGroup)
                .channel(NioServerSocketChannel.class)
                .childHandler(new ChannelInitializer<SocketChannel>() {
                    @Override
                    protected void initChannel(SocketChannel ch) throws Exception {
                        ChannelPipeline pipeline = ch.pipeline();
                        // Http编解码器
                        pipeline.addLast(new HttpServerCodec());
                        // 写文件内容
                        pipeline.addLast(new ChunkedWriteHandler());
                        // 聚合解码HttpRequest/HttpContent/LastHttpContent到FullHttpRequest
                        //http数据在传输过程中是分段的,可以多个段聚合
                        pipeline.addLast(new HttpObjectAggregator(8192));
                        // 处理WebSocket升级握手、Ping、Pong等消息
                        pipeline.addLast(new WebSocketServerProtocolHandler("/ws"));
                        // 自定义WebSocket处理器
                        pipeline.addLast(new WebSocketHandler());
                    }
                });
                //绑定端口启动netty服务
                serverBootstrap.bind(8888)
                .addListener((ChannelFutureListener) future -> {
                    if (future.isSuccess()) {
                        System.out.println("Netty Server started on port 8888" );
                    } else {
                        System.err.println("Netty Server start failed on port 8888");
                    }
                });
    }
}
4.编写html测试代码
<!DOCTYPE html>
<html>

<head>
    <title>WebSocket Example</title>
    <meta charset="utf-8">
    <script type="text/javascript">
        let socket = new WebSocket("ws://localhost:8888/ws");

        socket.onopen = function(event) {
            console.log("WebSocket connected");
        };

        socket.onmessage = function(event) {
            console.log("Message received: " + event.data);
            // 在页面上展示接收到的消息
            document.getElementById("messageDisplay").innerText = event.data;
        };

        // 发送消息给服务器
        function sendMessage() {
            let messageToSend = document.getElementById("messageInput").value;
            socket.send(messageToSend);
        }
</script>
</head>

<body>
<h1>WebSocket Example</h1>
<div>
    <input type="text" id="messageInput" placeholder="Type a message...">
    <button onclick="sendMessage()">Send</button>
</div>
<div>
    <h2>Received Message:</h2>
    <p id="messageDisplay"></p>
</div>
</body>

</html>
5.编写调试controller
import com.example.websocket.demos.config.WebSocketHandler;
import io.netty.channel.Channel;
import io.netty.handler.codec.http.websocketx.TextWebSocketFrame;
import org.springframework.beans.factory.annotation.Autowired;
import org.springframework.http.ResponseEntity;
import org.springframework.web.bind.annotation.PostMapping;
import org.springframework.web.bind.annotation.RequestParam;
import org.springframework.web.bind.annotation.RestController;
@RestController
public class MessageController {
@Autowired
private WebSocketHandler webSocketHandler;
@PostMapping("/send-message")
public ResponseEntity<String> sendMessage(@RequestParam String message) {
// 这里简单模拟调用WebSocketHandler发送消息
for (Channel channel : WebSocketHandler.channels) {
channel.writeAndFlush(new TextWebSocketFrame("From Backend: " + message));
}
// 假设发送成功后返回成功的响应
return ResponseEntity.ok("发送成功!");
}
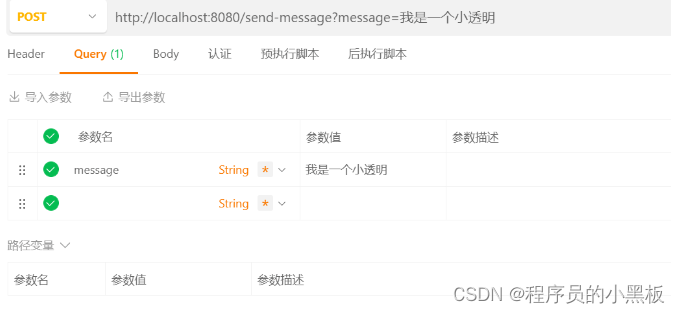
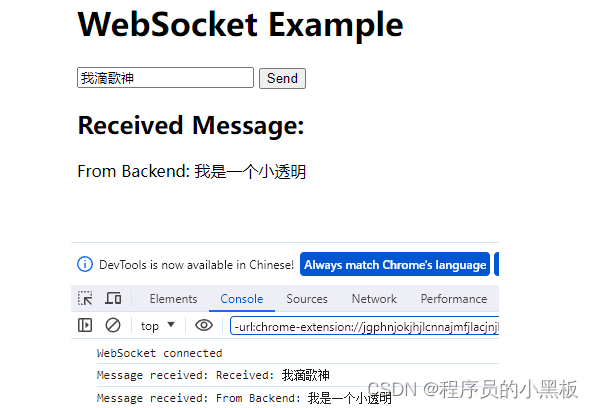
}5.测试
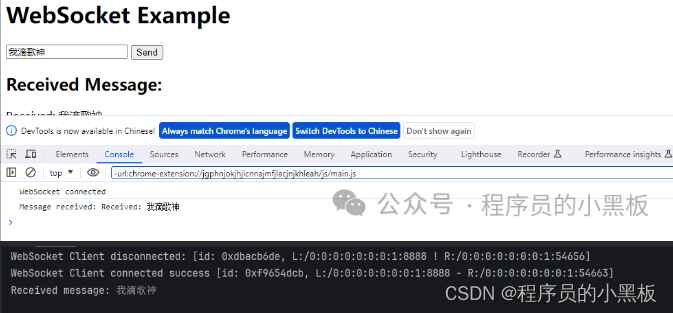
调用接口前端展示:
四、总结
-
javax.websocket是标准化的解决方案,适合于对标准规范有要求的场景
-
spring-boot-starter-websocket在Spring生态系统下提供了更方便的集成和开发方式,适用于需要快速开发的场景。
-
Netty适用于对性能和定制性要求较高的场景,但需要更深入的技术理解和开发投入。
选择合适的WebSocket实现取决于项目需求和团队的技术栈,需要根据实际情况权衡各种优劣势,做出最合适的选择。
学习更多简单好理解的编程和架构知识!
关注我 不迷路
或者微信 添加公众号


 4577
4577


 被折叠的 条评论
为什么被折叠?
被折叠的 条评论
为什么被折叠?
 到【灌水乐园】发言


