1.前言
Sequoiadb分布式数据库作为新一代的nosql数据库。除了拥有高性能之外对标准SQL也是支持的,Sequoiadb能够对接spark之外,还有企业级的SequoiaSql可以选择,SequoiaSql是解析sql语言,Sequoiadb来执行SequoiaSql解析出的语言并执行相关命令,SequoiaSql相当于客户端,Sequoiadb相当于后端。用户可以通过JDBC驱动连接SequoiaSql进行应用程序开发。用户通过扩展SequoiaSql功能,让开发者可以使用SQL语句访问Sequoiadb数据库,完成Sequoiadb数据库的增、删、查、改操作,本片文章介绍Sequoiadb如何对接SequoiaSql进行应用开发。
2、安装部署
2.1、安装SequoiaSql
以下步骤需要在root下操作
1、进入安装包目录
cd/opt
2、给Sequoiasql添加执行权限
chmod +xsequoiasql-oltp-2.8-x86_64-enterprise-installer.run
3、验证权限,结果为:-rwxr-xr-x即可:
ls-la sequoiasql-oltp-2.8-x86_64-enterprise-installer.run
4、安装sequoiasql选择模式为text,在安装的时候要指定安装路径,使用默认目录: /opt/SequoiaSQL。
./sequoiasql-oltp-2.8-x86_64-enterprise-installer.run --mode text
5、修改sequoiasql 目录及目录下的文件权限
chown-R sdbadmin:sdbadmin_group /opt/sequoiasql
6、修改结果为:
drwxr-xr-x sdbadmin sdbadmin_group
以下步骤在sdbadmin下操作
7、切换sdbadmin用户
su- sdbadmin
8、备份环境变量
cp~/.bashrc ~/.bashrc2.bak
9、添加环境变量
vi~/.bashrc
#追加以下两行
exportpath=$path:/opt/sequoiasql/bin
exportld_library_path=$ld_library_path:/opt/sequoiasql/lib
Note:红色部分为用户自定义的安装目录
10、使配置生效
source~/.bashrc
11、检查配置
echo${path}
12、进入安装目录
cd /opt/sequoiasql
13、初始化数据目录,其中pg_data和bin目录同一级。
./bin/initdb-D ./pg_data/
14、备份pg_data目录下的pg_hba.conf和SequoiaSql.conf
cd /opt/sequoiasql/pg_data
cppg_hba.conf pg_hba.conf.bak
cpSequoiaSql.conf SequoiaSql.conf.bak
15、验证是否备份
ls-la
/opt/sequoiasql/pg_data/pg_hba.conf.bak
/opt/sequoiasql/pg_data/SequoiaSql.conf.bak
16、修改配置文件pg_hba.conf,增加红色这一行
# IPV4 local connections:
host all all 127.0.0.1/32 trust
host all all 0.0.0.0/0 trust
# IPV6 local connections:
host all all ::1/128 trust
17、验证是否修改成功catpg_hba.conf ,打印结果:
# IPV4 local connections:
host all all 127.0.0.1/32 trust
host all all 0.0.0.0/0 trust
# IPV6 local connections:
host all all ::1/128 trust
18、修改SequoiaSql.conf,修改红色部分。
listen_addresses = '*'
port = 5432
Max_connections = 100
Shared_buffers = 128 MB
log_connections = on
log_disconnections = on
log_line_prefix = ‘%m %p %r'
log_timezone = ‘PRC’
exit_on_error = on
19、检查端口是否被占用(在root用户下操作)
netstat-nap | grep 5432
Note:如果5432端口被占用或者希望修改SequoiaSql 的启动端口,则在上面的步骤中修改port端口,设置为闲置且没有用户使用的端口。
20、启动进程
cd/opt/sequoiasql
./bin/postgres-D ./pg_data/ >> logfile 2>&1 &
21、检查端口是否已经被SequoiaSql占用,输出为如下信息表示启动成功
netstat-nap | grep 5432
tcp 0 0 127.0.0.1:5432 0.0.0.0:* LISTEN 20502/postgres
unix 2 [ ACC ] STREAM LISTENING 40776754 20502/postgres /tmp/.s.PGSQL.5432
22、创建 Sequoiasql 的 database
$bin/createdb -p 5432 foo
23、进入 SequoiaSql shell 环境
$bin/psql -p 5432 foo
2.2、检查SequoiaSql插件
1、检查sdb_fdw.so文件
切换到SequoiaSql的lib目录中
cd/opt/sequoiasql/bin
llsdb_fdw.so*
lrwxrwxrwx. 1 root root 22 Sep 12 20:18 sdb_fdw.so ->sdb_fdw.so_e_2.8_27329
-rwxr-xr-x. 1 root root 1164510 Jan 23 2017 sdb_fdw.so_e_2.8_27329
可以看到已经有软连接sdb_fdw.so 连接的是sdb_fdw.so_e_2.8_27329,其中2.8_27329为数据库的版本号,表示为:2.8版本的27329打包序列。如下图所示:
2、检查sdb_fdw.control和sdb_fdw--1.0.sql这两个文件
切换到SequoiaSql的/share/extension目录中
cd/opt/sequoiasql/share/extension
查看这两个文件是否已经存在
llsdb_fdw*
-rw-r--r--. 1 root root 469 Jan 23 2017 sdb_fdw--1.0.sql
-rw-r--r--. 1 root root 153 Jan 23 2017 sdb_fdw.control
如下图所示:
2.3、Sequoiadb连接Sequoiasql
1、首先加载Sequoiadb连接驱动
foo=#create extension sdb_fdw;
2、配置与Sequoiadb连接参数
foo=#create server sdb_server foreign data wrapper sdb_fdw options(address'127.0.0.1', service '11810', user 'sdbadmin', password 'mypassword');
Note:
1)、如果没有配置数据库密码验证,可以忽略user与password字段。
2)、连接参数包括address、service 、user、password、preferedinstance 和 transaction。
3)、address和service 参数分别指的是主机名和端口号;为了避免在一个协调节点出现异常后Sequoiasql无法使用的情况,用户可以指定多个协调节点,即address可写成 ’hostname1:service1,hostname2:service2’的形式,同时用户必须指定service 为空字符串。示例如下:
foo=# create server sdb_server foreign datawrapper sdb_fdw options(address'192.168.30.182:11810,192.168.30.183:11810,192.168.30.184:11810', service '',user 'sdbadmin', password 'mypassword'); ;
4)、preferedinstance参数是在指定SequoiaSql 访问Sequoiadb 数据节点时,优先选择连接哪个角色的数据节点,默认为’s’,即备节点,可配置参数为’m’/’M’/’s’/’S’/’a’/’A’/1-7,分别表示master/slave/anyone/node1-node7。
5)、transaction参数对接db的事务,默认值为false 。
3、关联Sequoiadb的集合空间与集合
foo=#create foreign table test (name text, id numeric) server sdb_server options (collectionspace 'cs', collection 'cl', decimal 'on' ) ;
Note:
其中是在foo这个库下操作创建的表名为test,关联的集合空间为cs ,集合为cl。
4、重启 SequoiaSql
$ bin/pg_ctl stop -s -D pg_data/ -m fast;bin/postgres -D pg_data/ >> logfile 2>&1 &
5、验证是否关联成功
1)、此时在Sequoiadb的sdb中进行查询为:
2)、在Sequoiasql中查询test的结果:
发现两个查询出来的结果值相同,说明已经关联成功。
6、进入Sequoiasql的shell中常用的一些操作:
\c切换到不同的库
\l显示所的库
\q退出pg
\h:查看SQL命令的解释,比如\h select。
\?:查看psql命令列表。\l:列出所有数据库。
\c[database_name]:连接其他数据库。
\d:列出当前数据库的所有表格。
\d[table_name]:列出某一张表格的结构。
\du:列出所有用户。
\e:打开文本编辑器。
\conninfo:列出当前数据库和连接的信息。
2.4、调整SequoiaSql配置文件
1、查看pg_shell中默认的配置
执行命令:
foo=#set
结果为:
AUTOCOMMIT= 'on'
PROMPT1= '%/%R%# '
PROMPT2= '%/%R%# '
PROMPT3= '>> '
VERBOSITY= 'default'
VERSION= 'SequoiaSql 9.3.4 on x86_64-unknown-linux-gnu, compiled by gcc (SUSE Linux)4.3.4 [gcc-4_3-branch revision 152973], 64-bit'
DBNAME= 'foo'
USER= 'sdbadmin'
PORT= '5432'
ENCODING= 'UTF8'
2、调整pg_shell查询时,每次获取记录数
foo=#setFETCH_COUNT 100
调整为每次ps_shell每次获取100 条记录立即返回记录,然后再继续获取。直接在pg_shell中修改配置文件,只能在当前pg_shell中生效,重新登录pg_shell需要重新设置。
3、调整pg_shell的日志级别
$>sed -i 's/#client_min_messages =notice/client_min_messages = debug1/g' pg_data/SequoiaSql.conf
4、调整pg引擎的日志级别
1、设计概要
3.1、设计框架图
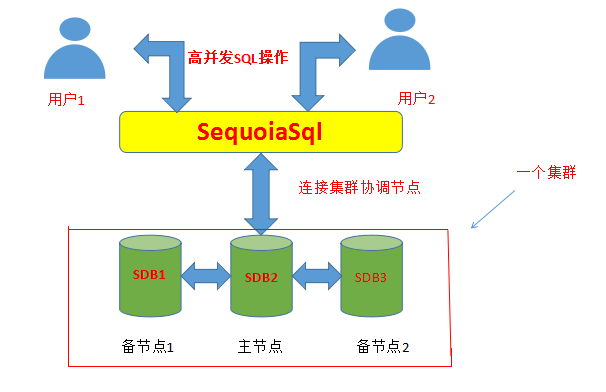
框架图如下:
多个应用使用JDBC连接SequoiaSql进行高并发的SQL操作,SequoiaSql连接Sequoiadb的协调节点,连接默认选择备机作为连接的机器,当有插入的操作时会在主节点进行插入。
3.2、数据类型对应
在SequoiaSql进行表关联时数据类型需要指定。
| Sequoiadb | SequoiaSql |
| string | text |
| string | char/char(N) |
| string | varchar/varchar(N) |
| int/double/long | numeric |
| int | int |
| int/double | float |
| date | date |
| binary | bytea |
| timestamp | timestamp |
| array | TYPE[] sample:text[] |
| boolean | boolean |
| null | text |
3.3、注意事项
1、注意字符的大小写
Sequoiadb 中的集合空间、集合和字段名均对字母的大小写敏感
1) 集合空间、集合名大写
假设Sequoiadb 中存在名为TEST的集合空间,CHEN的集合,在SequoiaSql中建立相应的映射表
foo=# create foreign table sdb_upcase_cs_cl (name text) serversdb_server options ( collectionspace 'TEST', collection 'CHEN' ) ;
2) 字段名大写
假设Sequoiadb 中存在名为foo的集合空间,bar的集合,而且保存的数据为:
{
"_id": {
"$oid":"53a2a0e100e75e2c53000006"
},
"NAME": "test"
}
在SequoiaSql中建立相应的映射表
foo=# create foreign table sdb_upcase_field (“NAME” text) serversdb_server options ( collectionspace 'foo', collection 'bar' ) ;
执行查询命令:
foo=# select * from sdb_upcase_field;
查询结果为:
NAME
------
test
(1 rows)
2. 映射Sequoiadb中的数据类型
假设Sequoiadb中存在foo集合空间,bar集合,保存记录为:
{
"_id": {
"$oid":"53a2de926b4715450a000001"
},
"name": [
1,
2,
3,
],
"id": 123
}
在SequoiaSql 中建立相应的映射表
foo=# create foreign table bartest (name numeric[], id numeric) serversdb_server options ( collectionspace 'foo', collection 'bar' ) ;
执行查询命令:
foo=# select * from bartest;
查询结果:
name |id
---------+-----
{1,2,3} | 123
3. 连接Sequoiadb 协调节点错误
如果SequoiaSql连接的Sequoiadb 协调节点重启,在查询时报错
ERROR: Unable to get collection"chen.test", rc = -15
HINT: Make sure the collectionspace and collection exist on the remotedatabase
解决方法:
退出SequoiaSql shell
foo=# q
重新进入SequoiaSql shell
$> bin/psql -p 5432 foo
1、对接使用示例
4.1、修改SequoiaSql的连接配置
1、修改SequoiaSql的监听地址
$>sed -i "s/#listen_addresses = 'localhost'/listen_addresses ='0.0.0.0'/g" pg_data/SequoiaSql.conf
2、修改信任的机器列表
$>linenum=$(cat-n pg_data/pg_hba.conf | grep "# IPv4 local connections:" | awk'{print $1}');
let "linenum=linenum+1";varStr="host all all 0.0.0.0/0 trust";
sed -i "${linenum} a${varStr}" pg_data/pg_hba.conf;
3、重启SequoiaSql
$>bin/pg_ctl stop -s -D pg_data/ -mfast; bin/postgres -D pg_data/ >> logfile 2>&1 &
4.2、使用JDBC连接SequoiaSql
1、已经安装好Eclipse,并且创建好工程,将Sequoiadb.jar包导入。
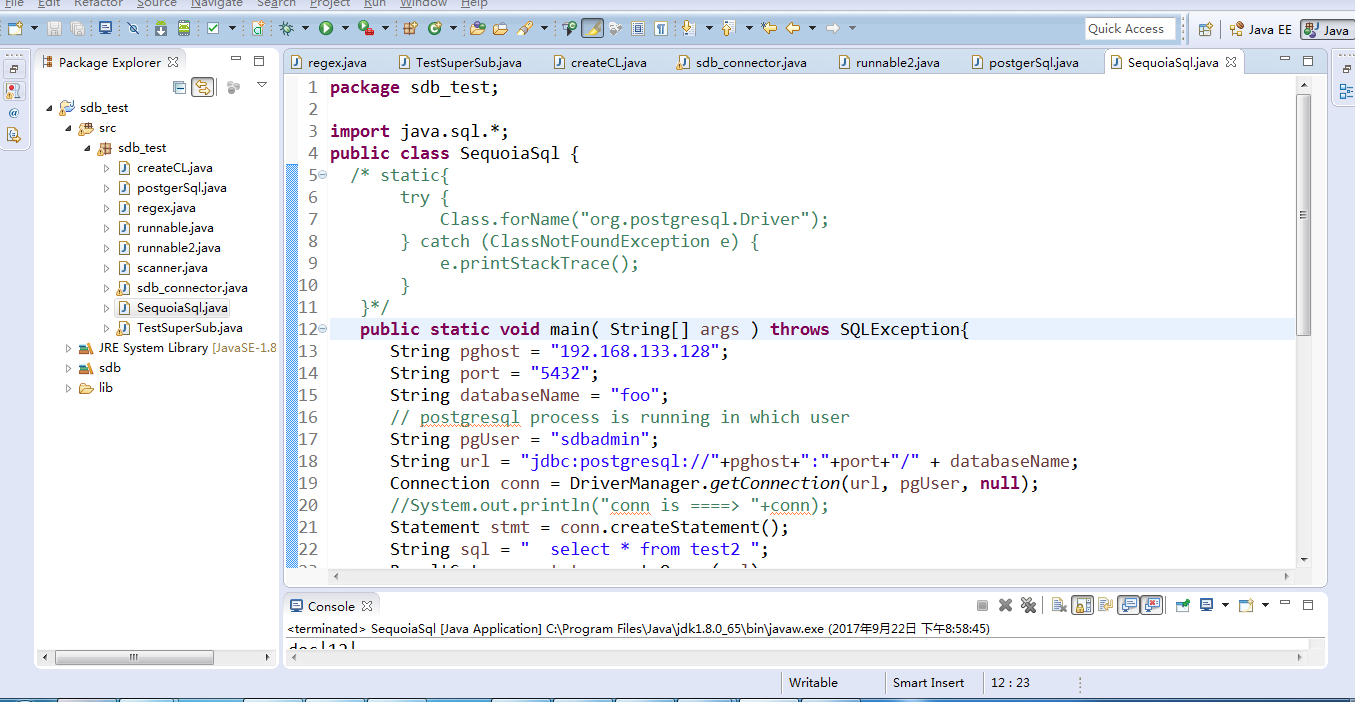
2、执行如下代码进行连接:
package sdb_test;
import java.sql.*;
public class SequoiaSql {
/*static{
try {
Class.forName("org.SequoiaSql.Driver");
} catch (ClassNotFoundException e) {
e.printStackTrace();
}
}*/
public static void main( String[] args ) throws SQLException{
String pghost = "机器IP";
String port = "5432";
String databaseName = "foo";
// SequoiaSql process is running in which user
String pgUser = "sdbadmin";
String url ="jdbc:SequoiaSql://"+pghost+":"+port+"/" +databaseName;
Connection conn = DriverManager.getConnection(url, pgUser, null);
//System.out.println("conn is ====> "+conn);
Statement stmt = conn.createStatement();
String sql = "select * from test2 ";
ResultSet rs = stmt.executeQuery(sql);
boolean isHeaderPrint = false;
while (rs.next()) {
ResultSetMetaData md = rs.getMetaData();
int col_num = md.getColumnCount();
if (isHeaderPrint){
for (int i = 1; i <= col_num; i++) {
System.out.print(md.getColumnName(i)+ "|");
isHeaderPrint = true;
}
}
for (int i = 1; i <= col_num; i++) {
System.out.print(rs.getString(i)+ "|");
}
System.out.println();
}
stmt.close();
conn.close();
}
}
3、分析执行的结果是否正确
1)、在Sequoiadb中进行这张表的查询
> db.cs2.cl2.find()
{
"_id": {
"$oid": "59c4af84622ea311aa000000"
},
"name": "doc",
"age": 12
}
{
"_id": {
"$oid": "59c4af8e622ea311aa000001"
},
"name": "Jess",
"age": 13
}
{
"_id": {
"$oid": "59c4af9c622ea311aa000002"
},
"name": "dd",
"age": 14
}
{
"_id": {
"$oid": "59c4afa4622ea311aa000003"
},
"name": "eer",
"age": 15
}
Return 4 row(s).
Takes 0.007498s.
2)、在SequoiaSql关联Sequoiadb的表
foo=# create foreign table test2 (name text,age int) server sdb_server options( collectionspace 'cs2', collection 'cl2' ) ;

3)、在SequoiaSql中进行查询
foo=# select * from test2;
name| age
------+-----
doc | 12
Jess| 13
dd | 14
eer | 15
(4 rows)
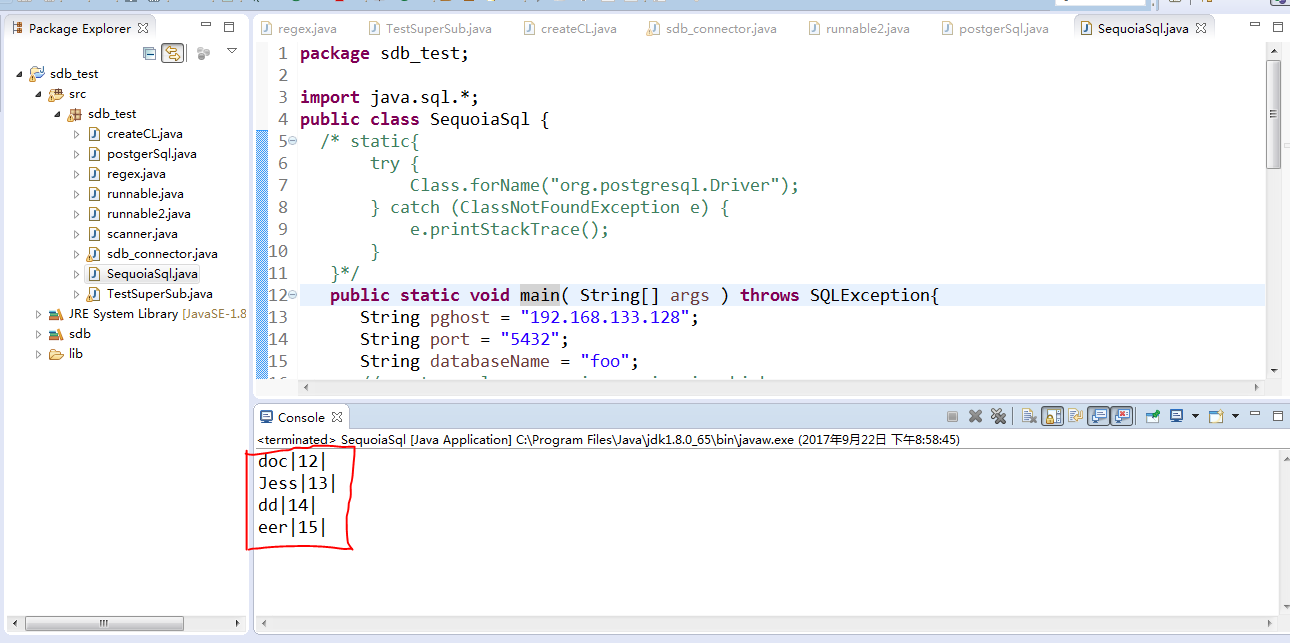
4)、通过JDBC连接查询test2这张表
查询出的结果完全相同,通过以上可以证明,JDBC连接已经成功,开发时可以直接进行传SQL变量进行使用。
4.3、使用SQl的join操作
创建cs.cl 使用bulkinsert插入10000000条数据
vardb = new Sdb("localhost",11810);
var recordList = [];
var bulkNum = 1024;
var i = 0;
while (i<10000000){
recordList.push ({name:"test",num:i,cost:i*10});
++i;
if (recordList.length%bulkNum == 0){
db.cs.cl.insert(recordList) ;
recordList = [];
}
}
if (recordList.length != 0) {
db.cs.cl.insert(recordList); recordList = [];
}
创建cs.cl2,使用bulkinsert插入1000000条数据
var db = newSdb("localhost",11810);
var recordList = [];
var bulkNum = 1024;
var i = 0;
while (i<1000000){
recordList.push ({name:"hhh",num:i*10,cost:i*100,address:”beijing”});
++i;
if (recordList.length%bulkNum == 0){
db.cs.cl.insert(recordList) ;
recordList = [];
}
}
if (recordList.length != 0) {
db.cs.cl.insert(recordList); recordList = [];
}
给cs.cl和cs.cl2创建SequoiaSql表
#创建cs_cl表
create foreign table cs_cl (name text, numint ,cost int ) server
sdb_server options ( collectionspace 'cs',collection 'cl', decimal 'on' ) ;
#创建cs_cl2表
createforeign table cs_cl2 (name text, num int ,cost int,address text) serversdb_server options ( collectionspace 'cs', collection 'cl2', decimal 'on' ) ;
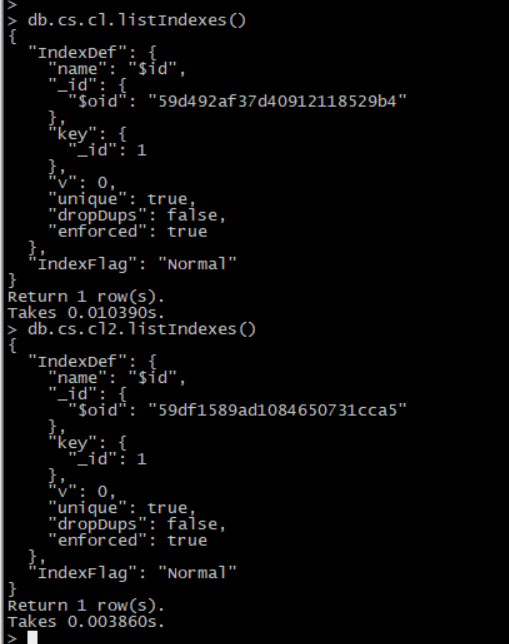
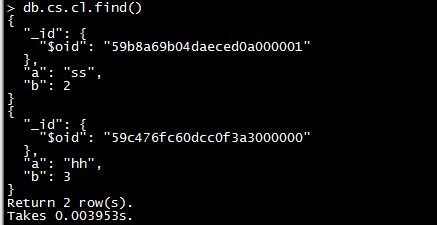
效果如下图所示:

此时cs3.cl3是没有索引
在SequoiaSql中进行两张表的关联查询查看访问计划
foo=# explain select a.name,b.cost fromcs_cl2 a left join cs_cl b on
a.num=b.cost where a.num=100;
QUERYPLAN
----------------------------------------------------------------------------------
Hash Right Join (cost=105774.48..14237022.97 rows=1380650000width=36)
Hash Cond: (b.cost = a.num)
-> Foreign Scan on cs_clb (cost=0.00..151453.00 rows=50000width=4)
Filter: (cost = 100)
Foreign Namespace: cs.cl
-> Hash (cost=105213.31..105213.31 rows=27613width=36)
-> Foreign Scan on cs_cl2a (cost=0.00..105213.31 rows=27613width=36)
Filter: (num = 100)
Foreign Namespace: cs.cl2
(9 rows)
显示是走Hash Right Join
给cs.cl的cost字段创建索引
>db.cs.cl.createIndex("cost_index",{"cost":1})
Takes 32.411557s.
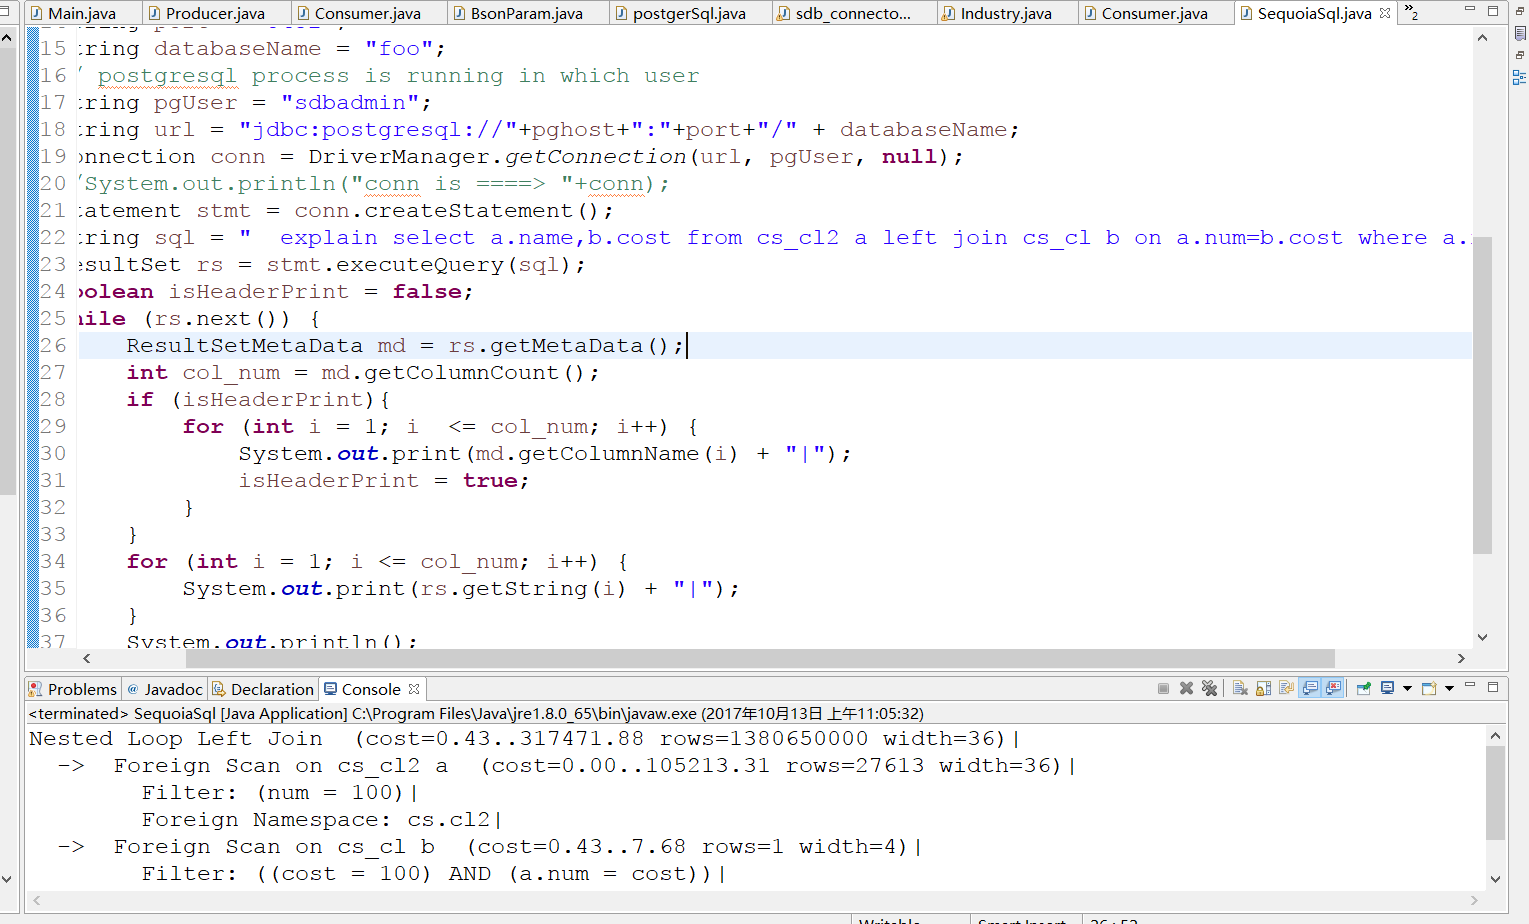
在Sequoiasql中进行left join 查询同时执行访问计划
foo=# explain select a.name,b.cost fromcs_cl2 a left join cs_cl b on a.num=b.cost where a.num=100;
QUERYPLAN
----------------------------------------------------------------------------
Nested Loop Left Join (cost=0.43..317471.88 rows=1380650000width=36)
-> Foreign Scan on cs_cl2a (cost=0.00..105213.31 rows=27613width=36)
Filter: (num = 100)
Foreign Namespace: cs.cl2
-> Foreign Scan on cs_clb (cost=0.43..7.68 rows=1 width=4)
Filter: ((cost = 100) AND (a.num = cost))
Foreign Namespace: cs.cl
(7 rows)
显示是走 Nested Loop Left Join

使用JDBC显示同样的结果
当创建cs.cl2的num索引,删除cs.cl的cost索引。
>db.cs.cl2.createIndex("num_index",{"num":1})
Takes 15.430328s.
>db.cs.cl.dropIndex("cost_index")
Takes 1.791945s.

重新执行left join的访问计划可以看到
foo=# explain select a.name,b.cost fromcs_cl2 a left join cs_cl b on a.num=b.cost where a.num=100;
QUERYPLAN
----------------------------------------------------------------------------------
HashRight Join (cost=105774.48..14237022.97rows=1380650000 width=36)
Hash Cond: (b.cost = a.num)
-> Foreign Scan on cs_clb (cost=0.00..151453.00 rows=50000width=4)
Filter: (cost = 100)
Foreign Namespace: cs.cl
-> Hash (cost=105213.31..105213.31 rows=27613width=36)
-> Foreign Scan on cs_cl2a (cost=0.00..105213.31 rows=27613width=36)
Filter: (num = 100)
Foreign Namespace: cs.cl2
(9 rows)

综上所述可以得出,是否是使用Nested Loop Left Join和右表的关联字段是否有索引有关。
5、sequoiasql和postgresql对比
Sequoiasql对postgresql进行了升级和优化,两者都能够支持标准sql,支持高并发的sql操作。比较有特点是Sequoiasql重点优化了关联查询,当连接到Sequoiadb数据库时能够支持Nested Loop Left Join和left Join之间的随意切换使用。当使用Nested Loop Left Join进行查询时使得性能得到了比较高的提升,因为在Sequoiadb数据库中是进行索引读。
Sequoiasql的Nested LoopLeft Join功能由引擎配置文件的enable_nestloop参数控制是否开启,当然该功能默认是开启的。两种join类型进行比较:
1、NL Join使用要求
Sequoiasql在做关联查询时需要执行NL Join关联策略,需要满足以下条件
1) enable_nestloop参数设置为on
2) 关联右表(也叫探查表、内部表)的关联字段有创建索引
3) 关联左表(也叫驱动表、外部表)的数据量相对较少
使用NL Join的效率一般来讲是最快的
2、Hash join要求
SequoiaSQL在执行关联查询时,如果不满足NL Join的要求,则自动选择使用HashJoin完成关联查询。
6、Sequoiasql中hint使用
6.1、安装pg_hint
1、首先解压pg_hint.tar.gz
tar -zxvf pg_hint.tar.gz
存在以下文件

2、拷贝配置文件
将以下文件拷贝到pg安装目录下share/extension/
pg_hint_plan.control
pg_hint_plan--1.1.3.sql
pg_hint_plan--1.0--1.1.1.sql
pg_hint_plan--1.1.1--1.1.2.sql
pg_hint_plan--1.1.2--1.1.3.sql

3、拷贝pg_hint动态库
将以下文件拷贝到pg安装目录下lib/
pg_hint_plan.so.93.1.1.3
赋予可执行权限
chmod +x pg_hint_plan.so.93.1.1.3
创建软链接
>ln -s pg_hint_plan.so.93.1.1.3pg_hint_plan.so
4、修改pg配置文件(数据目录下)
>cd /opt/sequoiasql/pg_data
>vi postgresql.conf
#配置选项shared_preload_libraries
shared_preload_libraries = 'pg_hint_plan'

5、重新启动pg
$>bin/pg_ctl stop -s -D pg_data/ -mfast; bin/postgres -D pg_data/ >>
logfile 2>&1 &
使用命令netstat -nap | grep 5432 出现如下信息表示5432端口启动成功

使用命令 ps -elf | grep postgres 出现如下信息表示启动成功
6.2、使用pg_hint
1、进入Sequoiasql中
[sdbadmin@sdb1 bin]$ psql -p 5432 foo
psql (9.3.4)
Type "help" for help.
foo=#

2、正常执行sql,查看访问计划
foo=# explain select a.name,b.cost fromcs_cl2 a left join cs_cl b on a.num=b.cost where a.num=100;
QUERYPLAN
----------------------------------------------------------------------------
Nested Loop Left Join (cost=0.43..317471.88 rows=1380650000width=36)
-> Foreign Scan on cs_cl2a (cost=0.00..105213.31 rows=27613width=36)
Filter: (num = 100)
Foreign Namespace: cs.cl2
-> Foreign Scan on cs_clb (cost=0.43..7.68 rows=1 width=4)
Filter: ((cost = 100) AND (a.num = cost))
Foreign Namespace: cs.cl
(7 rows)

3、使用pg_hint,改变关联方式
foo=# /*+ HashJoin(a b) */explain selecta.name,b.cost from cs_cl2 a left join cs_cl b on a.num=b.cost where a.num=100;
QUERYPLAN
----------------------------------------------------------------------------------
HashRight Join (cost=105774.48..14237022.97rows=1380650000 width=36)
Hash Cond: (b.cost = a.num)
-> Foreign Scan on cs_clb (cost=0.00..151453.00 rows=50000 width=4)
Filter: (cost = 100)
Foreign Namespace: cs.cl
-> Hash (cost=105213.31..105213.31 rows=27613width=36)
-> Foreign Scan on cs_cl2a (cost=0.00..105213.31 rows=27613width=36)
Filter: (num = 100)
Foreign Namespace: cs.cl2
(9 rows)

发现已经从原来的Nested Loop Left Join变为Hash Right Join,说明配置已经生效。
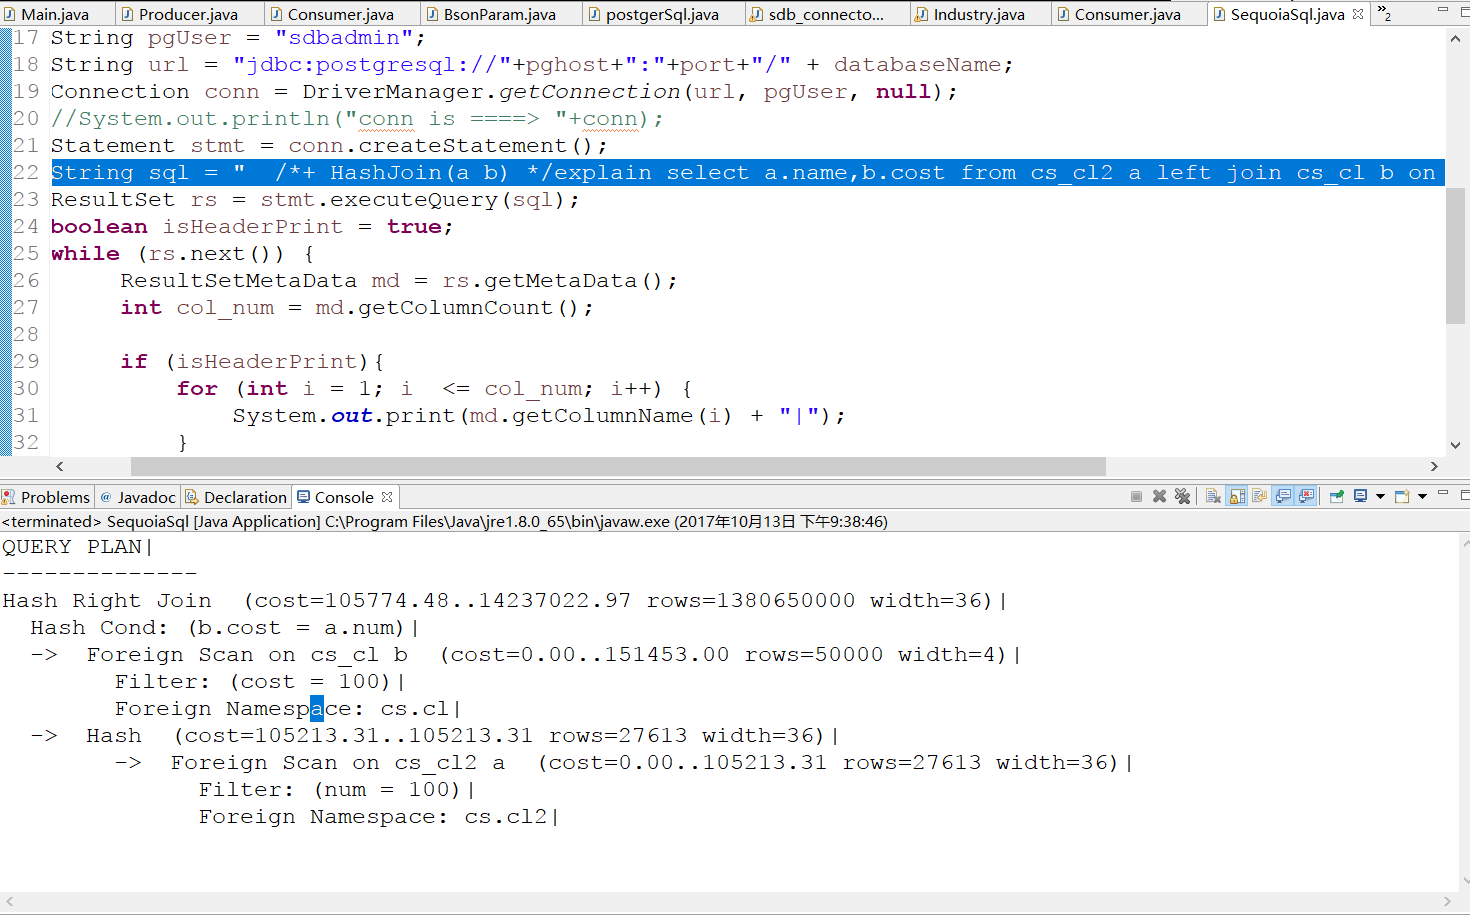
4、在JDBC中执行pg_hint
在代码中添加
String sql = " /*+ HashJoin(a b) */explain selecta.name,b.cost from cs_cl2 a left join cs_cl b on a.num=b.cost where a.num=100;";
和在shell中执行的结果相同
5、pg_hint功能说明
| Group | Format | Description |
| Scan method | SeqScan(table) | Forces sequential scan on the table |
| TidScan(table) | Forces TID scan on the table. | |
| IndexScan(table[ index...]) | Forces index scan on the table. Restricts to specified indexes if any. | |
| IndexOnlyScan(table[ index...]) | Forces index only scan on the table. Rstricts to specfied indexes if any. Index scan may be used if index only scan is not available. Available for PostgreSQL 9.2 and later. | |
| BitmapScan(table[ index...]) | Forces bitmap scan on the table. Restoricts to specfied indexes if any. | |
| NoSeqScan(table) | Forces not to do sequential scan on the table. | |
| NoTidScan(table) | Forces not to do TID scan on the table. | |
| NoIndexScan(table) | Forces not to do index scan and index only scan (For PostgreSQL 9.2 and later) on the table. | |
| NoIndexOnlyScan(table) | Forces not to do index only scan on the table. Available for PostgreSQL 9.2 and later. | |
| NoBitmapScan(table) | Forces not to do bitmap scan on the table. | |
| Join method | NestLoop(table table[ table...]) | Forces nested loop for the joins consist of the specifiled tables. |
| HashJoin(table table[ table...]) | Forces hash join for the joins consist of the specifiled tables. | |
| MergeJoin(table table[ table...]) | Forces merge join for the joins consist of the specifiled tables. | |
| NoNestLoop(table table[ table...]) | Forces not to do nested loop for the joins consist of the specifiled tables. | |
| NoHashJoin(table table[ table...]) | Forces not to do hash join for the joins consist of the specifiled tables. | |
| NoMergeJoin(table table[ table...]) | Forces not to do merge join for the joins consist of the specifiled tables. |
7、总结
通过Sequoiadb和SequoiaSql进行对接,能够使得Sequoiadb支持标准SQl语法。JDBC 是 Sun 提供的一套数据库编程接口API 函数,由 Java 语言编写的类、界面组成。用 JDBC 写的程序能够自动地将 SQL 语句传送给相应的数据库管理系统。通过对接SequoiaSql的JDBC接口,能够使开发者尽快上手不必掌握复杂的API,降低了学习成本,是众多开发者的首选。







 5688
5688

 被折叠的 条评论
为什么被折叠?


