


前言
上篇文章《Tomcat优化-Tomcat如何打破双亲委派》我们深入分析了一下JVM的ClassLoader类加载器机制,以及Tomcat通过打破双亲委派来实现自己的加载隔离,本篇文章接着上篇文章分析Tomcat的启动流程,主要是看Tomcat是如何进行初始化的。如果还没看前面2章的请先看,不然会有点吃力哦,特别是《深入Tomcat底层架构》
回顾
先来简单回顾一下Tomcat中的几个核心组件,看下图
- Tomcat最外层的是Server,一个Server代表一个服务器
- 一个Server中包含多个Service,这样可以实现
通过不同的端口号来访问同一台机器上部署的不同应用 - Connector : 监听一个端口,
Connector用于接收请求并将接收的请求封装为Request和Response再交由Engine进行处理,处理完请求之后再返回给Connector,最后在由Connector通过Socket将处理的结果返回给客户端 - Container : 用于封装和管理Servlet,和处理Request请求;Tomcat 设计了 4 种容器,分别是 Engine、Host、Context 和 Wrapper。这 4 种容器不是平行关系,而是父子关系。
- Engine:引擎,Servlet 的顶层容器,用来管理多个虚拟站点,一个 Service 最多只能有一个 Engine;
- Host:虚拟主机,负责 web 应用的部署和 Context 的创建。可以给 Tomcat 配置多个虚拟主机地址,而一个虚拟主机下可以部署多个 Web 应用程序;可以给每个Host配置一个域名
- Context:Web 应用上下文,包含多个 Wrapper,负责 web 配置的解析、管理所有的 Web 资源。一个Context对应一个 Web 应用程序。
- Wrapper:表示一个 Servlet,最底层的容器,是对 Servlet 的封装,负责 Servlet 实例的创建、执行和销毁

Tomcat启动流程
BootStrap#main Tomcat入口方法
Tomcat的启动类是在 org.apache.catalina.startup.Bootstrap#main中,通过执行main方法来启动,该方法中会创建一个Bootstrap对象,然后执行Bootstrap.init()方法来进行初始化。同时该方法中维护了 Bootstrap 的 start ,stop等生命周期方法的入口,源码如下
public static void main(String args[]) {

        synchronized (daemonLock) {
            if (daemon == null) {
                // Don't set daemon until init() has completed
                Bootstrap bootstrap = new Bootstrap();
                try {
                	//1.初始化Tomcat
                    bootstrap.init();
                } catch (Throwable t) {
                    handleThrowable(t);
                    log.error("Init exception", t);
                    return;
                }
                daemon = bootstrap;
            } else {
                // When running as a service the call to stop will be on a new
                // thread so make sure the correct class loader is used to
                // prevent a range of class not found exceptions.
                Thread.currentThread().setContextClassLoader(daemon.catalinaLoader);
            }
        }

        try {
            String command = "start";
            if (args.length > 0) {
                command = args[args.length - 1];
            }
			//触发startd指令
            if (command.equals("startd")) {
                args[args.length - 1] = "start";
                daemon.load(args);
                daemon.start();
               //触发 stop执行
            } else if (command.equals("stopd")) {
                args[args.length - 1] = "stop";
                daemon.stop();
            } else if (command.equals("start")) {
                daemon.setAwait(true);
                daemon.load(args);
                daemon.start();
                if (null == daemon.getServer()) {
                    System.exit(1);
                }
            } else if (command.equals("stop")) {
                daemon.stopServer(args);
            } else if (command.equals("configtest")) {
                daemon.load(args);
                if (null == daemon.getServer()) {
                    System.exit(1);
                }
                System.exit(0);
            } else {
                log.warn("Bootstrap: command \"" + command + "\" does not exist.");
            }
        } catch (Throwable t) {
            // Unwrap the Exception for clearer error reporting
            if (t instanceof InvocationTargetException && t.getCause() != null) {
                t = t.getCause();
            }
            handleThrowable(t);
            log.error("Error running command", t);
            System.exit(1);
        }
    }
bootstrap#init Tomcat 初始化
下面我们切入到bootstrap#init初始化方法中,该方法中会调用 initClassLoaders初始化Tomcat自定义的类加载器,下面我们可以看到三个类加载器分别是:commonLoader,catalinaLoader,sharedLoader。三个类加载器创建好之后,会通过catalinaLoader加载 Catalina.class并实例化它。并把sharedLoader作为Catalina的setParentClassLoader父类加载器。如下:
//Tomcat中自定义的classLoader
ClassLoader commonLoader = null;
ClassLoader catalinaLoader = null;
ClassLoader sharedLoader = null;

//初始化ClassLoader
private void initClassLoaders() {
     try {
         commonLoader = createClassLoader("common", null);
         if (commonLoader == null) {
             // no config file, default to this loader - we might be in a 'single' env.
             commonLoader = this.getClass().getClassLoader();
         }
         catalinaLoader = createClassLoader("server", commonLoader);
         sharedLoader = createClassLoader("shared", commonLoader);
     } catch (Throwable t) {
         handleThrowable(t);
         log.error("Class loader creation threw exception", t);
         System.exit(1);
     }
 }

//初始化bootstrap
public void init() throws Exception {
		//初始化类加载器
        initClassLoaders();

        Thread.currentThread().setContextClassLoader(catalinaLoader);

        SecurityClassLoad.securityClassLoad(catalinaLoader);

        // Load our startup class and call its process() method
        if (log.isTraceEnabled()) {
            log.trace("Loading startup class");
        }
        //加载 Catalina 类
        Class<?> startupClass = catalinaLoader.loadClass("org.apache.catalina.startup.Catalina");
        //实例化 Catalina 对象
        Object startupInstance = startupClass.getConstructor().newInstance();

        // Set the shared extensions class loader
        if (log.isTraceEnabled()) {
            log.trace("Setting startup class properties");
        }
        String methodName = "setParentClassLoader";
        Class<?> paramTypes[] = new Class[1];
        paramTypes[0] = Class.forName("java.lang.ClassLoader");
        Object paramValues[] = new Object[1];
        paramValues[0] = sharedLoader;
        //调用 Catalina的setParentClassLoader,为Catalina设置 parent 类加载器
        Method method = startupInstance.getClass().getMethod(methodName, paramTypes);
        method.invoke(startupInstance, paramValues);

        catalinaDaemon = startupInstance;
    }
bootstrap#startd Tomcat启动
初始化好类加载器之后,就会执行Tomcat的生命周期方法,这个会根据启动started ,stoped指令做判断,然后调用bootstrap#startd , bootstrap#stoped 来决定是启动或者停止Tomcat
//启动
if (command.equals("startd")) {
       args[args.length - 1] = "start";
       daemon.load(args);
       daemon.start();
  //停止
   } else if (command.equals("stopd")) {
       args[args.length - 1] = "stop";
       daemon.stop();
   }
bootstrap#load 加载配置
如果是startd会先调用 bootstrap#load 来加载tomcat的基础配置,而该方法中会通过反射调用 org.apache.catalina.startup.Catalina#load 方法来加载
    private void load(String[] arguments) throws Exception {

        // Call the load() method
        //调用load方法
        String methodName = "load";
        Object param[];
        Class<?> paramTypes[];
        if (arguments == null || arguments.length == 0) {
            paramTypes = null;
            param = null;
        } else {
            paramTypes = new Class[1];
            paramTypes[0] = arguments.getClass();
            param = new Object[1];
            param[0] = arguments;
        }
        //通过反射调用  org.apache.catalina.startup.Catalina#load方法
        Method method = catalinaDaemon.getClass().getMethod(methodName, paramTypes);
        if (log.isTraceEnabled()) {
            log.trace("Calling startup class " + method);
        }
        method.invoke(catalinaDaemon, param);
    }
bootstrap#load 主要通过反射调用 Catalina#load 去做加载
Catalina#load 加载配置
该方法默认会从conf/server.xml 加载并解析Tomcat的配置,然后调用 StandardServer#init进行初始化
public class Catalina {
	protected static final StringManager sm = StringManager.getManager(Constants.Package);
	//默认加载的配置文件
    public static final String SERVER_XML = "conf/server.xml";
    protected String configFile = SERVER_XML;

	//父类加载器
    protected ClassLoader parentClassLoader = Catalina.class.getClassLoader();
    /**
     * The server component we are starting or stopping.
     */
     //服务对象 :通过Server来停止或者启动服务,实现类是:StandardServer
    protected Server server = null;


  /**
     * Start a new server instance.
     */
    public void load() {

       ...
       //开始解析server.xml配置文件
        // Parse main server.xml
        parseServerXml(true);
        Server s = getServer();
        if (s == null) {
            return;
        }
		//把Catalina对象交给Server
        getServer().setCatalina(this);
        getServer().setCatalinaHome(Bootstrap.getCatalinaHomeFile());
        getServer().setCatalinaBase(Bootstrap.getCatalinaBaseFile());

        // Stream redirection
        initStreams();
		//调用Server#init初始化
        // Start the new server
        try {
            getServer().init();
        } catch (LifecycleException e) {
            if (Boolean.getBoolean("org.apache.catalina.startup.EXIT_ON_INIT_FAILURE")) {
                throw new Error(e);
            } else {
                log.error(sm.getString("catalina.initError"), e);
            }
        }

        if (log.isInfoEnabled()) {
            log.info(sm.getString("catalina.init",
                    Long.toString(TimeUnit.NANOSECONDS.toMillis(System.nanoTime() - t1))));
        }
    }


}
Lifecycle 生命周期接口
Server的唯一实现类是StandardServer,代表着一个Tomcat服务,它
间接实现了Lifecycle接口,Lifecycle是Tomcat提供的生命周期接口,其中包含了对象的start,stop,init,destory等生命周期方法。
下面是org.apache.catalina.Lifecycle接口源码
public interface Lifecycle {
	......
    //销毁
    void destroy() throws LifecycleException;
    void stop() throws LifecycleException;
	//启动
    void start() throws LifecycleException;
	//初始化
    void init() throws LifecycleException;
}
同时Tomcat还为 Lifecycle 提供了一个抽象实现LifecycleBase,它复写了这些生命周期方法,然后通过抽象方法的方式让其子类去具体实现,如下
public abstract class LifecycleBase implements Lifecycle {

	//初始化方法
	    @Override
    public final synchronized void init() throws LifecycleException {
        	...
            initInternal();
            ...
    }
    //抽象方法子类实现

    protected abstract void initInternal() throws LifecycleException;

	//启动方法
	@Override
    public final synchronized void start() throws LifecycleException {

       		...
            startInternal();
          	...
    }
    //抽象方法子类实现
     protected abstract void startInternal() throws LifecycleException;


}
对于init, start, stop,destory 方法都是如此实现,这就是典型的模板方法设计模式 ,除了StandardServer外还有几个很核心的组件也是 Lifecycle 的子类如:StandardService,Connector,StandardEngine,StandardHost,StandardContext,StandardWrapper,都实现了生命周期方法。如下:

有了生命周期方法之后,Tomcat的各个组件就可以做到一键启停了,非常方便。
组件初始化
StandardServer#init 初始化
代码回到 Catalina#load方法,该方法中会调用 getServer().init(); 对Server进行初始化,其实现类是:StandardServer,而init方法又在父类LifecycleBase类中,
public abstract class LifecycleBase implements Lifecycle {

	public final synchronized void init() throws LifecycleException {
     		...
            initInternal();
			...
    }

	//调用子类的方法
    /**
     * Sub-classes implement this method to perform any instance initialisation
     * required.
     *
     * @throws LifecycleException If the initialisation fails
     */
    protected abstract void initInternal() throws LifecycleException;

}

//子类,最终通过 initInternal 来初始化

public final class StandardServer extends LifecycleMBeanBase implements Server {
	 @Override
    protected void initInternal() throws LifecycleException {
		//先初始化父类
        super.initInternal();

     	...省略...
        // Initialize our defined Services
        //找到当前Server下的所有service,调用Service#init方法初始化
        for (Service service : findServices()) {
            service.init();
        }
    }
}
StandardService#init 初始化
StandardServer#initInternal方法中会找到该Server下的所有Service,然后调用其init方法,Service具体的实现类是 StandardService,它继承了 LifecycleMBeanBase,实现了Service接口。 和 StandardServer 一样,service#init 方法也是在 LifecycleMBeanBase父类中,然后通过 抽象方法 initInternal 来调用子类的实现,所以最终初始化的代码在StandardService#initInternal 方法中
public class StandardService extends LifecycleMBeanBase implements Service {

	...省略...

	@Override
    protected void initInternal() throws LifecycleException {
		//父类先初始化
        super.initInternal();

        if (engine != null) {
            engine.init();
        }
		//初始化执行器:线程池
        // Initialize any Executors
        for (Executor executor : findExecutors()) {
            if (executor instanceof JmxEnabled) {
                ((JmxEnabled) executor).setDomain(getDomain());
            }
            executor.init();
        }

        // Initialize mapper listener
        mapperListener.init();
		//找到service下的所有 Connector 然后进行初始化
        // Initialize our defined Connectors
        for (Connector connector : findConnectors()) {
            connector.init();
        }
    }
}
Connector#init 连接器初始化
连接器Connector也 继承了 LifecycleBase ,同样的道理,在调用init方法的时候会通过父类的init调用抽象方法:initInternal ,然后通过之类来实现,下面是Connector#initInternal 方法
@Override
    protected void initInternal() throws LifecycleException {
		//父类先初始化
        super.initInternal();
		//protocolHandler 协议处理器,默认实现是NIO : Http11NioProtocol
        if (protocolHandler == null) {
            throw new LifecycleException(sm.getString("coyoteConnector.protocolHandlerInstantiationFailed"));
        }

        // Initialize adapter
        //初始化 适配器对象
        adapter = new CoyoteAdapter(this);
        //把适配器设置给Http11NioProtocol
        protocolHandler.setAdapter(adapter);

       ...省略...

        try {
        	//对 protocolHandler 进行初始化
            protocolHandler.init();
        } catch (Exception e) {
            throw new LifecycleException(sm.getString("coyoteConnector.protocolHandlerInitializationFailed"), e);
        }
    }
ProtocolHandler.init 初始化
在 Connector#initInternal 方法中会创建 CoyoteAdapter适配器对象,然后调用 ProtocolHandler.init 对ProtocolHandler进行初始化,默认的实现是 Http11NioProtocol(NIO协议)。Http11NioProtocol没有init方法,它是通过其父类 AbstractHttp11Protocol#init来初始化,源码如下
public abstract class AbstractHttp11Protocol<S> extends AbstractProtocol<S> {

	 @Override
    public void init() throws Exception {
        // Upgrade protocols have to be configured first since the endpoint
        // init (triggered via super.init() below) uses this list to configure
        // the list of ALPN protocols to advertise
        for (UpgradeProtocol upgradeProtocol : upgradeProtocols) {
            configureUpgradeProtocol(upgradeProtocol);
        }
		//通过父类初始化
        super.init();

        // Set the Http11Protocol (i.e. this) for any upgrade protocols once
        // this has completed initialisation as the upgrade protocols may expect this
        // to be initialised when the call is made
        for (UpgradeProtocol upgradeProtocol : upgradeProtocols) {
            upgradeProtocol.setHttp11Protocol(this);
        }
    }


public abstract class AbstractProtocol<S> implements ProtocolHandler, MBeanRegistration {

	 @Override
    public void init() throws Exception {
        if (getLog().isInfoEnabled()) {
            getLog().info(sm.getString("abstractProtocolHandler.init", getName()));
            logPortOffset();
        }

        if (oname == null) {
            // Component not pre-registered so register it
            oname = createObjectName();
            if (oname != null) {
                Registry.getRegistry(null, null).registerComponent(this, oname, null);
            }
        }

        if (this.domain != null) {
            ObjectName rgOname = new ObjectName(domain + ":type=GlobalRequestProcessor,name=" + getName());
            this.rgOname = rgOname;
            Registry.getRegistry(null, null).registerComponent(getHandler().getGlobal(), rgOname, null);
        }

        String endpointName = getName();
        endpoint.setName(endpointName.substring(1, endpointName.length() - 1));
        endpoint.setDomain(domain);
		//Endpoint 初始化
        endpoint.init();
    }

}
Endpoint#init 初始化
我们看到 AbstractProtocol#init方法中最终会对 Endpoint进行初始化,Endpoint 默认的实现是 NioEndpoint,它也是通过父类的init来进行初始化的,org.apache.tomcat.util.net.AbstractEndpoint#init
public abstract class AbstractEndpoint<S,U> {

public final void init() throws Exception {
        if (bindOnInit) {
            bindWithCleanup();
            bindState = BindState.BOUND_ON_INIT;
        }
        if (this.domain != null) {
            // Register endpoint (as ThreadPool - historical name)
            oname = new ObjectName(domain + ":type=ThreadPool,name=\"" + getName() + "\"");
            Registry.getRegistry(null, null).registerComponent(this, oname, null);

            ObjectName socketPropertiesOname = new ObjectName(domain +
                    ":type=SocketProperties,name=\"" + getName() + "\"");
            socketProperties.setObjectName(socketPropertiesOname);
            Registry.getRegistry(null, null).registerComponent(socketProperties, socketPropertiesOname, null);

            for (SSLHostConfig sslHostConfig : findSslHostConfigs()) {
                registerJmx(sslHostConfig);
            }
        }
    }

}
到这里init的流程就结束了,这里话了一个图总结一下

组件启动
bootstrap#start 启动
组件的启动和初始化流程差不多,首先回到Bootstrap#mian方法,执行完 load方法后就会执行bootstrap#start方法来启动Tomcat, bootstrap#start 调用的是Catalina#start方法来启动
public void start() throws Exception {
        if (catalinaDaemon == null) {
            init();
        }

        Method method = catalinaDaemon.getClass().getMethod("start", (Class[]) null);
        //调用catalina#start方法
        method.invoke(catalinaDaemon, (Object[]) null);
    }
Catalina#start 启动
下面是 Catalina # start启动方法,方法中会拿到StandardServer执行其start方法,源码如下
public class Catalina {


 /**
     * Start a new server instance.
     */
    public void start() {

        //启动Server,实现类是StandardServer

        // Start the new server
        try {
            getServer().start();
        } catch (LifecycleException e) {
            log.fatal(sm.getString("catalina.serverStartFail"), e);
            try {
                getServer().destroy();
            } catch (LifecycleException e1) {
                log.debug(sm.getString("catalina.destroyFail"), e1);
            }
            return;
        }

       ...省略...
    }
}
StandardServer#startInternal 启动
StandardServer#Start方法和init方法一样,也是通过org.apache.catalina.util.LifecycleBase#start 生命周期父类来调用,最终通过抽象的startInternal方法来启动Server,下面是 StandardServer#startInternal方法代码
@Override
    protected void startInternal() throws LifecycleException {

       	//找到Server下的所有Service,执行Start方法
        // Start our defined Services
        for (Service service : findServices()) {
            service.start();
        }

        if (periodicEventDelay > 0) {
            monitorFuture = getUtilityExecutor().scheduleWithFixedDelay(this::startPeriodicLifecycleEvent, 0, 60,
                    TimeUnit.SECONDS);
        }
    }
在StandardServer#startInternal方法中会找到所有的Service调用其satrt方法来启动。默认会执行StandardService#start,然后通过父类生命周期类调用org.apache.catalina.core.StandardService#startInternal方法,源码如下
 @Override
    protected void startInternal() throws LifecycleException {

        if (log.isInfoEnabled()) {
            log.info(sm.getString("standardService.start.name", this.name));
        }
        //设置状态:启动中
        setState(LifecycleState.STARTING);

        // Start our defined Container first
        //启动engine容器
        if (engine != null) {
            engine.start();
        }
		//启动线程池
        for (Executor executor : findExecutors()) {
            executor.start();
        }
		//启动映射监听器
        mapperListener.start();

        // Start our defined Connectors second
        //找到拦截器,启动连接器
        for (Connector connector : findConnectors()) {
            // If it has already failed, don't try and start it
            if (connector.getState() != LifecycleState.FAILED) {
                connector.start();
            }
        }
    }
StandardService#startInternal 启动
StandardService#startInternal方法中会去找到 Engine 和 Connector去启动。
- Engine#start方法会继续往后调用子容器,比如:Host,Context,Wrapper
- Connector#start方法会启动 NIoEndpoint 去监听Socket请求
protected void startInternal() throws LifecycleException {

        if (log.isInfoEnabled()) {
            log.info(sm.getString("standardService.start.name", this.name));
        }
        setState(LifecycleState.STARTING);

        // Start our defined Container first
        //【重要】启动 Engine
        if (engine != null) {
            engine.start();
        }

        for (Executor executor : findExecutors()) {
            executor.start();
        }

        mapperListener.start();

        // Start our defined Connectors second
        for (Connector connector : findConnectors()) {
            // If it has already failed, don't try and start it
            if (connector.getState() != LifecycleState.FAILED) {
            	//【重要】连接器的启动
                connector.start();
            }
        }
    }
先说Engine,它默认的实现是StandardEngine,它的startInternal方法直接调用了父类ContainerBase 基础容器类的 startInternal来启动,org.apache.catalina.core.StandardEngine#startInternal源码如下
    @Override
    protected void startInternal() throws LifecycleException {

        // Log our server identification information
        if (log.isInfoEnabled()) {
            log.info(sm.getString("standardEngine.start", ServerInfo.getServerInfo()));
        }
		//调用父类的启动方法
        // Standard container startup
        super.startInternal();
    }
ContainerBase#startInternal 通过父类启动
下面是其父类 org.apache.catalina.core.ContainerBase#startInternal 的源码,方法中会拿到所有的子容器,然后包装到 StartChild 中去执行。StartChild是一个Callable线程。然后交给一个线程池去依次执行
protected void startInternal() throws LifecycleException {

        reconfigureStartStopExecutor(getStartStopThreads());

        // Start our subordinate components, if any
        logger = null;
        getLogger();
        Cluster cluster = getClusterInternal();
        if (cluster instanceof Lifecycle) {
            ((Lifecycle) cluster).start();
        }
        Realm realm = getRealmInternal();
        if (realm instanceof Lifecycle) {
            ((Lifecycle) realm).start();
        }

        // Start our child containers, if any
        //拿到所有的子容器,比如:StandardEndpoint的子容器是StandardHost
        Container[] children = findChildren();
        List<Future<Void>> results = new ArrayList<>(children.length);
        for (Container child : children) {
        	//【重要】把子容器交给线程池去执行,StartChild是线程对象
            results.add(startStopExecutor.submit(new StartChild(child)));
        }

        MultiThrowable multiThrowable = null;

        for (Future<Void> result : results) {
            try {
                result.get();
            } catch (Throwable e) {
                log.error(sm.getString("containerBase.threadedStartFailed"), e);
                if (multiThrowable == null) {
                    multiThrowable = new MultiThrowable();
                }
                multiThrowable.add(e);
            }

        }
        if (multiThrowable != null) {
            throw new LifecycleException(sm.getString("containerBase.threadedStartFailed"),
                    multiThrowable.getThrowable());
        }

        // Start the Valves in our pipeline (including the basic), if any
        //【重要】责任链
        if (pipeline instanceof Lifecycle) {
            ((Lifecycle) pipeline).start();
        }

        setState(LifecycleState.STARTING);

        // Start our thread
        //【重要】让线程跑起来,后台去执行 容器
        if (backgroundProcessorDelay > 0) {
            monitorFuture = Container.getService(ContainerBase.this).getServer().getUtilityExecutor()
                    .scheduleWithFixedDelay(new ContainerBackgroundProcessorMonitor(), 0, 60, TimeUnit.SECONDS);
        }
    }
ContainerBackgroundProcessor 后台任务
在该方法中容器对象 Container(Engine,Host,Context,Wrapper) 被交给一个 StartChild 线程对象,然后通过线程池去执行 Container#start方法,除此之外Tomcat还通过线程池启动了一个后台任务:scheduleWithFixedDelay(new ContainerBackgroundProcessorMonitor(), 0, 60, TimeUnit.SECONDS); ContainerBackgroundProcessorMonitor 也是一个runnable 它通过 threadStart 方法来调用 ContainerBackgroundProcessor ,
 protected void threadStart() {
       ...
            backgroundProcessorFuture = Container.getService(this).getServer().getUtilityExecutor()
                    .scheduleWithFixedDelay(new ContainerBackgroundProcessor(), backgroundProcessorDelay,
                            backgroundProcessorDelay, TimeUnit.SECONDS);
        }
    }
ContainerBackgroundProcessor 也是一个runnable,它的run方法中会调用一个 processChildren方法,该方法会调用此容器及其子容器的 backgroundProcess 方法
protected class ContainerBackgroundProcessor implements Runnable {

        @Override
        public void run() {
            processChildren(ContainerBase.this);
        }

        protected void processChildren(Container container) {
            ClassLoader originalClassLoader = null;

            try {
                if (container instanceof Context) {
                    Loader loader = ((Context) container).getLoader();
                    // Loader will be null for FailedContext instances
                    if (loader == null) {
                        return;
                    }

                    // Ensure background processing for Contexts and Wrappers
                    // is performed under the web app's class loader
                    originalClassLoader = ((Context) container).bind(false, null);
                }
                //【重要】调用容器的 backgroundProcess 方法
                container.backgroundProcess();
                Container[] children = container.findChildren();
                for (Container child : children) {
                    if (child.getBackgroundProcessorDelay() <= 0) {
                    //[重要]调用子容器的 backgroundProcess
                        processChildren(child);
                    }
                }
            } catch (Throwable t) {
                ExceptionUtils.handleThrowable(t);
                log.error(sm.getString("containerBase.backgroundProcess.error"), t);
            } finally {
                if (container instanceof Context) {
                    ((Context) container).unbind(false, originalClassLoader);
                }
            }
        }
    }
container.backgroundProcess 后台任务
container.backgroundProcess 该方法最终会通过父类ContainerBase#backgroundProcess 方法来执行,而在该方法中会发布一个事件
public synchronized void backgroundProcess() {

        ...
        fireLifecycleEvent(PERIODIC_EVENT, null);
    }

    protected void fireLifecycleEvent(String type, Object data) {
        LifecycleEvent event = new LifecycleEvent(this, type, data);
        for (LifecycleListener listener : lifecycleListeners) {
            listener.lifecycleEvent(event);
        }
    }
发布事件会触发LifecycleListener#lifecycleEvent 方法,其中比较重要的一个实现是org.apache.catalina.startup.HostConfig#lifecycleEvent ,它里面包含了对项目的部署逻辑
public void lifecycleEvent(LifecycleEvent event) {

        // Identify the host we are associated with
        try {
            host = (Host) event.getLifecycle();
            if (host instanceof StandardHost) {
                setCopyXML(((StandardHost) host).isCopyXML());
                setDeployXML(((StandardHost) host).isDeployXML());
                setUnpackWARs(((StandardHost) host).isUnpackWARs());
                setContextClass(((StandardHost) host).getContextClass());
            }
        } catch (ClassCastException e) {
            log.error(sm.getString("hostConfig.cce", event.getLifecycle()), e);
            return;
        }

        // Process the event that has occurred
        if (event.getType().equals(Lifecycle.PERIODIC_EVENT)) {
            check();
        } else if (event.getType().equals(Lifecycle.BEFORE_START_EVENT)) {
            beforeStart();
        } else if (event.getType().equals(Lifecycle.START_EVENT)) {
            start();
        } else if (event.getType().equals(Lifecycle.STOP_EVENT)) {
            stop();
        }
    }


 protected void check() {

     	... 发布项目
            // Hotdeploy applications
            deployApps();
        }
    }
HostConfig#deployApps 发布项目
在 HostConfig#lifecycleEvent 方法中会调用check做一些列检查,然后代用 deployApps()方法去发布项目,各种部署方式都有,如下:
    protected void deployApps() {
    	// catalina-home/webapps 目录
        File appBase = host.getAppBaseFile();
        //拿到Tomcat默认的项目目录
        File configBase = host.getConfigBaseFile();
        String[] filteredAppPaths = filterAppPaths(appBase.list());
        // Deploy XML descriptors from configBase
        //从xml文件中去发布项目
        deployDescriptors(configBase, configBase.list());
        // Deploy WARs
        //发布war包
        deployWARs(appBase, filteredAppPaths);
        // Deploy expanded folders
        //发布外部项目
        deployDirectories(appBase, filteredAppPaths);
    }
StandardHost#start 启动
StandardHost是在ContainerBase#startInternal中,通过 startStopExecutor.submit(new StartChild(child)) ,去触发调用的,
这里设计很巧妙,比如:当前执行的容器是StandardEngine#startInternal,在方法中拿到的子容器findChildren 是StandardHost容器,把 StandardHost 包装到StartChild线程对象去执行,StartChild#call方法中会调用子容器的 start方法
 private static class StartChild implements Callable<Void> {
		//子容器
        private Container child;

        StartChild(Container child) {
            this.child = child;
        }

        @Override
        public Void call() throws LifecycleException {
        	//启动子容器 :Engine -> Host -> Context -> wrapper
            child.start();
            return null;
        }
    }
这里我把始终容器的继承关系和start调用关系画了一个图方便理解如下:
- 要注意的是这几个容器都是通过 ContainerBase#startInternal 来完成Start调用的

下面是 StandardHost 的源码 org.apache.catalina.core.StandardHost#startInternal,这里很有意思,他加入了2个东西
- Pipeline :管道
- Valve :阀门 ,这个在 Tomcat第一章《Tomcat核心架构》有讲过Pipeline-Valve 责任链,Tomcat通过Pipeline+Valve 责任链完成容器的调用
protected void startInternal() throws LifecycleException {

        // Set error report valve
        String errorValve = getErrorReportValveClass();
        if ((errorValve != null) && (!errorValve.equals(""))) {
            try {
                boolean found = false;
                Valve[] valves = getPipeline().getValves();
                for (Valve valve : valves) {
                    if (errorValve.equals(valve.getClass().getName())) {
                        found = true;
                        break;
                    }
                }
                if (!found) {
                    Valve valve = ErrorReportValve.class.getName().equals(errorValve) ? new ErrorReportValve() :
                            (Valve) Class.forName(errorValve).getConstructor().newInstance();
                    getPipeline().addValve(valve);
                }
            } catch (Throwable t) {
                ExceptionUtils.handleThrowable(t);
                log.error(sm.getString("standardHost.invalidErrorReportValveClass", errorValve), t);
            }
        }
        //调用父类的启动方法
        super.startInternal();
    }
然而再其父类 org.apache.catalina.core.ContainerBase#startInternal 方法中,提供了pipeline的调用方法((Lifecycle) pipeline).start()
protected void startInternal() throws LifecycleException {

        reconfigureStartStopExecutor(getStartStopThreads());

        // Start our subordinate components, if any
        logger = null;
        getLogger();
        //是否是集群部署
        Cluster cluster = getClusterInternal();
        if (cluster instanceof Lifecycle) {
            ((Lifecycle) cluster).start();
        }
        Realm realm = getRealmInternal();
        if (realm instanceof Lifecycle) {
            ((Lifecycle) realm).start();
        }

        // Start our child containers, if any
        Container[] children = findChildren();
        List<Future<Void>> results = new ArrayList<>(children.length);
        for (Container child : children) {
        	//调用子容器
            results.add(startStopExecutor.submit(new StartChild(child)));
        }
		...
        //启动我们管道中的阀门(包括基本阀门)(如果有)
        // Start the Valves in our pipeline (including the basic), if any
        if (pipeline instanceof Lifecycle) {
            ((Lifecycle) pipeline).start();
        }
		...
		//这里通过线程池开启后台线程
       	if (backgroundProcessorDelay > 0) {
            monitorFuture = Container.getService(ContainerBase.this).getServer().getUtilityExecutor()
                    .scheduleWithFixedDelay(new ContainerBackgroundProcessorMonitor(), 0, 60, TimeUnit.SECONDS);
        }
    }
该方法中还会启动后台线程的执行,最终会调用 org.apache.catalina.core.ContainerBase#threadStart 开启后台线程处理,比如:定时检查SESSION超时。
pipeline#start 责任链
我们看到在 ContainerBase#startInternal 方法中还加入了 pipeline的调用,这里采用的是责任链模式。下面我把Tomcat的启动流程画了一个图尝试理解一下。

Connector#start 启动
连接器的启动是在 org.apache.catalina.core.StandardService#startInternal方法中,找到所有的Connector 调用 start来启动,最终调用Connector的startInternal方法
protected void startInternal() throws LifecycleException {

        // Validate settings before starting
        String id = (protocolHandler != null) ? protocolHandler.getId() : null;
        if (id == null && getPortWithOffset() < 0) {
            throw new LifecycleException(
                    sm.getString("coyoteConnector.invalidPort", Integer.valueOf(getPortWithOffset())));
        }

        setState(LifecycleState.STARTING);

        // Configure the utility executor before starting the protocol handler
        if (protocolHandler != null && service != null) {
            protocolHandler.setUtilityExecutor(service.getServer().getUtilityExecutor());
        }

        try {
            protocolHandler.start();
        } catch (Exception e) {
            // Includes NPE - protocolHandler will be null for invalid protocol if throwOnFailure is false
            throw new LifecycleException(sm.getString("coyoteConnector.protocolHandlerStartFailed"), e);
        }
    }
ProtocolHandler#start 启动
在该方法中会先为ProtocolHandler(默认是:Http11NioProtocol )指定Executor执行器,然后执行其 start方法,而在ProtocolHandler#start方法中又会去启动endpoint#start,下面是:org.apache.coyote.AbstractProtocol#start源码
public void start() throws Exception {
        if (getLog().isInfoEnabled()) {
            getLog().info(sm.getString("abstractProtocolHandler.start", getName()));
            logPortOffset();
        }
		//启动 endpoint端点
        endpoint.start();
        //开启超时检查
        monitorFuture = getUtilityExecutor().scheduleWithFixedDelay(() -> {
            startAsyncTimeout();
        }, 0, 60, TimeUnit.SECONDS);
    }
Endpoint#Starter 启动
Endpoint是用来监听请求的,在NIoEndpoint#startInternal方法中会启动 NIO 端点,创建接受器Accpetor、Poller轮询器线程等,org.apache.tomcat.util.net.NioEndpoint#startInternal源码如下
public void startInternal() throws Exception {

        if (!running) {
            running = true;
            paused = false;
			...

            // Create worker collection
            //创建处理work线程的线程池
            if (getExecutor() == null) {
                createExecutor();
            }
			//初始化请求连接数量,通过LimitLatch来现在最大连接数
            initializeConnectionLatch();

            // Start poller thread
            //开启 poller 线程
            poller = new Poller();
            Thread pollerThread = new Thread(poller, getName() + "-Poller");
            pollerThread.setPriority(threadPriority);
            pollerThread.setDaemon(true);
            pollerThread.start();
			//启动accptor线程
            startAcceptorThread();
        }
    }
在NioEndpoint中维护了一个 Acceptor , Acceptor本身是一个线程对象,他通过NIO事件轮询机制去接受Socket请求。如果你看过 《深入Tomcat核心架构》就能理解这,如果没看过不妨去看看。到这里代表Tomcat启动成功

Tomcat启动总结
- Tomcat的启动流程入口是 Bootsrap#main方法,他会先执行 init 进行初始化类加载器和实例化Catalina对象。它通过自定义WebAppClassloader类加载器来实现不同APP应用的加载隔离,从而打破了传统JVM的双亲委派机制
- 初始化完成后通过反射调用Catalina#load方法,该方法会通过Lifecycle生命周期接口来实现一键调用相关组件的init 和 start方法,比如:StandardServer ,StandardService,StandardEndpoint ,StandardHost…都是 Lifecycle的之类 , 这里用到模板方法设计模式
- Lifecycle提供了一个抽象类:LifecycleBase ,所有的容器对象都通过 LifecycleBase 来实现一一调用。比如:Server的初始化,Service的初始化,Connector等
- 我们知道Service是由 Connector 和 Engine 组成,所以在StandardService只要分了两条线去执行,一条线是通过 engine.start 去启动相关容器:如Host,Context,Wrapper,另一条先是通过Connector#start去启动 Endpoint ,监听Socket请求,默认采用NIO模式
- 另外一个点是在ContainerBase#startInternal中发布 LifecycleEvent 事件,通过后台线程去发布项目
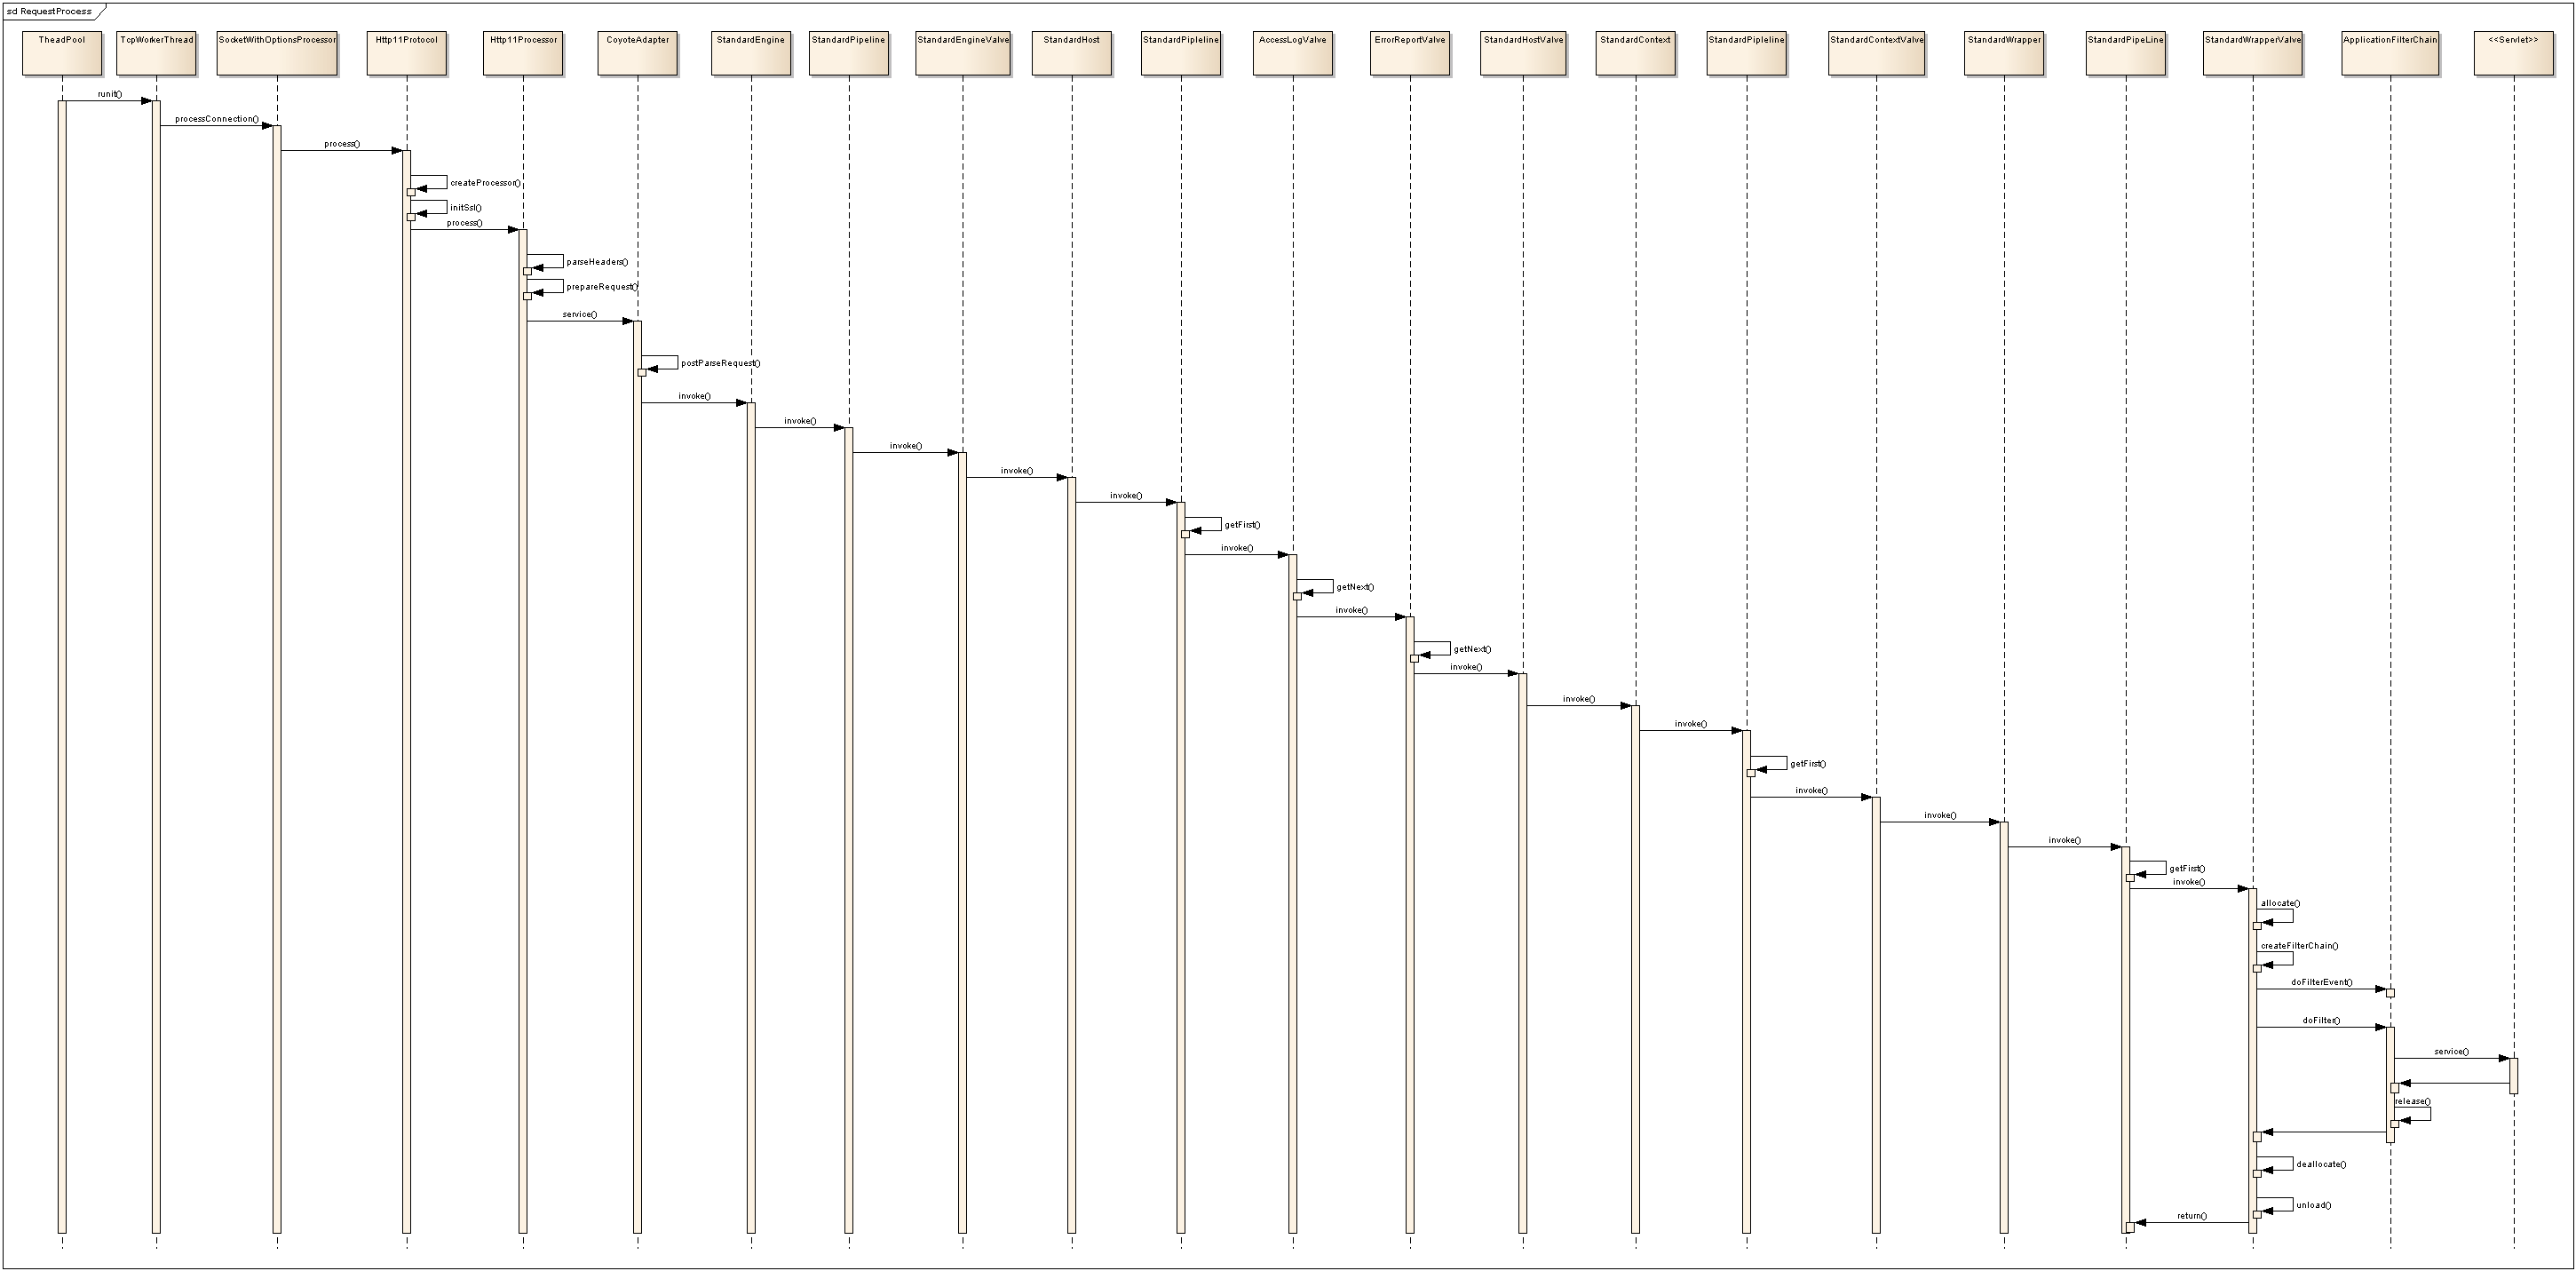
所以总结下来我们发现Tomcat的架构很高级,用到了:工厂模式,模板方法,组合模式,双亲委派(自定义类加载器实现app隔离),责任链模式,NIO编程。真正做到了高内聚低耦合。下面贴一下Tomat启动流程和请求执行消息流程图
文章就写到这里咯,如果文章对你有所帮助,不要吝啬你的小赞赞。


 2799
2799

 被折叠的 条评论
为什么被折叠?
被折叠的 条评论
为什么被折叠?
 到【灌水乐园】发言


