


前言
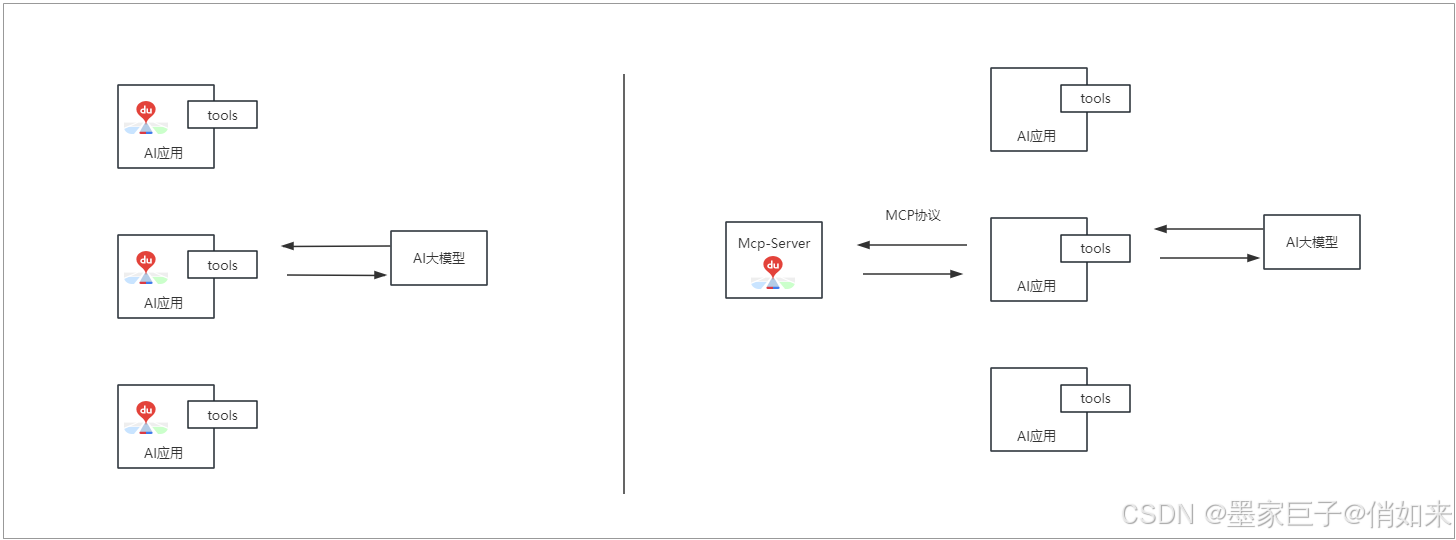
根据我们前面学习的知识我们知道,针对系统中不同的业务场景我们可以开发不同的tools来实现大模型调用,如果我们有多个AI应用都要实现相同的功能,那么可能就会在多个应用中定义重复的tools,导致一些重复的工作量,那么我们可以不可以吧通用的tools进行统一抽取(MCP-Server),然后AI应用通过某种协议(MCP-协议)去链接以达到复用的目的(有点像中台的感觉),如下使用百度地图举例
所以最近有一个东西非常火:MCP
什么是MCP
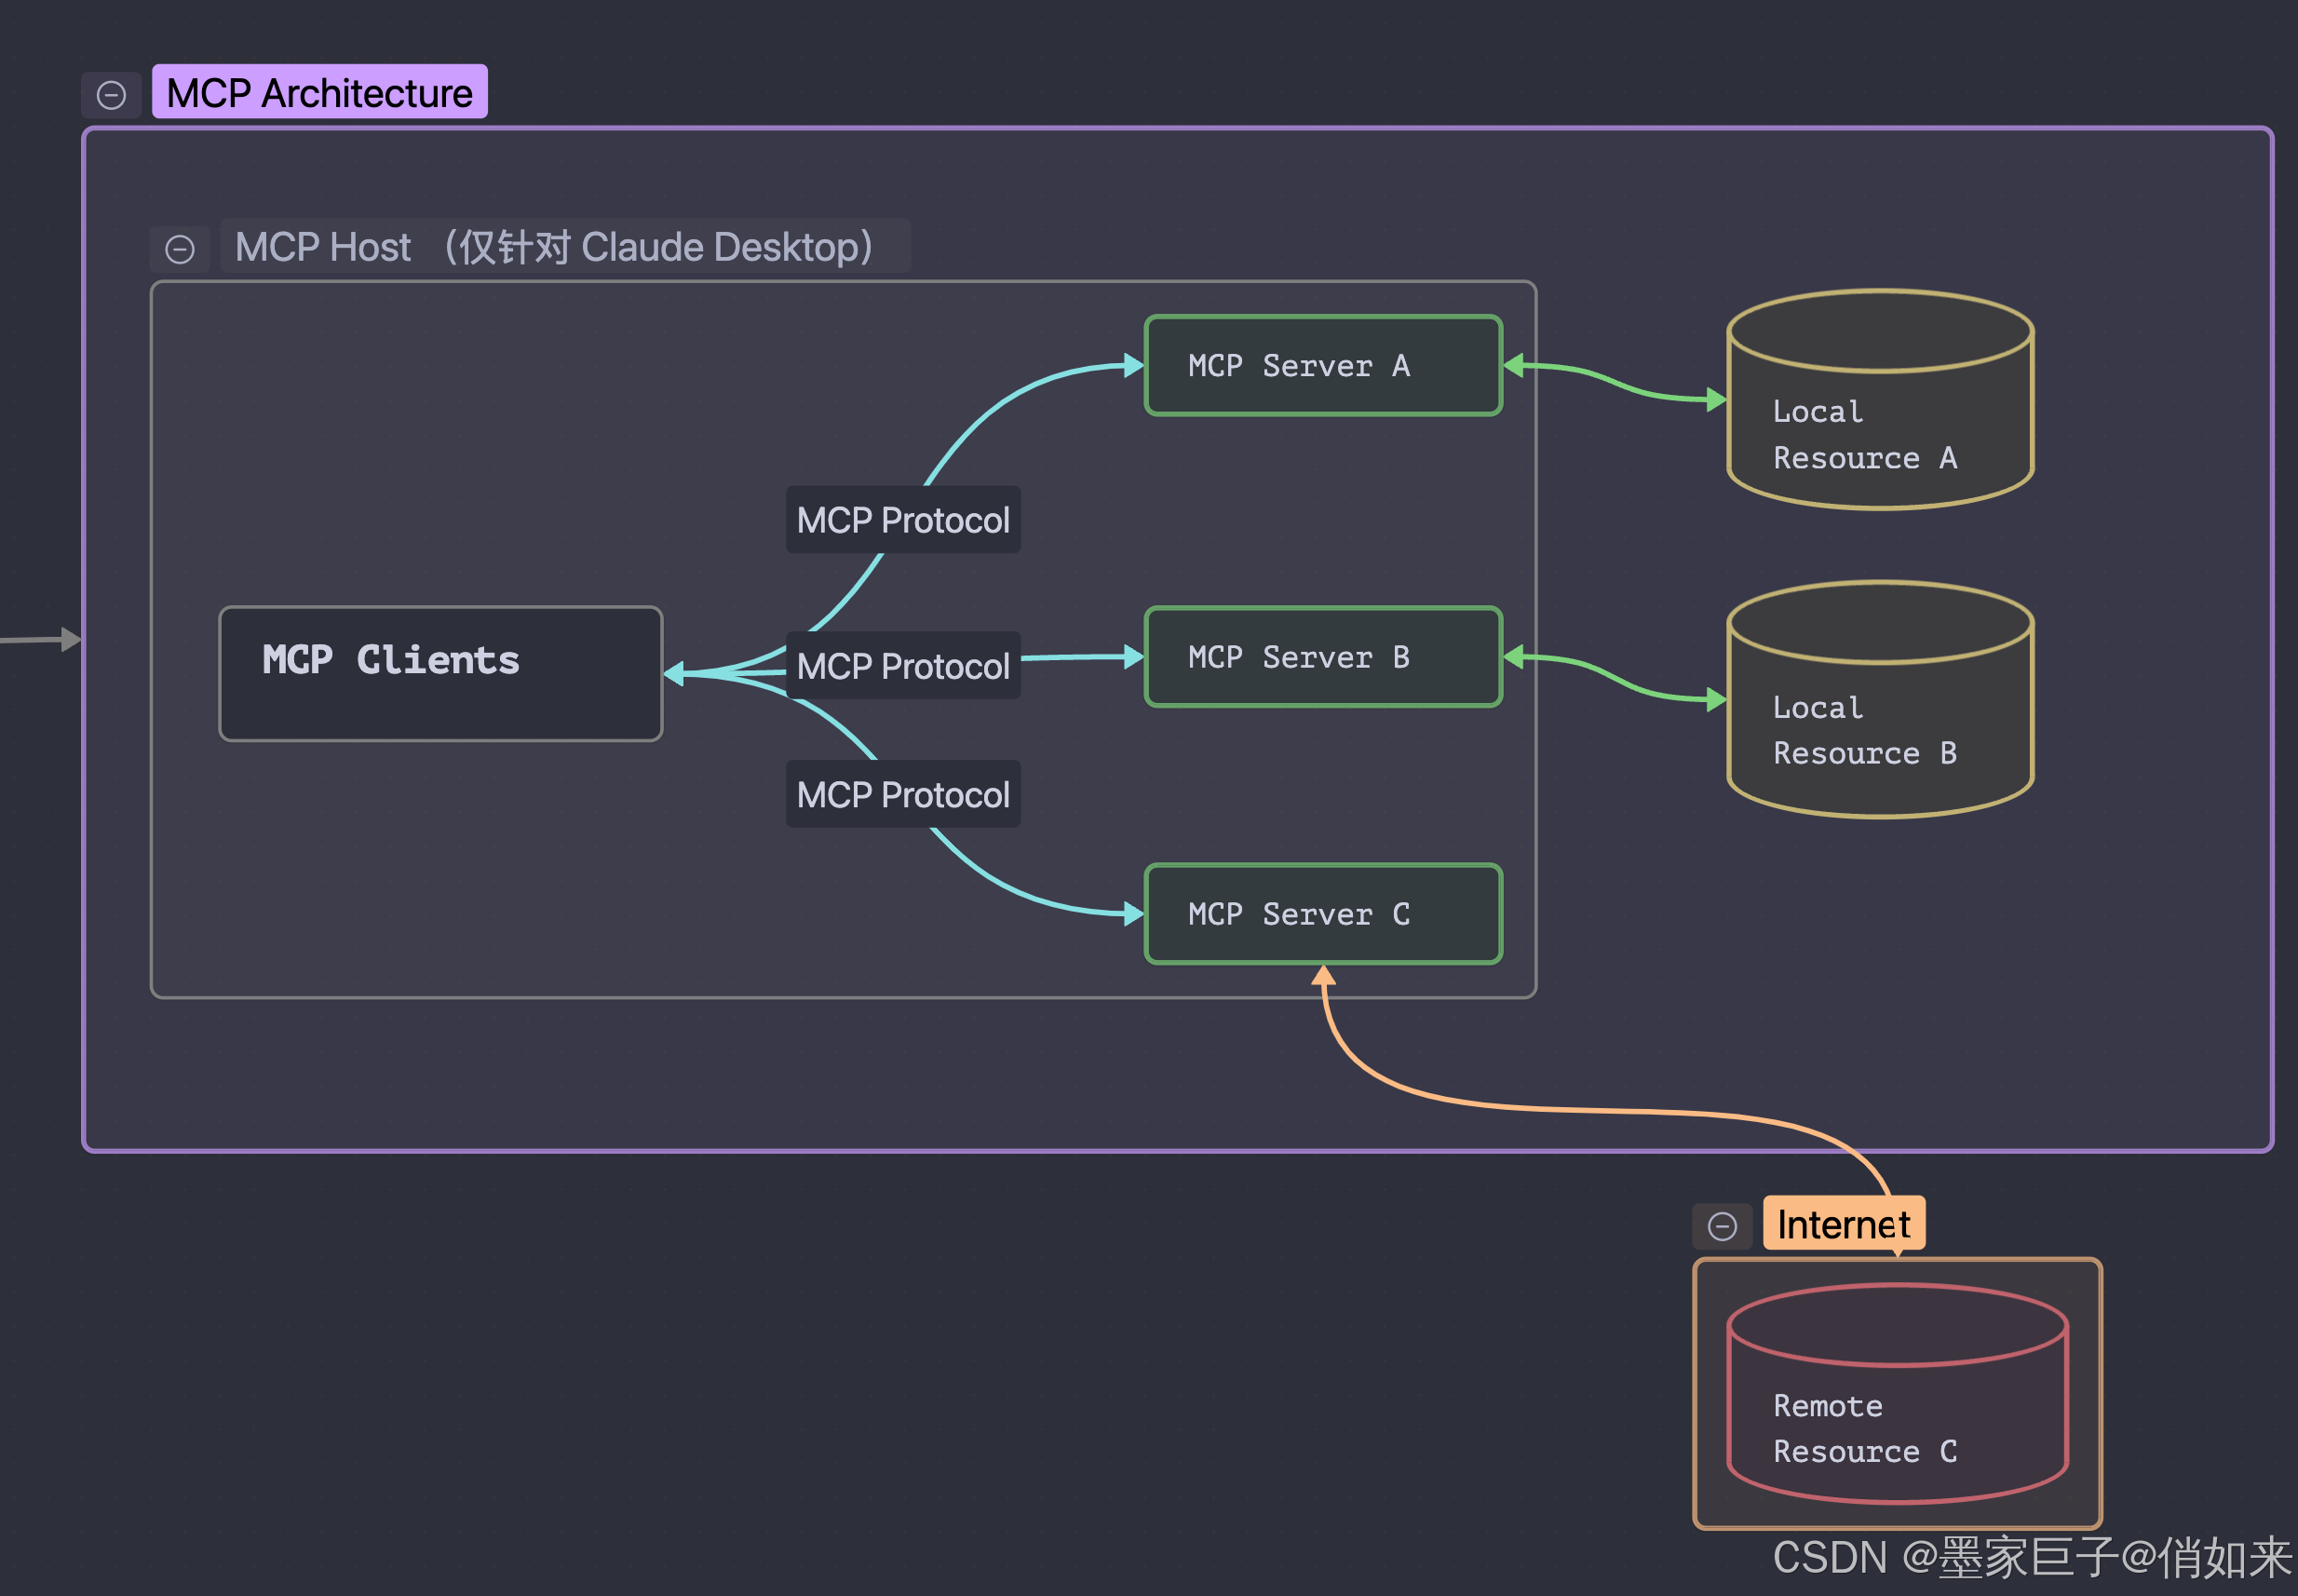
MCP : Model Context Protocol (MCP) ,它是一个开放协议,它使 LLM 应用与外部数据源和工具之间的无缝集成成为可能。无论你是构建 AI 驱动的 IDE、改善 chat 交互,还是构建自定义的 AI 工作流,MCP 提供了一种标准化的方式,将 LLM 与它们所需的上下文连接起来。
通过MCP我们可以直接连接三方的MCP服务,这里介绍一个平台
- https://mcp.composio.dev:MCP 聚合平台地址
- https://mcp.so/ : mcpso
- https://bailian.console.aliyun.com/?tab=mcp#/mcp-market : 阿里百炼
- https://smithery.ai
- https://mcpservers.org
- https://mcps.live
本篇文章我们暂时不对接三方的MCP服务,而是自己开发MCP服务完成对接。
MCP服务端
1.导入依赖
这里我们采用SpringAI来开发MCP服务,因为目前Langchain4j并没有提供对MCP-Server的支持,创建 mcp-server 工程导入以下依赖
- SpringAI我们采用 1.0.0.M7版本
- SpringBoot采用3.4.4
- spring-ai-bom : SpringAI的依赖清单
- spring-ai-starter-mcp-server-webmvc :MCP 服务,它支持 sse , stdio , WebFlux 三种传输模式支持,具体参考:https://docs.spring.io/spring-ai/reference/1.0/api/mcp/mcp-server-boot-starter-docs.html
- repositories :指定依赖下载的仓库,否则MCP可能下载不下来
<properties>
        <maven.compiler.source>21</maven.compiler.source>
        <maven.compiler.target>21</maven.compiler.target>
        <project.build.sourceEncoding>UTF-8</project.build.sourceEncoding>
        <spring-ai.version>1.0.0-M7</spring-ai.version>
    </properties>

    <parent>
        <groupId>org.springframework.boot</groupId>
        <artifactId>spring-boot-starter-parent</artifactId>
        <version>3.4.4</version>
    </parent>

    <dependencyManagement>
        <dependencies>
            <!-- Spring AI BOM -->
            <dependency>
                <groupId>org.springframework.ai</groupId>
                <artifactId>spring-ai-bom</artifactId>
                <version>1.0.0-M7</version>
                <type>pom</type>
                <scope>import</scope>
            </dependency>
        </dependencies>
    </dependencyManagement>


    <dependencies>

        <dependency>
            <groupId>org.springframework.ai</groupId>
            <artifactId>spring-ai-starter-mcp-server-webmvc</artifactId>
        </dependency>
        <dependency>
            <groupId>org.projectlombok</groupId>
            <artifactId>lombok</artifactId>
        </dependency>


        <dependency>
            <groupId>cn.hutool</groupId>
            <artifactId>hutool-all</artifactId>
            <version>5.8.26</version>
        </dependency>
        <dependency>
            <groupId>org.springframework.boot</groupId>
            <artifactId>spring-boot-starter-test</artifactId>
        </dependency>
    </dependencies>
    <build>
        <plugins>
            <plugin>
                <groupId>org.springframework.boot</groupId>
                <artifactId>spring-boot-maven-plugin</artifactId>
            </plugin>
        </plugins>
    </build>
    <repositories>
        <repository>
            <id>spring-milestones</id>
            <name>Spring Milestones</name>
            <url>https://repo.spring.io/milestone</url>
            <snapshots>
                <enabled>false</enabled>
            </snapshots>
        </repository>
        <repository>
            <id>spring-snapshots</id>
            <name>Spring Snapshots</name>
            <url>https://repo.spring.io/snapshot</url>
            <releases>
                <enabled>false</enabled>
            </releases>
        </repository>
        <repository>
            <id>central-portal-snapshots</id>
            <name>Central Portal Snapshots</name>
            <url>https://central.sonatype.com/repository/maven-snapshots/</url>
            <releases>
                <enabled>false</enabled>
            </releases>
            <snapshots>
                <enabled>true</enabled>
            </snapshots>
        </repository>
    </repositories>
2.对MCP Server做配置
所有属性都以 为前缀spring.ai.mcp.server:具体的配置项自行看官网
spring.main.banner-mode=off
# logging.pattern.console=

# spring.ai.mcp.server.stdio=false
# mcp服务名-比较重要,客户端要用
spring.ai.mcp.server.name=my-weather-server
# 版本
spring.ai.mcp.server.version=0.0.1
spring.ai.mcp.server.stdio=false
# 同步异步
spring.ai.mcp.server.type=sync
同步/异步服务器类型
-
同步服务器- 使用 实现的默认服务器类型McpSyncServer。它专为应用程序中简单的请求-响应模式而设计。要启用此服务器类型,spring.ai.mcp.server.type=SYNC请在配置中进行设置。激活后,它会自动处理同步工具规范的配置。
-
异步服务器- 异步服务器实现使用McpAsyncServer并针对非阻塞操作进行了优化。要启用此服务器类型,请使用 配置您的应用程序spring.ai.mcp.server.type=ASYNC。此服务器类型会自动设置异步工具规范,并内置 Project Reactor 支持。
传输方式选择 :MCP 服务器支持三种传输机制,每种机制都有其专用的启动器:
-
标准输入/输出 (STDIO) -spring-ai-starter-mcp-server
-
Spring MVC(服务器发送事件) -spring-ai-starter-mcp-server-webmvc
-
Spring WebFlux(反应式 SSE)spring-ai-starter-mcp-server-webflux
3.定义天气查询Tools
这里还是以百度地图-天气查询为例定义tools,改代码之前写过
@Service
@Slf4j
public class McpWeatherTool {

    HashMap<String,Integer> code = new HashMap<>(){{
        put("成都",510100);
    }};

    @Tool(name="getWeatcher",description = "获取城市天气信息")
    public String getWeatcher(@ToolParam(description = "城市",required = true)String city){
        String url = "https://api.map.baidu.com/weather/v1/?district_id="+code.get(city)+"&data_type=all&ak=你的key";
        log.info("查询天气url = {}",url);
        return HttpUtil.get(url);
    }


    @Tool(name="searchGoods",description = "搜索商品价格")
    public String search(@ToolParam(description = "商品",required = true)String goods){
        return "五毛钱";
    }

}
4.定义工具提供者
这里我们需要定义一个 ToolCallbackProvider ,把MCP服务暴露出去,通过 toolObjects 来绑定tools。当服务器启动起来,客户端通过sse,或者stdio等方式链接到服务器,执行Tool供应商提供的工具
@Configuration
public class MCPServerConfig {

    @Bean
    public ToolCallbackProvider weatherTools(McpWeatherTool mcpWeatherTool){
        return MethodToolCallbackProvider.builder().toolObjects(mcpWeatherTool).build();
    }

}
然后就是 编写启动类把项目启动起来。
5.服务端测试
@SpringBootTest(classes = MCPServerStart.class)
public class McpTest {

    @Test
    public void sseTest(){
        HttpClientSseClientTransport httpClientSseClientTransport =HttpClientSseClientTransport.builder("http://localhost:8080").build();
        McpSyncClient mcpSyncClient = McpClient.sync(httpClientSseClientTransport).build();
        mcpSyncClient.initialize();


        McpSchema.CallToolResult callToolResult = mcpSyncClient.callTool(new McpSchema.CallToolRequest("getWeatcher", Map.of("city","成都")));

        System.out.println(callToolResult);

        try {
            Thread.sleep(2000);
        } catch (InterruptedException e) {
            throw new RuntimeException(e);
        }
    }

    @Test
    public void stdioTest(){

        System.out.println(new File(".").getAbsolutePath());
		//需要先把项目package打包成jar
        var stdioParams = ServerParameters.builder("java")
                .args("-Dspring.ai.mcp.server.stdio=true", "-Dspring.main.web-application-type=none",
                        "-Dlogging.pattern.console=", "-jar",
                        "target/springai-mcp-1.0-SNAPSHOT.jar")
                .build();


        McpSyncClient mcpSyncClient = McpClient.sync(new StdioClientTransport(stdioParams)).build();
        mcpSyncClient.initialize();

        // 发起请求
        McpSchema.CallToolResult callToolResult = mcpSyncClient.callTool(new McpSchema.CallToolRequest("getWeatcher", Map.of("city","成都")));
        System.out.println(callToolResult);
    }
}
MCP客户端
1.导入基础依赖
创建SpringBoot工程,导入依赖,客户端我们采用 <artifactId>spring-ai-starter-mcp-client</artifactId> 依赖,同时我们需要接入一个大模型,这里我使用的是 zhipuai 智普AI,其他的大模型也是可以的。
<properties>
        <maven.compiler.source>21</maven.compiler.source>
        <maven.compiler.target>21</maven.compiler.target>
        <project.build.sourceEncoding>UTF-8</project.build.sourceEncoding>
        <spring-ai.version>1.0.0-M7</spring-ai.version>
    </properties>

    <parent>
        <groupId>org.springframework.boot</groupId>
        <artifactId>spring-boot-starter-parent</artifactId>
        <version>3.4.4</version>
    </parent>

    <dependencyManagement>
        <dependencies>
            <dependency>
                <groupId>org.springframework.ai</groupId>
                <artifactId>spring-ai-bom</artifactId>
                <version>${spring-ai.version}</version>
                <type>pom</type>
                <scope>import</scope>
            </dependency>
        </dependencies>
    </dependencyManagement>


    <dependencies>
        <dependency>
            <groupId>org.projectlombok</groupId>
            <artifactId>lombok</artifactId>
        </dependency>
        <!--<dependency>
            <groupId>org.springframework.ai</groupId>
            <artifactId>spring-ai-starter-mcp-client-webflux</artifactId>
        </dependency>-->
        <dependency>
            <groupId>cn.hutool</groupId>
            <artifactId>hutool-all</artifactId>
            <version>5.8.26</version>
        </dependency>
        <dependency>
            <groupId>org.springframework.boot</groupId>
            <artifactId>spring-boot-starter-web</artifactId>
        </dependency>
        <dependency>
            <groupId>org.springframework.ai</groupId>
            <artifactId>spring-ai-starter-mcp-client</artifactId>
        </dependency>

        <dependency>
            <groupId>org.springframework.ai</groupId>
            <artifactId>spring-ai-zhipuai-spring-boot-starter</artifactId>
            <version>1.0.0-M6</version>
        </dependency>
    </dependencies>

    <repositories>
        <repository>
            <name>Central Portal Snapshots</name>
            <id>central-portal-snapshots</id>
            <url>https://central.sonatype.com/repository/maven-snapshots/</url>
            <releases>
                <enabled>false</enabled>
            </releases>
            <snapshots>
                <enabled>true</enabled>
            </snapshots>
        </repository>
        <repository>
            <id>spring-milestones</id>
            <name>Spring Milestones</name>
            <url>https://repo.spring.io/milestone</url>
            <snapshots>
                <enabled>false</enabled>
            </snapshots>
        </repository>
        <repository>
            <id>spring-snapshots</id>
            <name>Spring Snapshots</name>
            <url>https://repo.spring.io/snapshot</url>
            <releases>
                <enabled>false</enabled>
            </releases>
        </repository>
    </repositories>
2.配置MCP客户端
主要是配置zhipu大模型(https://bigmodel.cn/ 注册账号,创建APIKEY),以及mcp客户端的配置
server:
  port: 8100  #端口
  tomcat:
    uri-encoding: UTF-8   #服务编码
spring:
  application:
    name: mcp-client
  ai:
    zhipuai:
      api-key: 你的key
      chat:
        options:
          model: glm-4-plus
    mcp:
      client:
        sse:
          connections:
            my-weather-server:		#MCP服务器名字
              url: http://localhost:8080 #MCP服务器地址
        toolcallback:
          enabled: true #开启tool调用
        #stdio:
          #servers-configuration: classpath:mcp-servers-config.json
配置中处理提供了通过 sse方式去链接McpServer, 还提供了stdio方式,该方式需要指定一个mcp的配置文件json, mcp-servers-config.json 内容如下
{
  "mcpServers": {
    "brave-search": {
      "command": "java",
      "args": [
        "-Dspring.ai.mcp.server.stdio=true", "-Dspring.main.web-application-type=none",
        "-Dlogging.pattern.console=", "-jar",
        "E:/code_space/ai/springai-mcp/target/springai-mcp-1.0-SNAPSHOT.jar"
      ],
      "env": {
      }
    }
}
3.配置ChatClient客户端
这里我们通过 ChatClient.Builder 构建一个客户端,同时指定大模型的提示词,以及指定tools提供商
@Configuration
public class MCPClientConfig {

    @Bean
    public ChatClient chatClient(ChatClient.Builder builder,ToolCallbackProvider tools){
        return builder.defaultSystem("""
                你是一个AI助手,请分析用户的问题,做出不同的处理,你现在拥有以下能力
                1.如果用户的提问包含城市和天气,就为用户查询指定城市的天气
                2.如果用户的提问包含商品,就为用户查询商品信息
                """).defaultTools(tools).build();
    }

}
4.编写Controller
这里就比较简单了,注入ChatClient向大模型提问即可
@RestController
@RequestMapping("/ai")
@RequiredArgsConstructor
public class AiController {

    @Resource
    private  ChatClient chatClient;

    @GetMapping("/chat")
    public Flux<String> fcChat(@RequestParam("prompt") String userInput) {
        Flux<String> flux = chatClient.prompt(userInput).stream().content();
        return flux;
    }
}
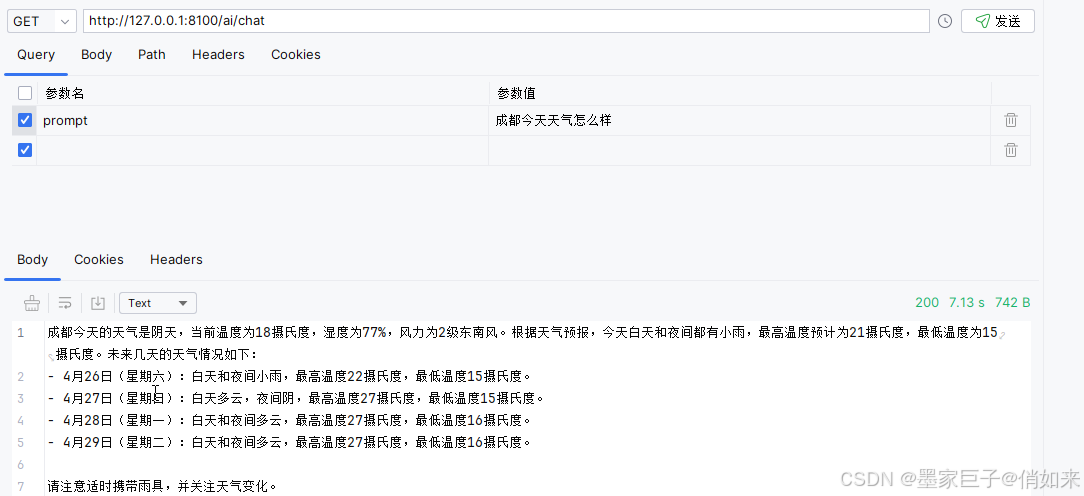
5.启动测试
访问controller,向他询问天气情况,查看结果
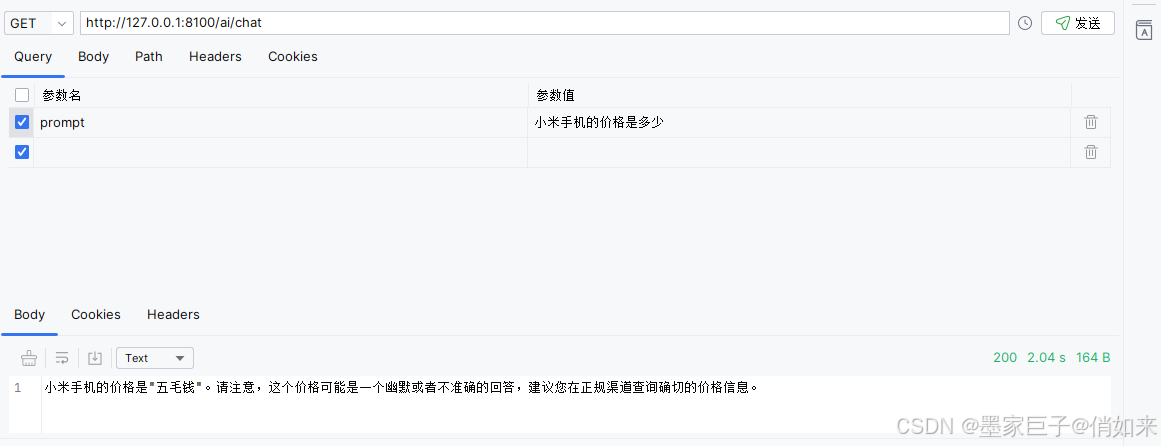
换一个问题
总结
该文章我们讲解了如何使用SpringAI开发完整的Mcp服务端和客户端,通过这种方式我们可以把tools抽取到统一服务中,然后借助大模型通过MCP协议去链接服务器,达到一个tools复用的目的。当然MCP的功能远不止于此。如果文章对你有所帮助请三连。


 412
412

 被折叠的 条评论
为什么被折叠?
被折叠的 条评论
为什么被折叠?
 到【灌水乐园】发言


