


文本类组件
文本框组件
在界面当中显示文本信息
TextView 标签
android:text
文本框展示的内容
其中的android:text推荐使用values/strings.xml中资源指定
<resources>
    <string name="app_name">wenbenkuangzujianone</string>
    <string name="study_this">study_content</string>
</resources>
<TextView
        android:layout_width="wrap_content"
        android:layout_height="wrap_content"
        android:text="@string/study_this"
         />
android:textSize
文本框字体的大小,推荐使用sp单位
    <TextView
        android:layout_width="wrap_content"
        android:layout_height="wrap_content"
        android:text="@string/study_this"
        android:textSize="27sp"
         />
android:textColor
设置文本的颜色
<TextView
        android:layout_width="wrap_content"
        android:layout_height="wrap_content"
        android:text="@string/study_this"
        android:textSize="27sp"
        android:textColor="#FFFF00"
         />
android:singleLine
将很长的文本显示为单行,多出来的内容,用…来展示
<TextView
        android:layout_width="wrap_content"
        android:layout_height="wrap_content"
        android:text="@string/study_this"
        android:textSize="27sp"
        android:textColor="#FFFF00"
        android:singleLine="true"
         />
android:background
文本框也可以设置背景
android:maxWidth
为了让文本框自动换行,可以设置一行的最大宽度,多出来的内容在下一行展示
android:singleLine
文本框中的内容单行显示,多余的内容通过…代替
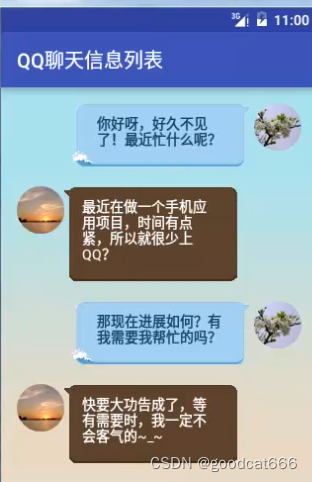
实例:显示QQ聊天内容
使用9patch图片,将图片放置到drawable目录下
<?xml version="1.0" encoding="utf-8"?>
<GridLayout xmlns:android="http://schemas.android.com/apk/res/android"
    xmlns:tools="http://schemas.android.com/tools"
    android:layout_width="match_parent"
    android:layout_height="match_parent"
    android:paddingBottom="@dimen/activity_vertical_margin"
    android:paddingLeft="@dimen/activity_horizontal_margin"
    android:paddingRight="@dimen/activity_horizontal_margin"
    android:paddingTop="@dimen/activity_vertical_margin"
    android:background="@drawable/bg"
    android:columnCount="6"
    tools:context="com.mingrisoft.MainActivity" >
    <!-- 第一行 -->
    <TextView
        android:id="@+id/textView1"
        android:layout_width="wrap_content"
        android:layout_height="wrap_content"
        android:background="@drawable/bg_textview"
        android:maxWidth="180dp"
        android:text="你好呀,好久不见了!最近忙什么呢?"
        android:textSize="14sp"
        android:textColor="#16476B"
        android:layout_gravity="end"
        android:layout_columnSpan="4"
        android:layout_column="1"
        android:layout_row="0"
        android:layout_marginRight="5dp"
        android:layout_marginBottom="20dp"
        />
    <ImageView
        android:id="@+id/ico1"
        android:layout_column="5"
        android:layout_columnSpan="1"
        android:layout_gravity="top"
        android:src="@drawable/ico2"
        android:layout_row="0" />
    <!-- 第二行 -->
    <ImageView
        android:id="@+id/ico2"
        android:layout_column="1"
        android:layout_gravity="top"
        android:layout_row="1"
        android:src="@drawable/ico1"/>
    <TextView
        android:id="@+id/textView2"
        android:layout_width="wrap_content"
        android:layout_height="wrap_content"
        android:background="@drawable/bg_textview2"
        android:maxWidth="180dp"
        android:text="最近在做一个手机应用项目,时间有点紧,所以就很少上QQ"
        android:textColor="#FFFFFF"
        android:textSize="14sp"
        android:layout_marginBottom="20dp"
        android:layout_row="1"
        />
    <!-- 第三行 -->
    <TextView
        android:id="@+id/textView3"
        android:layout_width="wrap_content"
        android:layout_height="wrap_content"
        android:background="@drawable/bg_textview"
        android:maxWidth="180dp"
        android:text="那现在进展如何?有我需要我帮忙的吗?"
        android:layout_gravity="end"
        android:textColor="#16476B"
        android:layout_columnSpan="4"
        android:layout_column="1"
        android:layout_row="2"
        android:layout_marginRight="5dp"
        android:layout_marginBottom="20dp"
        android:textSize="14sp" />
    <ImageView
        android:id="@+id/ico3"
        android:layout_column="5"
        android:layout_columnSpan="1"
        android:layout_gravity="top"
        android:src="@drawable/ico2"
        android:layout_row="2" />

    <!-- 第4行 -->
    <ImageView
        android:id="@+id/ico4"
        android:layout_column="1"
        android:layout_gravity="top"
        android:layout_row="3"
        android:src="@drawable/ico1"/>
    <TextView
        android:id="@+id/textView4"
        android:layout_width="wrap_content"
        android:layout_height="wrap_content"
        android:background="@drawable/bg_textview2"
        android:maxWidth="180dp"
        android:text="快要大功告成了,等有需要时,我一定不会客气的~_~"
        android:layout_marginBottom="20dp"
        android:textColor="#FFFFFF"
        android:layout_row="3"
        android:textSize="14sp" />

</GridLayout>
编辑框组件
用于输入内容,使用EditText标签
EditText是TextView 的子类,TextView可使用的属性,EditText也可以使用
android:hint
指定输入内容的提示信息,在编辑框中输入具体,提示内容消失
android:inputType
可以指定textPassword,成为密码框,根据需要自己选择就行
android:drawableLeft
在编辑框的左侧放置图片,使用图片资源就行
android api 17 在左侧添加图像 android:drawableStart
在其他位置也可以绘制图像
android:drawablePadding
在编辑框中放置图片时,图片和编辑框的编辑可以通过该属性指定
android:lines
编辑框组将的行数,当输入的行数超过指定行,编辑框会自动向上滚动
获取编辑框输入的内容
EditText editText = (EditText) findViewById(R.id.edittext);
String strings = editText.getText().toString();
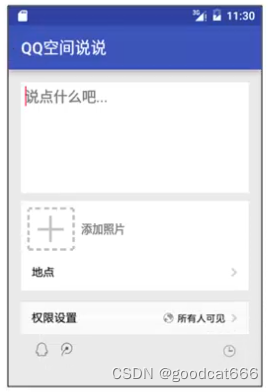
实例:手机QQ空间的写说说页面
<?xml version="1.0" encoding="utf-8"?>
	<LinearLayout xmlns:android="http://schemas.android.com/apk/res/android"
	    xmlns:tools="http://schemas.android.com/tools"
	    android:layout_width="match_parent"
	    android:layout_height="match_parent"
	    android:orientation="vertical"
	    android:paddingBottom="16dp"
	    android:paddingLeft="16dp"
	    android:paddingRight="16dp"
	    android:paddingTop="16dp"
	    android:background="#EAEAEA"
	    tools:context="com.mingrisoft.MainActivity" >
<!-- 添加写说说编辑框 -->
	    <EditText
	        android:id="@+id/editText1"
	        android:layout_width="match_parent"
	        android:layout_height="wrap_content"
	        android:lines="6"
	        android:hint="说点什么吧..."
	        android:padding="5dp"
	        android:background="#FFFFFF"
	        android:gravity="top"
	        android:layout_marginBottom="10dp"
	        android:inputType="textMultiLine" >

	    </EditText>
<!-- 设置添加照片栏目 -->
	    <TextView
	         android:id="@+id/textView1"
	         android:layout_width="match_parent"
	         android:layout_height="wrap_content"
	         android:drawableLeft="@mipmap/addpicture"
	         android:text="添加照片"
	         android:drawablePadding="8dp"
	         android:gravity="center_vertical"
	         android:padding="8dp"
	         android:background="#FFFFFF"
	         android:textColor="#767676"
	        />
	<!-- 设置底部分享栏目 -->
	    <TextView
	         android:id="@+id/textView2"
	         android:layout_width="match_parent"
	         android:layout_height="wrap_content"
	         android:drawableLeft="@mipmap/bottom"
	        />
		<ImageView
        	android:layout_width="match_parent"
        	android:layout_height="wrap_content"
        	android:src="@mipmap/bottom"
        	android:scaleType="fitXY" <!--拉伸图片--> />

	</LinearLayout>
按钮类组件
普通按钮
触发一个动作,该动作在按钮的回调中实现
Button组件,Button组件继承于文本框组件,文本框使用的属性,按钮都可以使用
<Button
    android:id="@+id/button1"
    android:layout_width="match_parent"
    android:layout_height="wrap_content"
    android:background="@drawable/shape"
    android:text="授权并登录"
    android:textColor="#FFFFFF" />
通过匿名内部类设置监听事件
Button button= (Button) findViewById(R.id.button1);   //通过ID获取布局按钮
//为按钮添加单击事件监听器
button.setOnClickListener(new View.OnClickListener() {
    @Override
    public void onClick(View v) {
        Toast.makeText(MainActivity.this,"您已授权登录开心消消乐",Toast.LENGTH_SHORT).show();
    }
});
通过onClick属性实现按钮监听
1、在activity中编写一个包含View类型参数的方法
2、将android:onClick属性指定为步骤1中的方法名
android:onClick="myClick"
图片按钮
ImageButton
和普通按钮一样
和普通按钮的共同点
- 单机时都可以触发onClick事件
和普通按钮不同点
ImageButton没有android:text属性
<ImageButton
        android:id="@+id/switch1"
        android:layout_width="wrap_content"
        android:layout_height="wrap_content"
        android:background="#0000" <!--完全透明的颜色-->
        android:src="@mipmap/bt_switch"
        android:layout_marginTop="10dp"
        />
单选按钮
单选按钮成组出现,同一时刻只有一个按钮可以被选中
需要通过RadioGroup将一组RadioButton组合成一组
android:checked
可是设置单选按钮为默认选中状态
    <RadioGroup
        android:id="@+id/rg"
        android:layout_width="wrap_content"
        android:layout_height="wrap_content">
        <RadioButton
            android:id="@+id/rb_a"
            android:layout_width="wrap_content"
            android:layout_height="wrap_content"
            android:text="A:125" />
        <!--单选按钮B-->
        <RadioButton
            android:id="@+id/rb_b"
            android:layout_width="wrap_content"
            android:layout_height="wrap_content"
            android:text="B:100" />
        <!--单选按钮C-->
        <RadioButton
            android:id="@+id/rb_c"
            android:layout_width="wrap_content"
            android:layout_height="wrap_content"
            android:text="C:175" />
        <!--单选按钮D-->
        <RadioButton
            android:id="@+id/rb_d"
            android:layout_width="wrap_content"
            android:layout_height="wrap_content"
            android:text="D:200" />
    </RadioGroup>
查看一个组别中哪个单选按钮被选中
1、获取RadioGroup,并获取RadioGroup的个数
2、通过RadioGroup.getChildAt(i) 获取组中的RadioButton
3、遍历RadioButton,通过radioButton.isChecked() 检查哪个单选按钮被选中了
        Button bt = (Button)findViewById(R.id.bt);
        RadioGroup rg = (RadioGroup)findViewById(R.id.rg);
        bt.setOnClickListener(new View.OnClickListener(){
            @Override
            public void onClick(View v){
                for(int i = 0;i<rg.getChildCount();i++){
                    RadioButton radioButton = (RadioButton)rg.getChildAt(i);
                    if(radioButton.isChecked()){
                        if(radioButton.getText().equals("B:100")){
                            Toast.makeText(MainActivity.this,"回答正确",Toast.LENGTH_LONG).show();
                        }else{
                            AlertDialog.Builder builder = new AlertDialog.Builder(MainActivity.this);
                            builder.setMessage("回答错误,下面请看解析:当张山换完零钱之后," +
                                    "给了顾客75还有价值25元的商品,自己还剩下了25元。这时," +
                                    "李石来找张山要钱,张山把自己剩下的相当于是李石的25元给了李石," +
                                    "另外自己掏了75元。这样张山赔了一个25元的商品和75元的人民币," +
                                    "总共价值100元。");
                            builder.setPositiveButton("确定",null).show();
                        }
                        break;
                    }
                }
            }
                              }

        );
复选框
复选框可以进行多选设置,使用CheckBox标记
由于可以多选,不需要其他标记进行辅助包成一组
<?xml version="1.0" encoding="utf-8"?>
<LinearLayout xmlns:android="http://schemas.android.com/apk/res/android"
    xmlns:tools="http://schemas.android.com/tools"
    android:orientation="vertical"
    android:layout_width="match_parent"
    android:layout_height="match_parent"
    android:paddingBottom="@dimen/activity_vertical_margin"
    android:paddingLeft="@dimen/activity_horizontal_margin"
    android:paddingRight="@dimen/activity_horizontal_margin"
    android:paddingTop="@dimen/activity_vertical_margin"
    tools:context="mingrisoft.com.MainActivity">
    <ImageView
    android:layout_width="match_parent"
    android:layout_height="wrap_content"
    android:src="@mipmap/feiji_top"
    />
    <TextView
        android:layout_width="wrap_content"
        android:layout_height="wrap_content"
        android:text="登录后该应用将获得以下权限"
        android:textSize="14sp"
        />
    <CheckBox
        android:id="@+id/checkbox1"
        android:layout_width="wrap_content"
        android:layout_height="wrap_content"
        android:text="获得你的公开信息(昵称、头像等)"
        android:checked="true"
        android:textSize="12sp"
        android:textColor="#BDBDBD"/>
    <CheckBox
        android:id="@+id/checkbox2"
        android:layout_width="wrap_content"
        android:layout_height="wrap_content"
        android:text="寻找与你共同使用该应用的好友"
        android:checked="true"
        android:textSize="12sp"
        android:textColor="#BDBDBD"/>
    <CheckBox
        android:id="@+id/checkbox3"
        android:layout_width="wrap_content"
        android:layout_height="wrap_content"
        android:text="帮助你通过该应用向好友发送消息"
        android:checked="true"
        android:textSize="12sp"
        android:textColor="#BDBDBD"/>
    <Button
        android:id="@+id/btn_login"
        android:layout_width="match_parent"
        android:layout_height="wrap_content"
        android:background="#009688"
        android:text="确认登录"/>
    <Button
        android:layout_marginTop="20dp"
        android:layout_width="match_parent"
        android:layout_height="wrap_content"
        android:background="#FFFFFF" android:text="取消"/>


</LinearLayout>
相应复选框是否被选中
btn_login = (Button) findViewById(R.id.btn_login);      //通过ID获取布局确认登录按钮
checkBox1 = (CheckBox) findViewById(R.id.checkbox1);    //通过ID获取布局复选框1
checkBox2 = (CheckBox) findViewById(R.id.checkbox2);    //通过ID获取布局复选框2
checkBox3 = (CheckBox) findViewById(R.id.checkbox3);    //通过ID获取布局复选框3
btn_login.setOnClickListener(new View.OnClickListener() {   //为确认登录按钮
    @Override
    public void onClick(View v) {
        String checked = "";           //保存选中的值
        if (checkBox1.isChecked()) { //当第一个复选框被选中
            checked += checkBox1.getText().toString() ;  //输出第一个复选框内信息
        }
        if (checkBox2.isChecked()) { //当第二个复选框被选中
            checked += checkBox2.getText().toString() ;  //输出第二个复选框内信息
        }
        if (checkBox3.isChecked()) { //当第三个复选框被选中
            checked += checkBox3.getText().toString() ;  //输出第三个复选框内信息
        }
        //显示被选中复选框对应的信息
        Toast.makeText(MainActivity.this, checked, Toast.LENGTH_LONG).show();
    }
});
日期类组件
日期选择器
表示DatePicker组件创建日期选择器
<?xml version="1.0" encoding="utf-8"?>
<LinearLayout xmlns:android="http://schemas.android.com/apk/res/android"
    xmlns:tools="http://schemas.android.com/tools"
    android:layout_width="match_parent"
    android:layout_height="match_parent"
    android:orientation="vertical"
    android:paddingBottom="@dimen/activity_vertical_margin"
    android:paddingLeft="@dimen/activity_horizontal_margin"
    android:paddingRight="@dimen/activity_horizontal_margin"
    android:paddingTop="@dimen/activity_vertical_margin"
    tools:context="mingrisoft.com.MainActivity">
    <!--创建日期选择器-->
    <DatePicker
        android:id="@+id/datePicker"
        android:layout_width="match_parent"
        android:layout_height="match_parent">

    </DatePicker>

</LinearLayout>
可以初始化日期选择器的时间并获取日期选择器选中的时间
int year,month,day;     //定义年,月,日
DatePicker datePicker;           //定义日期选择器

datePicker= (DatePicker) findViewById(R.id.datePicker);    //通过ID获取布局日期选择器
Calendar calendar=Calendar.getInstance();
year=calendar.get(Calendar.YEAR);           //获取当前年
month=calendar.get(Calendar.MONTH);         //获取当前月
day=calendar.get(Calendar.DAY_OF_MONTH);   //获取当前日
//初始化日期选择器,并且在初始化时指定监听器
datePicker.init(year, month, day, new DatePicker.OnDateChangedListener() {
    @Override
    public void onDateChanged(DatePicker view, int year, int monthOfYear, int dayOfMonth) {
        MainActivity.this.year=year;            //改变年的参数
        MainActivity.this.month=monthOfYear;    //改变月的参数
        MainActivity.this.day=dayOfMonth;       //改变日的参数
        show(year,monthOfYear,dayOfMonth);       //通过消息框显示日期
    }
});

private void show(int year, int monthOfYear, int dayOfMonth) {
    String str=year+"年"+monthOfYear+1+"月"+dayOfMonth+"日"; //获取选择器设置的日期
    Toast.makeText(MainActivity.this,str,Toast.LENGTH_SHORT).show(); //将选择的日期显示出来
}
时间选择器
使用TimePicker标签
<?xml version="1.0" encoding="utf-8"?>
<LinearLayout xmlns:android="http://schemas.android.com/apk/res/android"
    xmlns:tools="http://schemas.android.com/tools"
    android:layout_width="match_parent"
    android:layout_height="match_parent"
    android:paddingBottom="@dimen/activity_vertical_margin"
    android:paddingLeft="@dimen/activity_horizontal_margin"
    android:paddingRight="@dimen/activity_horizontal_margin"
    android:paddingTop="@dimen/activity_vertical_margin"
    tools:context="mingrisoft.com.MainActivity">
	<TimePicker
	    android:id="@+id/timePicker"
	    android:layout_width="match_parent"
	    android:layout_height="match_parent">
	</TimePicker>
</LinearLayout>
初始化时间选择器,并获取选择的时间
TimePicker timePicker;            //定义时间选择器
int hour,minute;                  //定义小时和分

timePicker= (TimePicker) findViewById(R.id.timePicker);  //通过ID获取布局时间选择器
timePicker.setIs24HourView(true);                         //设置时间为24小时制
Calendar calendar=Calendar.getInstance();
hour=calendar.get(Calendar.HOUR_OF_DAY);                  //获取当前小时
minute=calendar.get(Calendar.MINUTE);                     //获取当前分钟
//为时间选择器设置监听器
timePicker.setOnTimeChangedListener(new TimePicker.OnTimeChangedListener() {
    @Override
    public void onTimeChanged(TimePicker view, int hourOfDay, int minute) {
        MainActivity.this.hour=hourOfDay;          //改变小时后的参数
        MainActivity.this.minute=minute;           //改变分钟后的参数
        show(hourOfDay,minute);                     //通过消息框显示选择的时间
    }

    private void show(int hourOfDay, int minute) {
        String str=hourOfDay+"时"+minute+"分";      //获取选择器设置的时间
        Toast.makeText(MainActivity.this,str,Toast.LENGTH_SHORT).show();//显示消息提示框
    }
});
计时器
从计时开始,走过的时间
通过Chronometer使用计时器组件:默认以时:分:秒进行显示
android:format
该属性可以执行计时器的显示时间格式
计时器需要用到的方法
- setBase() : 设置计时器的起始时间
- setFormat() : 设置显示时间的格式
- start() : 指定开始计时
- stop() : 指定停止计时
- setOnChronometerTickListener() : 为计时器绑定事件监听器,当计时器改变时触发该监听器
<?xml version="1.0" encoding="utf-8"?>
<RelativeLayout xmlns:android="http://schemas.android.com/apk/res/android"
    xmlns:tools="http://schemas.android.com/tools"
    android:background="@mipmap/xiaoxiao"
    android:layout_width="match_parent"
    android:layout_height="match_parent"
    android:paddingBottom="@dimen/activity_vertical_margin"
    android:paddingLeft="@dimen/activity_horizontal_margin"
    android:paddingRight="@dimen/activity_horizontal_margin"
    android:paddingTop="@dimen/activity_vertical_margin"
    tools:context="mingrisoft.com.MainActivity">
    <!--添加计时器-->
    <Chronometer
        android:id="@+id/ch"
        android:layout_width="wrap_content"
        android:layout_height="wrap_content"
        android:textColor="#FFFF00"
        android:layout_marginRight="8dp"
        android:layout_marginTop="10dp"
        android:layout_alignParentTop="true"
        android:layout_alignParentRight="true" />
</RelativeLayout>
计时器的启动和事件监听
Chronometer ch;          //定义计时器

getWindow().setFlags(WindowManager.LayoutParams.FLAG_FULLSCREEN,
        WindowManager.LayoutParams.FLAG_FULLSCREEN);    //设置全屏显示
ch = (Chronometer) findViewById(R.id.ch);   //获取计时器组件
ch.setBase(SystemClock.elapsedRealtime());  //设置起始时间
ch.setFormat("%s");                         //设置显示时间格式
ch.start();                                 //开启计时器
//添加监听器
ch.setOnChronometerTickListener(new Chronometer.OnChronometerTickListener() {
    @Override
    public void onChronometerTick(Chronometer chronometer) {
        //判断时间计时达到60秒时
        if (SystemClock.elapsedRealtime() - ch.getBase() >= 60000) {
            ch.stop();  //停止计时器
        }
    }
});


 1183
1183


 被折叠的 条评论
为什么被折叠?
被折叠的 条评论
为什么被折叠?
 到【灌水乐园】发言


