


http://blog.csdn.net/jesse_mx/article/details/52965281
前言
博主也算是刚开始研究SSD项目,之前写了一篇SSD的安装和配置,这次是简单介绍下如何用SSD检测单张图片,其实过程也比较简单,下面正式开始。
准备工作
当然,首先你要把SSD按照教程编译好,设置好Python环境变量,然后重启计算机(建议),开始本次工作。SSD项目检测单张图片有C++程序和ipython程序,这里建议用ipython,主要是方便简单(最近新增了C++程序说明)。该工具路径为/home/mx/caffe/example/ssd_detect.ipynb,使用jupyter notebook工具操作。SSD项目常在更新,如果有模型不匹配的问题,请去github下载最新的文件。
安装 jupyter notebook
这里用pip安装该工具,安装pip的过的可以跳过下面一段:
下载安装包pip压缩包解压之后,发现里面有个setup.py文件,终端运行:
- 1
- 1
这样,pip就安装上了。
下面用pip安装jupyter notebook
- 1
- 1
安装成功后,运行notebook
- 1
- 1
程序会在浏览器中打开notebook, 点击右上角的New-python2, 就可以新建一个网页一样的文件,扩展名为ipynb。在这个网页上,我们就可以像在命令行下面一样运行python代码了。输入代码后,按shift+enter运行,更多的快捷键,可点击上方的help-Keyboard shortcuts查看,或者先按esc退出编辑状态,再按h键查看。
下载SSD模型
该工具使用的模型是VGG_VOC0712_SSD_300x300_iter_120000.caffemodel(以前是60000,作者更新了),为了第一次就成功,我们就用它了,这是下载地址 ,下载完后解压,把里面的VGGNet文件夹移动到/home/mx/caffe/models/之下。当然,你掌握这个程序后,完全可以修改路径,检测其他模型的效果。
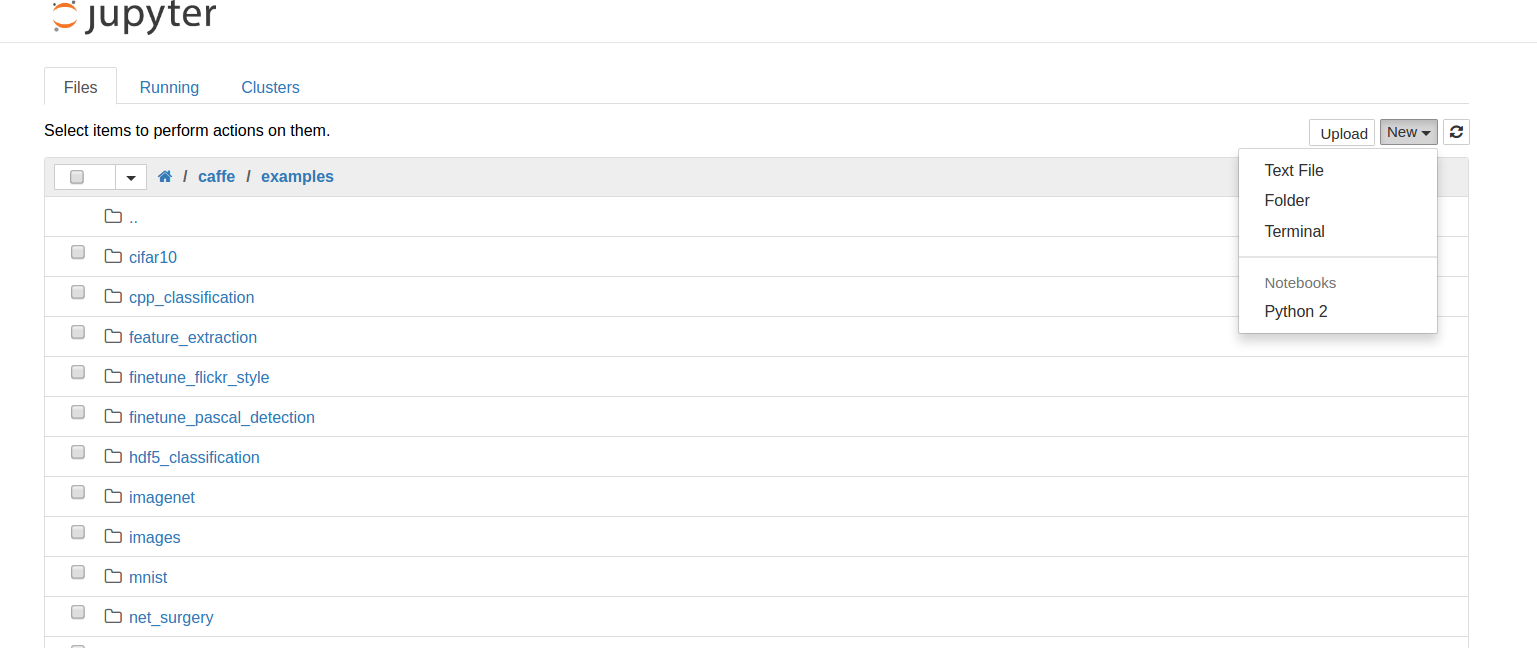
运行程序检测单张图片
在jupyter notebook打开的网页中按照路径找到ssd_detect.ipynb,打开后发现是这样:
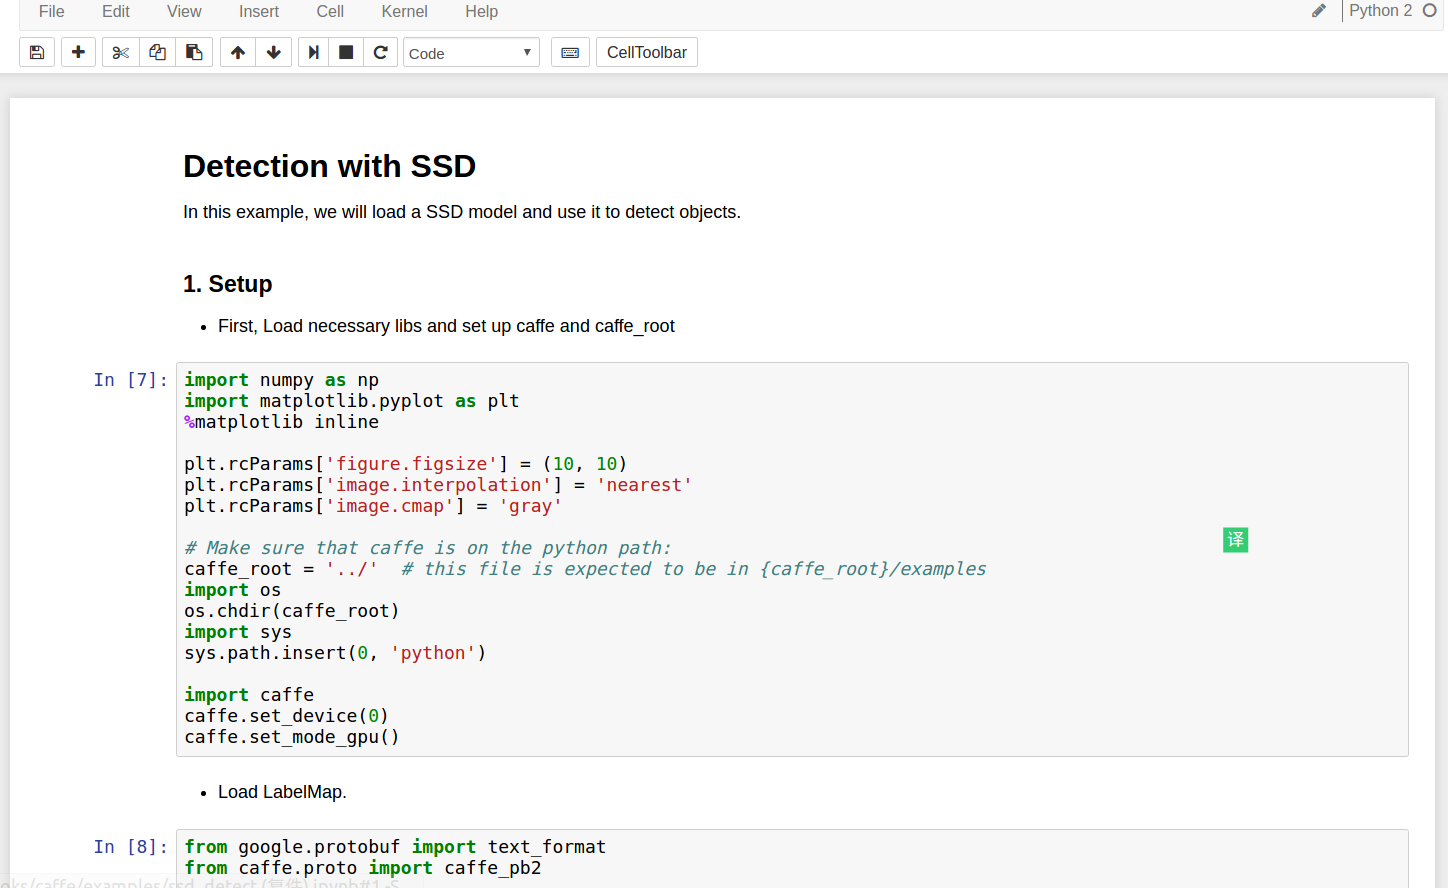
完整的程序我就不放出来了,你打开都和我一样,然后检查下面4个路径是否正确:
- 1
- 2
- 3
- 4
- 1
- 2
- 3
- 4
如果检查无误,就可以开始从头shift+enter运行了,中途可能正常运行,也可能会出错,比如我就遇到如下错误:
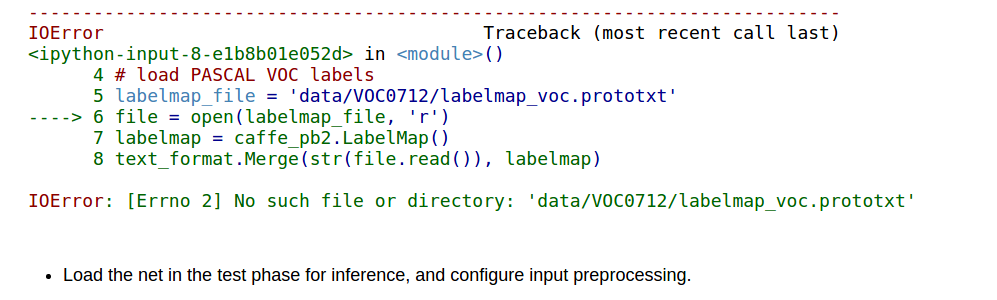
我的办法是,把caffe路径换成绝对路径:
把 caffe_root = ‘../’ 换成 caffe_root = ‘/home/mx/caffe/’ ,理论上不会再出错了,如果仍然找不到,可以尝试在诸如labelmp的路径前面添加点东西,比如:labelmap_file = caffe_root+’data/VOC0712/labelmap_voc.prototxt’
还有一种模型错误也很常见,那是deploy.prototxt文件的问题,见后文。
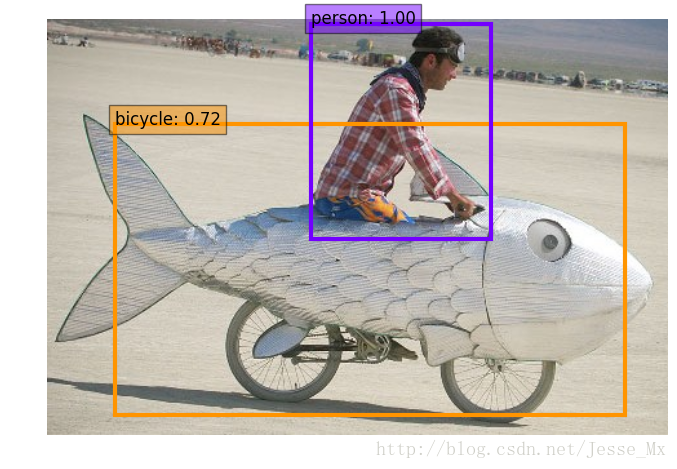
fish-bike.jpg的检测结果如下:
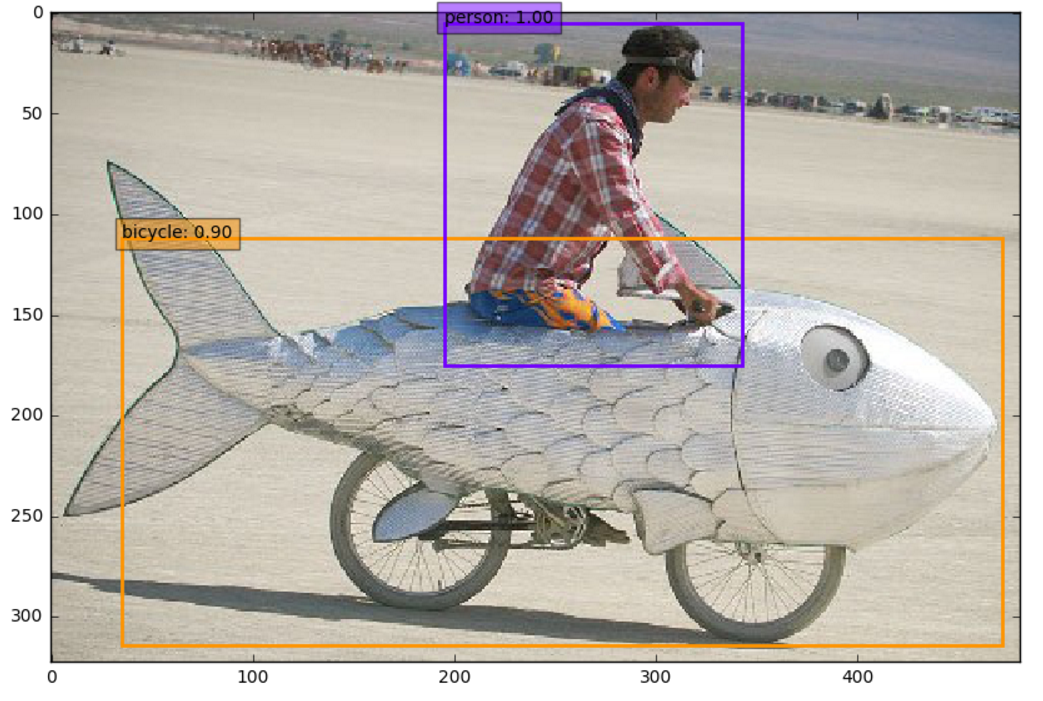
换一张复杂一点的图片image = caffe.io.load_image(‘examples/images/my-pic.jpg’) ,检测结果如下:
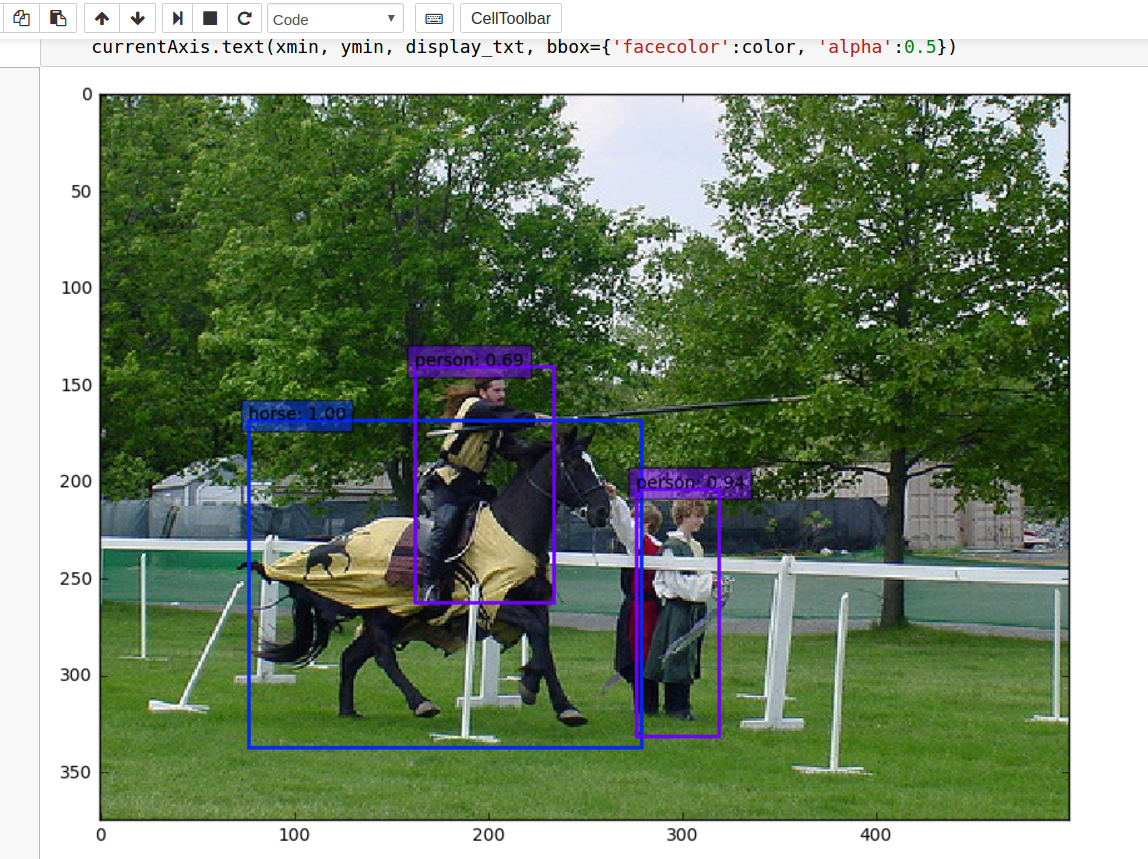
看来效果也是不错的,但是我感觉在网页上跑SSD可能有点吃力,我的jupyter notebook都崩溃过几次(如果电脑配置高多半不会),这里可以把程序另存为py文件,再进行一些微调(比如加个for循环,图片保存到本地之类的),方便平时调用。
其实这种程序也是学习pycaffe的好帮手,推荐一个更好的教程:Caffe for Python 官方教程(翻译) ,如果不懂某个函数,记得善用help,比如:
- 1
- 2
- 3
- 4
- 5
- 6
- 7
- 8
- 9
- 10
- 11
- 12
- 13
- 14
- 15
- 16
- 17
- 18
- 19
- 20
- 21
- 22
- 1
- 2
- 3
- 4
- 5
- 6
- 7
- 8
- 9
- 10
- 11
- 12
- 13
- 14
- 15
- 16
- 17
- 18
- 19
- 20
- 21
- 22
—————————————–分割线————————————-
关于ssd_detect.cpp
好像有部分同学比较关心ssd的C++检测图片程序,也就是ssd_detect.cpp的用法。我们知道,C++程序要经过编译,生成可执行程序才能进行使用(把它作为一个类来调用则是另外一回事了),这个cpp理论上也是可以编译的(有评论说Eclipse中实现了编译,前提是你要会配置那些依赖项),我尝试用“g++ -o ssd_detect ssd_detect.cpp”来进行编译,发现一直报错,主要是找不到需要的include项,很自然的想到添加CPLUS_INCLUDE_PATH环境变量来解决,可是后来又遇到google proto等等的问题,凭我这种三流水平只能投降了,暂时宣告手动编译cpp失败。
其实呢,这个cpp最好是通过make命令(Makefile文件指定包含目录和依赖项等)编译。所以,我们在配置caffe阶段make all的时候,已经从ssd_detect.cpp生成了可执行的二进制文件(留意make all命令的终端显示就可知道),也就是ssd的C++接口程序,路径就在caffe/build/examples/ssd/ssd_detect.bin。那好,我们先看一下它的用法。
终端输入:
- 1
- 2
- 3
- 4
- 5
- 6
- 7
- 8
- 9
- 10
- 11
- 12
- 13
- 14
- 15
- 16
- 17
- 18
- 19
- 20
- 21
- 1
- 2
- 3
- 4
- 5
- 6
- 7
- 8
- 9
- 10
- 11
- 12
- 13
- 14
- 15
- 16
- 17
- 18
- 19
- 20
- 21
可以看到,该程序需要三个必选参数以及一些可选参数,必选参数首先是model_file,也就是检测模型描述文件;然后是weights_file,网络权值文件;list_file,待检测文件,格式为txt,里面列出检测图片/视频的路径。可选参数包括阈值、文件格式、均值文件、图片均值、输出文件这些,都有解释,一看就懂。
运行一个命令试试:
- 1
- 2
- 1
- 2
其中test.txt内容为“example/images/cat.jpg”
呵呵,又报错了:“ImportError: libcaffe.so.1.0.0-rc3: cannot open shared object file: No such file or directory”,还好这个错误在本人知识范围内,也就是静态链接库的问题,so easy。
- 1
- 2
- 3
- 1
- 2
- 3
也有可能会出现这种错误:terminate called after throwing an instance of ‘boost::filesystem::filesystem_error’ what(): boost::filesystem::create_directories: Permission denied: “/home-2/wliu/data/VOCdevkit/results/VOC2007/SSD_300x300”。原因是作者提供的最新SSD300模型中deploy.prototxt里面有些东西没有删干净,找到最后一层,直接把超参数save_output_param整个删掉(也可以替换为个人路径)。
- 1
- 2
- 3
- 4
- 5
- 6
- 7
- 8
- 1
- 2
- 3
- 4
- 5
- 6
- 7
- 8
然后重新运行检测命令,这次有结果了:examples/images/cat.jpg 8 0.999853 163 38 350 358
这个C++程序目前只能得到这样的描述结果,想要可视化的结果要么写一个程序读取里面的文本信息,然后用OpenCV画框;也可以修改源cpp程序重新编译,这个还没尝试,等有空了研究。
复杂一些的例子,检测视频(得到的结果也是每一帧的文本描述),改变阈值并保存检测结果:
- 1
- 1
ssd_detect.cpp检测结果的可视化
之前博主说过,只用ssd_detect.bin检测图片,只能得到一些文本描述结果,大家想要的其实是可视化的带框图片。原本还想自己写一个小程序实现,结果是我想多了,作者已经在新一版的SSD中增加了这一功能,具体而言,就是examples/ssd/plot_detections.py文件。下面来说说怎么用。
首先想到这个py文件多半是读取一些参数(examples/images/cat.jpg 8 0.999853 163 38 350 358这种)才能画框,那么打开这个py文件,找一下接口部分:
- 1
- 2
- 3
- 4
- 5
- 6
- 7
- 8
- 9
- 10
- 11
- 12
- 13
- 14
- 15
- 1
- 2
- 3
- 4
- 5
- 6
- 7
- 8
- 9
- 10
- 11
- 12
- 13
- 14
- 15
果不其然,包含2个必选参数和4个可选参数。必选参数是检测结果文件txt、原始图片文件夹;可选参数有labelmap.prototxt、筛选阈值、保存路径、特定的类别(比如只显示汽车的检测结果)。
先前已经用ssd_detect.bin得到了自带图片的检测结果,存为result.txt:
- 1
- 2
- 3
- 4
- 1
- 2
- 3
- 4
下面开工,用一下这个py文件:
- 1
- 1
立马报错:
examples/images/examples/images/cat.jpg does not exist
examples/images/examples/images/cropped_panda.jpg does not exist
examples/images/examples/images/fish-bike.jpg does not exist
看来图片路径没对,txt中已经有了图片路径,造成路径重复,这个参数不能这么写,但是不写肯定不行。动下脑筋,变成绝对路径不就行了吗。
- 1
- 1
现在好了,在examples文件夹下找到了三张图片,已经画好框,大功告成。


 3017
3017

 被折叠的 条评论
为什么被折叠?
被折叠的 条评论
为什么被折叠?
 到【灌水乐园】发言


