


一、前言
今天是六一,先祝大家六一快乐!距上次发文章已经过了快一个月,工作有点忙,所以有点拖更,见谅~
我们这次来研究一下
Crawler
(爬虫)示例。官方其实还有个示例——Reacher,但是这个示例比较简单,就是模拟一个带两个关节的手臂去跟随目标物体,其核心就是让我们学会如何利用Configurable Joint来进行训练,相比之下,Crawler就复杂得多,因此我们跳过Reacher这个示例,感兴趣的童靴可以自己去研究一下。
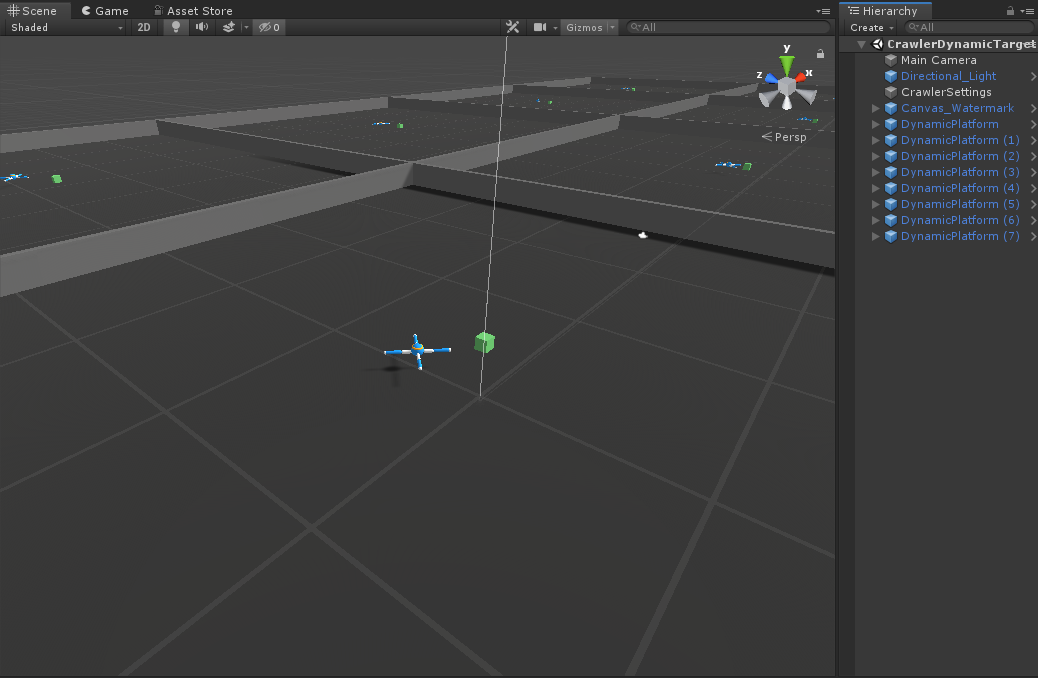
先来看看Crawler示例的效果:
可以看到这次小蓝变成了一只四脚爬虫,每只脚上有两个关节,其任务就是通过四肢协调运动找到绿色方块。大概可以预想到,这个示例在开始训练的时候先要解决的问题就是小蓝怎么通过四肢协调站起来不摔倒,然后进行移动,最后才是找到绿色方块。
此外,该示例有两个场景:CrawlerDynamicTarget和CrawlerStaticTarget,分别是动态目标物和静态目标物,上图展示的就是动态生成目标物,绿色的方块会产生到随机的位置,而后者是绿色方块就在小蓝的前方。因此我们直接研究较难的CrawlerDynamicTarget示例,CrawlerStaticTarget也就迎刃而解了。
二、环境与训练参数
-
设定:有四只胳膊和四只前臂的生物。
-
目标:Agent必须移动它的身体朝目标方向移动而不摔倒。
-
CrawlerStaticTarget :目标方向一直在前方。
-
CrawlerDynamicTarget :目标会随机改变位置。
-
Agents:环境中包含8个相同行为参数的agent。
-
Agent奖励设定(独立的):
-
若小蓝的速度方向朝向目标方向,则+0.03*(速度与目标方向的点积)。
-
若小蓝面朝目标方向,则+0.01*(小蓝向前方向与目标方向的点积)。
-
随着时间的增加,每一帧-0.001(PS.该奖励是可勾选可不勾选的,官方示例默认未勾选)。
-
Note :这里来说一下,为什么奖励这样设定。首先要明白点积的概念:从几何意义来讲,若有两个向量 a 、 b ,则 a · b = | a || b |cos(a, b),由此可推出:
-
①当 a · b >0,两向量方向基本相同,夹角在0°到90°之间;
-
②当 a · b =0,两向量正交,相互垂直;
-
③当 a · b <0,两向量方向基本相反,夹角在90°到180°之间。
-
因此,当小蓝和目标速度或朝向大于90°时,其实是在奖励负数,由此来迫使小蓝面朝目标物并且向目标物前进,这里的设置其实还比较巧妙,可以注意一下。
-
行为参数:
-
矢量观测空间:117个变量,分别对应于每个肢节的位置、角度、速度、角速度,再加小蓝body的加速度和角加速度。
-
矢量动作空间:(Continuous)20个变量,对应关节的转动。
-
视觉观察:无。
-
可变参数:无。
-
基准平均奖励:
-
CrawlerStaticTarget :2000。
-
CrawlerDynamicTarget :400。
三、场景基本结构
这个示例的场景很简单:
其中,CrawlerSettings里有一个
AdjustTrainingTimescale
脚本,该脚本就是通过数字键来改变Time.timeScale属性的,说是可以在训练的时候用,本次训练的时候我会试一下改变Time.timeScale能否加快训练速度。
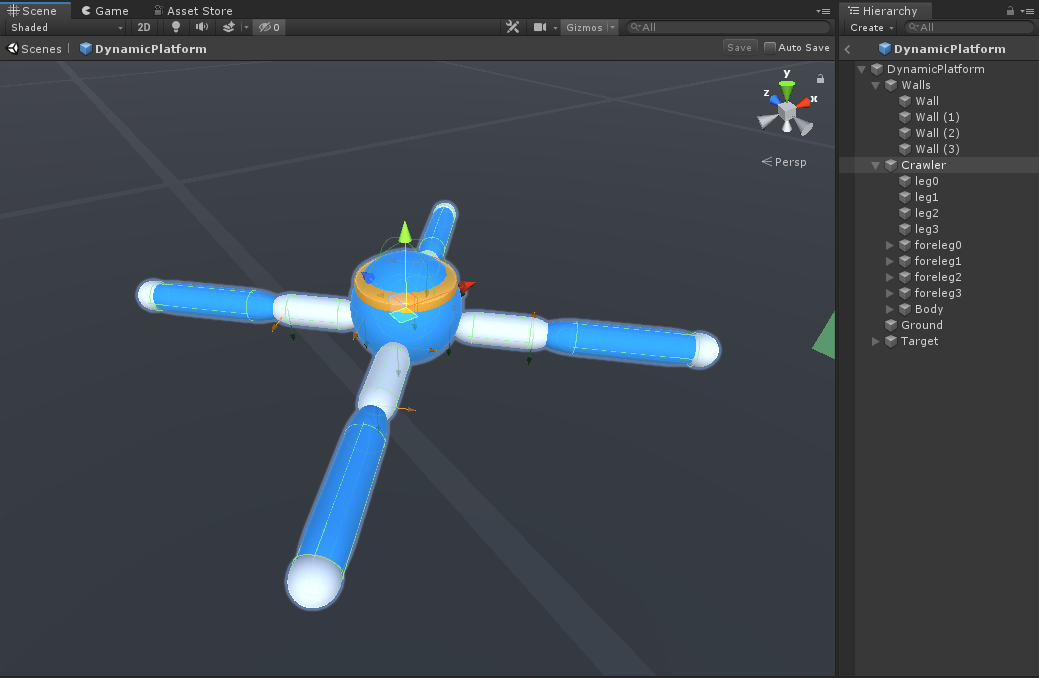
然后来详细讲一下训练单元:
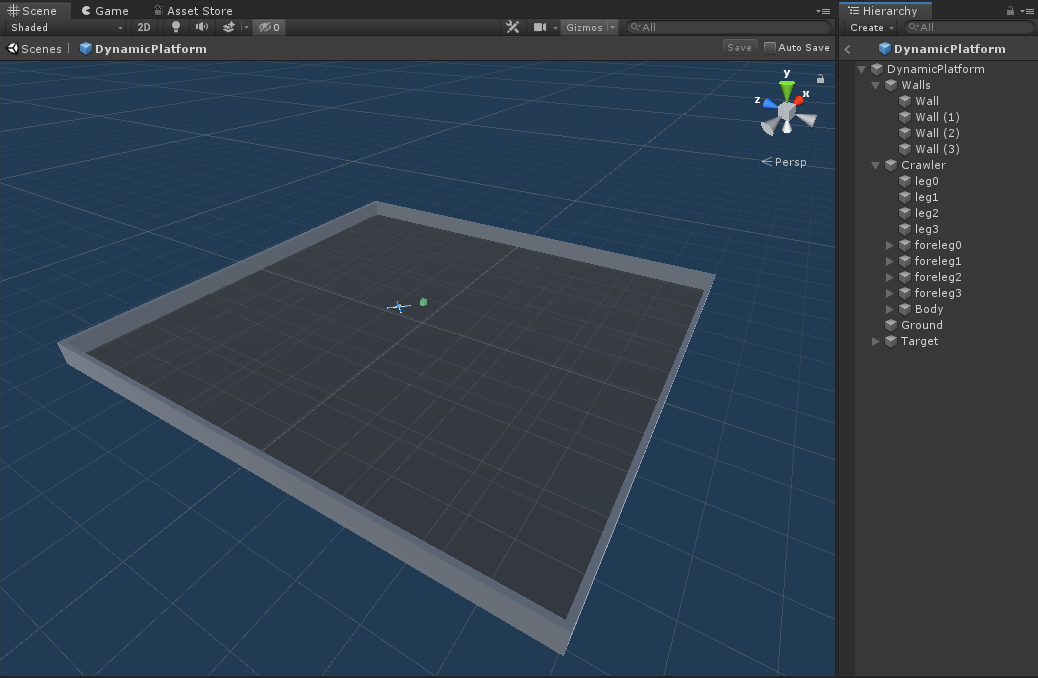
训练单元里的Walls、Ground以及Target都如同直译,没啥特别说的,主要看一下Crawler:
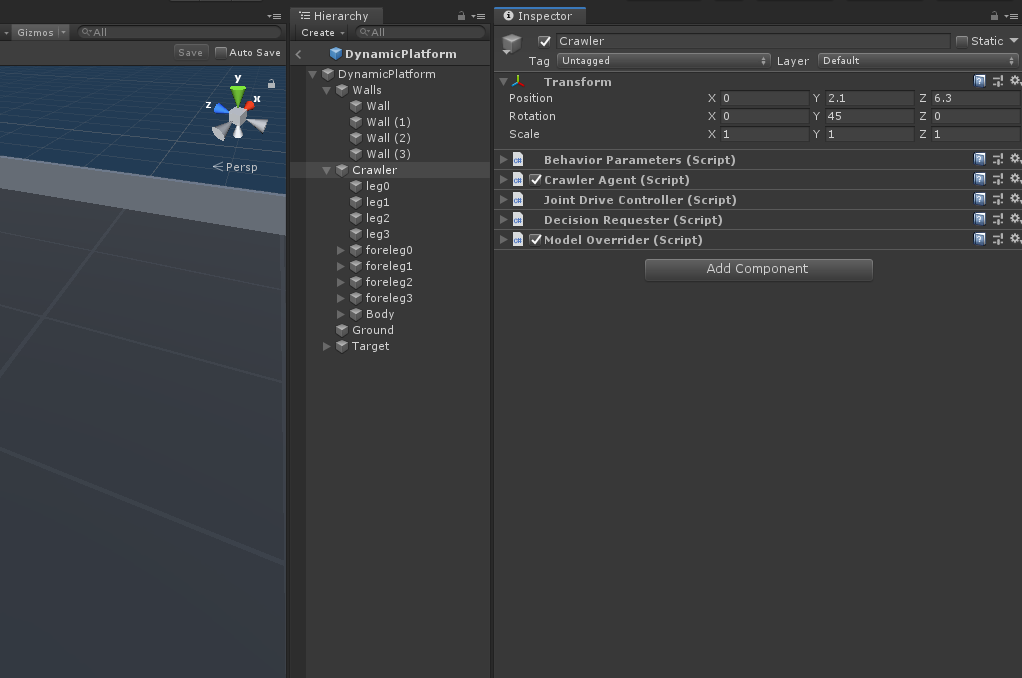
Crawler身上有5个脚本,
BehaviorParameters
是行为参数脚本,只要有继承Agent的脚本,则会自动附加该脚本;
CrawlerAgent
则是agent训练脚本;
DecisionRequester
会定期自动为agent请求决策,如果没有该脚本,则需要手动调用Agent.RequestDecision()方法,不过之前的例子其实Agent上都有这个脚本,我以前忘记讲了;
JointDriveController
控制各个关节,具体还有什么作用一会儿代码解析的时候再来看;
ModelOverrider
这个脚本在0.15.0里是没有的,这个脚本可以先不用管它,这个脚本的作用大概是在训练前,在Console里输入指定的命令,允许在训练期间覆盖代理的.nn模型文件。
除此之外,Crawler的Body还有一个
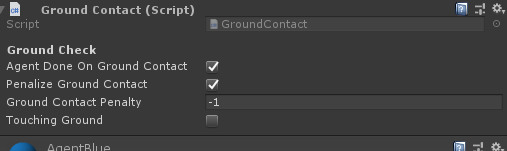
GroundContact
脚本,该脚本是用来检测Crawler是否摔倒,即头部触地,此时可以对agent惩罚1,并重新开始新的Episode,这两个都是可选的:
Crawler有四只前臂和四只腿,再加一个Body:
它们是以Configuration Joint(关节组件)两两相连的,以一部分为例:
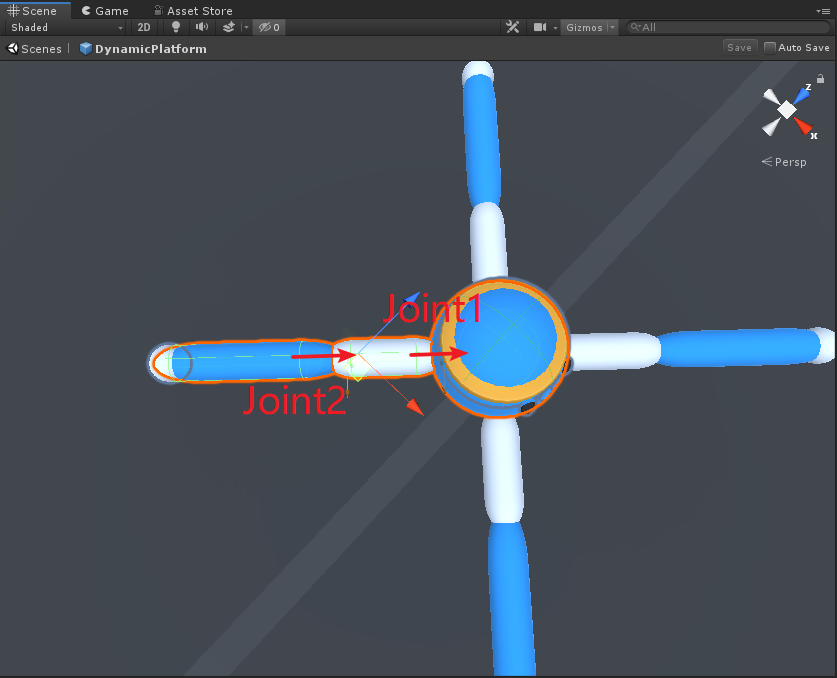
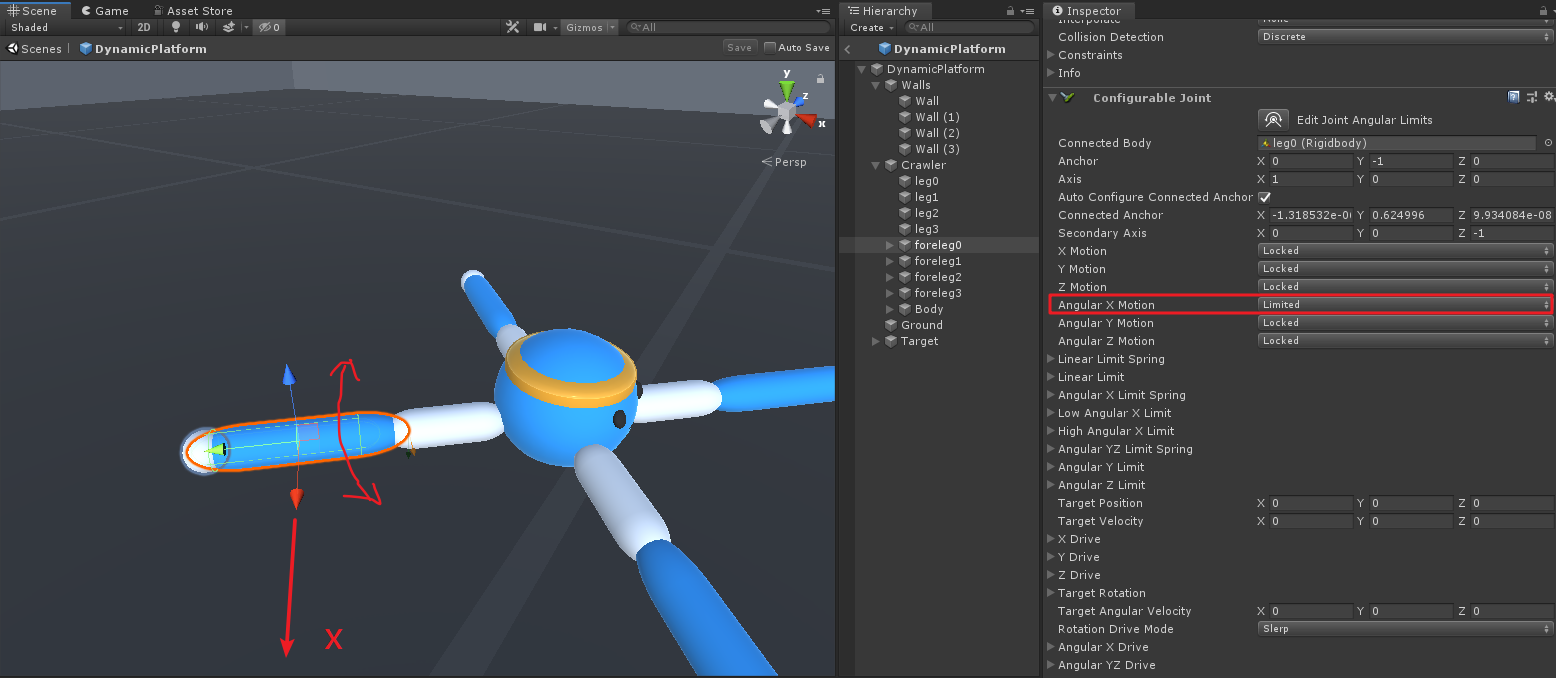
这里小提一下可配置关节 (Configurable Joint),该组件具有非常强的自定义性,具体可以看下图:
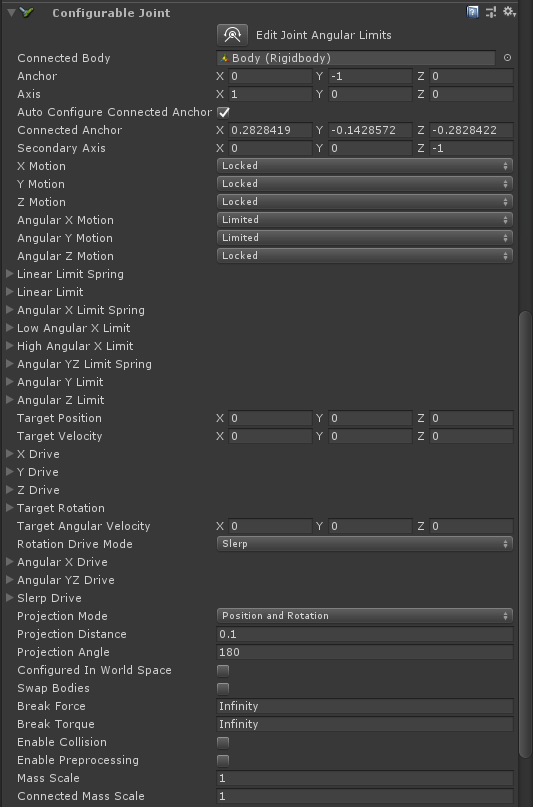
可以配置的参数非常多,但其实很多都是基础的参数,各个参数是如何限制该关节的,建议大家自己下去后再去深入研究,我们这里大概可以看一下Crawler的四肢是如何运动的: 首先看前臂:

前臂的绕X、Y角旋转没被锁定(Locked),其余的都被锁定了。
再看一下后臂:
后臂的只有绕X轴是没被锁定的,其余的都被锁定了。
这样组合的结果就是(灵魂画手,能看懂即可。。。):
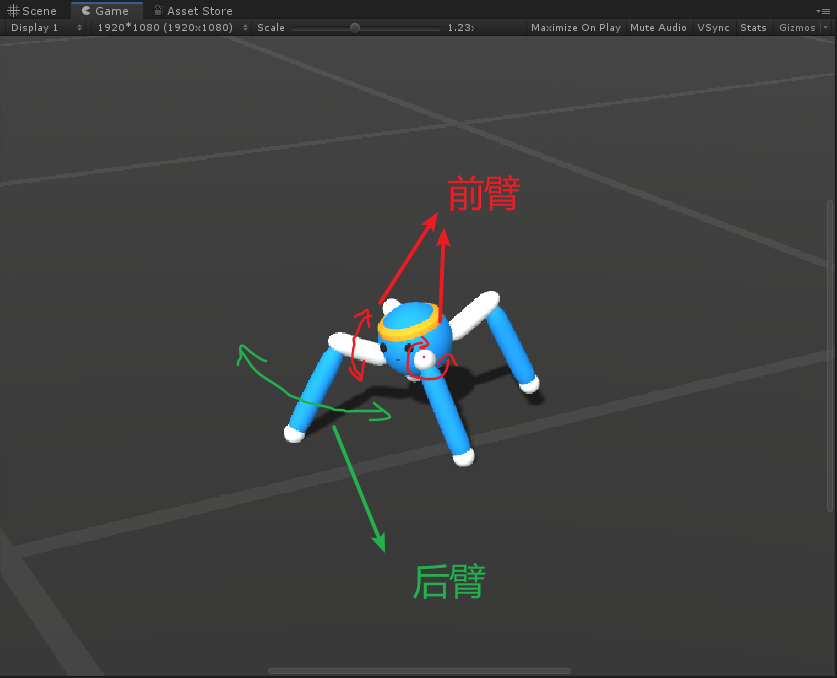
前臂可以绕自身中心轴转,可以绕body上下转,而后臂只能绕前臂上下。该关节配置构成了Crawler运动的基础。
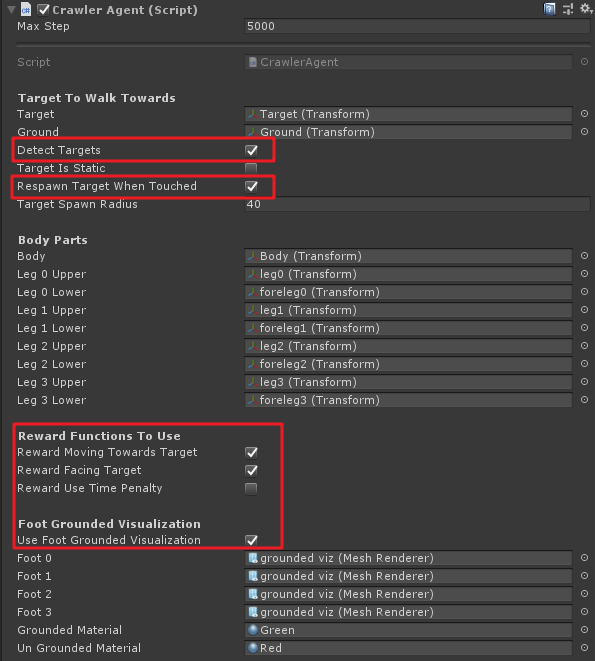
每个后臂还有一个脚的子物体(就是那个小圆球),我看官方本来是想在脚接触地面时令小球换个材质,不接触地面时又是另一种材质,但是示例中最终并没有使用该方法,我们可以来试试这个功能:
建立两个材质球Red和Green,然后分别将这两个材质球拖到Crawler预制体的Agent脚本上,并勾选
Use Foot Grounded Visualization
选项:
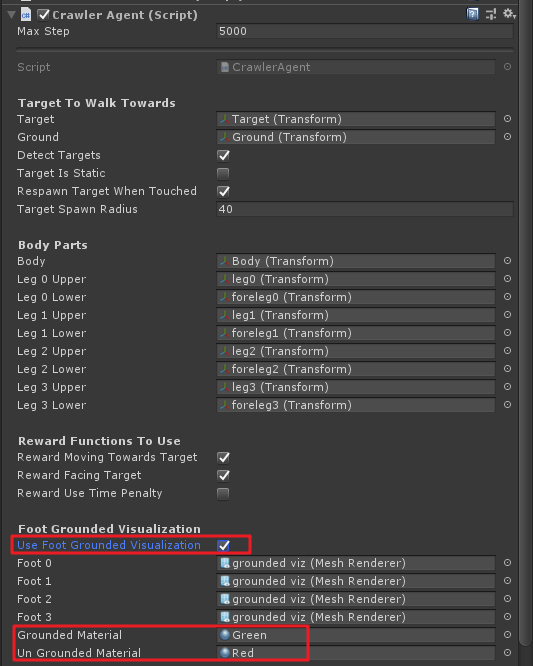
运行的话我们就会有以下效果:
脚基础地面就变成绿色,不接触地面就是红色。
四、代码分析
本示例的代码首先需要理解Agent身上的
JointDriveController
脚本,该脚本用于设置Crawler的肢体关节协调(其他三个示例Walker、Warm也一样用到该脚本),同时该脚本中还包括
BodyPart
脚本,用于存储agent中每个肢体部分的相关信息。
我们先来看一下BodyPart结构,是如何对Crawler的身体做存储的。
BodyPart
     /// <summary>


     /// 用于存储agent每个身体部位的行动和学习相关信息


     /// </summary>


     [

     System

     .

     Serializable

     ]


     public


     class


     BodyPart


     {


     [

     Header

     (

     "Body Part Info"

     )

     ]


     [

     Space

     (

     10

     )

     ]


     public


     ConfigurableJoint

      joint

     ;

     //身体的可配置关节组件


     public


     Rigidbody

      rb

     ;

     //刚体


     [

     HideInInspector

     ]


     public


     Vector3

      startingPos

     ;

     //起始位置


     [

     HideInInspector

     ]


     public


     Quaternion

      startingRot

     ;

     //起始角度


     [

     Header

     (

     "Ground & Target Contact"

     )

     ]


     [

     Space

     (

     10

     )

     ]


     public


     GroundContact

      groundContact

     ;

     //检测地面接触


     public


     TargetContact

      targetContact

     ;

     //检测目标接触


     [

     FormerlySerializedAs

     (

     "thisJDController"

     )

     ]


     [

     HideInInspector

     ]


     public


     JointDriveController

      thisJdController

     ;

     //关节组件Controller


     [

     Header

     (

     "Current Joint Settings"

     )

     ]


     [

     Space

     (

     10

     )

     ]


     public


     Vector3

      currentEularJointRotation

     ;

     //关节当前欧拉角


     [

     HideInInspector

     ]


     public


     float

      currentStrength

     ;

     //当前作用力


     public


     float

      currentXNormalizedRot

     ;


     public


     float

      currentYNormalizedRot

     ;


     public


     float

      currentZNormalizedRot

     ;


     [

     Header

     (

     "Other Debug Info"

     )

     ]


     [

     Space

     (

     10

     )

     ]


     public


     Vector3

      currentJointForce

     ;

     //当前关节作用力


     public


     float

      currentJointForceSqrMag

     ;

     //当前关节作用力大小


     public


     Vector3

      currentJointTorque

     ;

     //当前关节转矩


     public


     float

      currentJointTorqueSqrMag

     ;

     //当前关节转矩大小


     public


     AnimationCurve

      jointForceCurve

     =


     new


     AnimationCurve

     (

     )

     ;

     //关节作用力曲线


     public


     AnimationCurve

      jointTorqueCurve

     =


     new


     AnimationCurve

     (

     )

     ;

     //关节力矩曲线


     /// <summary>


     /// Reset body part to initial configuration.


     /// 身体关节初始化


     /// </summary>


     public


     void


     Reset

     (

     BodyPart

      bp

     )


     {


            bp

     .

     rb

     .

     transform

     .

     position

     =

      bp

     .

     startingPos

     ;

     //位置


            bp

     .

     rb

     .

     transform

     .

     rotation

     =

      bp

     .

     startingRot

     ;

     //角度


            bp

     .

     rb

     .

     velocity

     =

      Vector3

     .

     zero

     ;

     //速度


            bp

     .

     rb

     .

     angularVelocity

     =

      Vector3

     .

     zero

     ;

     //角速度


     if


     (

     bp

     .

     groundContact

     )


     {

     //地面接触标志置位


                bp

     .

     groundContact

     .

     touchingGround

     =


     false

     ;


     }


     if


     (

     bp

     .

     targetContact

     )


     {

     //目标接触标志置位


                bp

     .

     targetContact

     .

     touchingTarget

     =


     false

     ;


     }


     }


     /// <summary>


     /// 根据给定的x,y,z角度和力的大小计算扭矩


     /// </summary>


     public


     void


     SetJointTargetRotation

     (

     float

      x

     ,


     float

      y

     ,


     float

      z

     )


     {


            x

     =


     (

     x

     +


     1f

     )


     *


     0.5f

     ;


            y

     =


     (

     y

     +


     1f

     )


     *


     0.5f

     ;


            z

     =


     (

     z

     +


     1f

     )


     *


     0.5f

     ;


     //Mathf.Lerp(from : float, to : float, t : float) 插值,t=0~1,返回(to-from)*t


     var

      xRot

     =

      Mathf

     .

     Lerp

     (

     joint

     .

     lowAngularXLimit

     .

     limit

     ,

      joint

     .

     highAngularXLimit

     .

     limit

     ,

      x

     )

     ;


     var

      yRot

     =

      Mathf

     .

     Lerp

     (

     -

     joint

     .

     angularYLimit

     .

     limit

     ,

      joint

     .

     angularYLimit

     .

     limit

     ,

      y

     )

     ;


     var

      zRot

     =

      Mathf

     .

     Lerp

     (

     -

     joint

     .

     angularZLimit

     .

     limit

     ,

      joint

     .

     angularZLimit

     .

     limit

     ,

      z

     )

     ;


     //Mathf.InverseLerp(from : float, to : float, value : float)反插值,返回value在from和to之间的比例值


            currentXNormalizedRot

     =

      Mathf

     .

     InverseLerp

     (

     joint

     .

     lowAngularXLimit

     .

     limit

     ,

      joint

     .

     highAngularXLimit

     .

     limit

     ,

      xRot

     )

     ;


            currentYNormalizedRot

     =

      Mathf

     .

     InverseLerp

     (

     -

     joint

     .

     angularYLimit

     .

     limit

     ,

      joint

     .

     angularYLimit

     .

     limit

     ,

      yRot

     )

     ;


            currentZNormalizedRot

     =

      Mathf

     .

     InverseLerp

     (

     -

     joint

     .

     angularZLimit

     .

     limit

     ,

      joint

     .

     angularZLimit

     .

     limit

     ,

      zRot

     )

     ;


            joint

     .

     targetRotation

     =

      Quaternion

     .

     Euler

     (

     xRot

     ,

      yRot

     ,

      zRot

     )

     ;

     //使关节转向目标角度


            currentEularJointRotation

     =


     new


     Vector3

     (

     xRot

     ,

      yRot

     ,

      zRot

     )

     ;

     //当前关节欧拉角


     }


     /// <summary>


     /// 设置关节作用力大小


     /// </summary>


     /// <param name="strength"></param>


     public


     void


     SetJointStrength

     (

     float

      strength

     )


     {


     var

      rawVal

     =


     (

     strength

     +


     1f

     )


     *


     0.5f


     *

      thisJdController

     .

     maxJointForceLimit

     ;


     var

      jd

     =


     new


     JointDrive


     {


                positionSpring

     =

      thisJdController

     .

     maxJointSpring

     ,

     //关节最大弹力


                positionDamper

     =

      thisJdController

     .

     jointDampen

     ,

     //关节弹性大小


                maximumForce

     =

      rawVal

     //施加的最大力


     }

     ;


            joint

     .

     slerpDrive

     =

      jd

     ;


            currentStrength

     =

      jd

     .

     maximumForce

     ;

     //当前施加的力


     }


     }
以上代码说难不难,说简单也不简单。。。主要是涉及到Joint组件的使用,这里面牵扯到一些力学知识,我就不望文生义了,有兴趣的同学可以深入研究一下。
JointDriveController
     /// <summary>


     /// Joint控制器


     /// </summary>


     public


     class


     JointDriveController


     :


     MonoBehaviour


     {


     [

     Header

     (

     "Joint Drive Settings"

     )

     ]


     [

     Space

     (

     10

     )

     ]


     public


     float

      maxJointSpring

     ;

     //关节最大弹力大小


     public


     float

      jointDampen

     ;

     //关节抵抗弹力的强度


     public


     float

      maxJointForceLimit

     ;

     //最大作用力


     //float m_FacingDot;//该变量没用到


     //身体部位字典


     [

     HideInInspector

     ]


     public


     Dictionary

     <

     Transform

     ,

      BodyPart

     >

      bodyPartsDict

     =


     new


     Dictionary

     <

     Transform

     ,

      BodyPart

     >

     (

     )

     ;


     /// <summary>


     /// 创建BodyPart对象并将其添加到字典中


     /// </summary>


     public


     void


     SetupBodyPart

     (

     Transform

      t

     )


     {


     var

      bp

     =


     new


     BodyPart


     {


                rb

     =

      t

     .

     GetComponent

     <

     Rigidbody

     >

     (

     )

     ,


                joint

     =

      t

     .

     GetComponent

     <

     ConfigurableJoint

     >

     (

     )

     ,


                startingPos

     =

      t

     .

     position

     ,


                startingRot

     =

      t

     .

     rotation


     }

     ;


            bp

     .

     rb

     .

     maxAngularVelocity

     =


     100

     ;

     //最大角速度为100


     //添加地面碰撞检测脚本


            bp

     .

     groundContact

     =

      t

     .

     GetComponent

     <

     GroundContact

     >

     (

     )

     ;


     if


     (

     !

     bp

     .

     groundContact

     )


     {


                bp

     .

     groundContact

     =

      t

     .

     gameObject

     .

     AddComponent

     <

     GroundContact

     >

     (

     )

     ;


                bp

     .

     groundContact

     .

     agent

     =

      gameObject

     .

     GetComponent

     <

     Agent

     >

     (

     )

     ;


     }


     else


     {


                bp

     .

     groundContact

     .

     agent

     =

      gameObject

     .

     GetComponent

     <

     Agent

     >

     (

     )

     ;


     }


     //添加目标碰撞检测脚本


            bp

     .

     targetContact

     =

      t

     .

     GetComponent

     <

     TargetContact

     >

     (

     )

     ;


     if


     (

     !

     bp

     .

     targetContact

     )


     {


                bp

     .

     targetContact

     =

      t

     .

     gameObject

     .

     AddComponent

     <

     TargetContact

     >

     (

     )

     ;


     }


            bp

     .

     thisJdController

     =


     this

     ;


            bodyPartsDict

     .

     Add

     (

     t

     ,

      bp

     )

     ;


     }


     /// <summary>


     /// 更新身体每一部分当前的作用力及转矩


     /// </summary>


     public


     void


     GetCurrentJointForces

     (

     )


     {


     foreach


     (

     var

      bodyPart

     in

      bodyPartsDict

     .

     Values

     )


     {

     //轮询身体每部分


     if


     (

     bodyPart

     .

     joint

     )


     {


                    bodyPart

     .

     currentJointForce

     =

      bodyPart

     .

     joint

     .

     currentForce

     ;

     //当前关节作用力


                    bodyPart

     .

     currentJointForceSqrMag

     =

      bodyPart

     .

     joint

     .

     currentForce

     .

     magnitude

     ;

     //当前关节作用力大小


                    bodyPart

     .

     currentJointTorque

     =

      bodyPart

     .

     joint

     .

     currentTorque

     ;

     //当前关节作用转矩


                    bodyPart

     .

     currentJointTorqueSqrMag

     =

      bodyPart

     .

     joint

     .

     currentTorque

     .

     magnitude

     ;

     //当前关节作用转矩大小


     if


     (

     Application

     .

     isEditor

     )


     {

     //IDE下,创建关节作用力和关节力矩的曲线


     if


     (

     bodyPart

     .

     jointForceCurve

     .

     length

     >


     1000

     )


     {


                            bodyPart

     .

     jointForceCurve

     =


     new


     AnimationCurve

     (

     )

     ;


     }


     if


     (

     bodyPart

     .

     jointTorqueCurve

     .

     length

     >


     1000

     )


     {


                            bodyPart

     .

     jointTorqueCurve

     =


     new


     AnimationCurve

     (

     )

     ;


     }


                        bodyPart

     .

     jointForceCurve

     .

     AddKey

     (

     Time

     .

     time

     ,

      bodyPart

     .

     currentJointForceSqrMag

     )

     ;


                        bodyPart

     .

     jointTorqueCurve

     .

     AddKey

     (

     Time

     .

     time

     ,

      bodyPart

     .

     currentJointTorqueSqrMag

     )

     ;


     }


     }


     }


     }


     }
这个脚本主要是将多个BodyPart进行管理的作用,同时可以实时更新身体每一部分作用力及转矩,用以Agent收集
BodyPart的相关信息。
以上两个脚本我注释的比较粗略,主要是对Joint组件的不熟悉造成的,该组件使用的细节我就不深入讲解了,我们主要能弄清楚ml-agents是如何对这种多关节复杂的agent进行训练的就可以了。
GroundContact
     /// <summary>


     /// 该脚本包含了agent可能与地面接触的关节运动的逻辑。通过该脚本,可以设置某些身体部位如果接触地面后做出惩罚


     /// </summary>


     [

     DisallowMultipleComponent

     ]


     //不可重复挂载特性


     public


     class


     GroundContact


     :


     MonoBehaviour


     {


     [

     HideInInspector

     ]


     public


     Agent

      agent

     ;

     //对应的agent


     //当接触地面时,是否令agent置位


     [

     Header

     (

     "Ground Check"

     )

     ]


     public


     bool

      agentDoneOnGroundContact

     ;


     //是否在接触地面时惩罚agent


     public


     bool

      penalizeGroundContact

     ;


     //接触地面惩罚的数值


     public


     float

      groundContactPenalty

     ;


     //接触地面标志


     public


     bool

      touchingGround

     ;


     //地面物体的tag


     const


     string

      k_Ground

     =


     "ground"

     ;


     /// <summary>


     /// 检测碰撞是否为地面


     /// </summary>


     void


     OnCollisionEnter

     (

     Collision

      col

     )


     {


     if


     (

     col

     .

     transform

     .

     CompareTag

     (

     k_Ground

     )

     )


     {

     //碰撞到地面


                touchingGround

     =


     true

     ;


     if


     (

     penalizeGroundContact

     )


     {

     //惩罚agent


                    agent

     .

     SetReward

     (

     groundContactPenalty

     )

     ;


     }


     if


     (

     agentDoneOnGroundContact

     )


     {

     //使得agent重新开始


                    agent

     .

     EndEpisode

     (

     )

     ;


     }


     }


     }


     /// <summary>


     /// 检查地面碰撞是否结束,并使其标志复位


     /// </summary>


     void


     OnCollisionExit

     (

     Collision

      other

     )


     {


     if


     (

     other

     .

     transform

     .

     CompareTag

     (

     k_Ground

     )

     )


     {


                touchingGround

     =


     false

     ;


     }


     }


     }
该脚本在小蓝的每个BodyPart上都有挂载,我们可以来详细看一下:
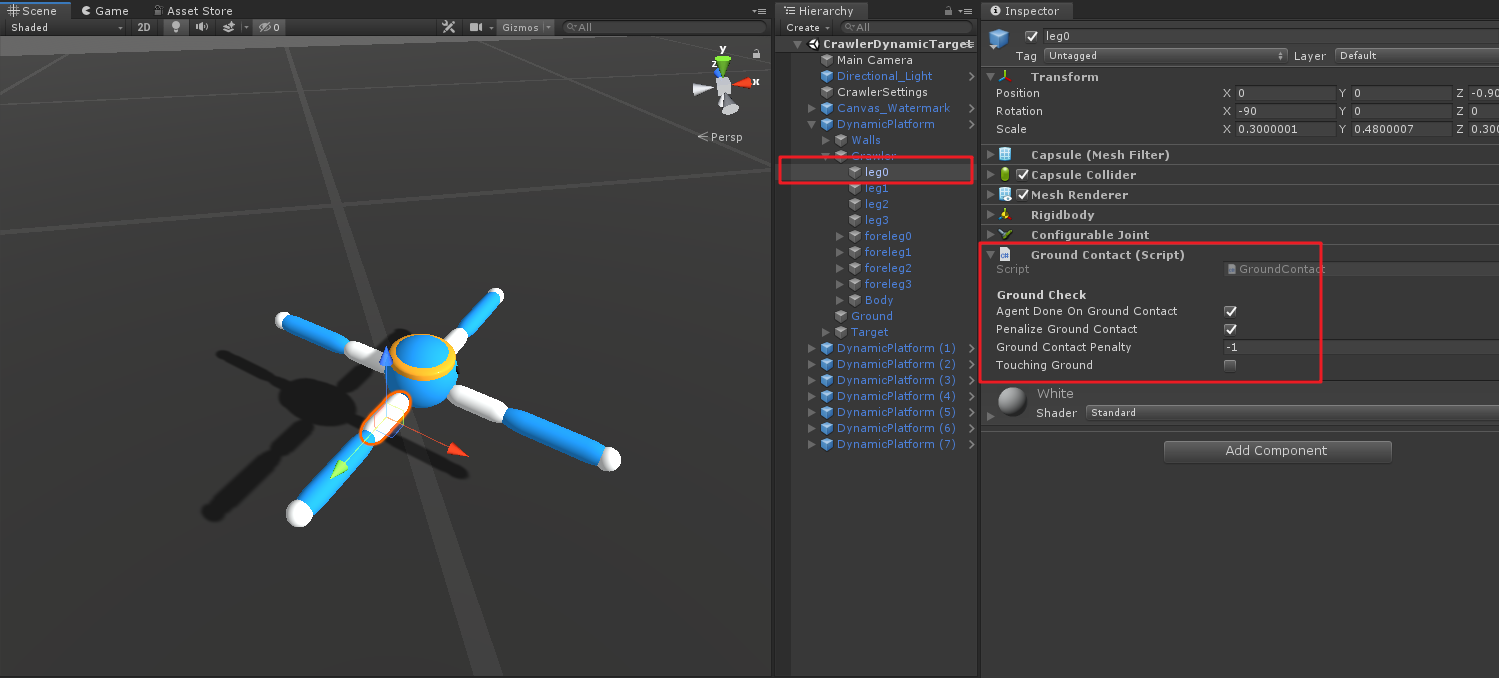
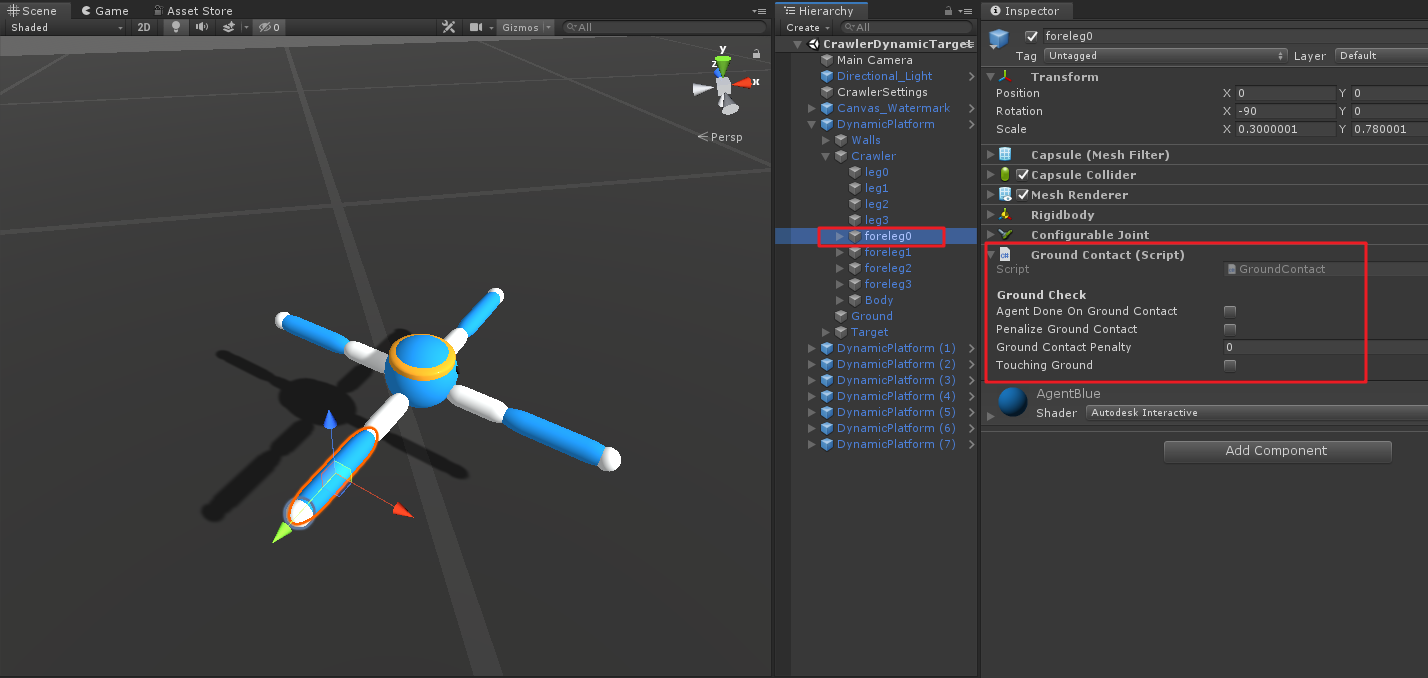
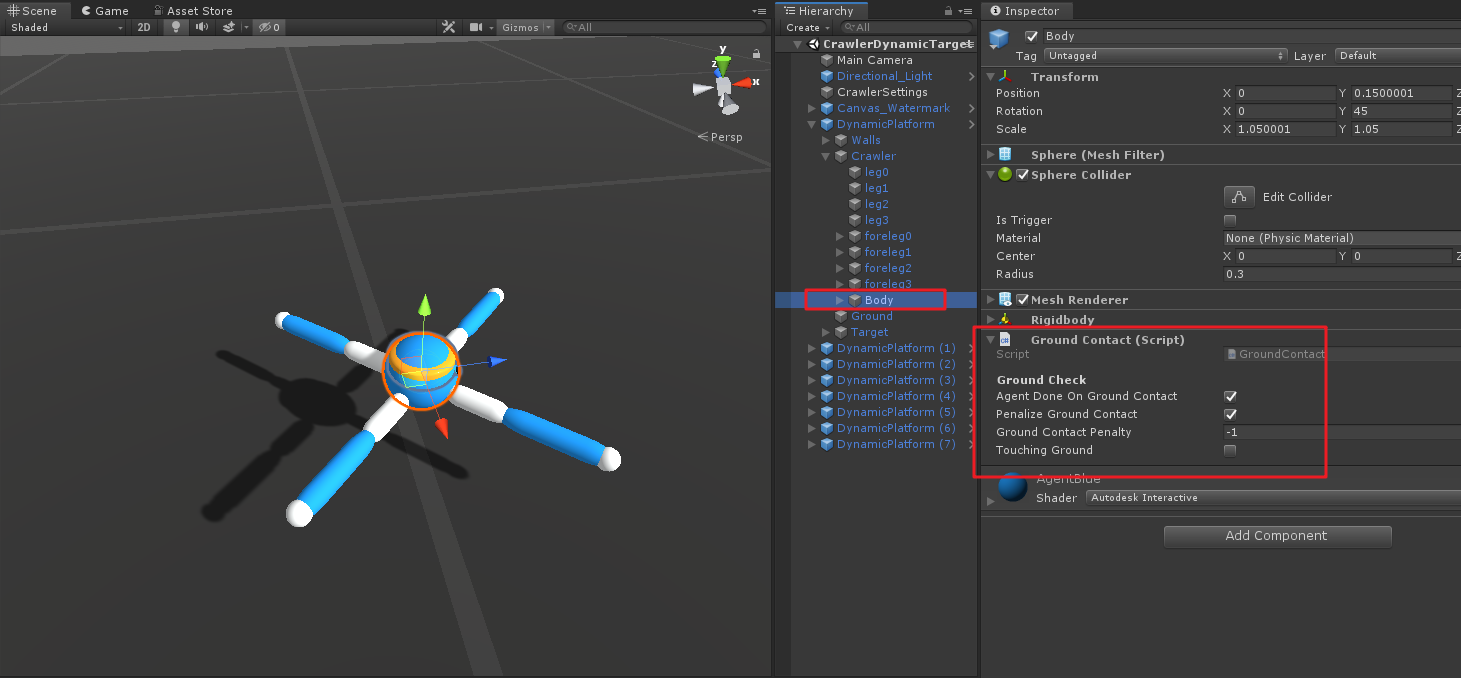
由上图可知,当agent的leg以及Body接触地面后,会使agent惩罚1,并使得agent重新开始新的一轮训练;而foreLeg接触地面则不做任何惩罚。
同时可以留意一下脚本一开始的
[DisallowMultipleComponent]
特性,该特性可使得脚本组件只在同一物体上存在一个。
下面我们来看一下Crawler的Agent脚本。
CrawlerAgent
Agent初始化
     /// <summary>


     /// Crawler的Agent脚本


     /// </summary>


     [

     RequireComponent

     (

     typeof

     (

     JointDriveController

     )

     )

     ]

     //要求JointDriveController脚本同时存在


     public


     class


     CrawlerAgent


     :


     Agent


     {


     [

     Header

     (

     "Target To Walk Towards"

     )

     ]


     [

     Space

     (

     10

     )

     ]


     public


     Transform

      target

     ;

     //目标方块


     public


     Transform

      ground

     ;

     //地面


     public


     bool

      detectTargets

     ;

     //检测目标标志


     public


     bool

      targetIsStatic

     ;

     //目标物是否是静态的


     public


     bool

      respawnTargetWhenTouched

     ;

     //当为true时,到达目标后,目标会重新随机到其他地方


     public


     float

      targetSpawnRadius

     ;

     //目标随机位置半径


     //各部分BodyPart


     [

     Header

     (

     "Body Parts"

     )

     ]


     [

     Space

     (

     10

     )

     ]


     public


     Transform

      body

     ;


     public


     Transform

      leg0Upper

     ;


     public


     Transform

      leg0Lower

     ;


     public


     Transform

      leg1Upper

     ;


     public


     Transform

      leg1Lower

     ;


     public


     Transform

      leg2Upper

     ;


     public


     Transform

      leg2Lower

     ;


     public


     Transform

      leg3Upper

     ;


     public


     Transform

      leg3Lower

     ;


     [

     Header

     (

     "Joint Settings"

     )

     ]


     [

     Space

     (

     10

     )

     ]


     JointDriveController

      m_JdController

     ;

     //Joint控制器


     Vector3

      m_DirToTarget

     ;

     //小蓝到目标物的方向


     float

      m_MovingTowardsDot

     ;

     //小蓝速度方向与目标方向的点积


     float

      m_FacingDot

     ;

     //小蓝正方向与目标方向的点积


     [

     Header

     (

     "Reward Functions To Use"

     )

     ]


     [

     Space

     (

     10

     )

     ]


     public


     bool

      rewardMovingTowardsTarget

     ;

     //速度方向与目标方向奖励是否开启


     public


     bool

      rewardFacingTarget

     ;

     //小蓝正方向与目标方向点积是否开启


     public


     bool

      rewardUseTimePenalty

     ;

     //是否随时间流逝而惩罚


     [

     Header

     (

     "Foot Grounded Visualization"

     )

     ]


     [

     Space

     (

     10

     )

     ]


     public


     bool

      useFootGroundedVisualization

     ;

     //是否使脚接触地面改变材质


     public


     MeshRenderer

      foot0

     ;


     public


     MeshRenderer

      foot1

     ;


     public


     MeshRenderer

      foot2

     ;


     public


     MeshRenderer

      foot3

     ;


     public


     Material

      groundedMaterial

     ;

     //接触地面脚的材质


     public


     Material

      unGroundedMaterial

     ;

     //未接触地面脚的材质


     Quaternion

      m_LookRotation

     ;

     //小蓝到目标方向四元数


     Matrix4x4

      m_TargetDirMatrix

     ;

     //目标方向旋转矩阵


     /// <summary>


     /// Agent初始化


     /// </summary>


     public


     override


     void


     Initialize

     (

     )


     {


        m_JdController

     =


     GetComponent

     <

     JointDriveController

     >

     (

     )

     ;

     //获得Joint控制器


        m_DirToTarget

     =

      target

     .

     position

     -

      body

     .

     position

     ;

     //小蓝到目标方向向量


     //Setup each body part


     //设置身体每一部分


        m_JdController

     .

     SetupBodyPart

     (

     body

     )

     ;


        m_JdController

     .

     SetupBodyPart

     (

     leg0Upper

     )

     ;


        m_JdController

     .

     SetupBodyPart

     (

     leg0Lower

     )

     ;


        m_JdController

     .

     SetupBodyPart

     (

     leg1Upper

     )

     ;


        m_JdController

     .

     SetupBodyPart

     (

     leg1Lower

     )

     ;


        m_JdController

     .

     SetupBodyPart

     (

     leg2Upper

     )

     ;


        m_JdController

     .

     SetupBodyPart

     (

     leg2Lower

     )

     ;


        m_JdController

     .

     SetupBodyPart

     (

     leg3Upper

     )

     ;


        m_JdController

     .

     SetupBodyPart

     (

     leg3Lower

     )

     ;


     }


     }
这段代码主要注意一下上面将要使用的变量。
Agent环境观测值收集
     /// <summary>


     /// 观测值收集


     /// </summary>


     /// <param name="sensor"></param>


     public


     override


     void


     CollectObservations

     (

     VectorSensor

      sensor

     )


     {


        m_JdController

     .

     GetCurrentJointForces

     (

     )

     ;

     //更新身体每一部分当前的作用力及转矩


     //更新小蓝到目标的方向


        m_DirToTarget

     =

      target

     .

     position

     -

      body

     .

     position

     ;

     //向量agent到target


        m_LookRotation

     =

      Quaternion

     .

     LookRotation

     (

     m_DirToTarget

     )

     ;

     //获取小蓝正向到目标向量的四元数


        m_TargetDirMatrix

     =

      Matrix4x4

     .

     TRS

     (

     Vector3

     .

     zero

     ,

      m_LookRotation

     ,

      Vector3

     .

     one

     )

     ;

     //将上述四元数转换为旋转矩阵


     //Body到地面的高度(下方测量值)


     RaycastHit

      hit

     ;


     if


     (

     Physics

     .

     Raycast

     (

     body

     .

     position

     ,

      Vector3

     .

     down

     ,


     out

      hit

     ,


     10.0f

     )

     )


     {


            sensor

     .

     AddObservation

     (

     hit

     .

     distance

     )

     ;


     }


     else


            sensor

     .

     AddObservation

     (

     10.0f

     )

     ;


     //前方、上方测量值收集


     //获取body的正向到目标方向转换的相对向量


     var

      bodyForwardRelativeToLookRotationToTarget

     =

      m_TargetDirMatrix

     .

     inverse

     .

     MultiplyVector

     (

     body

     .

     forward

     )

     ;


        sensor

     .

     AddObservation

     (

     bodyForwardRelativeToLookRotationToTarget

     )

     ;


     //获取body的上方到目标方向转换的相对向量


     var

      bodyUpRelativeToLookRotationToTarget

     =

      m_TargetDirMatrix

     .

     inverse

     .

     MultiplyVector

     (

     body

     .

     up

     )

     ;


        sensor

     .

     AddObservation

     (

     bodyUpRelativeToLookRotationToTarget

     )

     ;


     foreach


     (

     var

      bodyPart

     in

      m_JdController

     .

     bodyPartsDict

     .

     Values

     )


     {

     //收集身体每一部分的测量值


     CollectObservationBodyPart

     (

     bodyPart

     ,

      sensor

     )

     ;


     }


     }


     /// <summary>


     /// 将每个身体部位的相关信息添加到观察中


     /// </summary>


     public


     void


     CollectObservationBodyPart

     (

     BodyPart

      bp

     ,


     VectorSensor

      sensor

     )


     {


     var

      rb

     =

      bp

     .

     rb

     ;


     //是否接触地面


        sensor

     .

     AddObservation

     (

     bp

     .

     groundContact

     .

     touchingGround

     ?


     1


     :


     0

     )

     ;


     //bp速度方向相对于目标方向的相对矢量,即速度与目标方向关系


     var

      velocityRelativeToLookRotationToTarget

     =

      m_TargetDirMatrix

     .

     inverse

     .

     MultiplyVector

     (

     rb

     .

     velocity

     )

     ;


        sensor

     .

     AddObservation

     (

     velocityRelativeToLookRotationToTarget

     )

     ;


     //bp角加速度方向相对于目标方向的相对矢量,即角速度与目标方向关系


     var

      angularVelocityRelativeToLookRotationToTarget

     =

      m_TargetDirMatrix

     .

     inverse

     .

     MultiplyVector

     (

     rb

     .

     angularVelocity

     )

     ;


        sensor

     .

     AddObservation

     (

     angularVelocityRelativeToLookRotationToTarget

     )

     ;


     if


     (

     bp

     .

     rb

     .

     transform

     !=

      body

     )


     {

     //除了body之外的部分,获取每一部分(肢体)的相对位置,x、y、z当前角度以及当前作用力


     var

      localPosRelToBody

     =

      body

     .

     InverseTransformPoint

     (

     rb

     .

     position

     )

     ;


            sensor

     .

     AddObservation

     (

     localPosRelToBody

     )

     ;


            sensor

     .

     AddObservation

     (

     bp

     .

     currentXNormalizedRot

     )

     ;


     // Current x rot


            sensor

     .

     AddObservation

     (

     bp

     .

     currentYNormalizedRot

     )

     ;


     // Current y rot


            sensor

     .

     AddObservation

     (

     bp

     .

     currentZNormalizedRot

     )

     ;


     // Current z rot


            sensor

     .

     AddObservation

     (

     bp

     .

     currentStrength

     /

      m_JdController

     .

     maxJointForceLimit

     )

     ;


     }


     }
这部分代码我认为是Crawler示例中比较重要的部分,因为从中可以学习到如何对于多关节的复杂问题进行数据收集,这里面又涉及到一些角度转换的问题,例如四元数、转换矩阵操作等。
总体来,这部分数据主要如下:小蓝forward到目标的相对旋转关系,小蓝up到目标的相对关系,每一部分速度方向、角速度相对于目标方向关系,每部分肢节的作用力及旋转角度等。
这里有兴趣的童靴可以仔细研究一下,我这里主要来搞一些四元数的相关用法。
-
四元数(Quaternion)
-
网上关于四元数的文章应该很多了,我按我得理解写一下,有错误请指正。
-
首先说到四元数,主要用到的地方就是三维世界中物体的旋转,对于三维世界中描述物体的旋转,我们一般有三种方法表示:旋转矩阵、欧拉角、四元数。
-
以一个点p为例,以上述三种方法旋转得到p',则有:
-
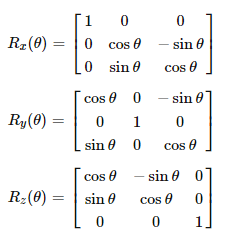
旋转矩阵
-
旋转矩阵乘以点p的齐次坐标,得到旋转后的的点p':
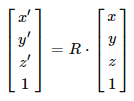
另,绕x,y,z轴旋转θ的矩阵为:
-
欧拉角
-
欧拉角描述旋转,是我们通常用的方式,例如下图,可以将其旋转分解为三步(蓝色为起始坐标系,红色为旋转后的坐标系):
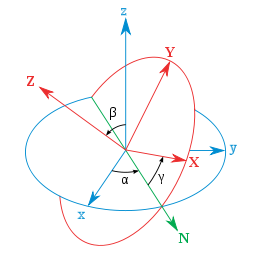
     先绕z轴旋转α,再绕x轴旋转β,最后绕z轴旋转γ。当然这里的旋转顺序并不是规定死的,在Unity中,旋转的顺序是ZXY顺序。

那么对应于以上欧拉角的旋转矩阵为:

不过欧拉角有个解决不了的问题,即“万向节死锁”问题,同时使用欧拉角也不能进行平滑插值。
-
四元数
-
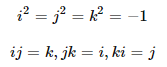
四元数其实是一种高阶复数,它可以很方便的描述物体绕任意轴的旋转,四元数q可以表示为:

其中,i、j、k满足:
同时四元数又可以写成一个向量和一个实数的组合形式:

四元数可以看作是向量和实数的更加一般的形式,我们普通用的向量可以视为实部为
0
的四元数,而实数可以视为虚部为
0
的四元数,由此可以得到一些四元数符合实数或者向量的运算性质(感兴趣的同学可以自己去查,例如四元数的乘法、共轭四元数、四元数的逆等)。
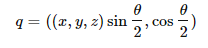
利用四元数来刻画三维空间中的旋转,令点p绕单位向量
(
x
,
y
,
z
)
表示的轴旋转θ,则可申明一个四元数q:
     再令我们要旋转的p点写成四元数的形式

     p

     (

     P

     ,

     0

     )

     (相当于虚部为p,实部为

     0

     ),则旋转后的p'可以用以下公式计算:
当然这个公式的右边可以看到,是三个四元数的乘法,最后得到的p'也是一个四元数。
-
Unity中四元数的API
-
上面我们讲了三种旋转方式,都只是比较简单的讲解,有许多细节其实并没有涉及到,其实可以分别利用三种方法对一个点去计算旋转后的位置,这样可以更加深刻的加深印象。
-
在Unity中,我们大多数使用的是欧拉角来描述物体的旋转,但其实四元数更加方便,功能更加强大。但是四元数的实部和虚部如果你不是很了解,则不要去修改它们,这里我们只是解析一下Quaternion的一些API用法。
-
Quaternion.AngleAxis(float angle, Vector3 axis)
-
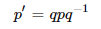
这个方法其实就是四元数的本来用法,即绕某轴axis旋转angle角度,例如,使得一个Cube绕Unity中x轴旋转45度,则有
-
q = Quaternion.AngleAxis(45, Vector3.right);Cube.transform.rotation = q;
-
上式中q为任意四元数,效果如下图:
-
初始位置,蓝色线为物体自身z轴,绿色为y轴,红色为x轴。
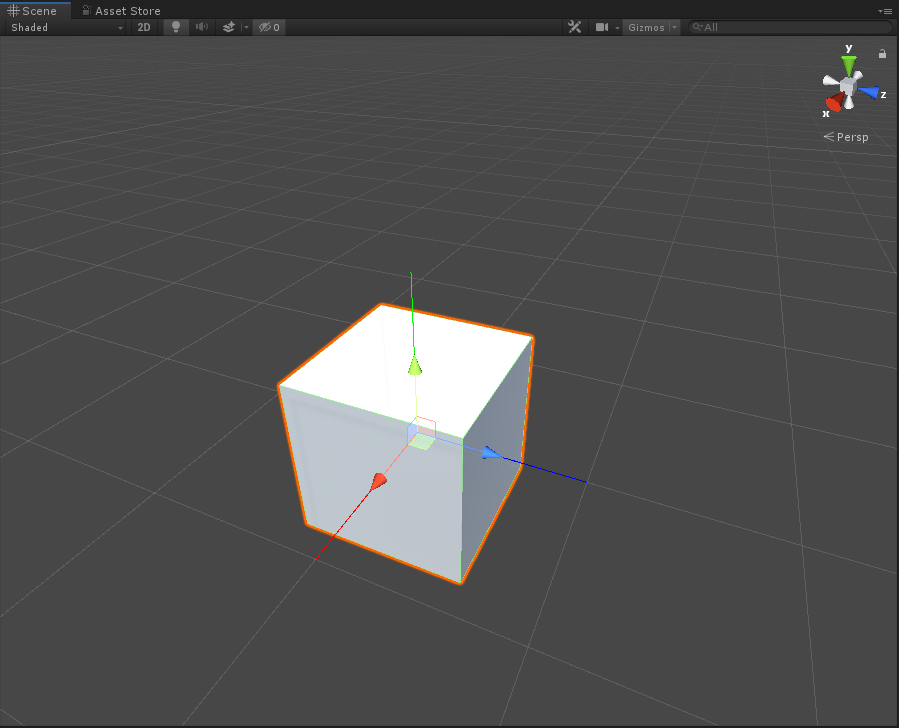
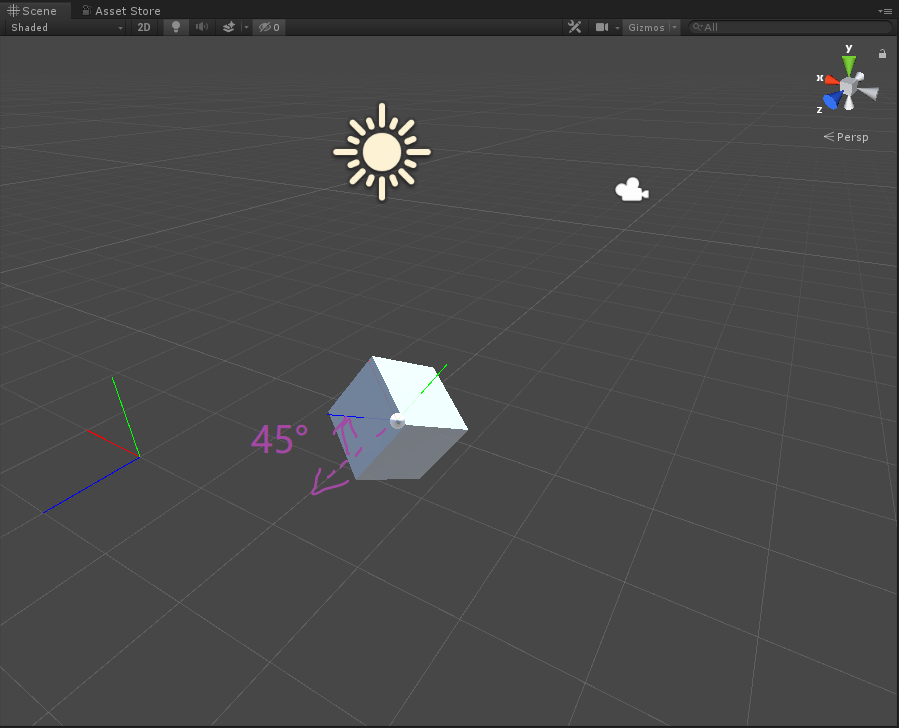
变换后:
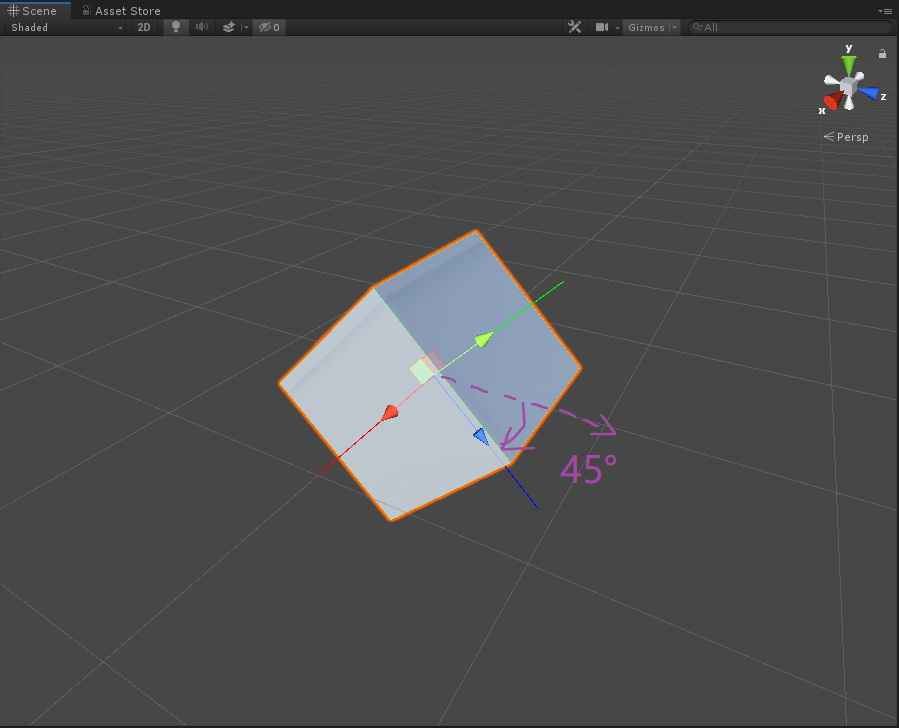
当然,我们也可以利用该函数使得Cube绕任意轴旋转angle角度,我们在场景中放置一个轴:
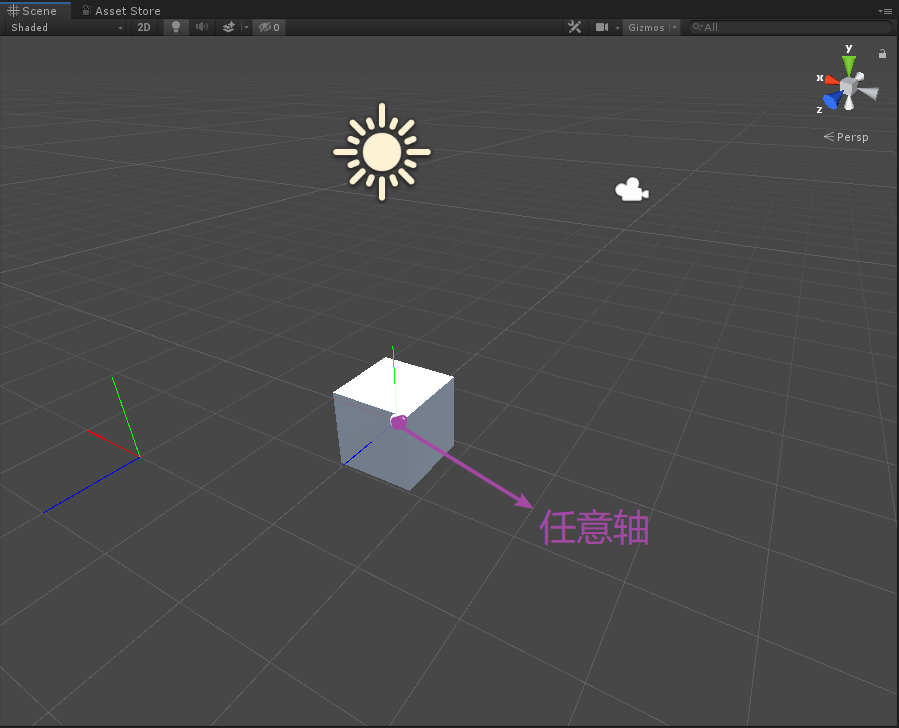
     然后让Cube绕这这根轴旋转

     45

     度,既有:

`q

     =

      Quaternion

     .

     AngleAxis

     (

     45

     ,

      Axis

     .

     transform

     .

     up

     )

     ;

     Cube

     .

     transform

     .

     rotation

     =

      q

     ;

     `
-
Quaternion.LookRotation(Vector3 forward, Vector3 upwards = Vector3.up)
-
这个函数其实就是让物体的前方指向forward方向,物体的上方指向upwards方向(可不赋值)。例如,我现在要让Cube的前方指向下,上方指向前,则有:
-
q = Quaternion.LookRotation(Vector3.down, Vector3.forward);Cube.transform.rotation = q;

当然这个函数就可以衍生出一些还玩的用法,例如同步两个物体的旋转,我们引入一个Target球体:
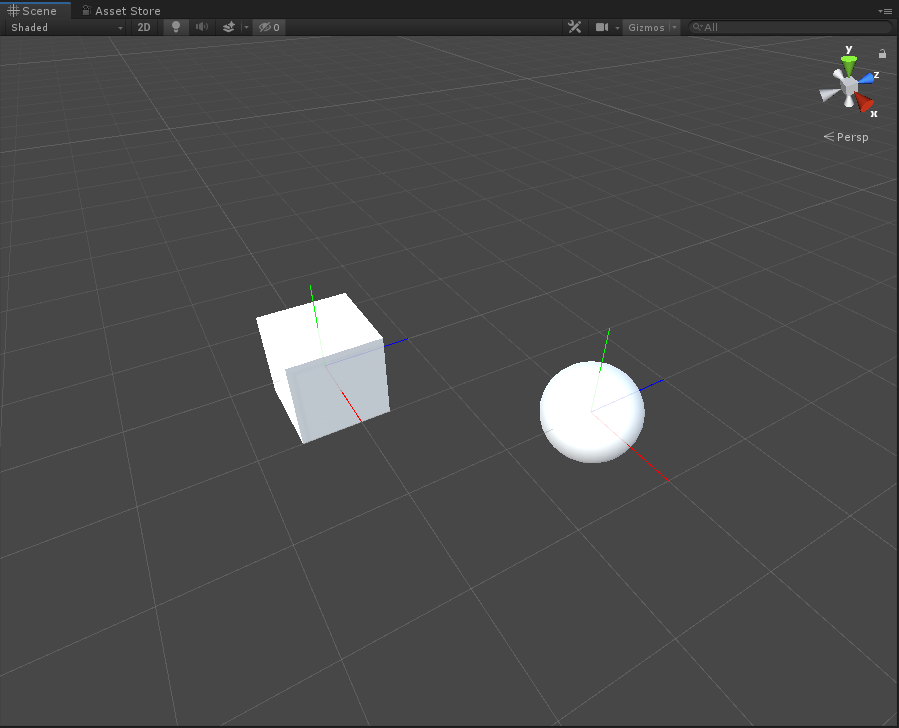
     现在使得方块的前方与球体的上方一致,方块的上方与球体的后方一致,将代码在Update中执行:

`q

     =

      Quaternion

     .

     LookRotation

     (

     Target

     .

     transform

     .

     up

     ,


     -

     Target

     .

     transform

     .

     forward

     )

     ;

     Cube

     .

     transform

     .

     rotation

     =

      q

     ;

     `

则有:

     可以看到上图中方块的前方(蓝色轴)一直与球体的上方(绿色轴)一致,而方块的上方(绿色轴)一直与球体的后方一致。

除此之外,我们还可以利用该方法使得方块一直面向球体:

`q

     =

      Quaternion

     .

     LookRotation

     (

     Target

     .

     transform

     .

     position

     )

     ;

     Cube

     .

     transform

     .

     rotation

     =

      q

     ;

     `
当然这样写有个弊端,就是方块的位置不能移动,如果移动的话,则该方法失效:
     可以看到将方块上移一些,则不能看向目标球体了,因此我们可以对这段代码改造一下:

`

     var

      vec

     =

      Target

     .

     transform

     .

     position

     -

      Cube

     .

     transform

     .

     position

     ;

     q

     =

      Quaternion

     .

     LookRotation

     (

     vec

     )

     ;

     Cube

     .

     transform

     .

     rotation

     =

      q

     ;

     `

这样就可以一直使得方块的前方指向目标球体了。
-
Quaternion.FromToRotation(Vector3 fromDirection, Vector3 toDirection)
-
这个函数主要是将某个方向fromDirection指向另一个方向toDirection,例如将Cube的前方指向Cube的下方,则有:
-
q = Quaternion.FromToRotation(Cube.transform.forward, -Cube.transform.up);
-
当然,除此之外,我们会发现如果使用Quaternion.LookRotation可以令方块前方一直看向目标球体,那如果想让方块的上方一直看向目标球体怎么办呢?这里就需要使用Quaternion.FromToRotation来操作了,一开始你可能会写出以下代码:
-
q = Quaternion.FromToRotation(Cube.transform.up, Target.transform.position);
-
但是这段代码是有问题的,会使得Cube产生抖动:
所以这里其实是应该这么写:
     `q

     =

      Quaternion

     .

     FromToRotation

     (

     Vector3

     .

     up

     ,

      Target

     .

     transform

     .

     position

     )

     ;

     `

这样就能实现方块的上方一直指向目标球体,与上面同理,再次改造一下,使得方块移动位置也可以指向球体,则有:

`

     var

      vec

     =

      Target

     .

     transform

     .

     position

     -

      Cube

     .

     transform

     .

     position

     ;

     q

     =

      Quaternion

     .

     FromToRotation

     (

     Vector3

     .

     up

     ,

      vec

     )

     ;

     `
     OK,到这里我们对于四元数这几个函数就讲解到这,算是抛砖引玉,如果理解有什么不正确的地方还请留言指正。附上测试的代码,注释可以自己进行撤销去测试,基本都是上面讲解中涉及到的代码:

```c#


     public


     class


     QuaTest


     :


     MonoBehaviour


     {


     public


     GameObject

      Cube

     ;


     public


     GameObject

      Axis

     ;


     public


     GameObject

      Target

     ;


     private


     Quaternion

      q

     ;


     void


     Update

     (

     )


     {


     //向右(x)


        Debug

     .

     DrawLine

     (

     Cube

     .

     transform

     .

     position

     ,

      Cube

     .

     transform

     .

     localPosition

     +

      Cube

     .

     transform

     .

     right

     ,

      Color

     .

     red

     )

     ;


        Debug

     .

     DrawLine

     (

     Target

     .

     transform

     .

     position

     ,

      Target

     .

     transform

     .

     localPosition

     +

      Target

     .

     transform

     .

     right

     ,

      Color

     .

     red

     )

     ;


     //向前(z)


        Debug

     .

     DrawLine

     (

     Cube

     .

     transform

     .

     position

     ,

      Cube

     .

     transform

     .

     localPosition

     +

      Cube

     .

     transform

     .

     forward

     ,

      Color

     .

     blue

     )

     ;


        Debug

     .

     DrawLine

     (

     Target

     .

     transform

     .

     position

     ,

      Target

     .

     transform

     .

     localPosition

     +

      Target

     .

     transform

     .

     forward

     ,

      Color

     .

     blue

     )

     ;


     //向上(y)


        Debug

     .

     DrawLine

     (

     Cube

     .

     transform

     .

     position

     ,

      Cube

     .

     transform

     .

     localPosition

     +

      Cube

     .

     transform

     .

     up

     ,

      Color

     .

     green

     )

     ;


        Debug

     .

     DrawLine

     (

     Target

     .

     transform

     .

     position

     ,

      Target

     .

     transform

     .

     localPosition

     +

      Target

     .

     transform

     .

     up

     ,

      Color

     .

     green

     )

     ;


     if


     (

     Input

     .

     GetKeyDown

     (

     KeyCode

     .

     Q

     )

     )


     {


     //Cube绕x轴旋转45度


     //q = Quaternion.AngleAxis(45, Vector3.right);


     //Cube绕Axis自定义轴旋转45度


     //q = Quaternion.AngleAxis(45, Axis.transform.up);


     //绕x轴旋转90度


     //q = Quaternion.Euler(90, 0, 0);//欧拉角实现


     //q = Quaternion.LookRotation(Vector3.down, Vector3.forward);//令物体的前方指向下,上方指向前


     //q = Quaternion.AngleAxis(90, Vector3.right);//令物体绕右轴(x轴)旋转90度


     //q = Quaternion.FromToRotation(Vector3.forward, Vector3.down);//令物体的前方指向物体的下方,不能使用自身坐标系


     //q = Quaternion.FromToRotation(Cube.transform.forward, -Cube.transform.up);//令物体的前方指向物体的下方,不能使用自身坐标系


            Cube

     .

     transform

     .

     rotation

     =

      q

     ;


     }


     //令方块前方与球体上方一致,方块上方与球体后方一致,即令方块的旋转与球的旋转同步


     //q = Quaternion.LookRotation(Target.transform.up, -Target.transform.forward);


     //令方块一直面向目标球体,若Cube自身坐标变了,则失效


     //q = Quaternion.LookRotation(Target.transform.position);


     //令方块一直面向目标球体,Cube自身坐标变也一直面向


     //var vec = Target.transform.position - Cube.transform.position;


     //q = Quaternion.LookRotation(vec);


     //令方块上方一直看向目标球体


     //q = Quaternion.FromToRotation(Cube.transform.up, Target.transform.position);//如果使用自身的向上向量,会产生抖动


     //q = Quaternion.FromToRotation(Vector3.up, Target.transform.position);


     var

      vec

     =

      Target

     .

     transform

     .

     position

     -

      Cube

     .

     transform

     .

     position

     ;


        q

     =

      Quaternion

     .

     FromToRotation

     (

     Vector3

     .

     up

     ,

      vec

     )

     ;

     //注,这里需要使用世界坐标向上,而不能使用自身坐标系的向上向量


        Cube

     .

     transform

     .

     rotation

     =

      q

     ;


     }


     }


```
Agent动作反馈
     /// <summary>


     /// 动作反馈


     /// </summary>


     /// <param name="vectorAction"></param>


     public


     override


     void


     OnActionReceived

     (

     float

     [

     ]

      vectorAction

     )


     {


     //获取所有部分


     var

      bpDict

     =

      m_JdController

     .

     bodyPartsDict

     ;


     var

      i

     =


     -

     1

     ;


     //设置每一部分的角度


        bpDict

     [

     leg0Upper

     ]

     .

     SetJointTargetRotation

     (

     vectorAction

     [

     ++

     i

     ]

     ,

      vectorAction

     [

     ++

     i

     ]

     ,


     0

     )

     ;


        bpDict

     [

     leg1Upper

     ]

     .

     SetJointTargetRotation

     (

     vectorAction

     [

     ++

     i

     ]

     ,

      vectorAction

     [

     ++

     i

     ]

     ,


     0

     )

     ;


        bpDict

     [

     leg2Upper

     ]

     .

     SetJointTargetRotation

     (

     vectorAction

     [

     ++

     i

     ]

     ,

      vectorAction

     [

     ++

     i

     ]

     ,


     0

     )

     ;


        bpDict

     [

     leg3Upper

     ]

     .

     SetJointTargetRotation

     (

     vectorAction

     [

     ++

     i

     ]

     ,

      vectorAction

     [

     ++

     i

     ]

     ,


     0

     )

     ;


        bpDict

     [

     leg0Lower

     ]

     .

     SetJointTargetRotation

     (

     vectorAction

     [

     ++

     i

     ]

     ,


     0

     ,


     0

     )

     ;


        bpDict

     [

     leg1Lower

     ]

     .

     SetJointTargetRotation

     (

     vectorAction

     [

     ++

     i

     ]

     ,


     0

     ,


     0

     )

     ;


        bpDict

     [

     leg2Lower

     ]

     .

     SetJointTargetRotation

     (

     vectorAction

     [

     ++

     i

     ]

     ,


     0

     ,


     0

     )

     ;


        bpDict

     [

     leg3Lower

     ]

     .

     SetJointTargetRotation

     (

     vectorAction

     [

     ++

     i

     ]

     ,


     0

     ,


     0

     )

     ;


     //设置每一部分的作用力


        bpDict

     [

     leg0Upper

     ]

     .

     SetJointStrength

     (

     vectorAction

     [

     ++

     i

     ]

     )

     ;


        bpDict

     [

     leg1Upper

     ]

     .

     SetJointStrength

     (

     vectorAction

     [

     ++

     i

     ]

     )

     ;


        bpDict

     [

     leg2Upper

     ]

     .

     SetJointStrength

     (

     vectorAction

     [

     ++

     i

     ]

     )

     ;


        bpDict

     [

     leg3Upper

     ]

     .

     SetJointStrength

     (

     vectorAction

     [

     ++

     i

     ]

     )

     ;


        bpDict

     [

     leg0Lower

     ]

     .

     SetJointStrength

     (

     vectorAction

     [

     ++

     i

     ]

     )

     ;


        bpDict

     [

     leg1Lower

     ]

     .

     SetJointStrength

     (

     vectorAction

     [

     ++

     i

     ]

     )

     ;


        bpDict

     [

     leg2Lower

     ]

     .

     SetJointStrength

     (

     vectorAction

     [

     ++

     i

     ]

     )

     ;


        bpDict

     [

     leg3Lower

     ]

     .

     SetJointStrength

     (

     vectorAction

     [

     ++

     i

     ]

     )

     ;


     }
注意这里Action Space Type为
Continuous
,且Space Size为
20
。
Agent重置
     /// <summary>


     /// Agent重置,使得身体各个部分初始化等


     /// </summary>


     public


     override


     void


     OnEpisodeBegin

     (

     )


     {


     if


     (

     m_DirToTarget

     !=

      Vector3

     .

     zero

     )


     {

     //让小蓝正向面对目标物


            transform

     .

     rotation

     =

      Quaternion

     .

     LookRotation

     (

     m_DirToTarget

     )

     ;


     }


        transform

     .

     Rotate

     (

     Vector3

     .

     up

     ,

      Random

     .

     Range

     (

     0.0f

     ,


     360.0f

     )

     )

     ;

     //使得小蓝随机旋转一个角度


     foreach


     (

     var

      bodyPart

     in

      m_JdController

     .

     bodyPartsDict

     .

     Values

     )


     {

     //身体各部分置位


            bodyPart

     .

     Reset

     (

     bodyPart

     )

     ;


     }


     if


     (

     !

     targetIsStatic

     )


     {

     //如果开启动态目标物,则随机重置目标物位置


     GetRandomTargetPos

     (

     )

     ;


     }


     }


     /// <summary>


     /// 使得目标方块位置随机生成


     /// </summary>


     public


     void


     GetRandomTargetPos

     (

     )


     {


     //Random.insideUnitSphere:返回半径为1的球体内的一个随机点


     var

      newTargetPos

     =

      Random

     .

     insideUnitSphere

     *

      targetSpawnRadius

     ;


        newTargetPos

     .

     y

     =


     5

     ;


        target

     .

     position

     =

      newTargetPos

     +

      ground

     .

     position

     ;


     }
在之前的版本中,Agent重置函数为
AgentReset()
,现在版本更名为
OnEpisodeBegin()
。
此外,以上代码段中可以看一下随机产生目标物的方法,其使用了
UnityEngine.Random.insideUnitSphere
属性,该值会返回一个半径为1的球体内的一个随机点,除此之外,该类中还提供
onUnitSphere
(在球上随机位置),
insideUnitCircle
(在平面圆内随机位置)两个属性。
其他
     void


     FixedUpdate

     (

     )


     {


     if


     (

     detectTargets

     )


     {

     //开启检测碰撞目标奖励


     foreach


     (

     var

      bodyPart

     in

      m_JdController

     .

     bodyPartsDict

     .

     Values

     )


     {

     //每帧遍历身体的每个部分,是否碰撞到目标


     if


     (

     bodyPart

     .

     targetContact

     &&

      bodyPart

     .

     targetContact

     .

     touchingTarget

     )


     {

     //碰撞到目标,则奖励1,并根据自选项重置目标位置


     TouchedTarget

     (

     )

     ;


     }


     }


     }


     if


     (

     useFootGroundedVisualization

     )


     {

     //是否开启碰撞地板脚变材质功能


            foot0

     .

     material

     =

      m_JdController

     .

     bodyPartsDict

     [

     leg0Lower

     ]

     .

     groundContact

     .

     touchingGround


     ?

      groundedMaterial


     :

      unGroundedMaterial

     ;


            foot1

     .

     material

     =

      m_JdController

     .

     bodyPartsDict

     [

     leg1Lower

     ]

     .

     groundContact

     .

     touchingGround


     ?

      groundedMaterial


     :

      unGroundedMaterial

     ;


            foot2

     .

     material

     =

      m_JdController

     .

     bodyPartsDict

     [

     leg2Lower

     ]

     .

     groundContact

     .

     touchingGround


     ?

      groundedMaterial


     :

      unGroundedMaterial

     ;


            foot3

     .

     material

     =

      m_JdController

     .

     bodyPartsDict

     [

     leg3Lower

     ]

     .

     groundContact

     .

     touchingGround


     ?

      groundedMaterial


     :

      unGroundedMaterial

     ;


     }


     if


     (

     rewardMovingTowardsTarget

     )


     {

     //是否开启速度方向与目标方向奖励惩罚机制


     RewardFunctionMovingTowards

     (

     )

     ;


     }


     if


     (

     rewardFacingTarget

     )


     {

     //是否开启小蓝前方与目标方向奖励惩罚机制


     RewardFunctionFacingTarget

     (

     )

     ;


     }


     if


     (

     rewardUseTimePenalty

     )


     {

     //是否开启随时间流失惩罚机制


     RewardFunctionTimePenalty

     (

     )

     ;


     }


     }


     /// <summary>


     /// 计算小蓝速度方向与目标方向的点积,以此来奖励或惩罚


     /// </summary>


     void


     RewardFunctionMovingTowards

     (

     )


     {


        m_MovingTowardsDot

     =

      Vector3

     .

     Dot

     (

     m_JdController

     .

     bodyPartsDict

     [

     body

     ]

     .

     rb

     .

     velocity

     ,

      m_DirToTarget

     .

     normalized

     )

     ;


     AddReward

     (

     0.03f


     *

      m_MovingTowardsDot

     )

     ;


     }


     /// <summary>


     /// 计算小蓝正向与目标方向的点积,以此来惩罚获奖励


     /// </summary>


     void


     RewardFunctionFacingTarget

     (

     )


     {


        m_FacingDot

     =

      Vector3

     .

     Dot

     (

     m_DirToTarget

     .

     normalized

     ,

      body

     .

     forward

     )

     ;


     AddReward

     (

     0.01f


     *

      m_FacingDot

     )

     ;


     }


     /// <summary>


     /// 随时间流失,惩罚小蓝,促使其快速完成任务


     /// </summary>


     void


     RewardFunctionTimePenalty

     (

     )


     {


     AddReward

     (

     -

     0.001f

     )

     ;


     }
此段代码主要是对各种自选项进行设置判断,主要用途就是设置在什么时候给予小蓝惩罚或奖励。
至此,我们将Crawler的主要代码都解析了一遍,可能有一些地方没有解析的很清楚,也算是抛砖引玉,主要借鉴一下里面的用法即可,实现还是要根据具体需求具体分析,除此之外引入了一些四元数的内容,这次也算是对四元数知识的空缺进行了一定程度的弥补。
五、训练
在命令行中输入以下命令:
mlagents-learn config/trainer_config.yaml --run-id=crawler_normal --train
进行训练,如下图:

有点像魔鬼的步伐。。。
还记得
AdjustTrainingTimescale
脚本么,是设置Time.Scale的脚本,此时我们如果按数字键1~9,会发现Crawler的动作确实可以减慢或加速,就不做动图了,动图帧数一定的,也看不出来加速或减速,所以自己可以去试一下。这个值应该是确实能影响训练速度的,我打印了一下,普通训练的话这个值是20,Time.Scale最大为100,但是也应该不能设置的太大,太大的话会造成Update卡顿,反而影响训练速度,不过这个是我猜的。。。
训练一段时间就发现小蓝以飞快速度奔向目标:
得飘得飘得意的飘~
顺带附上训练后的TesorBoard:
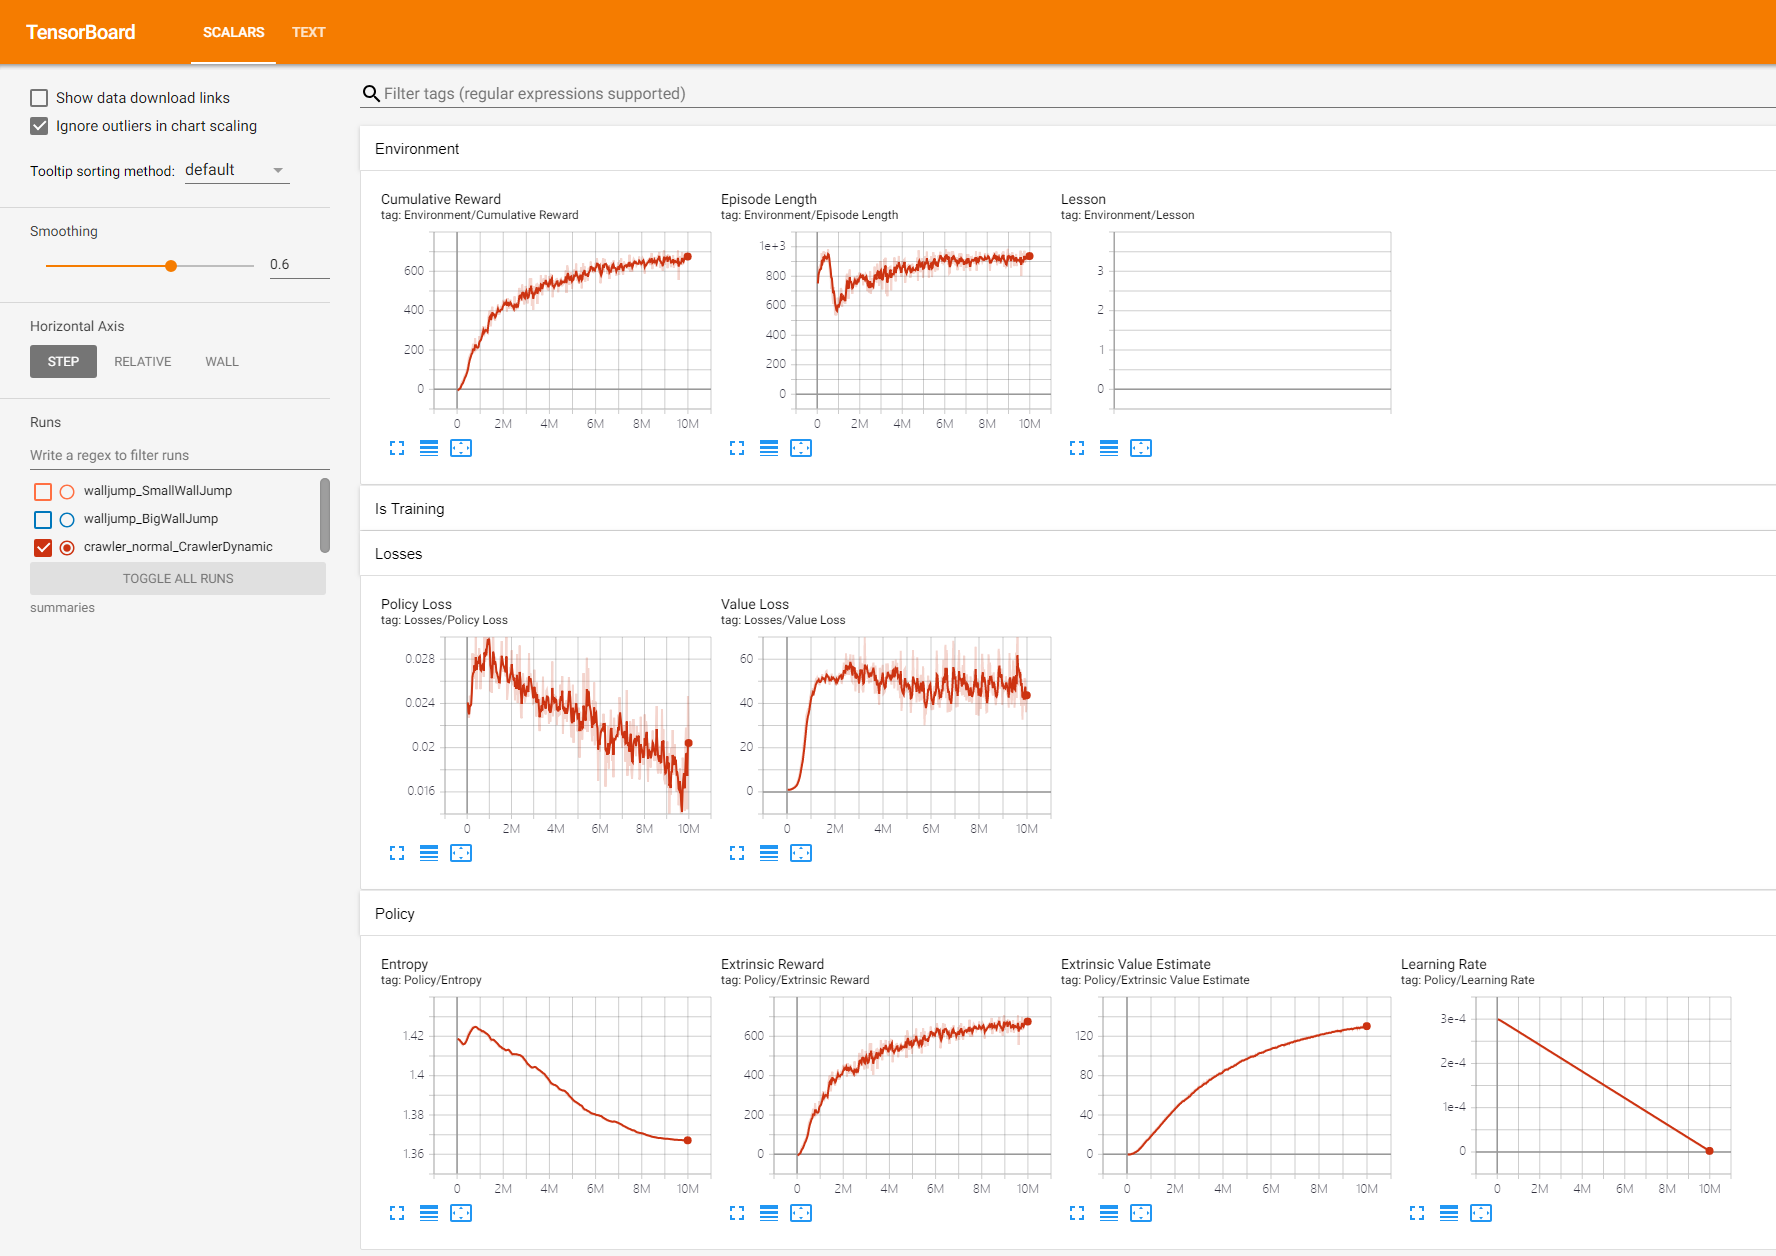
可以看到,最终训练的Cumulative Reward大概在650左右,比官方的数据400还要好很多。
放到Unity中来看一下训练效果:
效果和官方训练的模型一样,没什么问题。
六、总结
本次的案例主要是展示对于复杂的多关节对象如何训练,并且提及到了一些四元数的知识,欢迎大家点赞留言共同探讨。
写文不易~因此做以下申明:
1.博客中标注原创的文章,版权归原作者 煦阳(本博博主) 所有;
2.未经原作者允许不得转载本文内容,否则将视为侵权;
3.转载或者引用本文内容请注明来源及原作者;
4.对于不遵守此声明或者其他违法使用本文内容者,本人依法保留追究权等。


 267
267


 被折叠的 条评论
为什么被折叠?
被折叠的 条评论
为什么被折叠?
 到【灌水乐园】发言


