


SpringBoot整合Redis
开发者只需要引入 Spring Data Redis 依赖,然后简单配下 redis 的基本信息,系统就会提供一个 RedisTemplate 供开发者使用
结合 Cache 的用法,Spring3.1 中开始引入了令人激动的 Cache,在 Spring Boot 中,可以非常方便的使用 Redis 来作为 Cache 的实现,进而实现数据的缓存。
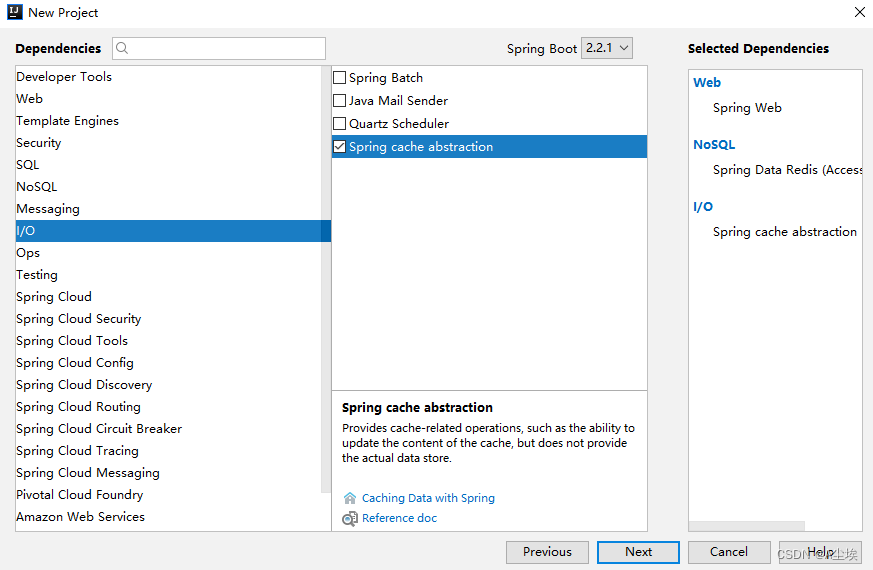
一、工程创建( web、cache 以及 redis)
<dependency>
    <groupId>org.springframework.boot</groupId>
    <artifactId>spring-boot-starter-cache</artifactId>
</dependency>
<dependency>
    <groupId>org.springframework.boot</groupId>
    <artifactId>spring-boot-starter-data-redis</artifactId>
</dependency>
<dependency>
    <groupId>org.springframework.boot</groupId>
    <artifactId>spring-boot-starter-web</artifactId>
</dependency>
配置文件(配置了 Redis 的端口和地址,然后给缓存取了一个名字)
spring.redis.port=6380
spring.redis.host=192.168.66.128

spring.cache.cache-names=c1
二、开启缓存
@SpringBootApplication
@EnableCaching
public class RediscacheApplication {
    public static void main(String[] args) {
        SpringApplication.run(RediscacheApplication.class, args);
    }
}
Spring Boot 就会自动帮我们在后台配置一个 RedisCacheManager,相关的配置是在org.springframework.boot.autoconfigure.cache.RedisCacheConfiguration 类中完成的。
@Configuration
@ConditionalOnClass(RedisConnectionFactory.class)
@AutoConfigureAfter(RedisAutoConfiguration.class)
@ConditionalOnBean(RedisConnectionFactory.class)
@ConditionalOnMissingBean(CacheManager.class)
@Conditional(CacheCondition.class)
class RedisCacheConfiguration {

	//系统会自动提供一个 RedisCacheManager 的 Bean,实现了Spring 中的 Cache 接口
	//直接使用 Spring 中的缓存注解和接口了,而缓存数据则会被自动存储到 Redis 上。
	//在单机的 Redis 中,这个 Bean 系统会自动提供,如果是 Redis 集群,这个 Bean 需要开发者来提供
	@Bean
	public RedisCacheManager cacheManager(RedisConnectionFactory redisConnectionFactory,
			ResourceLoader resourceLoader) {
		RedisCacheManagerBuilder builder = RedisCacheManager
				.builder(redisConnectionFactory)
				.cacheDefaults(determineConfiguration(resourceLoader.getClassLoader()));
		List<String> cacheNames = this.cacheProperties.getCacheNames();
		if (!cacheNames.isEmpty()) {
			builder.initialCacheNames(new LinkedHashSet<>(cacheNames));
		}
		returnthis.customizerInvoker.customize(builder.build());
	}
}
三、注解使用缓存
@CacheConfig
在类上使用,用来描述该类中所有方法使用的缓存名称,当然也可以不使用该注解,直接在具体的缓存注解上配置名称,示例代码如下:
@Service
@CacheConfig(cacheNames="c1")
public class UserService{

}
@Cacheable
这个注解一般加在查询方法上,表示将一个方法的返回值缓存起来,默认情况下,缓存的 key 就是方法的参数,缓存的 value 就是方法的返回值。
@Cacheable(key="#id") //只使用 id 作为缓存的 key,如果对 key 有复杂的要求,可以自定义 keyGenerator
public User getUserById(Integer id,String username){

	return getUserFromDBById(id);
}
当有多个参数时,默认就使用多个参数来做 key
如果只需要其中某一个参数做 key,则可以在 @Cacheable 注解中,通过 key 属性来指定 key
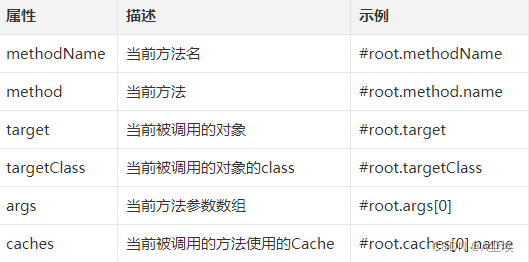
Spring Cache 中提供了 root 对象,可以在不定义 keyGenerator 的情况下实现一些复杂的效果:
@CachePut
这个注解一般加在更新方法上,当数据库中的数据更新后,缓存中的数据也要跟着更新
使用该注解,可以将方法的返回值自动更新到已经存在的 key 上,示例代码如下:
@CachePut(key = "#user.id")
public User updateUserById(User user) {
    return user;
}
@CacheEvict
这个注解一般加在删除方法上,当数据库中的数据删除后,相关的缓存数据也要自动清除
该注解在使用的时候也可以配置按照某种条件删除(condition 属性)或者或者配置清除所有缓存(allEntries 属性),示例代码如下:
@CacheEvict()
public void deleteUserById(Integer id) {
    //在这里执行删除操作, 删除是去数据库中删除
}
Lua脚本
- Lua脚本在Redis中执行,避免了多次的客户端与服务器之间的通信。这可以减少网络开销,提高性能,特别是在需要执行多个Redis命令以完成一个操作时。原子性:Redis保证Lua脚本的原子性执行,无需担心竞态条件或并发问题。
- Lua脚本可以与Redis事务一起使用,确保一系列命令的原子性执行。这允许你将多个操作视为一个单一的事务,要么全部成功,要么全部失败。
- Lua脚本提供了一种在Redis中执行复杂操作的方法,允许你在一个脚本中组合多个Redis命令。这对于处理复杂的业务逻辑非常有用,例如计算和更新分布式计数器、实现自定义数据结构等。
- 使用Lua脚本,你可以实现复杂的原子锁,而不仅仅是使用Redis的SETNX(set if not exists)命令。
- 对于大批量的数据处理,Lua脚本可以减少客户端和服务器之间的往返次数,从而显著减少网络开销。
- 通过将复杂的计算移至服务器端,可以减轻客户端的负担,降低服务器的负载。
- Redis天生支持Lua脚本,因此不需要额外的插件或扩展。
- Lua脚本是一种常见的脚本语言,易于编写和维护。
-- 局部变量
local age = 30

-- 全局变量
name = "john"

--[[
	数据类型:整数、浮点数、字符串、布尔值、nil
]]
local num = 42
local str = "Hello, Lua!"
local flag = true
local empty = nil
local person = { name = "John", age = 30 }

--[[
	条件语句
	循环语句
]]
if age < 18 then
    print("未成年")
elseif age >= 18 and age < 65 then
    print("成年")
else
    print("老年")
end

for i = 1, 5 do
    print(i)
end

local count = 0
while count < 3 do
    print("循环次数: " .. count)
    count = count + 1
end

repeat
    print("至少执行一次")
until count > 5
-- 表数据结构,用{}定义,包含键值对,键值对可以是任何数据类型
local person = {name = "jordan",age = 23,hobbies = {"basketball","baseball"}}
print("姓名:"..person.name)
print("年龄:"..person.age)

-- 模块化,通过require关键字加载

-- 标准库,文件操作,网络编程,正则表达式,事件处理等,通过内置模块,如io/socket等
-- 字符串处理
local text = "Lua programming"
local sub = string.sub(text,1,3)
print(sub)

-- 错误处理,使用pcall汉书来包裹可能引发异常的代码块,以捕获并处理错误,通常与assert一起使用
local success,result = pcall(function()
	error("出错了!")
end)

if success then
	print("执行成功")
else
	print("错误信息:"..result)
end
错误返回值: Lua脚本在执行期间可能会遇到错误,例如脚本本身存在语法错误,或者在脚本中的某些操作失败。Redis执行Lua脚本后,会返回脚本的执行结果。你可以检查这个结果以查看是否有错误,通常返回值是一个特定的错误标识。例如,如果脚本执行成功,返回值通常是OK,否则会有相应的错误信息。
异常处理: 在Spring Boot应用程序中,你可以使用异常处理来捕获Redis执行脚本时可能抛出的异常。Spring Data Redis提供了一些异常类,如RedisScriptExecutionException,用于处理脚本执行期间的错误。你可以使用try-catch块来捕获这些异常并采取相应的措施,例如记录错误信息或执行备用操作。
应用场景
一、缓存更新
在缓存中存储某些数据,但需要定期或基于条件更新这些数据,同时确保在更新期间不会发生并发问题
使用Lua脚本,你可以原子性地检查数据的新鲜度,如果需要更新,可以在一个原子性操作中重新计算数据并更新缓存
local cacheKey = KEYS[1] --获取缓存键
local data = redis.call('GET',cacheKey) -- 尝试从缓存中获取数据

if not data then
	-- 数据不在缓存中,重新计算并设置
	data = calculateData()
	redis.call('SET',cacheKey,data)
end
return data
二、原子操作
需要执行多个Redis命令作为一个原子操作,确保它们在多线程或多进程环境下不会被中断
使用Lua脚本,你可以将多个命令组合成一个原子操作,如实现分布式锁、计数器、排行榜等
local key = KEYS[1] -- 获取键名
local value = ARGV[1] -- 获取参数值
local current = redis.call('GET',key) -- 获取当前值
if not current or tonumber(current) < tonumber(value) then
	-- 如果当前值不存在或者新值更大,设置新值
	redis.call('SET',key,value)
end
-- 考虑一个计数器的场景,多个客户端需要原子性地增加计数
local key = KEYS[1]
local increment = ARGV[1]
return redis.call('INCRBY',key,increment)
三、数据处理
需要对Redis中的数据进行复杂的处理,如统计、筛选、聚合等。
使用Lua脚本,你可以在Redis中执行复杂的数据处理,而不必将数据传输到客户端进行处理,减少网络开销
local keyPattern = ARGV[1] -- 获取键名匹配模式
local keys = redis.call('KEYS',keyPattern) -- 获取匹配的键
local result = {}
for i,key in ipairs(keys) do
	local data = redis.call('GET',key) -- 获取每个键对应的数据
	table.insert(result,processData(data))
end
return result
--[[
	Lua脚本允许你在Redis服务器端执行复杂的数据处理。这减少了将数据传输到客户端进行处理的开销,并允许你在Redis中执行更复杂的逻辑,从而提高性能
]]
local total = 0
for _,key in ipairs(KEYS) do
	local value = redis.call('GET',key)
	total = total + tonumber(value)
end
return total
四、分布式锁
使用Lua脚本,你可以在Redis中执行复杂的数据处理,而不必将数据传输到客户端进行处理,减少网络开销
使用Lua脚本,你可以原子性地尝试获取锁,避免竞态条件,然后在完成后释放锁
local lockKey = KEYS[1] -- 获取锁的键名
local lockValue = ARGV[1] -- 获取锁的值
local lockTimeout = ARGV[2] --获取锁的超时时间
if redis.call('SET',lockKey,lockValue,'NX','PX',lockTimeout) then
	-- 锁获取成功,执行相关操作
	redis.call('DEL',lockKey)
	return true
else
	return false --无法获取锁
五、事务
local key1 = KEYS[1]
local key2 = KEYS[2]
local value = ARGV[1]

redis.call('SET', key1, value)
redis.call('INCRBY', key2, value)

-- 如果这里的任何一步失败,整个事务将回滚
SpringBoot实现Lua脚本
Spring Data Redis和Lettuce(或Jedis)客户端的使用
一、添加依赖
<dependency>
    <groupId>org.springframework.boot</groupId>
    <artifactId>spring-boot-starter-data-redis</artifactId>
</dependency>
<dependency>
    <groupId>io.lettuce.core</groupId>
    <artifactId>lettuce-core</artifactId> <!-- 或使用Jedis -->
</dependency>
二、application.properties或application.yml配置Redis连接
spring.redis.host=127.0.0.1
spring.redis.port=6379
spring.redis.password=yourPassword
三、创建Lua脚本
myscript.lua
local a = tonumber(ARGV[1])
local b = tonumber(ARGV[2])
return a + b
四、编写代码执行Lua脚本
使用Spring Data Redis提供的StringRedisTemplate或LettuceConnectionFactory
两种不同的示例来执行Lua脚本,一种是直接运行Lua脚本字符串,另一种是运行脚本文件。
/**
	运行Lua脚本字符串
*/
@Service
public class LuaScriptService{

	@Autowired
	private StringRedisTemplate stringRedisTemplate;

	public Integer executeLuaScriptFromString(){

		String luaScript = "local a = tonumber(ARGV[1])\nlocal b = tonumber(ARGV[2])\nreturn a + b";

		RedisScript<Integer> script = new DefaultRedisScript<>(luaScript,Integer.class);

		String[] keys = new String[0];//通常情况下,没有KEYS部分
		Object[] args = new Object[]{10,20};//传递给Lua脚本的参数

		Integer result = stringRedisTemplate.execute(script,keys,args);
		return result;
	}
}
创建一个文件myscript.lua,然后通过类运行该文件
@Service
public class LuaScriptService{

	@Autowired
	private StringRedisTemplate.stringRedisTemplate;

	@Autowired
	private ResourceLoader resourceLoader;

	public Integer executeLuaScriptFromFile(){

		Resource resource = resourceLoader.getResource("classpath:mysript.lua");
		String luaScript;
		try{
			luaScript = new String(resource.getInputStream().readAllBytes());
		}catch(Exception e){
			throw new RuntimeException("Unable to read Lua script file.");
		}

		RedisScript<Integer> script = new DefaultRedisScript<>(luaScript, Integer.class);
        String[] keys = new String[0]; // 通常情况下,没有KEYS部分
        Object[] args = new Object[]{10, 20}; // 传递给Lua脚本的参数
        Integer result = stringRedisTemplate.execute(script, keys, args);
        return result;
	}
}
=========================================
Spring Cache缓存组件,提供了类似@Transactional注解事务的注解Cache支持,且提供了Cache等抽象,方便切换各种底层Cache(比如Redis)
一、添加依赖
<dependency>
	<groupId>org.springframework.boot</groupId>
	<artifactId>spring-boot-starter-data-redis</artifactId>
</dependency>

<!--Spring2.x集成redis所需要的-->
<dependency>
	<groupId>org.apache.commons</groupId>
	<artifactId>commons-pool2</artifactId>
</dependency>
二、Redis配置类
@Configuration
@EnableCaching
public class RedisConfig{

	/**
		自定义key规则
	*/
	@Bean
	public KeyGenerator keyGenerator(){
		return new KeyGenerator(){
			@Override
			public Object generate(Object target,Method method,Object... params){
				StringBuilder sb = new StringBuilder();
				sb.append(target.getClass().getName());
				sb.append(method.getName());
				for(Object obj:params){
					sb.append(obj.toString());
				}
				return sb.toString();
			}
		}
	}

	/**
		设置redisTemplate规则
	*/
	@Bean
	public RedisTemplate<Object,Object> redisTemplate(RedisConnectionFactory redisConnectionFactory){

		RedisTemplate<Object,Object> redisTemplate = new RedisTemplate<>();
		redisTemplate.setConnectionFactory(redisConnectionFactory);
		Jackson2JsonRedisSerializer jackson2JsonRedisSerializer = new Jackson2JsonRedisSerializer(Object.class);

		//解决查询缓存转换异常的问题
		ObjectMapper om = new ObjectMapper();
		//指定要序列化的域
		om.setVisibility(PropertyAccessor.ALL,JsonAutoDetect.Visibility.ANY);
		om.enableDefaultTyping(ObjectMapper.DefaultTyping.NON_FINAL);
		jackson2JsonRedisSerializer.setObjectMapper(om);

		//序列号key value
		redisTemplate.setKeySerializer(new StringRedisSerializer());
		redisTemplate.setValueSerializer(jackson2JsonRedisSerializer());
		redisTemplate.setHashKeySerializer(new StringRedisSerializer());
		redisTemplate.setHashValueSerializer(jackson2JsonRedisSerializer);

		redisTemplate.afterPropertiesSet();
		return redisTemplate;
	}

	/**
		设置CacheManager缓存规则
	*/
	@Bean
	public CacheManager cacheManager(RedisConnectionFactory factory){
		RedisSerializer<String> redisSerializer = new StringRedisSerializer();
		Jackson2JsonRedisSerializer jackson2JsonRedisSerializer = new Jackson2JsonRedisSerializer(Object.class);

		//解决查询缓存转换异常的问题
		ObjectMapper om = new ObjectMapper();
		//指定要序列化的域
		om.setVisibility(PropertyAccessor.ALL,JsonAutoDetect.Visibility.ANY);
		om.enableDefaultTyping(ObjectMapper.DefaultTyping.NON_FINAL);
		jackson2JsonRedisSerializer.setObjectMapper(om);

		//配置序列化(解决乱码问题),过期时间600秒
		RedisCacheConfiguration config = RedisCacheConfiguration.defaultCacheConfig()
			.entryTtl(Duration.ofSeconds(600))
			.serializeKeysWith(RedisSerializationContext.SerializationPair.fromSerializer(redisSerializer))
			.serializeValuesWith(RedisSerializationContext.SerializationPair.fromSerializer(jackson2JsonRedisSerializer))
			.disableCachingNullValues();

		RedisCacheManager cacheManager = RedisCacheManager.builder(factory)
			.cacheDefaults(config)
			.build();
		return cacheManager;
	}
}
三、添加配置(application.properties)
spring.redis.host=192.168.44.165
spring.redis.port=6379
spring.redis.database=0
spring.redis.timeout=1800000

spring.redis.lettuce.pool.max-active=20
spring.redis.lettuce.pool.max-wait=-1
spring.redis.lettuce.pool.max-idle=5
spring.redis.lettuce.pool.min-idle=0
服务器中通过命令启动redis
cd /usr/local/bin
./redis-server /etc/redis.conf

ps -ef | grep redis #查看是否启动成功

# 进入客户端,操作redis
./redis-cli
四、使用注解操作
①、@Cacheable 根据方法对其返回结果进行缓存,下次请求时,如果缓存存在,则直接读取缓存数据
如果缓存不存在,则执行方法,并把返回结果放入缓存,一般用在查询方法上
value 缓存名,必填,制定了缓存存放在哪块命名空间
cacheNames与value差不多,二选一即可
key 可选属性,使用SpEL标签自定义缓存的key
/**
	ServiceImpl实现类上的方法中
*/
@Cacheable(value="dict",keyGenerator="keyGenerator")//根据类名、包名生成的key,key前缀为dict
@Override
public List<Dict> findByParantId(Long parentId){

	List<Dict> dictList = dictMapper.selectList(new QueryWrapper<Dict>().eq("parent_id",parentId));
	dictList.stream().forEach(dict -> {
		boolean isHasChildren = this.isHasChildren(dict.getId());
		dict.setHasChileren(isHasChildren);
	});
	return dictList;
}
②、@CachePut使用该注解标志的方法,每次都会执行,并将结果存入指定缓存中
其他方法可以直接从相应的缓存中读取数据,而不需要查询数据库,一般用在新增方法上
value 缓存名,必填,制定了缓存存放在哪块命名空间
cacheNames与value差不多,二选一即可
key 可选属性,使用SpEL标签自定义缓存的key
③、@CacheEvict 清空缓存中的内容,一般用在更新或删除方法上
value 缓存名,必填,制定了缓存存放在哪块命名空间
cacheNames与value差不多,二选一即可
key 可选属性,使用SpEL标签自定义缓存的key
@CacheEvict(value="dict",allEntries=true) //方法调用后,清空所有缓存
@Override
public void importData(MultipartFile file){

	ExcelHelper fileHelper = new ExcelHelper(DictEeVo.class);
	List<DictEeVo> dictVoList = fileHelper.importExcel(file);
	if(!CollectionUtils.isEmpty(dictVoList)){
		dictMapper.imsertBatch(dictVoList);
	}
}
SpringBoot集成Redis实现Session共享
一、依赖
<dependency>
    <groupId>org.springframework.session</groupId>
    <artifactId>spring-session-data-redis</artifactId>
</dependency>
二、配置Redis缓存类
@EnableRedisHttpSession:开启Session共享功能。Session调用会自动通过Redis存储和获取。
想要达到Session共享的目的,在其他的系统上只需要做同样的配置即可。
maxInactiveIntervalInSeconds参数是设置Session失效时间,使用RedisSession之后,原Spring Boot的server.session.timeout属性不再生效
@Configuration
@EnableRedisHttpSession(maxInactiveIntervalInSeconds = 86400*30)
public class RedisConfig extends CachingConfigurerSupport{

	@Bean("redisTemplate")
	@ConfigurationProperties(prefix = "spring.redis")
	public RedisTemplate<String,Object> redisTemplate(RedisConnectionFactory factory){

		RedisTemplate<String, Object> redisTemplate = new RedisTemplate<>();
        redisTemplate.setConnectionFactory(factory);

        //将key的序列化设置成StringRedisSerializer
        StringRedisSerializer keySerializer = new StringRedisSerializer();
        redisTemplate.setKeySerializer(keySerializer);
        redisTemplate.setHashKeySerializer(keySerializer);

        redisTemplate.afterPropertiesSet();
        return redisTemplate;
	}
}
二、Controller
@RestController
@RequestMapping("/myt")
public class BootUserController {
    @Autowired
    private BootUserService service;

    @RequestMapping("/getUsers")
    public List<BootUser> getUsers() {
        List<BootUser> list = service.getUsers();
        return list;
    }

    @GetMapping(value = "/first")
    public Map<String, Object> firstResp (HttpServletRequest request){
        Map<String, Object> map = new HashMap<>();
        StringBuffer requestUrl = request.getRequestURL();
        request.getSession().setAttribute("requestUrl",requestUrl );
        map.put("requestUrl", requestUrl);
        return map;
    }

    @GetMapping(value = "/sessions")
    public Object sessions (HttpServletRequest request){
        Map<String, Object> map = new HashMap<>();
        map.put("sessionId", request.getSession().getId());
        map.put("message", request.getSession().getAttribute("requestUrl"));
        return map;
    }

}
三、启动测试
项目启动成功之后测试访问,访问8080端口的first地址:http://localhost:8080/myt/first
返回json结果:
{"requestUrl":"http://localhost:8080/myt/first"}
通过redis客户端工具连接redis服务,可以看到redis中已经存在springsession相关数据,此时也可以看到设置的sessions值。

接着,访问8080端口的sessions地址:
http://localhost:8080/myt/sessions
返回json结果:
{"sessionId":"3572e134-56b8-42ed-97b8-14620982f8c2","message":"http://localhost:8080/myt/first"}
四、访问9090端口
配置application.properties文件,请求9090端口的设置,配置信息如下:
#指定端口号
server.port=9090
项目启动成功之后测试访问,访问9090端口的sessions地址:
http://localhost:9090/myt/sessions
{"sessionId":"3572e134-56b8-42ed-97b8-14620982f8c2","message":"http://localhost:8080/myt/first"}
8080和9090端口两个服务的sessions访问地址,都会返回如下json结果:
{"sessionId":"3572e134-56b8-42ed-97b8-14620982f8c2","message":"http://localhost:8080/myt/first"}
结论:两个服务的访问地址不相同,但获取的session数据相同,说明已经实现了session共享,与前面说到的登录用户只需要登录验证一次就可以访问所有相互信任的应用系统呼应了。


 428
428


 被折叠的 条评论
为什么被折叠?
被折叠的 条评论
为什么被折叠?
 到【灌水乐园】发言


