


一、首先添加gradle库依赖:
在模块的build.gradle中添加Zxing库依赖。

dependencies {
    implementation 'com.journeyapps:zxing-android-embedded:3.5.0'
}
注意事项:
- 该库在需要时会自动引入ZXing库,无需额外手动引入。
- buildToolsVersion '23.0.2'(构建工具的版本要>=23.0.2)
- compile 'com.android.support:appcompat-v7:23.1.0' (support-v7包版本要在23+以上)
- 最低支持的Android版本(API level 9+)
----如果导入的依赖跟原本的依赖发生冲突,可以试试在gradle.properties文件中添加android.enableJetifier=true。
android.enableJetifier=true 是一个 Gradle 属性,用于在构建 Android 应用时启用 Jetifier 工具。Jetifier 是一个用于迁移旧版库的工具,它可以将旧版的支持库依赖转换为使用 AndroidX 库的等效依赖。
AndroidX 是一个支持库的重大改进,旨在提供更一致、稳定和功能丰富的开发体验。然而,许多第三方库和旧版的 Android 支持库并不直接兼容 AndroidX。这就是 Jetifier 工具发挥作用的地方。
android.enableJetifier=true 的作用是在构建过程中自动转换旧版支持库依赖,以确保与 AndroidX 的兼容性,从而帮助您顺利迁移至 AndroidX 并保持应用的正常运行。

二、在布局文件中添加一个点击的二维码图标。

三、在CollectionLocationActivity中为二维码设置点击事件,点击后跳转至扫描界面。
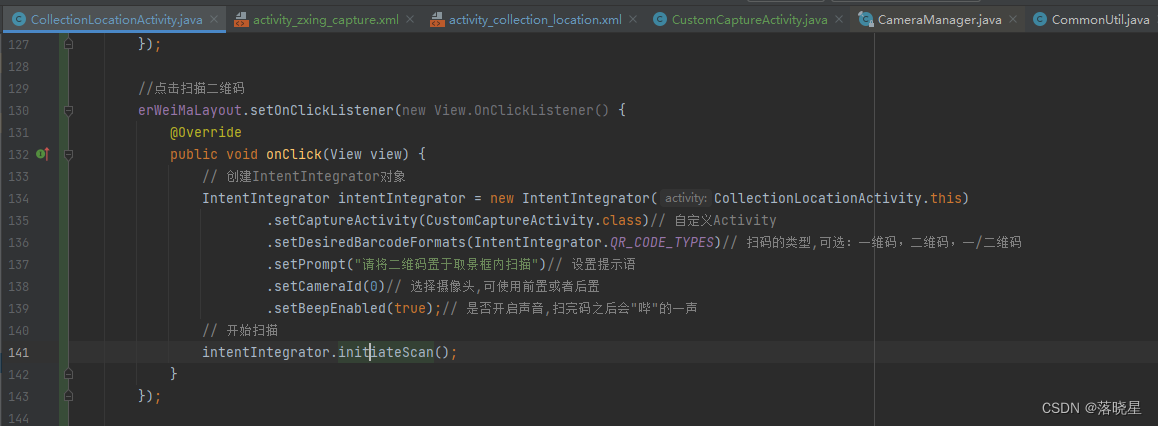
//点击扫描二维码
erWeiMaLayout.setOnClickListener(new View.OnClickListener() {
@Override
public void onClick(View view) {
// 创建IntentIntegrator对象
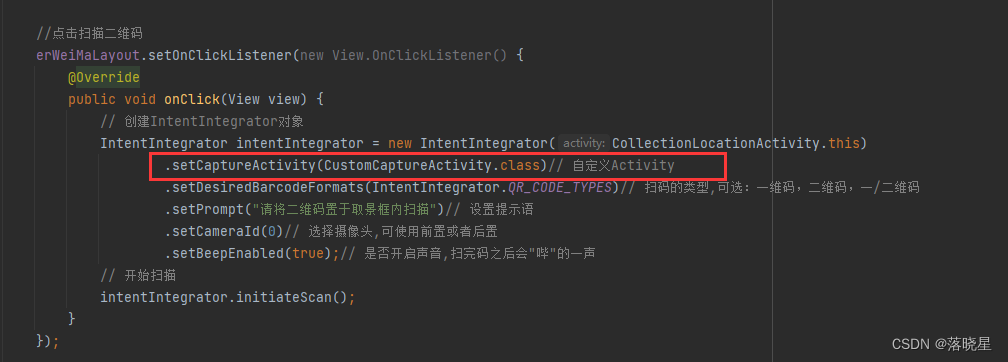
IntentIntegrator intentIntegrator = new IntentIntegrator(CollectionLocationActivity.this)
.setCaptureActivity(CustomCaptureActivity.class)// 自定义Activity
.setDesiredBarcodeFormats(IntentIntegrator.QR_CODE_TYPES)// 扫码的类型,可选:一维码,二维码,一/二维码
.setPrompt("请将二维码置于取景框内扫描")// 设置提示语
.setCameraId(0)// 选择摄像头,可使用前置或者后置
.setBeepEnabled(true);// 是否开启声音,扫完码之后会"哔"的一声
// 开始扫描
intentIntegrator.initiateScan();
}
});四、重写onActivityResult方法接收扫描结果。
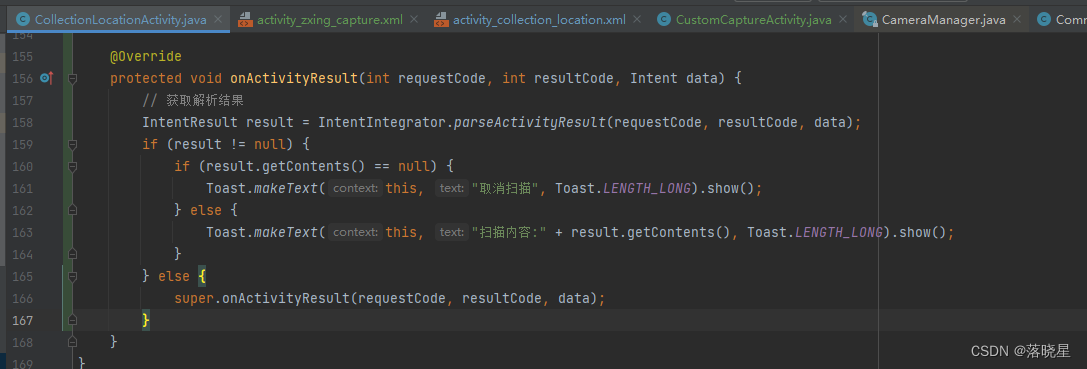
@Override
    protected void onActivityResult(int requestCode, int resultCode, Intent data) {
        // 获取解析结果
        IntentResult result = IntentIntegrator.parseActivityResult(requestCode, resultCode, data);
        if (result != null) {
            if (result.getContents() == null) {
                Toast.makeText(this, "取消扫描", Toast.LENGTH_LONG).show();
            } else {
                Toast.makeText(this, "扫描内容:" + result.getContents(), Toast.LENGTH_LONG).show();
            }
        } else {
            super.onActivityResult(requestCode, resultCode, data);
        }
}五、固定竖屏(仅需在manifest文件中添加如下配置)。
<?xml version="1.0" encoding="utf-8"?>
<manifest xmlns:android="http://schemas.android.com/apk/res/android"
    xmlns:tools="http://schemas.android.com/tools"
    package="com.example.wangnan7.qrcodescandemo">

    <application

        ......

        <!-- 调整二维码扫描界面为竖屏 -->
        <activity
            android:name="com.journeyapps.barcodescanner.CaptureActivity"
            android:screenOrientation="portrait"
            tools:replace="screenOrientation" />

    </application>

</manifest>
六、自定义扫描界面
在源码中可以查到,我们之前一直在使用一个CaptureActivity进行二维码扫描(如下所示):
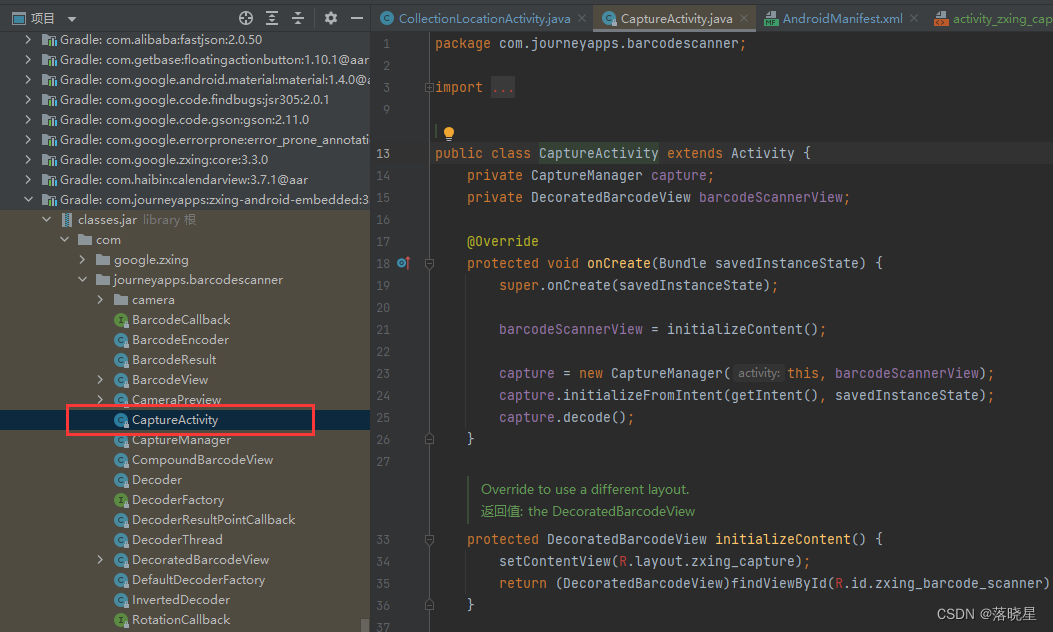
接下来,我们可以仿照CaptureActivity写一个自己的Activity(直接Copy也可以)。
import android.annotation.SuppressLint;
import android.content.pm.PackageManager;
import android.os.Build;
import android.os.Bundle;
import android.view.KeyEvent;
import android.view.View;
import android.view.WindowManager;
import android.widget.ImageView;
import android.widget.TextView;
import androidx.annotation.NonNull;
import androidx.appcompat.app.AppCompatActivity;
import androidx.appcompat.widget.Toolbar;
import com.journeyapps.barcodescanner.CaptureManager;
import com.journeyapps.barcodescanner.DecoratedBarcodeView;
import com.rcd.dcmspatrol.R;
import com.rcd.dcmspatrol.utils.ToastUtil;
/**
* @Class: CustomCaptureActivity
* @Description: 自定义条形码/二维码扫描
* @Date: 2024/6/24
*/
public class CustomCaptureActivity extends AppCompatActivity {
/**
* 条形码扫描管理器
*/
private CaptureManager mCaptureManager;
/**
* 条形码扫描视图
*/
private DecoratedBarcodeView mBarcodeView;
/**
* 标题栏
*/
private Toolbar mToolbar;
/**
* 点击开关手电筒
*/
private ImageView flashlightImage;
private TextView flashlightText;
@Override
protected void onCreate(Bundle savedInstanceState) {
super.onCreate(savedInstanceState);
initWindow();
setContentView(R.layout.activity_zxing_capture);
initToolbar();
//初始化变量
mBarcodeView = (DecoratedBarcodeView)findViewById(R.id.zxing_barcode_scanner);
mCaptureManager = new CaptureManager(this, mBarcodeView);
mCaptureManager.initializeFromIntent(getIntent(), savedInstanceState);
mCaptureManager.decode();
initView();
}
/**
* 初始化窗口
*/
private void initWindow() {
// API_19及其以上透明掉状态栏
if(Build.VERSION.SDK_INT >= Build.VERSION_CODES.KITKAT){
WindowManager.LayoutParams layoutParams = getWindow().getAttributes();
layoutParams.flags = WindowManager.LayoutParams.FLAG_TRANSLUCENT_STATUS | layoutParams.flags;
}
}
/**
* 初始化标题栏
*/
private void initToolbar() {
mToolbar = (Toolbar) findViewById(R.id.toolbar);
setSupportActionBar(mToolbar);
getSupportActionBar().setTitle("二维码扫描");
getSupportActionBar().setDisplayHomeAsUpEnabled(true);
mToolbar.setNavigationOnClickListener(new View.OnClickListener() {
@Override
public void onClick(View v) {
finish();
}
});
}
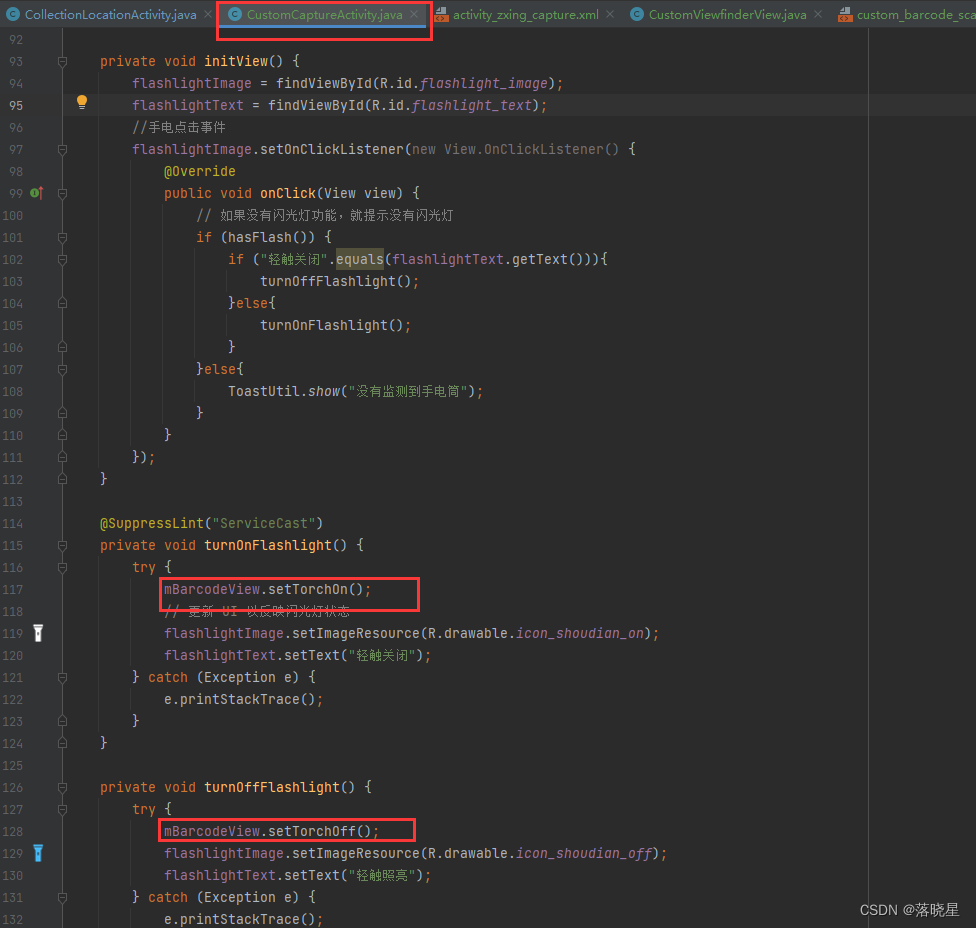
private void initView() {
flashlightImage = findViewById(R.id.flashlight_image);
flashlightText = findViewById(R.id.flashlight_text);
//手电点击事件
flashlightImage.setOnClickListener(new View.OnClickListener() {
@Override
public void onClick(View view) {
// 如果没有闪光灯功能,就提示没有闪光灯
if (hasFlash()) {
if ("轻触关闭".equals(flashlightText.getText())){
turnOffFlashlight();
}else{
turnOnFlashlight();
}
}else{
ToastUtil.show("没有监测到手电筒");
}
}
});
}
@SuppressLint("ServiceCast")
private void turnOnFlashlight() {
try {
mBarcodeView.setTorchOn();
// 更新 UI 以反映闪光灯状态
flashlightImage.setImageResource(R.drawable.icon_shoudian_on);
flashlightText.setText("轻触关闭");
} catch (Exception e) {
e.printStackTrace();
}
}
private void turnOffFlashlight() {
try {
mBarcodeView.setTorchOff();
flashlightImage.setImageResource(R.drawable.icon_shoudian_off);
flashlightText.setText("轻触照亮");
} catch (Exception e) {
e.printStackTrace();
}
}
@Override
protected void onResume() {
super.onResume();
mCaptureManager.onResume();
}
@Override
protected void onPause() {
super.onPause();
mCaptureManager.onPause();
}
@Override
protected void onDestroy() {
super.onDestroy();
mCaptureManager.onDestroy();
}
@Override
protected void onSaveInstanceState(Bundle outState) {
super.onSaveInstanceState(outState);
mCaptureManager.onSaveInstanceState(outState);
}
/**
* 权限处理
*/
@Override
public void onRequestPermissionsResult(int requestCode, @NonNull String permissions[], @NonNull int[] grantResults) {
super.onRequestPermissionsResult(requestCode, permissions, grantResults);
mCaptureManager.onRequestPermissionsResult(requestCode, permissions, grantResults);
}
/**
* 按键处理
*/
@Override
public boolean onKeyDown(int keyCode, KeyEvent event) {
return mBarcodeView.onKeyDown(keyCode, event) || super.onKeyDown(keyCode, event);
}
// 判断是否有闪光灯功能
private boolean hasFlash() {
return getApplicationContext().getPackageManager()
.hasSystemFeature(PackageManager.FEATURE_CAMERA_FLASH);
}
}
注:XML布局已经不是使用源码中CaptureActivity的布局。
源码布局如下:

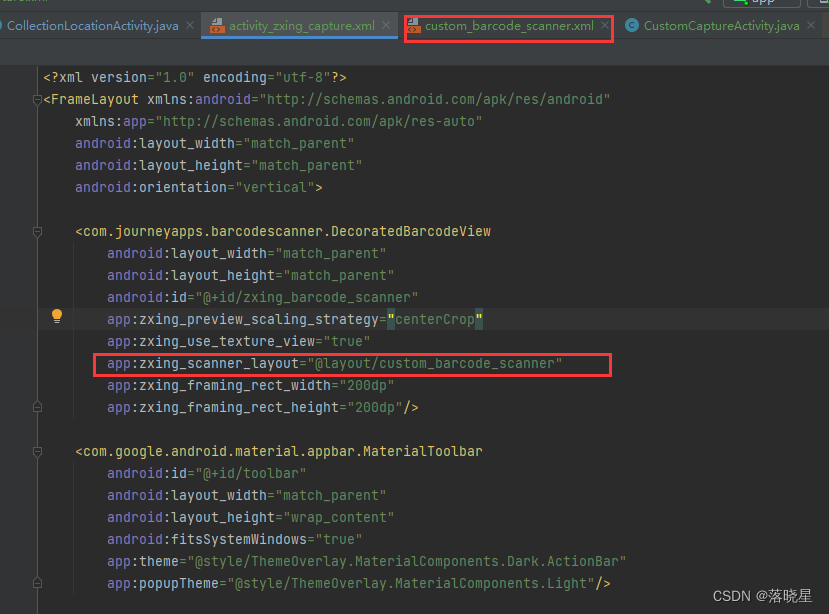
重新写一个布局:
<?xml version="1.0" encoding="utf-8"?>
<FrameLayout xmlns:android="http://schemas.android.com/apk/res/android"
    xmlns:app="http://schemas.android.com/apk/res-auto"
    android:layout_width="match_parent"
    android:layout_height="match_parent"
    android:orientation="vertical">

    <com.journeyapps.barcodescanner.DecoratedBarcodeView
        android:layout_width="match_parent"
        android:layout_height="match_parent"
        android:id="@+id/zxing_barcode_scanner"
        app:zxing_preview_scaling_strategy="centerCrop"
        app:zxing_use_texture_view="true"
        app:zxing_scanner_layout="@layout/custom_barcode_scanner"
        app:zxing_framing_rect_width="200dp"
        app:zxing_framing_rect_height="200dp"/>

    <com.google.android.material.appbar.MaterialToolbar
        android:id="@+id/toolbar"
        android:layout_width="match_parent"
        android:layout_height="wrap_content"
        android:fitsSystemWindows="true"
        app:theme="@style/ThemeOverlay.MaterialComponents.Dark.ActionBar"
        app:popupTheme="@style/ThemeOverlay.MaterialComponents.Light"/>

    <LinearLayout
        android:layout_width="wrap_content"
        android:layout_height="wrap_content"
        android:layout_gravity="center"
        android:layout_marginTop="70dp"
        android:orientation="vertical">

        <ImageView
            android:id="@+id/flashlight_image"
            android:layout_width="27dp"
            android:layout_height="27dp"
            android:layout_marginLeft="7sp"
            android:src="@drawable/icon_shoudian_off"/>

        <TextView
            android:id="@+id/flashlight_text"
            android:layout_width="wrap_content"
            android:layout_height="wrap_content"
            android:text="轻触照亮"
            android:textColor="@color/white"
            android:textSize="10sp"
            android:gravity="center"/>

    </LinearLayout>


</FrameLayout>
属性简介:
app:zxing_preview_scaling_strategy : 预览视图的缩放策略,使用centerCrop即可
app:zxing_use_texture_view : 是否使用纹理视图(黑色背景)
接下来,我们就可以把自定义扫描Activity的布局文件给替换掉了。
mBarcodeView = (DecoratedBarcodeView)findViewById(R.id.zxing_barcode_scanner);

最后,我们就可以在CollectionLocationActivity中调用这个新的扫描Activity了。
manifest文件中添加CustomCaptureActivity的声明
<activity
    android:name=".activity.CustomCaptureActivity"
    android:label="自定义扫描界面"
    android:screenOrientation="portrait"/>
七、修改扫描视图的样式
想要修改扫描视图的样式,需要略微研究下DecoratedBarcodeView的源码。
需要做的工作:
自定义View(继承ViewfinderView),重写onDraw方法,然后替换掉这里的ViewfinderView。
因为R.layout.zxing_barcode_scanner是源码中的布局文件,无法直接修改,所以还要重写一份布局文件给DecoratedBarcodeView加载。那么,接下来需要做两步准备工作:
(1)仿写默认布局文件R.layout.zxing_barcode_scanner
<?xml version="1.0" encoding="utf-8"?>
<FrameLayout
    xmlns:android="http://schemas.android.com/apk/res/android"
    android:layout_width="match_parent"
    android:layout_height="match_parent">

    <com.journeyapps.barcodescanner.BarcodeView
        android:layout_width="match_parent"
        android:layout_height="match_parent"
        android:id="@+id/zxing_barcode_surface"/>

    <com.rcd.dcmspatrol.components.CustomViewfinderView
        android:layout_width="match_parent"
        android:layout_height="match_parent"
        android:id="@+id/zxing_viewfinder_view"/>

    <TextView android:id="@+id/zxing_status_view"
        android:layout_width="wrap_content"
        android:layout_height="wrap_content"
        android:layout_gravity="center"
        android:layout_marginTop="120dp"
        android:background="@color/zxing_transparent"
        android:text="@string/zxing_msg_default_status"
        android:textColor="@color/zxing_status_text"/>

</FrameLayout>
(2)让DecoratedBarcodeView加载刚刚仿写布局,不再使用默认布局。
3.开始自定义扫描视图(继承ViewfinderView重写onDraw方法)
import android.content.Context;
import android.graphics.Canvas;
import android.graphics.Color;
import android.graphics.LinearGradient;
import android.graphics.Rect;
import android.graphics.Shader;
import android.util.AttributeSet;
import android.util.TypedValue;

import com.google.zxing.ResultPoint;
import com.journeyapps.barcodescanner.ViewfinderView;

import java.util.ArrayList;
import java.util.List;

/**
 * @Class: CustomViewfinderView
 * @Description: 自定义扫描框样式
 * @Author: ybw
 * @Date: 2024年6月26日
 */

public class CustomViewfinderView extends ViewfinderView {

    /**
     * 重绘时间间隔
     */
    public static final long CUSTOME_ANIMATION_DELAY = 16;

    /* ******************************************    边角线相关属性    ************************************************/

    /**
     * "边角线长度/扫描边框长度"的占比 (比例越大,线越长)
     */
    public float mLineRate = 0.1F;

    /**
     * 边角线厚度 (建议使用dp)
     */
    public float mLineDepth =  TypedValue.applyDimension(TypedValue.COMPLEX_UNIT_DIP, 4, getResources().getDisplayMetrics());

    /**
     * 边角线颜色
     */
    public int mLineColor = Color.rgb(61,155,243);

    /* *******************************************    扫描线相关属性    ************************************************/

    /**
     * 扫描线起始位置
     */
    public int mScanLinePosition = 0;

    /**
     * 扫描线厚度
     */
    public float mScanLineDepth = TypedValue.applyDimension(TypedValue.COMPLEX_UNIT_DIP, 4, getResources().getDisplayMetrics());

    /**
     * 扫描线每次重绘的移动距离
     */
    public float mScanLineDy = TypedValue.applyDimension(TypedValue.COMPLEX_UNIT_DIP, 3, getResources().getDisplayMetrics());

    /**
     * 线性梯度
     */
    public LinearGradient mLinearGradient;

    /**
     * 线性梯度位置
     */
    public float[] mPositions = new float[]{0f, 0.5f, 1f};

    /**
     * 线性梯度各个位置对应的颜色值
     */
    public int[] mScanLineColor = new int[]{0x00FFFFFF, Color.rgb(61,155,243), 0x00FFFFFF};


    public CustomViewfinderView(Context context, AttributeSet attrs) {
        super(context, attrs);
    }

    @Override
    public void onDraw(Canvas canvas) {
        refreshSizes();
        if (framingRect == null || previewFramingRect == null) {
            return;
        }

        Rect frame = framingRect;
        Rect previewFrame = previewFramingRect;

        int width = canvas.getWidth();
        int height = canvas.getHeight();

        //绘制4个角
        paint.setColor(mLineColor); // 定义画笔的颜色
        canvas.drawRect(frame.left, frame.top, frame.left + frame.width() * mLineRate, frame.top + mLineDepth, paint);
        canvas.drawRect(frame.left, frame.top, frame.left + mLineDepth, frame.top + frame.height() * mLineRate, paint);

        canvas.drawRect(frame.right - frame.width() * mLineRate, frame.top, frame.right, frame.top + mLineDepth, paint);
        canvas.drawRect(frame.right - mLineDepth, frame.top, frame.right, frame.top + frame.height() * mLineRate, paint);

        canvas.drawRect(frame.left, frame.bottom - mLineDepth, frame.left + frame.width() * mLineRate, frame.bottom, paint);
        canvas.drawRect(frame.left, frame.bottom - frame.height() * mLineRate, frame.left + mLineDepth, frame.bottom, paint);

        canvas.drawRect(frame.right - frame.width() * mLineRate, frame.bottom - mLineDepth, frame.right, frame.bottom, paint);
        canvas.drawRect(frame.right - mLineDepth, frame.bottom - frame.height() * mLineRate, frame.right, frame.bottom, paint);

        // Draw the exterior (i.e. outside the framing rect) darkened
        paint.setColor(resultBitmap != null ? resultColor : maskColor);
        canvas.drawRect(0, 0, width, frame.top, paint);
        canvas.drawRect(0, frame.top, frame.left, frame.bottom + 1, paint);
        canvas.drawRect(frame.right + 1, frame.top, width, frame.bottom + 1, paint);
        canvas.drawRect(0, frame.bottom + 1, width, height, paint);

        if (resultBitmap != null) {
            // Draw the opaque result bitmap over the scanning rectangle
            paint.setAlpha(CURRENT_POINT_OPACITY);
            canvas.drawBitmap(resultBitmap, null, frame, paint);
        } else {
            // 绘制扫描线
            mScanLinePosition += mScanLineDy;
            if(mScanLinePosition > frame.height()){
                mScanLinePosition = 0;
            }
            mLinearGradient = new LinearGradient(frame.left, frame.top + mScanLinePosition, frame.right, frame.top + mScanLinePosition, mScanLineColor, mPositions, Shader.TileMode.CLAMP);
            paint.setShader(mLinearGradient);
            canvas.drawRect(frame.left, frame.top + mScanLinePosition, frame.right, frame.top + mScanLinePosition + mScanLineDepth, paint);
            paint.setShader(null);

            float scaleX = frame.width() / (float) previewFrame.width();
            float scaleY = frame.height() / (float) previewFrame.height();

            List<ResultPoint> currentPossible = possibleResultPoints;
            List<ResultPoint> currentLast = lastPossibleResultPoints;
            int frameLeft = frame.left;
            int frameTop = frame.top;
            if (currentPossible.isEmpty()) {
                lastPossibleResultPoints = null;
            } else {
                possibleResultPoints = new ArrayList<>(5);
                lastPossibleResultPoints = currentPossible;
                paint.setAlpha(CURRENT_POINT_OPACITY);
                paint.setColor(resultPointColor);
                for (ResultPoint point : currentPossible) {
                    canvas.drawCircle(frameLeft + (int) (point.getX() * scaleX),
                            frameTop + (int) (point.getY() * scaleY),
                            POINT_SIZE, paint);
                }
            }
            if (currentLast != null) {
                paint.setAlpha(CURRENT_POINT_OPACITY / 2);
                paint.setColor(resultPointColor);
                float radius = POINT_SIZE / 2.0f;
                for (ResultPoint point : currentLast) {
                    canvas.drawCircle(frameLeft + (int) (point.getX() * scaleX),
                            frameTop + (int) (point.getY() * scaleY),
                            radius, paint);
                }
            }
        }

        // Request another update at the animation interval, but only repaint the laser line,
        // not the entire viewfinder mask.
        postInvalidateDelayed(CUSTOME_ANIMATION_DELAY,
                frame.left,
                frame.top,
                frame.right,
                frame.bottom);
    }
}
代码简介:
(1)onDraw方法中的大部分代码Copy自ViewfinderView,笔者添加了两部分逻辑:第一部分是边角线的绘制;第二部分是用“扫描线”替换掉了原有的“激光线”。
(2)代码的核心是在onDraw方法的第5行代码:
Rect frame = framingRect;这个矩阵记录了扫描框四个顶点的坐标,有了这个变量,各位可以发挥想象力自定义自己需要的扫描样式。
接下来,我们用CustomViewfinderView替换掉ViewfinderView(如下图所示)

八、扫描过程中的手电筒(闪光灯)的开关。
1、首先是在布局文件中添加图标。

2、然后就是在CustomCaptureActivity类中添加点击事件。
样式展示:
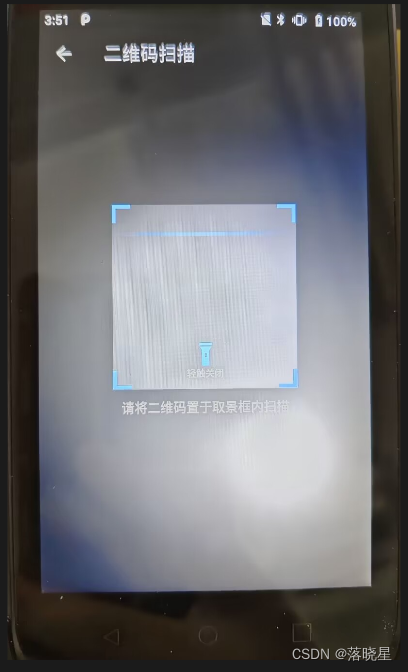

至此扫描二维码以及开关灯的功能就完成了。


 995
995


 被折叠的 条评论
为什么被折叠?
被折叠的 条评论
为什么被折叠?
 到【灌水乐园】发言


