转载请注明出处 http://blog.csdn.net/qianhaifeng2012/article/details/51737370
ViewRoot目前这个类已经没有了,是老版本中的一个类,在Android2.2以后用ViewRootImpl代替ViewRoot,对应于ViewRootImpl.java,他是链接WindowManager和DecorView的纽带,另外View的绘制也是通过ViewRootImpl来完成的。
它的主要作用我的总结为如下:
A:链接WindowManager和DecorView的纽带,更广一点可以说是Window和View之间的纽带。
B:完成View的绘制过程,包括measure、layout、draw过程。
C:向DecorView分发收到的用户发起的event事件,如按键,触屏等事件。
注:如果分析不对的地方,欢迎批评指正。
一、链接WindowManager和DecorView。
首先说第一个主要作用,链接WindowManager和DecorView,在ViewRootImpl.java中,开始的注释如下:
通过这一段注释,我们知道,ViewRootImpl他是View树的树根,但它却又不是View,实现了View与WindowManager之间的通信协议,具体的实现详情在WindowManagerGlobal这个类中。
那么View与WindowManager之间是怎么建立联系的呢,WindowManager所提供的功能很简单,常用的只有三个方法,即添加View,更新View和删除View,当然还有其它功能哈,比如改变Window的位置,WindowManager操作Window的过程更像是在操作Window中的View,这三个方法定义在ViewManager中,而WindowManager继承了ViewManager。
- public interface ViewManager
- {
-
-
-
-
-
-
-
-
-
-
- public void addView(View view, ViewGroup.LayoutParams params);
- public void updateViewLayout(View view, ViewGroup.LayoutParams params);
- public void removeView(View view);
- }
Window是一个抽象的概念,每一个Window都对应着一个View和一个ViewRootImpl,Window又通过ViewRootImpl与View建立联系,因此Window并不是实际存在的,他是以View的形式存在的。这点从WindowManager的定义也可以看出,它提供的三个接口方法addView,updateView,removeView都是针对View的,这说明View才是Window的实体,在实际使用中无法直接访问Window,对Window的访问必须通过WindowManager。而对Window的访问(添加,更新,删除)都是通过ViewRootImpl实现的。这里以Window的添加过程为例,删除过程,更新过程就不再赘述了。
Window的添加过程
Window的添加过程需要通过WindowManager的addView来实现,WindowManager又是一个接口,它的实现类是WindowManagerImpl,在WindowManagerImpl中的三大操作如下:
- @Override
- public void addView(View view, ViewGroup.LayoutParams params) {
- mGlobal.addView(view, params, mDisplay, mParentWindow);
- }
-
- @Override
- public void updateViewLayout(View view, ViewGroup.LayoutParams params) {
- mGlobal.updateViewLayout(view, params);
- }
-
- @Override
- public void removeView(View view) {
- mGlobal.removeView(view, false);
- }
-
- @Override
- public void removeViewImmediate(View view) {
- mGlobal.removeView(view, true);
- }
可以看出,WindowManagerImpl又调用了WindowManagerGloble的三大操作方法,这正好说明了ViewRootImpl类上面一开始那个注释了。This is for the most part an internal implementation detail of {@link WindowManagerGlobal}.
addView方法源码如下:
- public void addView(View view, ViewGroup.LayoutParams params,
- Display display, Window parentWindow) {
- if (view == null) {
- throw new IllegalArgumentException("view must not be null");
- }
- if (display == null) {
- throw new IllegalArgumentException("display must not be null");
- }
- if (!(params instanceof WindowManager.LayoutParams)) {
- throw new IllegalArgumentException("Params must be WindowManager.LayoutParams");
- }
-
- final WindowManager.LayoutParams wparams = (WindowManager.LayoutParams)params;
- if (parentWindow != null) {
- parentWindow.adjustLayoutParamsForSubWindow(wparams);
- } else {
-
-
- final Context context = view.getContext();
- if (context != null
- && context.getApplicationInfo().targetSdkVersion >= Build.VERSION_CODES.LOLLIPOP) {
- wparams.flags |= WindowManager.LayoutParams.FLAG_HARDWARE_ACCELERATED;
- }
- }
-
- ViewRootImpl root;
- View panelParentView = null;
-
- synchronized (mLock) {
-
- if (mSystemPropertyUpdater == null) {
- mSystemPropertyUpdater = new Runnable() {
- @Override public void run() {
- synchronized (mLock) {
- for (int i = mRoots.size() - 1; i >= 0; --i) {
- mRoots.get(i).loadSystemProperties();
- }
- }
- }
- };
- SystemProperties.addChangeCallback(mSystemPropertyUpdater);
- }
-
- int index = findViewLocked(view, false);
- if (index >= 0) {
- if (mDyingViews.contains(view)) {
-
- mRoots.get(index).doDie();
- } else {
- throw new IllegalStateException("View " + view
- + " has already been added to the window manager.");
- }
-
- }
-
-
-
- if (wparams.type >= WindowManager.LayoutParams.FIRST_SUB_WINDOW &&
- wparams.type <= WindowManager.LayoutParams.LAST_SUB_WINDOW) {
- final int count = mViews.size();
- for (int i = 0; i < count; i++) {
- if (mRoots.get(i).mWindow.asBinder() == wparams.token) {
- panelParentView = mViews.get(i);
- }
- }
- }
-
- root = new ViewRootImpl(view.getContext(), display);
-
- view.setLayoutParams(wparams);
-
- mViews.add(view);
- mRoots.add(root);
- mParams.add(wparams);
- }
-
-
- try {
- root.setView(view, wparams, panelParentView);
- } catch (RuntimeException e) {
-
- synchronized (mLock) {
- final int index = findViewLocked(view, false);
- if (index >= 0) {
- removeViewLocked(index, true);
- }
- }
- throw e;
- }
- }
addView方法主要分为如下几步:
1、检查参数是否合法
- if (view == null) {
- throw new IllegalArgumentException("view must not be null");
- }
- if (display == null) {
- throw new IllegalArgumentException("display must not be null");
- }
- if (!(params instanceof WindowManager.LayoutParams)) {
- throw new IllegalArgumentException("Params must be WindowManager.LayoutParams");
- }
-
- final WindowManager.LayoutParams wparams = (WindowManager.LayoutParams)params;
- if (parentWindow != null) {
- parentWindow.adjustLayoutParamsForSubWindow(wparams);
- }
2、创建ViewRootImpl并将View添加到列表中
在WindowManagerGlobal内部有如下几个列表比较重要:
- private final ArrayList<View> mViews = new ArrayList<View>();
- private final ArrayList<ViewRootImpl> mRoots = new ArrayList<ViewRootImpl>();
- private final ArrayList<WindowManager.LayoutParams> mParams =
- new ArrayList<WindowManager.LayoutParams>();
- private final ArraySet<View> mDyingViews = new ArraySet<View>();
在上面的声明中吗,mViews存储的是所有Window所对应的View,mRoots存储的是所有Window所对应的ViewRootImpl,mParams存储的是所有Window所对应的布局参数,而mDyingViews存储了那些正在被删除的View对象,或者说是那些已经调用removeView方法但是还没有删除的Window对象。在addView方法中通过如下方式将Window的一系列对象添加到列表中
。
- root = new ViewRootImpl(view.getContext(), display);
-
- view.setLayoutParams(wparams);
-
- mViews.add(view);
- mRoots.add(root);
- mParams.add(wparams);
3、通过ViewRootImpl来更新界面并完成Window的添加过程
这个步骤由ViewRootImpl的setView方法来完成,
- root.setView(view, wparams, panelParentView);
在setView内部会通过requestLayout来完成异步刷新请求,requestLayout最终会调用performTraversals方法来完成View的绘制,源码注释如下:差不多意思就是在添加Window之前先完成第一次layout布局过程,以确保在收到任何系统事件后面重新布局。
接着会通过WindowSession最终来完成Window的添加过程。在下面的代码中mWindowSession类型是IWindowSession,它是一个Binder对象,真正的实现类是Session,也就是说这其实是一次IPC过程,远程调用了Session中的addToDisPlay方法。
- try {
- mOrigWindowType = mWindowAttributes.type;
- mAttachInfo.mRecomputeGlobalAttributes = true;
- collectViewAttributes();
- res = mWindowSession.addToDisplay(mWindow, mSeq, mWindowAttributes,
- getHostVisibility(), mDisplay.getDisplayId(),
- mAttachInfo.mContentInsets, mInputChannel);
- } catch (RemoteException e) {
- mAdded = false;
- mView = null;
- mAttachInfo.mRootView = null;
- mInputChannel = null;
- mFallbackEventHandler.setView(null);
- unscheduleTraversals();
- setAccessibilityFocus(null, null);
- throw new RuntimeException("Adding window failed", e);
- }
Session中的addToDisPlay方法如下:Session这个类在package com.android.server.wm
- @Override
- public int addToDisplay(IWindow window, int seq, WindowManager.LayoutParams attrs,
- int viewVisibility, int displayId, Rect outContentInsets,
- InputChannel outInputChannel) {
- return mService.addWindow(this, window, seq, attrs, viewVisibility, displayId,
- outContentInsets, outInputChannel);
- }
可以看出,Window的添加请求就交给WindowManagerService去处理了。addView大概一个过程如下:
WindowManager——>WindowManagerGobal——>ViewRootImpl——>Session——>WindowManagerService
那么WindowManager又是如何与DecorView相连的呢,最终DecorView肯定是要添加到Window上的,而Window的具体实现类是PhoneWindow,因为DecorView嵌入在Window上,如图所示:
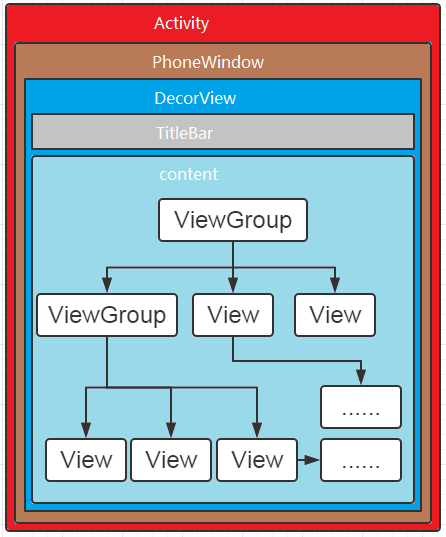
在ActivityThread中,当Activity对象被创建完毕后,会将DecorView添加到Window中,同时会创建ViewRootImpl对象,并将ViewRootImpl对象和DecorView建立关联,可以参考一下代码,在ActvityThread中,也就是ViewRootImpl是DecorView的父元素,但是ViewRootImpl并不是View。
- <span style="white-space:pre"> </span>r.window = r.activity.getWindow();
- View decor = r.window.getDecorView();
- decor.setVisibility(View.INVISIBLE);
- ViewManager wm = a.getWindowManager();
- WindowManager.LayoutParams l = r.window.getAttributes();
- a.mDecor = decor;
- l.type = WindowManager.LayoutParams.TYPE_BASE_APPLICATION;
- l.softInputMode |= forwardBit;
- if (a.mVisibleFromClient) {
- a.mWindowAdded = true;
- wm.addView(decor, l);
- }
我们平时在Activity调用setContentView会调用PhoneWindow的setContentView,最后会调用DecorView的addView方法,这也说明了我们添加的View是DecorView的子元素。
二、完成View的绘制过程
整个View树的绘图流程是在ViewRootImpl类的performTraversals()方法(这个方法巨长)开始的,该函数做的执行过程主要是根据之前设置的状态,判断是否重新计算视图大小(measure)、是否重新放置视图的位置(layout)、以及是否重绘 (draw),其核心也就是通过判断来选择顺序执行这三个方法中的哪个,如下:
- private void performTraversals() {
- ......
-
-
- int childWidthMeasureSpec = getRootMeasureSpec(mWidth, lp.width);
- int childHeightMeasureSpec = getRootMeasureSpec(mHeight, lp.height);
- ......
- mView.measure(childWidthMeasureSpec, childHeightMeasureSpec);
- ......
- mView.layout(0, 0, mView.getMeasuredWidth(), mView.getMeasuredHeight());
- ......
- mView.draw(canvas);
- ......
- }
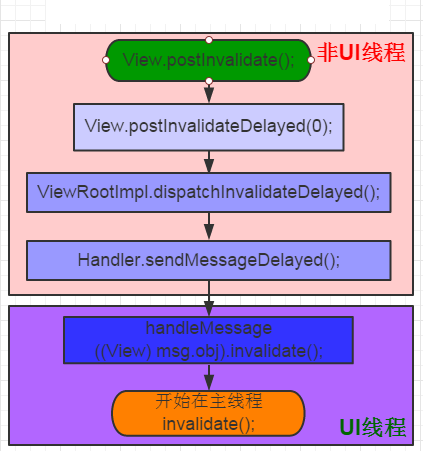
performTraversals方法会经过measure、layout和draw三个过程才能将一个View绘制出来,所以View的绘制是
ViewRootImpl完成的,另外当手动调用invalidate,postInvalidate,requestInvalidate也会最终调用performTraversals,来重新绘制View。其中requestLayout()方法会调用measure过程和layout过程,不会调用draw过程,也不会重新绘制任何View包括该调用者本身。

三、向DecorView分发事件。
这里的事件不仅仅包括MotionEvent,还有KeyEvent。我们知道View的时间分发顺序为Activity——>Window——>View,那么Activity的事件来源在哪里呢?这是个需要思考的问题,答案和ViewRootImpl有很大的关系。
首先,事件的根本来源来自于Native层的嵌入式硬件,然后会经过InputEventReceiver接受事件,然后交给ViewRootImpl,将事件传递给DecorView,DecorView再交给PhoneWindow,PhoneWindow再交给Activity。这样看来,整个体系的事件分发顺序为:
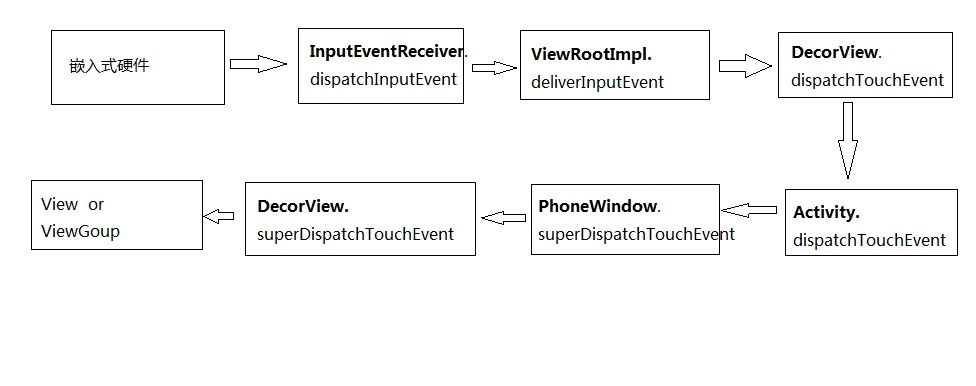
那么这一过程又是怎么实现的呢?
首先看ViewRootImpl的dispatchInputEvent方法。
- public void dispatchInputEvent(InputEvent event, InputEventReceiver receiver) {
- SomeArgs args = SomeArgs.obtain();
- args.arg1 = event;
- args.arg2 = receiver;
- Message msg = mHandler.obtainMessage(MSG_DISPATCH_INPUT_EVENT, args);
- msg.setAsynchronous(true);
- mHandler.sendMessage(msg);
- }
InputEvent输入事件,它有2个子类:KeyEvent和MotionEvent,其中KeyEvent表示键盘事件,而MotionEvent表示点击事件,这里InputEventReceiver译为输入事件接收者,顾名思义,就是用于接收输入事件,然后交给ViewRootImpl的dispatchInputEvent方法去分发处理。可以看到mHandler将逻辑切换到UI线程,代码如下。
- final ViewRootHandler mHandler = new ViewRootHandler();
- <pre name="code" class="java"> final class ViewRootHandler extends Handler {
- @Override
- public void handleMessage(Message msg) {
- switch (msg.what) {
-
- ........
-
- {
- SomeArgs args = (SomeArgs)msg.obj;</span>
- InputEvent event = (InputEvent)args.arg1;
- InputEventReceiver receiver = (InputEventReceiver)args.arg2;
- enqueueInputEvent(event, receiver, 0, true);
- args.recycle();
-
- } break;
- .................
- }
{
在mHandler的UI线程中,最终调用了enqueueInputEvent方法,该方法就是将输入事件打包,利用InputEvent,InputEventReceiver构造对象QueueInputEvent,然后加入到待处理的事件队列中,代码如下:
- void enqueueInputEvent(InputEvent event,
- InputEventReceiver receiver, int flags, boolean processImmediately) {
- QueuedInputEvent q = obtainQueuedInputEvent(event, receiver, flags);
-
-
-
-
-
-
- QueuedInputEvent last = mPendingInputEventTail;
- if (last == null) {
- mPendingInputEventHead = q;
- mPendingInputEventTail = q;
- } else {
- last.mNext = q;
- mPendingInputEventTail = q;
- }
- mPendingInputEventCount += 1;
- Trace.traceCounter(Trace.TRACE_TAG_INPUT, mPendingInputEventQueueLengthCounterName,
- mPendingInputEventCount);
-
- if (processImmediately) {
- doProcessInputEvents();
- } else {
- scheduleProcessInputEvents();
- }
- }
enqueueInputEvent方法又会调用doProcessInputEvents方法或者scheduleProcessInputEvents方法,这其实是同步或者同步处理消息队列的,同步或者异步根据传入的标志位processImmediately来判断。scheduleProcessInputEvents方法只是利用mHandler向UI线程发送了一个message,代码如下:
- private void scheduleProcessInputEvents() {
- if (!mProcessInputEventsScheduled) {
- mProcessInputEventsScheduled = true;
- Message msg = mHandler.obtainMessage(MSG_PROCESS_INPUT_EVENTS);
- msg.setAsynchronous(true);
- mHandler.sendMessage(msg);
- }
- }
UI线程处理的代码为:
- <span style="font-family:Comic Sans MS;"> case MSG_PROCESS_INPUT_EVENTS:
- mProcessInputEventsScheduled = false;
- doProcessInputEvents();
- brea</span>
这下就很清楚了,即使是调用了scheduleProcessInputEvents方法,最终还是会调用doProcessInputEvents方法,只是同步与异步的区别。doProcessInputEvents的代码如下:
- void doProcessInputEvents() {
-
- while (mPendingInputEventHead != null) {
- QueuedInputEvent q = mPendingInputEventHead;
- mPendingInputEventHead = q.mNext;
- if (mPendingInputEventHead == null) {
- mPendingInputEventTail = null;
- }
- q.mNext = null;
-
- mPendingInputEventCount -= 1;
- Trace.traceCounter(Trace.TRACE_TAG_INPUT, mPendingInputEventQueueLengthCounterName,
- mPendingInputEventCount);
-
- deliverInputEvent(q);
- }
-
-
-
- if (mProcessInputEventsScheduled) {
- mProcessInputEventsScheduled = false;
- mHandler.removeMessages(MSG_PROCESS_INPUT_EVENTS);
- }
- }
代码中的注释已经写得很清楚了,就是逐个分发输入事件队列中的事件,分发一个便从队列中删除,其实就是单链表的操作,分发过程过程用过deliverInputEvent方法,当队列中的输入事件都已经处理完,就立即清除标志位。deliverInputEvent方法如下:
- private void deliverInputEvent(QueuedInputEvent q) {
- Trace.asyncTraceBegin(Trace.TRACE_TAG_VIEW, "deliverInputEvent",
- q.mEvent.getSequenceNumber());
- if (mInputEventConsistencyVerifier != null) {
- mInputEventConsistencyVerifier.onInputEvent(q.mEvent, 0);
- }
-
- InputStage stage;
- if (q.shouldSendToSynthesizer()) {
- stage = mSyntheticInputStage;
- } else {
- stage = q.shouldSkipIme() ? mFirstPostImeInputStage : mFirstInputStage;
- }
-
- if (stage != null) {
- stage.deliver(q);
- } else {
- finishInputEvent(q);
- }
- }
在ViewRootImpl中,有一系列类似于InputStage(输入事件舞台)的概念,他是一个抽象类,它的deliver方法会处理一个输入事件。处理完成之后会调用finishInputEvent方法。
它有很多子类,对应具体的InputStage,每种InputStage可以处理一定的事件类型,比如AsyncInputStage、SyntheticInputStage、NativePostImeInputStage、ViewPreImeInputStage、ViewPostImeInputStage等,它的子类实现了InputStage的一些抽象方法,比如onProcess、onDeliverToNext、processKeyEvent、processPointerEvent、processTrackballEvent、processGenericMotionEvent,从这些方法大概可以看出意思,在不同的情况下,onProcess、onDeliverToNext方法就会被回调。
当一个InputEvent到来时,ViewRootImpl会寻找合适它的InputStage来处理。对于点击事件来说,ViewPostImeInputStage可以处理它,ViewPostImeInputStage中,ViewPostImeInputStage类中的onProcess方法如下。当onProcess被回调时,processKeyEvent、processPointerEvent、processTrackballEvent、processGenericMotionEvent至少有一个方法就会被调用,这些方法都是属于ViewPostImeInputStage的。
- @Override
- protected int onProcess(QueuedInputEvent q) {
- if (q.mEvent instanceof KeyEvent) {
- return processKeyEvent(q);
- } else {
-
-
- handleDispatchDoneAnimating();
- final int source = q.mEvent.getSource();
- if ((source & InputDevice.SOURCE_CLASS_POINTER) != 0) {
- return processPointerEvent(q);
- } else if ((source & InputDevice.SOURCE_CLASS_TRACKBALL) != 0) {
- return processTrackballEvent(q);
- } else {
- return processGenericMotionEvent(q);
- }
在processKeyEvent、processPointerEvent、processTrackballEvent、processGenericMotionEvent方法中都有一句很关键的一句代码;
- mView.dispatchKeyEvent(event)
- mView.dispatchPointerEvent(event)
- mView.dispatchTrackballEvent(event)
mView.dispatchGenericMotionEvent(event)
可以看到mView并没有实例化,其实他的实例化在ViewRootImpl的setView方法中,
- public void setView(View view, WindowManager.LayoutParams attrs, View panelParentView) {
- synchronized (this) {
- if (mView == null) {
- mView = view;
- .............................
-
-
- }
- }
可以看出,mView的实例化是在setView方法中完成,而我们知道ViewRootImpl的setView方法中传入的view参数是DecorView,因为ViewRootImpl通过setView方法将DecorView添加到PhoneWindow的。
所以这里的mView其实就是DecorView。
这样一来,可以知道ViewPostImeInputStage将事件分发到了View,而这里的mView又是DecorView,也就是多态的原理,如果DecorView没有上述的mView.的几个方法,就会调用View的方法,如果DecorView实现了就会调用DecorView的方法,继续跟踪源码,其中在View的dispatchPointerEvent方法如下:
public final boolean dispatchPointerEvent(MotionEvent event) {
    if (event.isTouchEvent()) {
        return dispatchTouchEvent(event);
    } else {
        return dispatchGenericMotionEvent(event);
    }
}
会调用dispatchTouchEvent方法,根据多态的特性,最终点击事件会传给给DecorView的dispatchTouchEvent方法。下面再看DecorView的dispatchTouchEvent方法。
@Override
public boolean dispatchTouchEvent(MotionEvent ev) {
    final Callback cb = getCallback();
    return cb != null && !isDestroyed() && mFeatureId < 0 ? cb.dispatchTouchEvent(ev)
            : super.dispatchTouchEvent(ev);
}
可以看出DecorView最终会调用cb.dispatchTouchEvent方法,那么问题问题又来了,这个Callback是什么,其实这个Callback就是当前的Activity。
首先Activity继承了Window.Callback
public class Activity extends ContextThemeWrapper
        implements LayoutInflater.Factory2,
        Window.Callback, KeyEvent.Callback,
        OnCreateContextMenuListener, ComponentCallbacks2,
        Window.OnWindowDismissedCallback {
然后Window.Callback的代码如下:
public interface Callback {
    /**
     * Called when action mode is first created. The menu supplied will be used to
     * generate action buttons for the action mode.
     *
     * @param mode ActionMode being created
     * @param menu Menu used to populate action buttons
     * @return true if the action mode should be created, false if entering this
     *              mode should be aborted.
     */
    public boolean onCreateActionMode(ActionMode mode, Menu menu);

    /**
     * Called to refresh an action mode's action menu whenever it is invalidated.
     *
     * @param mode ActionMode being prepared
     * @param menu Menu used to populate action buttons
     * @return true if the menu or action mode was updated, false otherwise.
     */
    public boolean onPrepareActionMode(ActionMode mode, Menu menu);

    /**
     * Called to report a user click on an action button.
     *
     * @param mode The current ActionMode
     * @param item The item that was clicked
     * @return true if this callback handled the event, false if the standard MenuItem
     *          invocation should continue.
     */
    public boolean onActionItemClicked(ActionMode mode, MenuItem item);

    /**
     * Called when an action mode is about to be exited and destroyed.
     *
     * @param mode The current ActionMode being destroyed
     */
    public void onDestroyActionMode(ActionMode mode);
}
所以Activity必须要实现Window.Callback当中的方法,基本都是事件传递相关的,其中就是dispatchTouchEvent方法,在Activity的 attach方法中有如下一段代码:
- final void attach(Context context, ActivityThread aThread,
- Instrumentation instr, IBinder token, int ident,
- Application application, Intent intent, ActivityInfo info,
- CharSequence title, Activity parent, String id,
- NonConfigurationInstances lastNonConfigurationInstances,
- Configuration config, String referrer, IVoiceInteractor voiceInteractor) {
- attachBaseContext(context);
-
- mFragments.attachHost(null );
-
- mWindow = new PhoneWindow(this);
- mWindow.setCallback(this);
- mWindow.setOnWindowDismissedCallback(this);
- mWindow.getLayoutInflater().setPrivateFactory(this);
PhoneWindow通过设置setCallback将Callback设置为this也就是Activity。
至此点击事件已经到了Activity,那么后面就和上面博客事件分发机制一样了。事件分发机制


 889
889

 被折叠的 条评论
为什么被折叠?
被折叠的 条评论
为什么被折叠?
 到【灌水乐园】发言


