


一.修改主机名
修改所有三个主机名:静态、瞬态和灵活主机名:
[root@localhost ~]# hostnamectl set-hostname node001
[root@localhost ~]# hostnamectl  set-hostname --pretty  node001
[root@localhost ~]# hostnamectl  set-hostname --static  node001
[root@localhost ~]# hostnamectl  set-hostname --transient node001
二.修改网卡配置
CentOS7配置网卡为静态IP
1.通过 cat 查看CentOS7最小化安装默认网卡设备配置信息
[root@localhost ~]# cat /etc/sysconfig/network-scripts/ifcfg-ens33
配置说明
TYPE=Ethernet # 网卡类型:为以太网
PROXY_METHOD=none # 代理方式:关闭状态
BROWSER_ONLY=no # 只是浏览器:否
BOOTPROTO=dhcp # 网卡的引导协议:DHCP[中文名称: 动态主机配置协议]
DEFROUTE=yes # 默认路由:是, 不明白的可以百度关键词默认路由
IPV4_FAILURE_FATAL=no # 是不开启IPV4致命错误检测:否
IPV6INIT=yes # IPV6是否自动初始化: 是[不会有任何影响, 现在还没用到IPV6]
IPV6_AUTOCONF=yes # IPV6是否自动配置:是[不会有任何影响, 现在还没用到IPV6]
IPV6_DEFROUTE=yes # IPV6是否可以为默认路由:是[不会有任何影响, 现在还没用到IPV6]
IPV6_FAILURE_FATAL=no # 是不开启IPV6致命错误检测:否
IPV6_ADDR_GEN_MODE=stable-privacy # IPV6地址生成模型:stable-privacy [这只一种生成IPV6的策略]
NAME=ens33 # 网卡物理设备名称
UUID=f47bde51-fa78-4f79-b68f-d5dd90cfc698 # 通用唯一识别码, 每一个网卡都会有, 不能重复, 否两台linux只有一台网卡可用
DEVICE=ens33 # 网卡设备名称, 必须和NAME值一样
ONBOOT=no # 是否开机启动, 要想网卡开机就启动或通过systemctl restart network控制网卡,必须设置为yes
2.使用 vim文本编辑器打开网卡设备文件
[root@localhost ~]# vim /etc/sysconfig/network-scripts/ifcfg-ens33
主要修改以下几项BOOTPROTO=static # 设置网卡引导协议为 静态 ONBOOT=yes # 设置网卡启动方式为 开机启动 IPADDR=192.168.1.111 # 设置IP地址 NETMASK=255.255.255.0 # 设置子网掩码 GATEWAY=192.168.1.1 # 设置网关
3.修改DNS
编辑  /etc/resolv.conf
修改文件内容 nameserver 114.114.114.114
4.重启网络服务
[root@localhost ~]# systemctl restart network
三.JDK安装
首先下载 jdk,不建议在线安装,速度太感人了
(1)首先删除自带的 openJDK
查看自带的 openJDK
rpm -qa | grep java
(2)然后逐一将显示的 openJDK 删除
rpm -e --nodeps java-1.8.0-openjdk-headless-1.8.0.101-3.b13.el7_2.x86_64
(3)安装 JDK
先下载 JDK
https://www.oracle.com/java/technologies/javase/javase-jdk8-downloads.html
安装 jdk,我电脑之前有,我没下载新的 直接用的我电脑里的版本
解压包
mkdir -p /usr/java/jdk1.8
tar -zxvf jdk-8u231-linux-x64.tar.gz -C /usr/java/jdk1.8 --strip-components 1
(4) jdk 环境变量配置
方法一:
编辑配置文件
| vim /etc/profile |
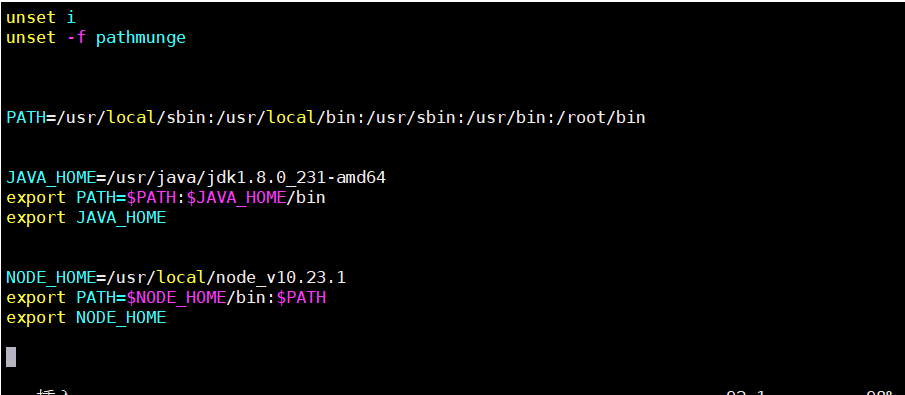
在文件末尾添加下面的内容
| JAVA_HOME=/usr/java/jdk1.8 CLASSPATH=./:$JAVA_HOME/lib/tools.jar:$JAVA_HOME/lib/rt.jar PATH=$JAVA_HOME/bin:$PATH export JAVA_HOME CLASSPATH PATH |
注: JAVA_HOME 为 JDK 安装目录
使环境变量配置生效
| source /etc/profile |
方法二:
必须进入当前目录下编写脚本
#cd /etc/profile.d
#vi Java.sh
示例
#!/bin/bash
JAVA_HOME=/usr/java/jdk1.8
PATH=$JAVA_HOME/bin:$PATH
export JRE_HOME=${JAVA_HOME}/jre
export CLASSPATH=.:${JAVA_HOME}/lib:${JRE_HOME}/lib
export PATH

sh Java.sh
source /etc/profile
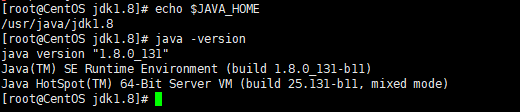
(5)配置完成后测试一下
显示 JDK 的地址
| echo $JAVA_HOME |
显示 java 版本
| java -version |
四.关闭防火墙以及 selinux
4.1、关闭三台服务器的防火墙,并配置防火墙不自动启动
(生产服务器不建议关闭防火墙,建议调试时可以关闭,生产启动开发需要用的端口)
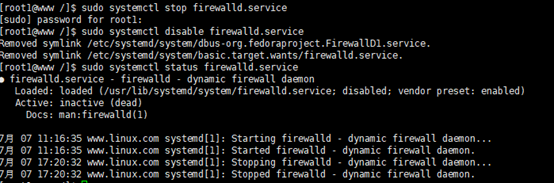
查看防火墙状态:
| systemctl status firewalld |
暂时关闭防火墙:
| systemctl stop firewalld.service |
永久关闭防火墙:
| systemctl disable firewalld.service |
重启防火墙:
| systemctl status firewalld.service |
结果如下显示:
4.2、关闭三台服务器的selinux策略
sed -i 's/SELINUX=enforcing/SELINUX=disabled/g' /etc/selinux/config
或者
| vim /etc/sysconfig/selinux |
将文件中 SELINUX=enforcing 修改为 SELINUX=disabled
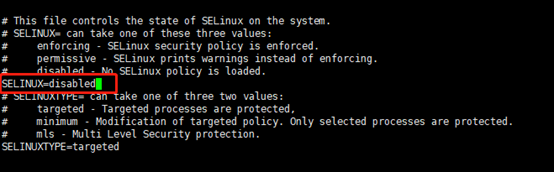
注:关闭 selinux 操作需要重启之后才能生效
重启后检测是否成功关闭 selinux 策略
| sestatus -v |
如果已经成功关闭则显示如下:

提供一个服务器环境初始化脚本(注:只能用于centos7.x版本,8.x以上版本不适用)
#!/bin/bash
# Filename:    centos7-init.sh
# Date:       2018/04/28
# Author:     root, root@outlook.com
# Version:     1.0
#判断是否为root用户
if [ `whoami` != "root" ];then
echo " only root can run it"
exit 1
fi
#执行前提示
echo -e "\033[31m 这是centos7系统初始化脚本,将更新系统内核至最新版本,请慎重运行! \033[0m"
read -s -n1 -p "Press any key to continue or ctrl+C to cancel"
echo "Your inputs: $REPLY"
#1.定义配置yum源的函数
yum_config(){
yum -y install wget
mv /etc/yum.repos.d/CentOS-Base.repo /etc/yum.repos.d/CentOS-Base.repo.backup
wget -O /etc/yum.repos.d/CentOS-Base.repo http://mirrors.aliyun.com/repo/Centos-7.repo
yum clean all && yum makecache
}
#2.定义配置NTP的函数
ntp_config(){
yum –y install chrony
systemctl start chronyd && systemctl enable chronyd
timedatectl set-timezone Asia/Shanghai && timedatectl set-ntp yes
}
#3.定义关闭防火墙的函数
close_firewalld(){
systemctl stop firewalld.service &> /dev/null
systemctl disable firewalld.service &> /dev/null
}
#4.定义关闭selinux的函数
close_selinux(){
setenforce 0
sed -i 's/enforcing/disabled/g' /etc/selinux/config
}
#5.定义安装常用工具的函数
yum_tools(){
yum install –y vim ntp wget curl curl-devel bash-completion lsof iotop iostat unzip bzip2 bzip2-devel
yum install –y gcc gcc-c++ make cmake autoconf openssl-devel openssl-perl net-tools
source /usr/share/bash-completion/bash_completion
}
#执行脚本
main(){

    yum_config;
    ntp_config;
    close_firewalld;
    close_selinux;
	yum_tools;

}
main
五.配置NTP服务设置时间同步
每台主机都需要安装NTP服务,初始化脚本中已经安装,没有的执行命令
yum -y install ntp
ntpdate -u cn.pool.ntp.org 同步网络时间
5.1 分别配置三台服务器的NTP服务
主节点配置如下:
| vim /etc/ntp.conf |
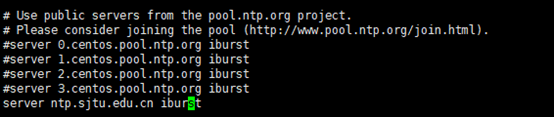
将文件默认server的指向,注释掉,然后指向上海交通大学网络中心NTP服务器的地址 ntp.sjtu.edu.cn

修改为:
两台子节点配置如下:
| vim /etc/ntp.conf |
将文件默认server的指向注释掉,然后指向主节点的服务器地址192.168.226.111
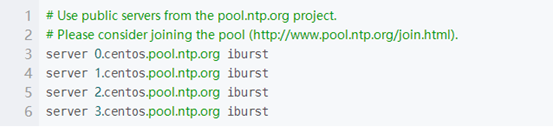
修改为:

注:一台主节点,两台子节点都需要配置
5.2 三台服务器均需要启动ntpd服务,并且配置ntpd服务开机自动启动
| systemctl start ntpd systemctl enable ntpd.service |
5.3 三台服务器中查询网络中的ntp服务器,同时显示客户端和每个服务器的关系
| ntpq -p |
5.3 子节点时间同步
ntpdate -u d-sn-001 #同步时间 master 指的是主机名,我这里自己配置了host指向主机节点了![]()
5.4 查看ntp服务状态
1)NTP服务命令
systemctl status ntpd 查看服务状态
systemctl stop ntpd
systemctl restart ntpd
hwclock --show 查看硬件时间
watch ntpq -p 查看同步状态
ntpdate -d 172.168.9.101 调试同步
ntpdate -u 172.168.9.101 同步主机
ntpstat 查看同步情况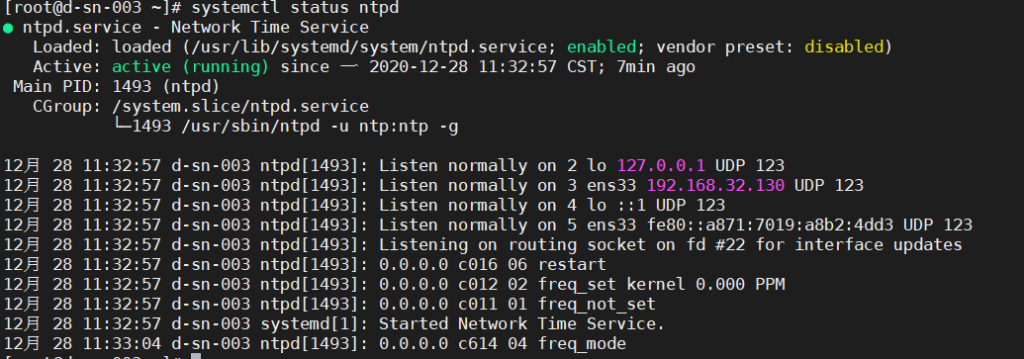
2)查看ntp链接状态
ntpq -p
remote:本机和上层ntp的ip或主机名,“+”表示优先,“*”表示次优先
refid:参考上一层ntp主机地址
st:stratum阶层
when:多少秒前曾经同步过时间
poll:下次更新在多少秒后
reach:已经向上层ntp服务器要求更新的次数
delay:网络延迟
offset:时间补偿
jitter:系统时间与bios时间差#
3)查看ntpd进程的状态
watch "ntpq -p"按 Ctrl+Z 停止查看进程
贴一个本地主机同步配置
主机
# For more information about this file, see the man pages
# ntp.conf(5), ntp_acc(5), ntp_auth(5), ntp_clock(5), ntp_misc(5), ntp_mon(5).

driftfile /var/lib/ntp/drift

# Permit time synchronization with our time source, but do not
# permit the source to query or modify the service on this system.
restrict default nomodify notrap nopeer noquery

# Permit all access over the loopback interface.  This could
# be tightened as well, but to do so would effect some of
# the administrative functions.

# Hosts on local network are less restricted.
#restrict 192.168.1.0 mask 255.255.255.0 nomodify notrap
#restrict 172.168.0.0 mask 255.255.255.0


# Use public servers from the pool.ntp.org project.
# Please consider joining the pool (http://www.pool.ntp.org/join.html).


server ntp.aliyun.com

restrict ntp.aliyun.com nomodify


#server 127.0.0.1
#fudge 127.0.0.1 stratum 10


#broadcast 192.168.1.255 autokey   # broadcast server
#broadcastclient         # broadcast client
#broadcast 224.0.1.1 autokey      # multicast server
#multicastclient 224.0.1.1    # multicast client
#manycastserver 239.255.254.254       # manycast server
#manycastclient 239.255.254.254 autokey # manycast client

# Enable public key cryptography.
#crypto

includefile /etc/ntp/crypto/pw

# Key file containing the keys and key identifiers used when operating
# with symmetric key cryptography.
keys /etc/ntp/keys

# Specify the key identifiers which are trusted.
#trustedkey 4 8 42

# Specify the key identifier to use with the ntpdc utility.
#requestkey 8

# Specify the key identifier to use with the ntpq utility.
#controlkey 8

# Enable writing of statistics records.
#statistics clockstats cryptostats loopstats peerstats

# Disable the monitoring facility to prevent amplification attacks using ntpdc
# monlist command when default restrict does not include the noquery flag. See
# CVE-2013-5211 for more details.
# Note: Monitoring will not be disabled with the limited restriction flag.
disable monitor
从机
# For more information about this file, see the man pages
# ntp.conf(5), ntp_acc(5), ntp_auth(5), ntp_clock(5), ntp_misc(5), ntp_mon(5).

driftfile /var/lib/ntp/drift

# Permit time synchronization with our time source, but do not
# permit the source to query or modify the service on this system.
restrict default nomodify notrap nopeer noquery

# Permit all access over the loopback interface.  This could
# be tightened as well, but to do so would effect some of
# the administrative functions.

# Hosts on local network are less restricted.
#restrict 192.168.1.0 mask 255.255.255.0 nomodify notrap

# Use public servers from the pool.ntp.org project.
# Please consider joining the pool (http://www.pool.ntp.org/join.html).

server 172.168.9.101
restrict 172.168.9.101 nomodify

#server 127.0.0.1
#fudge 127.0.0.1 stratum 10


#broadcast 192.168.1.255 autokey   # broadcast server
#broadcastclient         # broadcast client
#broadcast 224.0.1.1 autokey      # multicast server
#multicastclient 224.0.1.1    # multicast client
#manycastserver 239.255.254.254       # manycast server
#manycastclient 239.255.254.254 autokey # manycast client

# Enable public key cryptography.
#crypto

includefile /etc/ntp/crypto/pw

# Key file containing the keys and key identifiers used when operating
# with symmetric key cryptography.
keys /etc/ntp/keys

# Specify the key identifiers which are trusted.
#trustedkey 4 8 42

# Specify the key identifier to use with the ntpdc utility.
#requestkey 8

# Specify the key identifier to use with the ntpq utility.
#controlkey 8

# Enable writing of statistics records.
#statistics clockstats cryptostats loopstats peerstats

# Disable the monitoring facility to prevent amplification attacks using ntpdc
# monlist command when default restrict does not include the noquery flag. See
# CVE-2013-5211 for more details.
# Note: Monitoring will not be disabled with the limited restriction flag.
disable monitor
生产出现的问题,提供一个解决思路,不是专业运维大佬,希望大佬看到能够多多指教
| 在生产时crontab 使用ntpdate -u host_adress 使用定时任务进行同步时间,不论是搭建的本地NTP服务器,还是集群机器节点都 使用这种方式进行时间同步,这时发现ntp服务和ntpdate服务会出现同步后机器时间不一致,同步一段时间后出现request timeout, 现改动所有从机节点关闭ntp服务,时间全部使用定时任务ntpdate进行同步主机,修改所有机器时区,修改同步硬件时间,以下记录执行 命令,方便使用: |
ntpdate -u 172.168.9.101
timedatectl set-timezone Asia/Shanghai
timedatectl

ntpdate 172.168.9.101

//以系统时间为基准,修改硬件时间
[root@localhost ~]# hwclock -w

//以硬件时间为基准,修改系统时间
[root@localhost ~]# hwclock -s

最后提及一点,ntp服务,默认只会同步系统时间。如果想要让ntp同时同步硬件时间,可以设置/etc/sysconfig/ntpd文件。
在/etc/sysconfig/ntpd文件中,添加 SYNC_HWCLOCK=yes 这样,就可以让硬件时间与系统时间一起同步。

验证NTP设置是否正常工作的方法

Linux中有三个命令可用于验证NTP同步,在本文中,我们将告诉你如何使用所有这些命令验证NTP同步:

1、ntpq:ntpq是标准的NTP查询程序。

2、ntpstat:显示网络时间同步状态。

3、timedatectl:它控制systemd系统中的系统时间和日期。

kill -9 `ps -ef|grep ntpq|awk '{print $2}'`


101主节点不能关闭
restrict 172.168.9.101 nomodify notrap noquery
restrict 172.168.9.1 mask 255.255.255.0 nomodify notrap

systemctl disable ntpd
systemctl stop ntpd
vi /etc/crontab
crontab -e
systemctl reload crond
systemctl restart crond

cat /var/spool/mail/root
cat /dev/null > /var/spool/mail/root
*/1 * * * * /usr/sbin/ntpdate -u 172.168.9.101
6.防火墙相关
1、开放端口
firewall-cmd --zone=public --add-port=5672/tcp --permanent   # 开放5672端口
firewall-cmd --zone=public --remove-port=5672/tcp --permanent  #关闭5672端口
firewall-cmd --reload   # 配置立即生效

2、查看防火墙所有开放的端口
firewall-cmd --zone=public --list-ports
3、关闭防火墙
如果要开放的端口太多,嫌麻烦,可以关闭防火墙,安全性自行评估

systemctl stop firewalld.service
4、查看防火墙状态
 firewall-cmd --state
5、查看监听的端口
netstat -lnpt

PS:centos7默认没有 netstat 命令,需要安装 net-tools 工具,yum install -y net-tools
6、检查端口被哪个进程占用
netstat -lnpt |grep 5672
7、查看进程的详细信息
ps 6832

8、中止进程
kill -9 6832


 632
632


 被折叠的 条评论
为什么被折叠?
被折叠的 条评论
为什么被折叠?
 到【灌水乐园】发言


